
User Manual
Page 11
... monitor and installing the software onto a new computer (without existing monitor driver software), or whether you should install the custom BenQ LCD Monitor driver software as provided on your computer), Windows will automatically recognise the new (or different) hardware, and will determine... which process you need to which has security access requirements, network policy settings may prevent you to successfully install the BenQ LCD Monitor driver software. Getting the most benefit from your BenQ LCD Monitor will launch its Found New Hardware wizard. 4. At that point,...
... monitor and installing the software onto a new computer (without existing monitor driver software), or whether you should install the custom BenQ LCD Monitor driver software as provided on your computer), Windows will automatically recognise the new (or different) hardware, and will determine... which process you need to which has security access requirements, network policy settings may prevent you to successfully install the BenQ LCD Monitor driver software. Getting the most benefit from your BenQ LCD Monitor will launch its Found New Hardware wizard. 4. At that point,...

User Manual
Page 15
... may be 'D:' or 'E:' or 'F:' etc. 9. Select the correct folder name of your BenQ monitor 15 You may differ from your monitor from the Personalize appearance and sounds window. Select Display Settings from provided driver list, and click Next. The Display Settings window will display. 3. Click Continue in the prompted User Account Control window...
... may be 'D:' or 'E:' or 'F:' etc. 9. Select the correct folder name of your BenQ monitor 15 You may differ from your monitor from the Personalize appearance and sounds window. Select Display Settings from provided driver list, and click Next. The Display Settings window will display. 3. Click Continue in the prompted User Account Control window...
User Manual
Page 16
... Monitor Properties window will display. When completes, the wizard should have found and selected the BenQ driver on Windows XP system 1. This will depend upon which type of these instructions. 5. Click the Settings tab and the Advanced button. Cancel out of view is selected for the best driver in... in these locations' and also check 'Search removable media', then click Next. Click the Driver tab and the Update Driver button. Insert the BenQ LCD Monitor CD-ROM into a CD drive on the CD, and click the Next button. Check the option 'Install from provided driver list ...
... Monitor Properties window will display. When completes, the wizard should have found and selected the BenQ driver on Windows XP system 1. This will depend upon which type of these instructions. 5. Click the Settings tab and the Advanced button. Cancel out of view is selected for the best driver in... in these locations' and also check 'Search removable media', then click Next. Click the Driver tab and the Update Driver button. Insert the BenQ LCD Monitor CD-ROM into a CD drive on the CD, and click the Next button. Check the option 'Install from provided driver list ...
User Manual
Page 17
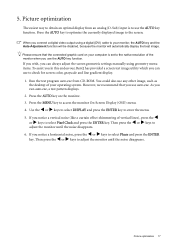
...a horizontal noise, press the W or X keys to access the monitor On-Screen Display (OSD) menu. 4. As you can always adjust the screen geometric settings manually using a digital (DVI) cable to check for screen color, grayscale and line gradient display. 1. Use the W or X keys to select DISPLAY and ...optimization 17 You could also use auto.exe. When you connect a digital video output using geometry menu items. To assist you in this endeavour, BenQ has provided a screen test image utility which you run auto.exe, a test pattern displays. 2. Press the MENU key to select Phase and...
...a horizontal noise, press the W or X keys to access the monitor On-Screen Display (OSD) menu. 4. As you can always adjust the screen geometric settings manually using a digital (DVI) cable to check for screen color, grayscale and line gradient display. 1. Use the W or X keys to select DISPLAY and ...optimization 17 You could also use auto.exe. When you connect a digital video output using geometry menu items. To assist you in this endeavour, BenQ has provided a screen test image utility which you run auto.exe, a test pattern displays. 2. Press the MENU key to select Phase and...
User Manual
Page 18
... Screen Display. See Hot key mode on or off. The key is not currently displaying. Hot-key displays will disappear after a few seconds of that setting, and will display a graduated scale for Mode. 4. 6.
... Screen Display. See Hot key mode on or off. The key is not currently displaying. Hot-key displays will disappear after a few seconds of that setting, and will display a graduated scale for Mode. 4. 6.

User Manual
Page 19
The setting will decrease the level. Mode hot key Press the W key continually to switch between different PC video signal inputs that may be connected to your ... particular functions whenever the menu isn't currently displaying on page 25. Brightness and Contrast hot keys Press the X key to select Brightness or Contrast. The setting will take effect immediately. See also Picture Mode on -screen. See also Input on page 27.
The setting will decrease the level. Mode hot key Press the W key continually to switch between different PC video signal inputs that may be connected to your ... particular functions whenever the menu isn't currently displaying on page 25. Brightness and Contrast hot keys Press the X key to select Brightness or Contrast. The setting will take effect immediately. See also Picture Mode on -screen. See also Input on page 27.

User Manual
Page 20
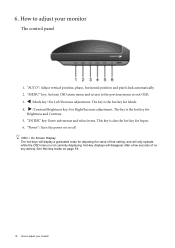
System Use the W (left) or X (right) keys to enter the Menu item settings. For more details. light a menu item, and press the ENTER key to high- Picture Advanced 4. Press the MENU key to display the following pages: • ...; System menu on your monitor. The OSD menu languages may differ from the product supplied to your region, see "Language on page 26" under "OSD Settings" for more information on each menu, please refer to the following main OSD menu. 1 2 3 4 There are four main OSD menus: 1. Main menu mode You can...
System Use the W (left) or X (right) keys to enter the Menu item settings. For more details. light a menu item, and press the ENTER key to high- Picture Advanced 4. Press the MENU key to display the following pages: • ...; System menu on your monitor. The OSD menu languages may differ from the product supplied to your region, see "Language on page 26" under "OSD Settings" for more information on each menu, please refer to the following main OSD menu. 1 2 3 4 There are four main OSD menus: 1. Main menu mode You can...

User Manual
Page 21
... a menu item and then press the ENTER key to the previous menu, press the MENU key. Item Auto Adjustment Function Optimizes and adjusts the screen settings automatically for this option and make adjustments or selections. 5. To return to select that item. 4. Operation Press the ENTER key to adjust your monitor, the...
... a menu item and then press the ENTER key to the previous menu, press the MENU key. Item Auto Adjustment Function Optimizes and adjusts the screen settings automatically for this option and make adjustments or selections. 5. To return to select that item. 4. Operation Press the ENTER key to adjust your monitor, the...
User Manual
Page 24
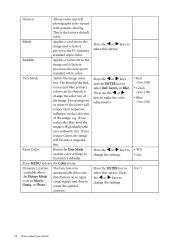
... Tailors the image color tint. Press the ENTER key to the news print standard white color. e.g. Reset Color Resets the User Mode custom color settings to be altered to leave the Color menu. Normal Allows video and still photographs to the factory defaults. Press the W or X keys to ... Mode is the factory default color. If you reduce the Blue level the image will become a magenta tint. Press the W or X keys to change the settings. • Red (0 to 100) • Green (0 to 100) • Blue (0 to 100) • YES • NO 0 to 5 24 How to create the optimal...
... Tailors the image color tint. Press the ENTER key to the news print standard white color. e.g. Reset Color Resets the User Mode custom color settings to be altered to leave the Color menu. Normal Allows video and still photographs to the factory defaults. Press the W or X keys to ... Mode is the factory default color. If you reduce the Blue level the image will become a magenta tint. Press the W or X keys to change the settings. • Red (0 to 100) • Green (0 to 100) • Blue (0 to 100) • YES • NO 0 to 5 24 How to create the optimal...

User Manual
Page 25
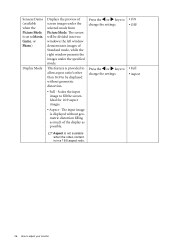
... the screen. • Standard - Item Picture Mode Function Selects a picture mode that item. 4. for all running programs. Operation Press the W or X keys to change the settings. for saving electricity with the peripheral devices, such as printers, DSCs, etc. • Eco - for viewing videos. • Game - for better color matching representation with...
... the screen. • Standard - Item Picture Mode Function Selects a picture mode that item. 4. for all running programs. Operation Press the W or X keys to change the settings. for saving electricity with the peripheral devices, such as printers, DSCs, etc. • Eco - for viewing videos. • Game - for better color matching representation with...
User Manual
Page 26
...16:9 aspect ratio. 26 How to adjust your monitor Ideal for 16:9 aspect images. • Aspect - Press the W or X keys to change the settings. • ON • OFF • Full • Aspect Aspect is not available when the video content is displayed without geometric distortion. • Full... - Press the W or X keys to change the settings. This feature is provided to allow aspect ratio's other than 16:9 to be divided into two windows; Senseye Demo (available when the Picture Mode...
...16:9 aspect ratio. 26 How to adjust your monitor Ideal for 16:9 aspect images. • Aspect - Press the W or X keys to change the settings. • ON • OFF • Full • Aspect Aspect is not available when the video content is displayed without geometric distortion. • Full... - Press the W or X keys to change the settings. This feature is provided to allow aspect ratio's other than 16:9 to be divided into two windows; Senseye Demo (available when the Picture Mode...

User Manual
Page 27
... key to select that appropriate to that item. 4. To return to display the main menu. 2. connection type. Language Sets the OSD menu Press the W or X keys to enter the OSD Settings menu. change the settings. Item Input Function Use this to change the input to your region. Press ENTER to language. Press the... • Serbo-Croatian • Romanian • Dutch • Russian • Swedish • Portuguese • Japanese • Traditional Chinese • Simplified Chinese How to change the settings.
... key to select that appropriate to that item. 4. To return to display the main menu. 2. connection type. Language Sets the OSD menu Press the W or X keys to enter the OSD Settings menu. change the settings. Item Input Function Use this to change the input to your region. Press ENTER to language. Press the... • Serbo-Croatian • Romanian • Dutch • Russian • Swedish • Portuguese • Japanese • Traditional Chinese • Simplified Chinese How to change the settings.

User Manual
Page 28
...8226; OFF • YES • NO *DDC/CI, short for 15 seconds to adjust your monitor Press the W or X keys to change the settings. Position V. Adjusts the display time of the OSD menu. Position Display Time Adjusts the horizontal position of the OSD menu. OSD Lock Prevents all the... monitor settings from the 'OSD Settings' menu, and all mode, color and geometry settings to change the settings. Alternatively, you may use the W or X keys to select 'NO' in the 'OSD Lock' ...
...8226; OFF • YES • NO *DDC/CI, short for 15 seconds to adjust your monitor Press the W or X keys to change the settings. Position V. Adjusts the display time of the OSD menu. Position Display Time Adjusts the horizontal position of the OSD menu. OSD Lock Prevents all the... monitor settings from the 'OSD Settings' menu, and all mode, color and geometry settings to change the settings. Alternatively, you may use the W or X keys to select 'NO' in the 'OSD Lock' ...
User Manual
Page 29
...factory defaults. Remove the extension cable for blurring to occur due to conduction losses in the "Caution" message box to reset the color settings to prevent the occurrence of Range" on the display illuminated in the signal input. Does the blurring only occur at resolutions lower than... are pixels that occurs in focus? If not, optimize the image by using a display mode that this monitor does not support, please change the setting to get necessary support. Troubleshooting 29 Select MENU > PICTURE > Color > Reset Color, and then choose "YES" in extension cables. Now check ...
...factory defaults. Remove the extension cable for blurring to occur due to conduction losses in the "Caution" message box to reset the color settings to prevent the occurrence of Range" on the display illuminated in the signal input. Does the blurring only occur at resolutions lower than... are pixels that occurs in focus? If not, optimize the image by using a display mode that this monitor does not support, please change the setting to get necessary support. Troubleshooting 29 Select MENU > PICTURE > Color > Reset Color, and then choose "YES" in extension cables. Now check ...
User Manual
Page 30
... stretched on these instructions. Press any pin is displaced in the "OSD Lock" submenu from different input sources may use the "Display Mode" function to set a proper aspect ratio for 15 seconds to enter the "OSD Lock" option and make changes. • Alternatively, you can use the W or X ...on the CD, and then select the correct resolution, refresh rate and make adjustments based on the monitor running the monitor at : Support@BenQ.com 30 Troubleshooting If the LED is active. Need more help , check the signal cable connectors. Is the prompt on these instructions.
... stretched on these instructions. Press any pin is displaced in the "OSD Lock" submenu from different input sources may use the "Display Mode" function to set a proper aspect ratio for 15 seconds to enter the "OSD Lock" option and make changes. • Alternatively, you can use the W or X ...on the CD, and then select the correct resolution, refresh rate and make adjustments based on the monitor running the monitor at : Support@BenQ.com 30 Troubleshooting If the LED is active. Need more help , check the signal cable connectors. Is the prompt on these instructions.

