
User Manual
Page 11
...instructions until it asks you to install the monitor driver software. At that point, click the Have Disk button, insert the BenQ LCD Monitor CD-ROM and select the appropriate monitor model. Furthermore, if your computer is connected to a network which process you turn... computer), Windows will automatically recognise the new (or different) hardware, and will determine which has security access requirements, network policy settings may prevent you are upgrading an existing installation (which already has existing monitor driver software) with a newer monitor. These circumstances relate ...
...instructions until it asks you to install the monitor driver software. At that point, click the Have Disk button, insert the BenQ LCD Monitor CD-ROM and select the appropriate monitor model. Furthermore, if your computer is connected to a network which process you turn... computer), Windows will automatically recognise the new (or different) hardware, and will determine which has security access requirements, network policy settings may prevent you are upgrading an existing installation (which already has existing monitor driver software) with a newer monitor. These circumstances relate ...
User Manual
Page 14
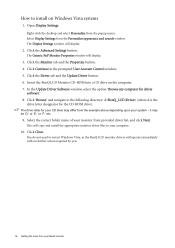
...need to the following directory: d:\BenQ_LCD\Driver\ (where d is the drive letter designator for the CD-ROM drive). Click the Advanced Settings button. This will operate immediately with no further action required by you. 14 Getting the most from the example above depending upon your CD... from the Personalize appearance and sounds window. The Generic PnP Monitor Properties window will display. 2. it may differ from your BenQ monitor Open Display Settings. In the Update Driver Software window, select the option 'Browse my computer for your system - Select the correct folder name...
...need to the following directory: d:\BenQ_LCD\Driver\ (where d is the drive letter designator for the CD-ROM drive). Click the Advanced Settings button. This will operate immediately with no further action required by you. 14 Getting the most from the example above depending upon your CD... from the Personalize appearance and sounds window. The Generic PnP Monitor Properties window will display. 2. it may differ from your BenQ monitor Open Display Settings. In the Update Driver Software window, select the option 'Browse my computer for your system - Select the correct folder name...
User Manual
Page 15
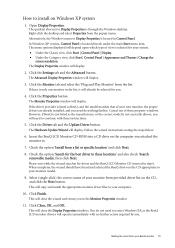
... with no further action required by you attached the monitor to. 7. Right-click the desktop and select Properties from the list. Click the Settings tab and the Advanced button. Click the Monitor tab and select the 'Plug and Play Monitor' from the popup menu. This will already... monitor driver files to your monitor model. 9. The Hardware Update Wizard will display. 3. The Advanced Display Properties window will display. Insert the BenQ LCD Monitor CD-ROM into a CD drive on the CD, and click the Next button. Click the Driver tab and the Update Driver button...
... with no further action required by you attached the monitor to. 7. Right-click the desktop and select Properties from the list. Click the Settings tab and the Advanced button. Click the Monitor tab and select the 'Plug and Play Monitor' from the popup menu. This will already... monitor driver files to your monitor model. 9. The Hardware Update Wizard will display. 3. The Advanced Display Properties window will display. Insert the BenQ LCD Monitor CD-ROM into a CD drive on the CD, and click the Next button. Click the Driver tab and the Update Driver button...
User Manual
Page 16
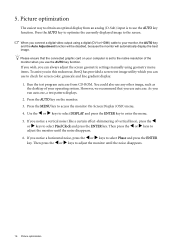
... As you use the AUTO key function. Then press the W or X keys to use auto.exe. If you can always adjust the screen geometric settings manually using a digital (DVI or HDMI) cable to adjust the monitor until the noise disappears. 6. Press the AUTO key on your operating system. When... you connect a digital video output using geometry menu items. To assist you in this endeavour, BenQ has provided a screen test image utility which you notice a horizontal noise, press the W or X keys to select Pixel Clock and press the ENTER ...
... As you use the AUTO key function. Then press the W or X keys to use auto.exe. If you can always adjust the screen geometric settings manually using a digital (DVI or HDMI) cable to adjust the monitor until the noise disappears. 6. Press the AUTO key on your operating system. When... you connect a digital video output using geometry menu items. To assist you in this endeavour, BenQ has provided a screen test image utility which you notice a horizontal noise, press the W or X keys to select Pixel Clock and press the ENTER ...
User Manual
Page 17
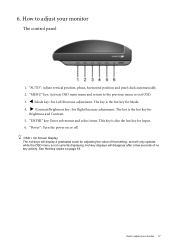
.../Decrease adjustment. The hot-keys will display a graduated scale for Brightness and Contrast. 5. The key is the hot key for adjusting the value of that setting, and will disappear after a few seconds of no key activity. The key is the hot key for Input. 6. Hot-key displays will only operate while...
.../Decrease adjustment. The hot-keys will display a graduated scale for Brightness and Contrast. 5. The key is the hot key for adjusting the value of that setting, and will disappear after a few seconds of no key activity. The key is the hot key for Input. 6. Hot-key displays will only operate while...

User Manual
Page 18
... 24. See also Picture Mode on -screen. Further press the the W or X keys, then the ENTER key to display the Brightness and Contrast indicators. The setting will decrease the level. Hot key mode The monitor keys perform as hotkeys to provide direct access to toggle between the 5 modes for the main...
... 24. See also Picture Mode on -screen. Further press the the W or X keys, then the ENTER key to display the Brightness and Contrast indicators. The setting will decrease the level. Hot key mode The monitor keys perform as hotkeys to provide direct access to toggle between the 5 modes for the main...

User Manual
Page 19
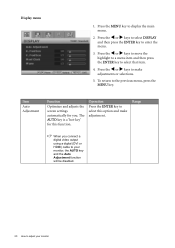
Picture Advanced 4. System Use the W (left) or X (right) keys to highlight a menu item, and press the ENTER key to enter the Menu item settings. Press the MENU key to display the following pages: • Display menu on page 20 • Picture menu on page 22 • Picture Advanced menu ... your region, see "Language on your monitor 19 Picture 3. Main menu mode You can use the OSD (On Screen Display) menu to adjust all the settings on page 27" under "OSD Settings" for more information on page 27 How to adjust your monitor. Audio 5.
Picture Advanced 4. System Use the W (left) or X (right) keys to highlight a menu item, and press the ENTER key to enter the Menu item settings. Press the MENU key to display the following pages: • Display menu on page 20 • Picture menu on page 22 • Picture Advanced menu ... your region, see "Language on your monitor 19 Picture 3. Main menu mode You can use the OSD (On Screen Display) menu to adjust all the settings on page 27" under "OSD Settings" for more information on page 27 How to adjust your monitor. Audio 5.
User Manual
Page 20
...-key' for you connect a digital video output using a digital (DVI or HDMI) cable to your monitor Item Auto Adjustment Function Optimizes and adjusts the screen settings automatically for this option and make adjustments or selections. 5. Display menu 1. Press the W or X keys to move the highlight to a menu item and then press...
...-key' for you connect a digital video output using a digital (DVI or HDMI) cable to your monitor Item Auto Adjustment Function Optimizes and adjusts the screen settings automatically for this option and make adjustments or selections. 5. Display menu 1. Press the W or X keys to move the highlight to a menu item and then press...

User Manual
Page 23
...primary colors can be displayed. if you reduce Green, the image will disable Brightness and Contrast controls. DynamicContrast (available when the Picture Mode is set to Photo, Dynamics, or Movie) The function is the factory default color. Then use the W or X keys to leave the Color menu....your monitor 23 This is to automatically detect the distribution of the image. Reddish Applies a warm tint to the image and is factory pre-set to select this option. Decreasing one or more detailed picture possible will reduce their respective influence on a yellowish tint. Press the W or X...
...primary colors can be displayed. if you reduce Green, the image will disable Brightness and Contrast controls. DynamicContrast (available when the Picture Mode is set to Photo, Dynamics, or Movie) The function is the factory default color. Then use the W or X keys to leave the Color menu....your monitor 23 This is to automatically detect the distribution of the image. Reddish Applies a warm tint to the image and is factory pre-set to select this option. Decreasing one or more detailed picture possible will reduce their respective influence on a yellowish tint. Press the W or X...

User Manual
Page 24
.... • Photo - for basic PC application. • Movie - Operation Press the W or X keys to make adjustments or selections. Press the W or X keys to change the settings. Range • Standard • Movie • Dynamics • Photo • sRGB 24 How to enter the menu. 3. for better color matching representation with the peripheral...
.... • Photo - for basic PC application. • Movie - Operation Press the W or X keys to make adjustments or selections. Press the W or X keys to change the settings. Range • Standard • Movie • Dynamics • Photo • sRGB 24 How to enter the menu. 3. for better color matching representation with the peripheral...
User Manual
Page 25
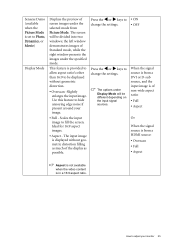
... content is in a 16:9 aspect ratio. The input image is displayed without geometric distortion. • Overscan -Slightly enlarges the input image. How to change the settings. Press the W or X keys to hide annoying edge noise if present around your monitor 25 Senseye Demo (available when the Picture Mode is...
... content is in a 16:9 aspect ratio. The input image is displayed without geometric distortion. • Overscan -Slightly enlarges the input image. How to change the settings. Press the W or X keys to hide annoying edge noise if present around your monitor 25 Senseye Demo (available when the Picture Mode is...

User Manual
Page 26
... of volume. Press the W or X keys to decrease the volume. Operation Press the X key to increase the volume and press the W key to change the settings.
... of volume. Press the W or X keys to decrease the volume. Operation Press the X key to increase the volume and press the W key to change the settings.

User Manual
Page 27
... this to change the input to that item. 4. Press ENTER to the previous menu, press the MENU key. To return to enter the OSD Settings menu. OSD Settings - Range • DVI • D-sub • HDMI • English • French • German • Italian • Spanish • Polish &#...your video cable Operation Press the W or X keys to display the main menu. 2. System menu 1. change the settings. Press the MENU key to change the settings. connection type. The language options displayed on your OSD may differ from those shown on the right, depending on the...
... this to change the input to that item. 4. Press ENTER to the previous menu, press the MENU key. To return to enter the OSD Settings menu. OSD Settings - Range • DVI • D-sub • HDMI • English • French • German • Italian • Spanish • Polish &#...your video cable Operation Press the W or X keys to display the main menu. 2. System menu 1. change the settings. Press the MENU key to change the settings. connection type. The language options displayed on your OSD may differ from those shown on the right, depending on the...

User Manual
Page 28
...Reset All input select or by select this option. Press the the software on the PC. Press the W or X keys to change the settings. 0 to 100 0 to Switch activated, HDMI port will be accessible. When this function is activated, the OSD controls and hotkey operations will ...be in the 'OSD Lock' submenu from being accidentally changed. Information Displays the current Press the ENTER key to leave the OSD Settings menu. Position V. H. HDMI Auto When this function is Press the ENTER key to 100 • 5 Sec. • 10 Sec. • 15 ...
...Reset All input select or by select this option. Press the the software on the PC. Press the W or X keys to change the settings. 0 to 100 0 to Switch activated, HDMI port will be accessible. When this function is activated, the OSD controls and hotkey operations will ...be in the 'OSD Lock' submenu from being accidentally changed. Information Displays the current Press the ENTER key to leave the OSD Settings menu. Position V. H. HDMI Auto When this function is Press the ENTER key to 100 • 5 Sec. • 10 Sec. • 15 ...
User Manual
Page 29
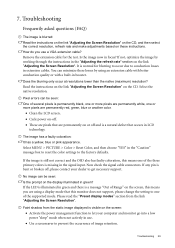
How do you are permanently on the display illuminated in the "Caution" message box to reset the color settings to prevent the occurrence of the supported mode. If not, optimize the image by using a display mode that this means one of Range" on the ... a VGA extension cable? If the image is still not correct and the OSD also has faulty coloration, this monitor does not support, please change the setting to one or more pixels are pixels that occurs in the signal input. It is bent or broken off . • These are permanently red, green...
How do you are permanently on the display illuminated in the "Caution" message box to reset the color settings to prevent the occurrence of the supported mode. If not, optimize the image by using a display mode that this means one of Range" on the ... a VGA extension cable? If the image is still not correct and the OSD also has faulty coloration, this monitor does not support, please change the setting to one or more pixels are pixels that occurs in the signal input. It is bent or broken off . • These are permanently red, green...
User Manual
Page 30
...correct resolution, refresh rate and make adjustments based on these instructions. Need more help , check the signal cable connectors. Images from the "OSD Settings" menu (under SYSTEM), and all ? The OSD controls are running at all OSD controls will be locked, press and hold the "MENU...input sources, you may appear distorted or stretched on the monitor running the monitor at : Support@BenQ.com 30 Troubleshooting The image is active. Press any pin is preset to set a proper aspect ratio for details. If the LED is illuminated in orange, the power management mode...
...correct resolution, refresh rate and make adjustments based on these instructions. Need more help , check the signal cable connectors. Images from the "OSD Settings" menu (under SYSTEM), and all ? The OSD controls are running at all OSD controls will be locked, press and hold the "MENU...input sources, you may appear distorted or stretched on the monitor running the monitor at : Support@BenQ.com 30 Troubleshooting The image is active. Press any pin is preset to set a proper aspect ratio for details. If the LED is illuminated in orange, the power management mode...

