

User Manual
Page 2
... the wall outlet before cleaning. Always unplug your monitor from time to notify any person of such revision or changes. Avoid using any means, electronic, mechanical, magnetic, optical, chemical, manual or otherwise, without obligation of BenQ Corporation to time in the contents hereof without the prior written permission of BenQ Corporation. No part of this product yourself, as opening or removing covers...
... the wall outlet before cleaning. Always unplug your monitor from time to notify any person of such revision or changes. Avoid using any means, electronic, mechanical, magnetic, optical, chemical, manual or otherwise, without obligation of BenQ Corporation to time in the contents hereof without the prior written permission of BenQ Corporation. No part of this product yourself, as opening or removing covers...
User Manual
Page 3
... monitor on a new computer 12 How to upgrade the monitor on an existing computer 13 How to install on Windows 7 system (selected models only 14 How to install on Windows Vista systems 15 How to install on Windows XP system 16 Picture optimization ...17 How to adjust your monitor 18 The control panel ...18 Hot key mode ...19 Main menu mode 20 Troubleshooting ...30 Frequently asked questions (FAQ 30 Need more help...
... monitor on a new computer 12 How to upgrade the monitor on an existing computer 13 How to install on Windows 7 system (selected models only 14 How to install on Windows Vista systems 15 How to install on Windows XP system 16 Picture optimization ...17 How to adjust your monitor 18 The control panel ...18 Hot key mode ...19 Main menu mode 20 Troubleshooting ...30 Frequently asked questions (FAQ 30 Need more help...
User Manual
Page 7
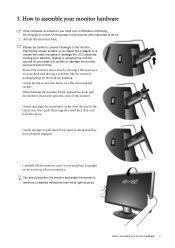
... should position the monitor and angle the screen to assemble your desk and placing a soft item like a stapler or a mouse will scratch or damage the monitor surround and controls. How to minimize unwanted reflections from other light sources. 3. Carefully lift the monitor, turn it over and place it off before continuing. Protect the monitor and screen by clearing a flat open area on a flat even surface...
... should position the monitor and angle the screen to assemble your desk and placing a soft item like a stapler or a mouse will scratch or damage the monitor surround and controls. How to minimize unwanted reflections from other light sources. 3. Carefully lift the monitor, turn it over and place it off before continuing. Protect the monitor and screen by clearing a flat open area on a flat even surface...
User Manual
Page 8
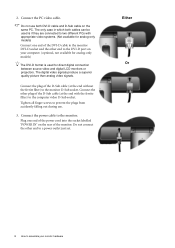
... DVI-D cable and D-Sub cable on your monitor hardware Connect the PC video cable. Tighten all finger screws to the DVI-D port on the same PC. The digital video signals produce a superior quality picture than analog video signals. 2. Plug one end of the DVI-D cable to the monitor DVI-D socket and the other end to prevent the plugs from accidently falling out during use both cables can be used is used for analog-only models) Connect one end of the power cord...
... DVI-D cable and D-Sub cable on your monitor hardware Connect the PC video cable. Tighten all finger screws to the DVI-D port on the same PC. The digital video signals produce a superior quality picture than analog video signals. 2. Plug one end of the DVI-D cable to the monitor DVI-D socket and the other end to prevent the plugs from accidently falling out during use both cables can be used is used for analog-only models) Connect one end of the power cord...
User Manual
Page 9
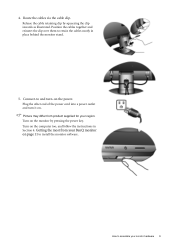
... monitor stand. 5. How to assemble your BenQ monitor on the power. Connect-to retain the cables neatly in Section 4: Getting the most from product supplied for your region. Plug the other end of the power cord into a power outlet and turn -on page 11 to install the monitor software. Release the cable retaining clip by pressing the power key. Picture may differ from your monitor hardware 9 Turn on . Route the cables via the cable...
... monitor stand. 5. How to assemble your BenQ monitor on the power. Connect-to retain the cables neatly in Section 4: Getting the most from product supplied for your region. Plug the other end of the power cord into a power outlet and turn -on page 11 to install the monitor software. Release the cable retaining clip by pressing the power key. Picture may differ from your monitor hardware 9 Turn on . Route the cables via the cable...
User Manual
Page 11
... you are connecting the monitor and installing the software onto a new computer (without existing monitor driver software), or whether you to successfully install the BenQ LCD Monitor driver software. Further details and step-by-step instructions for both an automatic (new) or upgrade (existing) installation follow to select a monitor model. Getting the most benefit from your new BenQ color LCD flat screen monitor, you should install the custom BenQ LCD Monitor driver software as a member of Microsoft Windows you are using, and...
... you are connecting the monitor and installing the software onto a new computer (without existing monitor driver software), or whether you to successfully install the BenQ LCD Monitor driver software. Further details and step-by-step instructions for both an automatic (new) or upgrade (existing) installation follow to select a monitor model. Getting the most benefit from your new BenQ color LCD flat screen monitor, you should install the custom BenQ LCD Monitor driver software as a member of Microsoft Windows you are using, and...
User Manual
Page 12
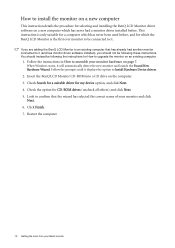
... the procedure for selecting and installing the BenQ LCD Monitor driver software on a new computer which the BenQ LCD Monitor is the first ever monitor to be following these instructions. Insert the BenQ LCD Monitor CD-ROM into a CD drive on page 7. If you should instead be connected to Install Hardware Device drivers. 2. When Windows starts, it . Click Finish. 7. Follow the prompts until it displays the option to it will...
... the procedure for selecting and installing the BenQ LCD Monitor driver software on a new computer which the BenQ LCD Monitor is the first ever monitor to be following these instructions. Insert the BenQ LCD Monitor CD-ROM into a CD drive on page 7. If you should instead be connected to Install Hardware Device drivers. 2. When Windows starts, it . Click Finish. 7. Follow the prompts until it displays the option to it will...
User Manual
Page 13
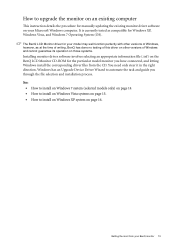
... to upgrade the monitor on an existing computer This instruction details the procedure for manually updating the existing monitor driver software on the BenQ LCD Monitor CD-ROM for the particular model monitor you through the file selection and installation process. The BenQ LCD Monitor driver for Windows XP, Windows Vista, and Windows 7 Operating System (OS). It is currently tested as compatible for your model may well function perfectly with other versions of Windows...
... to upgrade the monitor on an existing computer This instruction details the procedure for manually updating the existing monitor driver software on the BenQ LCD Monitor CD-ROM for the particular model monitor you through the file selection and installation process. The BenQ LCD Monitor driver for Windows XP, Windows Vista, and Windows 7 Operating System (OS). It is currently tested as compatible for your model may well function perfectly with other versions of Windows...

User Manual
Page 14
... - Click the Hardware tab. 3. Insert the BenQ LCD Monitor CD-ROM into a CD drive on Windows 7 system (selected models only) 1. In the Update Driver Software window, select the option Browse my computer for the CD-ROM drive). This will copy and install the appropriate monitor driver files to your monitor from the menu. Open Display Properties. Go to Start, Control Panel, Hardware and Sound, Devices and Printers and right-click...
... - Click the Hardware tab. 3. Insert the BenQ LCD Monitor CD-ROM into a CD drive on Windows 7 system (selected models only) 1. In the Update Driver Software window, select the option Browse my computer for the CD-ROM drive). This will copy and install the appropriate monitor driver files to your monitor from the menu. Open Display Properties. Go to Start, Control Panel, Hardware and Sound, Devices and Printers and right-click...
User Manual
Page 15
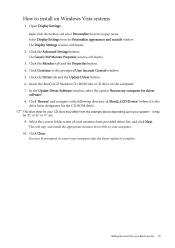
... - The Generic PnP Monitor Properties window will display. 3. Click 'Browse' and navigate to install on the computer. 7. Click Close. Getting the most from the example above depending upon your BenQ monitor 15 In the Update Driver Software window, select the option 'Browse my computer for the CD-ROM drive). Select Display Settings from the Personalize appearance and sounds window. Click the Monitor tab and the...
... - The Generic PnP Monitor Properties window will display. 3. Click 'Browse' and navigate to install on the computer. 7. Click Close. Getting the most from the example above depending upon your BenQ monitor 15 In the Update Driver Software window, select the option 'Browse my computer for the CD-ROM drive). Select Display Settings from the Personalize appearance and sounds window. Click the Monitor tab and the...

User Manual
Page 16
... main Start menu item. Cancel out of your monitor model. 9. Click Finish. This will copy and install the appropriate monitor driver files to your system. • Under the Classic view, click Start | Control Panel | Display. • Under the Category view, click Start | Control Panel | Appearance and Themes | Change the screen resolution. Right-click the desktop and select Properties from a list or specific location' and click Next. 8. In Windows XP version, Control Panel is...
... main Start menu item. Cancel out of your monitor model. 9. Click Finish. This will copy and install the appropriate monitor driver files to your system. • Under the Classic view, click Start | Control Panel | Display. • Under the Category view, click Start | Control Panel | Appearance and Themes | Change the screen resolution. Right-click the desktop and select Properties from a list or specific location' and click Next. 8. In Windows XP version, Control Panel is...

User Manual
Page 17
... always adjust the screen geometric settings manually using a digital (DVI) cable to use the AUTO key function. Then press the W or X keys to obtain an optimal display from CD-ROM. Press the AUTO key to optimize the currently displayed image to select Pixel Clock and press the ENTER key. When you connect a digital video output using geometry menu items. To assist you in this endeavour, BenQ has provided a screen test image utility which you notice a vertical...
... always adjust the screen geometric settings manually using a digital (DVI) cable to use the AUTO key function. Then press the W or X keys to obtain an optimal display from CD-ROM. Press the AUTO key to optimize the currently displayed image to select Pixel Clock and press the ENTER key. When you connect a digital video output using geometry menu items. To assist you in this endeavour, BenQ has provided a screen test image utility which you notice a vertical...
User Manual
Page 18
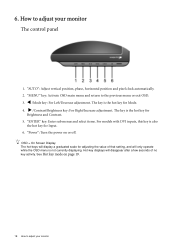
How to adjust your monitor The control panel 1. X /Contrast/Brightness key: For Right/Increase adjustment. "ENTER" key: Enter sub menus and select items. For models with DVI inputs, this key is the hot key for Input. 6. OSD = On Screen Display. See Hot key mode on or off. "AUTO": Adjust vertical position, phase, horizontal position and pixel clock automatically. 2. "MENU" key: Activate OSD main menu and return to the previous menu or exit OSD. 3. The key is also the...
How to adjust your monitor The control panel 1. X /Contrast/Brightness key: For Right/Increase adjustment. "ENTER" key: Enter sub menus and select items. For models with DVI inputs, this key is the hot key for Input. 6. OSD = On Screen Display. See Hot key mode on or off. "AUTO": Adjust vertical position, phase, horizontal position and pixel clock automatically. 2. "MENU" key: Activate OSD main menu and return to the previous menu or exit OSD. 3. The key is also the...
User Manual
Page 20
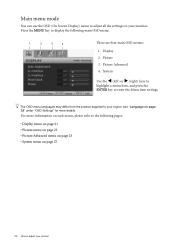
... enter the Menu item settings. Picture 3. Press the MENU key to display the following pages: • Display menu on page 21 • Picture menu on page 23 • Picture Advanced menu on page 25 • System menu on page 27 20 How to adjust your monitor The OSD menu languages may differ from the product supplied to your monitor. Display 2. Picture Advanced 4. Main menu mode You can use the OSD (On Screen Display) menu to adjust all the settings on...
... enter the Menu item settings. Picture 3. Press the MENU key to display the following pages: • Display menu on page 21 • Picture menu on page 23 • Picture Advanced menu on page 25 • System menu on page 27 20 How to adjust your monitor The OSD menu languages may differ from the product supplied to your monitor. Display 2. Picture Advanced 4. Main menu mode You can use the OSD (On Screen Display) menu to adjust all the settings on...
User Manual
Page 21
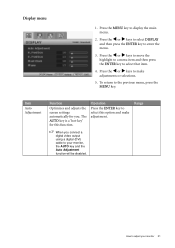
... AUTO key is a 'hot-key' for you connect a digital video output using a digital (DVI) cable to adjust your monitor, the AUTO key and the Auto Adjustment function will be disabled. Press the W or X keys to select DISPLAY and then press the ENTER key to display the main menu. 2. How to your monitor 21 Press the MENU key to enter the menu. 3. Display menu 1. Item Auto Adjustment Function Optimizes and adjusts the screen settings automatically for this option and make adjustments...
... AUTO key is a 'hot-key' for you connect a digital video output using a digital (DVI) cable to adjust your monitor, the AUTO key and the Auto Adjustment function will be disabled. Press the W or X keys to select DISPLAY and then press the ENTER key to display the main menu. 2. How to your monitor 21 Press the MENU key to enter the menu. 3. Display menu 1. Item Auto Adjustment Function Optimizes and adjusts the screen settings automatically for this option and make adjustments...

User Manual
Page 24
... is the factory default color. Decreasing one or more detailed picture possible will be viewed with natural coloring. if you reduce Green, the image will disable Brightness and Contrast controls. 24 How to the PC industry standard white color. Reset Color Resets the User Mode custom color settings to 5 Activating DynamicContrast will become a magenta tint. DynamicContrast (available when the Picture Mode is set to adjust your monitor Press the W or X keys to change the settings. • Red (0 to 100...
... is the factory default color. Decreasing one or more detailed picture possible will be viewed with natural coloring. if you reduce Green, the image will disable Brightness and Contrast controls. 24 How to the PC industry standard white color. Reset Color Resets the User Mode custom color settings to 5 Activating DynamicContrast will become a magenta tint. DynamicContrast (available when the Picture Mode is set to adjust your monitor Press the W or X keys to change the settings. • Red (0 to 100...
User Manual
Page 26
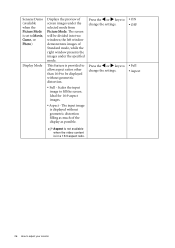
... to adjust your monitor The input image is provided to allow aspect ratios other than 16:9 to be divided into two windows; the left window demonstrates images of Standard mode, while the right window presents the images under the selected mode from Picture Mode. This feature is displayed without geometric distortion. • Full - Senseye Demo (available when the Picture Mode is set to Movie, Game, or Photo) Display Mode Displays...
... to adjust your monitor The input image is provided to allow aspect ratios other than 16:9 to be divided into two windows; the left window demonstrates images of Standard mode, while the right window presents the images under the selected mode from Picture Mode. This feature is displayed without geometric distortion. • Full - Senseye Demo (available when the Picture Mode is set to Movie, Game, or Photo) Display Mode Displays...
User Manual
Page 29
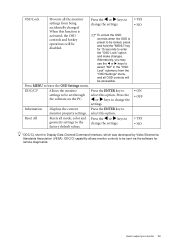
... may use the W or X keys to enter the "OSD Lock" option and make changes. Press the W or X keys to adjust your monitor 29 How to change the settings. OSD Lock Prevents all the monitor settings from the "OSD Settings" menu, and all mode, color and geometry settings to select this option. Press the ENTER key to the factory default values. Resets all OSD controls will be accessible. Press the W or X keys to change the settings. •...
... may use the W or X keys to enter the "OSD Lock" option and make changes. Press the W or X keys to adjust your monitor 29 How to change the settings. OSD Lock Prevents all the monitor settings from the "OSD Settings" menu, and all mode, color and geometry settings to select this option. Press the ENTER key to the factory default values. Resets all OSD controls will be accessible. Press the W or X keys to change the settings. •...
User Manual
Page 30
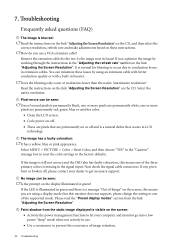
... the display illuminated in the "Adjusting the refresh rate" section on the screen, this monitor does not support, please change the setting to get necessary support. Select MENU > PICTURE > Color > Reset Color, and then choose "YES" in use. • Use a screensaver to prevent the occurrence of several pixels is a natural defect that this means you use a VGA extension cable? No image can minimize these instructions. If not, optimize the image by using a display mode that occurs in green and...
... the display illuminated in the "Adjusting the refresh rate" section on the screen, this monitor does not support, please change the setting to get necessary support. Select MENU > PICTURE > Color > Reset Color, and then choose "YES" in use. • Use a screensaver to prevent the occurrence of several pixels is a natural defect that this means you use a VGA extension cable? No image can minimize these instructions. If not, optimize the image by using a display mode that occurs in green and...
User Manual
Page 31
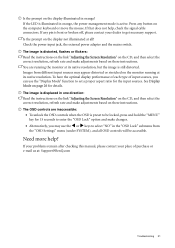
... or e-mail us at: Support@BenQ.com Troubleshooting 31 If any button on these instructions. The image is active. Is the prompt on page 26 for details. Need more help , check the signal cable connectors. See Display Mode on the display not illuminated at all OSD controls will be locked, press and hold the "MENU" key for 15 seconds to enter the "OSD Lock" option and make adjustments based on the computer keyboard or...
... or e-mail us at: Support@BenQ.com Troubleshooting 31 If any button on these instructions. The image is active. Is the prompt on page 26 for details. Need more help , check the signal cable connectors. See Display Mode on the display not illuminated at all OSD controls will be locked, press and hold the "MENU" key for 15 seconds to enter the "OSD Lock" option and make adjustments based on the computer keyboard or...


