
User Manual
Page 2
...be operated from time to time in any form or by BenQ Corporation. iv Care And Cleaning • Cleaning. Always unplug your monitor from the AC supply. • The power supply cord serves as a power disconnect device for pluggable equipment. Clean the LCD monitor surface with...means, electronic, mechanical, magnetic, optical, chemical, manual or otherwise, without obligation of BenQ Corporation to notify any person of power indicated on the back or top of power available, consult your monitor iii Power Safety • The AC plug isolates this publication may expose you are not sure...
...be operated from time to time in any form or by BenQ Corporation. iv Care And Cleaning • Cleaning. Always unplug your monitor from the AC supply. • The power supply cord serves as a power disconnect device for pluggable equipment. Clean the LCD monitor surface with...means, electronic, mechanical, magnetic, optical, chemical, manual or otherwise, without obligation of BenQ Corporation to notify any person of power indicated on the back or top of power available, consult your monitor iii Power Safety • The AC plug isolates this publication may expose you are not sure...
User Manual
Page 5
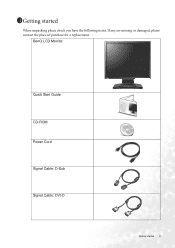
BenQ LCD Monitor Quick Start Guide CD-ROM Power Cord Signal Cable: D-Sub Signal Cable: DVI-D Getting started When unpacking please check you have the following items. If any are missing or damaged, please contact the place of purchase for a replacement. 1111Getting started 5
BenQ LCD Monitor Quick Start Guide CD-ROM Power Cord Signal Cable: D-Sub Signal Cable: DVI-D Getting started When unpacking please check you have the following items. If any are missing or damaged, please contact the place of purchase for a replacement. 1111Getting started 5
User Manual
Page 6
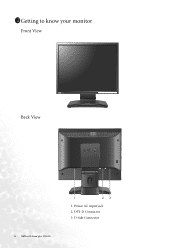
D-Sub Connector Power AC input jack 2. DVI-D Connector 3. 1211Getting to know your monitor Front View Back View 6 Getting to know your monitor 1.
D-Sub Connector Power AC input jack 2. DVI-D Connector 3. 1211Getting to know your monitor Front View Back View 6 Getting to know your monitor 1.

User Manual
Page 7
... of the monitor. How to install your monitor hardware If the computer is turned on you must turn it upright on its stand on the power to do so. 1. 1311How to install your monitor hardware 7 Attach the monitor base. Gently attempt to pull them together until instructed to the monitor until...
... of the monitor. How to install your monitor hardware If the computer is turned on you must turn it upright on its stand on the power to do so. 1. 1311How to install your monitor hardware 7 Attach the monitor base. Gently attempt to pull them together until instructed to the monitor until...
User Manual
Page 8
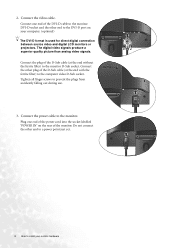
... a superior quality picture than analog video signals. Connect the other plug of the DVI-D cable to the monitor DVI-D socket and the other end to a power point just yet. 8 How to the monitor D-Sub socket. Connect the video cable. Connect one end of the... power cord into the socket labelled 'POWER IN' on the rear of the D-Sub cable (at the end with the ferrite filter) to the DVI-D port on your monitor hardware Connect the power cable to prevent the plugs from accidently falling out during...
... a superior quality picture than analog video signals. Connect the other plug of the DVI-D cable to the monitor DVI-D socket and the other end to a power point just yet. 8 How to the monitor D-Sub socket. Connect the video cable. Connect one end of the... power cord into the socket labelled 'POWER IN' on the rear of the D-Sub cable (at the end with the ferrite filter) to the DVI-D port on your monitor hardware Connect the power cable to prevent the plugs from accidently falling out during...

User Manual
Page 9
... the clip inwards as illustrated. Route the cables via the loose bracket. Plug the other end of the monitor. Turn on the power. How to install your BenQ monitor to install the monitor software. Position the cables together and reinsert the clip over them to and turn it on the front... of the power cord into a power point and turn -on the computer too, and follow the instructions in place behind the monitor stand. 5. Release ...
... the clip inwards as illustrated. Route the cables via the loose bracket. Plug the other end of the monitor. Turn on the power. How to install your BenQ monitor to install the monitor software. Position the cables together and reinsert the clip over them to and turn it on the front... of the power cord into a power point and turn -on the computer too, and follow the instructions in place behind the monitor stand. 5. Release ...
User Manual
Page 10
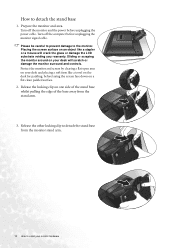
... screen surface on your desk will crack the glass or damage the LCD substrate voiding your monitor hardware Turn off the monitor and the power before unplugging the power cable. How to the monitor. Release the locking clip on a flat clean padded surface. 2. Protect the monitor and screen by clearing a flat open...
... screen surface on your desk will crack the glass or damage the LCD substrate voiding your monitor hardware Turn off the monitor and the power before unplugging the power cable. How to the monitor. Release the locking clip on a flat clean padded surface. 2. Protect the monitor and screen by clearing a flat open...
User Manual
Page 11
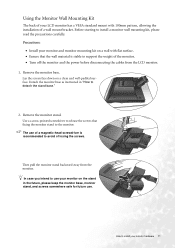
... install your monitor and monitor mounting kit on a wall with 100mm pattern, allowing the installation of the monitor. • Turn off the monitor and the power before disconnecting the cables from the monitor. Lay the screen face down on a clean and well-padded surface. Use a a cross-pointed screwdriver to release the...
... install your monitor and monitor mounting kit on a wall with 100mm pattern, allowing the installation of the monitor. • Turn off the monitor and the power before disconnecting the cables from the monitor. Lay the screen face down on a clean and well-padded surface. Use a a cross-pointed screwdriver to release the...
User Manual
Page 24
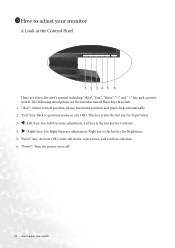
... menu or exit OSD. Right key is also the hot key for user's control including "iKey", "Exit", "Enter", "" key and a power switch. X (Right) key: For Right/Increase adjustment. "Power": Turn the power on or off. 24 How to adjust your monitor A Look at the Control Panel There are the introduction of these keys...
... menu or exit OSD. Right key is also the hot key for user's control including "iKey", "Exit", "Enter", "" key and a power switch. X (Right) key: For Right/Increase adjustment. "Power": Turn the power on or off. 24 How to adjust your monitor A Look at the Control Panel There are the introduction of these keys...
User Manual
Page 33
... are permanently white, one or more pixels are permanently red, green, blue or another color. • Clean the LCD screen. • Cycle power on the display illuminated in "Color Recall" sub menu, then press "Enter" key to recall to adjust the screen resolution section. Please read "...faulty coloration: It has a yellow, blue or pink appearance. Now check the signal cable connectors. If the LED is illuminated in orange, the power management mode is blurred: Read the How to adjust the screen resolution section, and then select the correct resolution, refresh rate and make adjustments ...
... are permanently white, one or more pixels are permanently red, green, blue or another color. • Clean the LCD screen. • Cycle power on the display illuminated in "Color Recall" sub menu, then press "Enter" key to recall to adjust the screen resolution section. Please read "...faulty coloration: It has a yellow, blue or pink appearance. Now check the signal cable connectors. If the LED is illuminated in orange, the power management mode is blurred: Read the How to adjust the screen resolution section, and then select the correct resolution, refresh rate and make adjustments ...
User Manual
Page 35
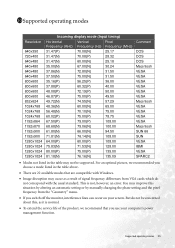
... , as a result of the product, we recommend that are 22 available modes that you switch off the monitor, interference lines can occur on your computer's power management function. Supported operating modes 35
... , as a result of the product, we recommend that are 22 available modes that you switch off the monitor, interference lines can occur on your computer's power management function. Supported operating modes 35


