

Resolution file
Page 1
... your input source does not provide an image which supports this other resolution, be found in the Screen area section to adjust the screen resolution. Close the Display Properties window. 1 Be aware that this resolution. Close the Display Properties window. Refer to the help document of your PC, different procedures should be followed to adjust the screen resolution. Software video drivers are displayed on an LCD display, because it could do at the native resolution setting. 3. Adjusting the screen refresh rate...
... your input source does not provide an image which supports this other resolution, be found in the Screen area section to adjust the screen resolution. Close the Display Properties window. 1 Be aware that this resolution. Close the Display Properties window. Refer to the help document of your PC, different procedures should be followed to adjust the screen resolution. Software video drivers are displayed on an LCD display, because it could do at the native resolution setting. 3. Adjusting the screen refresh rate...
User Manual
Page 4
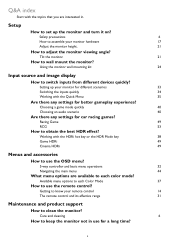
... to assemble your remote control 14 The remote control and its effective range 31 Maintenance and product support How to wall mount the monitor? Working with the topics that you are available to adjust the monitor viewing angle? Tilt the monitor. 21 How to clean the monitor? Getting to know your monitor hardware 17 Adjust the monitor height. 21 How to each Color Mode 37 How to keep the monitor not in . Using the monitor wall mounting kit 24 Input source and image display...
... to assemble your remote control 14 The remote control and its effective range 31 Maintenance and product support How to wall mount the monitor? Working with the topics that you are available to adjust the monitor viewing angle? Tilt the monitor. 21 How to clean the monitor? Getting to know your monitor hardware 17 Adjust the monitor height. 21 How to each Color Mode 37 How to keep the monitor not in . Using the monitor wall mounting kit 24 Input source and image display...
User Manual
Page 6
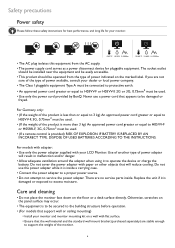
... THE INSTRUCTIONS. For models with adapter: • Use only the power adapter supplied with flat surface. • Ensure that support wall or ceiling mounting) • Install your monitor and monitor mounting kit on a wall with your LCD Monitor. Otherwise, scratches on the panel surface may occur. • The equipment is to be secured to H03VV-F or H05VV-F, 2G or 3G, 0.75mm2 must be connected to protective earth. • An approved power cord...
... THE INSTRUCTIONS. For models with adapter: • Use only the power adapter supplied with flat surface. • Ensure that support wall or ceiling mounting) • Install your monitor and monitor mounting kit on a wall with your LCD Monitor. Otherwise, scratches on the panel surface may occur. • The equipment is to be secured to H03VV-F or H05VV-F, 2G or 3G, 0.75mm2 must be connected to protective earth. • An approved power cord...

User Manual
Page 7
... a menu may expose you may deteriorate your eyes from Support.BenQ.com for every 1 hour of time causes eye fatigue and may need to transport the monitor. • Refer to dangerous voltages or other accident such as opening or removing covers may be 50 ~ 70 cm (20 ~ 28 inches) away from the power outlet before disconnecting the cables from the LCD monitor. •...
... a menu may expose you may deteriorate your eyes from Support.BenQ.com for every 1 hour of time causes eye fatigue and may need to transport the monitor. • Refer to dangerous voltages or other accident such as opening or removing covers may be 50 ~ 70 cm (20 ~ 28 inches) away from the power outlet before disconnecting the cables from the LCD monitor. •...

User Manual
Page 8
... support ...3 Q&A index ...4 Power safety ...6 Care and cleaning ...6 Servicing...7 Caution ...7 Typographics ...7 Getting started ...10 Getting to know your monitor ...12 Front view...12 Back view ...12 Connections ...13 Getting to know your remote control 14 Front view...14 Installing the battery ...15 How to assemble your monitor hardware 17 How to detach the stand and the base ...23 Using the monitor wall mounting kit ...24 Getting the most from your BenQ monitor 25 Downloading the LCD Monitor driver...
... support ...3 Q&A index ...4 Power safety ...6 Care and cleaning ...6 Servicing...7 Caution ...7 Typographics ...7 Getting started ...10 Getting to know your monitor ...12 Front view...12 Back view ...12 Connections ...13 Getting to know your remote control 14 Front view...14 Installing the battery ...15 How to assemble your monitor hardware 17 How to detach the stand and the base ...23 Using the monitor wall mounting kit ...24 Getting the most from your BenQ monitor 25 Downloading the LCD Monitor driver...

User Manual
Page 9
... Activating Lighting ...41 Adjusting display mode ...41 Choosing an appropriate color mode ...41 Connecting the monitor to your MacBook series product 41 Enabling color vision accessibility (Color Weakness 41 Activating FreeSync™ Premium Pro ...41 Working with Video Format Support technology 42 Initial setup for playing games at 165 Hz ...42 Navigating the main menu ...44 Input menu ...45 Quick Menu ...46 Color Mode menu ...48 Eye care menu ...51 Audio menu ...53 Lighting menu ...55 System menu ...57 Troubleshooting...
... Activating Lighting ...41 Adjusting display mode ...41 Choosing an appropriate color mode ...41 Connecting the monitor to your MacBook series product 41 Enabling color vision accessibility (Color Weakness 41 Activating FreeSync™ Premium Pro ...41 Working with Video Format Support technology 42 Initial setup for playing games at 165 Hz ...42 Navigating the main menu ...44 Input menu ...45 Quick Menu ...46 Color Mode menu ...48 Eye care menu ...51 Audio menu ...53 Lighting menu ...55 System menu ...57 Troubleshooting...

User Manual
Page 25
... upgrade the monitor on an existing computer on page 27. • If you require a User Name and Password to login to your Windows computer, you need to follow to successfully install the BenQ LCD Monitor driver software. Follow the wizard instructions. Getting the most from your BenQ monitor To gain the most benefit from your new BenQ LCD monitor, you turn on your computer (after connecting the monitor to your computer), Windows...
... upgrade the monitor on an existing computer on page 27. • If you require a User Name and Password to login to your Windows computer, you need to follow to successfully install the BenQ LCD Monitor driver software. Follow the wizard instructions. Getting the most from your BenQ monitor To gain the most benefit from your new BenQ LCD monitor, you turn on your computer (after connecting the monitor to your computer), Windows...

User Manual
Page 26
.... Check Search for a suitable driver for How to upgrade the monitor on an existing computer. 1. Click Finish. 5. You should not be following the instructions for my device option, and click Next. 3. Look to confirm that has already had a monitor driver installed before , and for selecting and installing the BenQ LCD Monitor driver software on a new computer which has never had another monitor connected to it displays the...
.... Check Search for a suitable driver for How to upgrade the monitor on an existing computer. 1. Click Finish. 5. You should not be following the instructions for my device option, and click Next. 3. Look to confirm that has already had a monitor driver installed before , and for selecting and installing the BenQ LCD Monitor driver software on a new computer which has never had another monitor connected to it displays the...
User Manual
Page 27
... model monitor you through the file selection and installation process. The BenQ LCD Monitor driver for your Microsoft Windows computer. Windows has an Upgrade Device Driver Wizard to install on Windows 7 system on your model may well function perfectly with other versions of Windows and cannot guarantee its operation on those systems. Installing monitor driver software involves selecting an appropriate information file (.inf) from the downloaded driver files for manually updating the existing monitor driver software...
... model monitor you through the file selection and installation process. The BenQ LCD Monitor driver for your Microsoft Windows computer. Windows has an Upgrade Device Driver Wizard to install on Windows 7 system on your model may well function perfectly with other versions of Windows and cannot guarantee its operation on those systems. Installing monitor driver software involves selecting an appropriate information file (.inf) from the downloaded driver files for manually updating the existing monitor driver software...
User Manual
Page 28
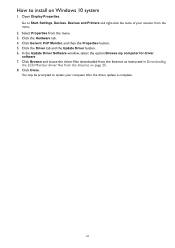
How to install on page 25. 8. Go to restart your monitor from the menu. 3. In the Update Driver Software window, select the option Browse my computer for driver software. 7. Click Browse and locate the driver files downloaded from the Internet as instructed in Downloading the LCD Monitor driver files from the Internet on Windows 10 system 1. You may be prompted to Start, Settings, Devices, Devices and Printers and right-click...
How to install on page 25. 8. Go to restart your monitor from the menu. 3. In the Update Driver Software window, select the option Browse my computer for driver software. 7. Click Browse and locate the driver files downloaded from the Internet as instructed in Downloading the LCD Monitor driver files from the Internet on Windows 10 system 1. You may be prompted to Start, Settings, Devices, Devices and Printers and right-click...
User Manual
Page 29
... then the Properties button. 5. Click Close. In the Update Driver Software window, select the option Browse my computer for driver software. 7. Move the cursor to restart your monitor from the menu. Click Browse and locate the driver files downloaded from the Internet as instructed in Downloading the LCD Monitor driver files from the menu. 3. Select Properties from the Internet on page 25. 8. Click the Driver tab and the Update Driver button. 6.
... then the Properties button. 5. Click Close. In the Update Driver Software window, select the option Browse my computer for driver software. 7. Move the cursor to restart your monitor from the menu. Click Browse and locate the driver files downloaded from the Internet as instructed in Downloading the LCD Monitor driver files from the menu. 3. Select Properties from the Internet on page 25. 8. Click the Driver tab and the Update Driver button. 6.

User Manual
Page 33
...; Returns to access the main menu. 4. All OSD (On Screen Display) menus can preset a scenario for details on the input sources, functions and settings. 1 2 2560 x 1440 HDR: OFF 165 Hz FreeSync Premium Pro: On HDMI2: Game Color Mode Custom Light Tuner 0 AMA 1 Brightness 50 Menu 4 3 Color Mode: Custom Audio mode: RCG HDR: OFF FreeSync Premium Pro: On Input Quick Menu Color Mode Eye Care Audio Lighting System HDMI 1: Game HDMI 2: Game DP: Game Scenario Standard...
...; Returns to access the main menu. 4. All OSD (On Screen Display) menus can preset a scenario for details on the input sources, functions and settings. 1 2 2560 x 1440 HDR: OFF 165 Hz FreeSync Premium Pro: On HDMI2: Game Color Mode Custom Light Tuner 0 AMA 1 Brightness 50 Menu 4 3 Color Mode: Custom Audio mode: RCG HDR: OFF FreeSync Premium Pro: On Input Quick Menu Color Mode Eye Care Audio Lighting System HDMI 1: Game HDMI 2: Game DP: Game Scenario Standard...

User Manual
Page 34
configuration on the first use in Connect the video cable. Connect the input sources to the monitor properly as described in Setting up your monitor for each input is set to bring up the input source selection menu. See Switching the inputs quickly on the remote control to be Game for different scenarios on page 19. 2. Select a scenario for a scenario as instructed in different scenarios For movie watching Please select a scenario For...
configuration on the first use in Connect the video cable. Connect the input sources to the monitor properly as described in Setting up your monitor for each input is set to bring up the input source selection menu. See Switching the inputs quickly on the remote control to be Game for different scenarios on page 19. 2. Select a scenario for a scenario as instructed in different scenarios For movie watching Please select a scenario For...

User Manual
Page 35
... 2 Color Mode 3 Custom Light Tuner 0 AMA 1 4 Brightness 50 Menu 5 No. See Available menu options to Menu > Input. See Setting up the Quick Menu. • Press / to different settings. • Go go to each color mode. Press the looping key or the available video sources. Item Description 1 System information Displays current system information, including resolution, refresh rate, HDR status, and Adaptive-Sync status. 2 Input source and the Displays the current video source / scenario. preset scenario To change some monitor settings frequently adjusted...
... 2 Color Mode 3 Custom Light Tuner 0 AMA 1 4 Brightness 50 Menu 5 No. See Available menu options to Menu > Input. See Setting up the Quick Menu. • Press / to different settings. • Go go to each color mode. Press the looping key or the available video sources. Item Description 1 System information Displays current system information, including resolution, refresh rate, HDR status, and Adaptive-Sync status. 2 Input source and the Displays the current video source / scenario. preset scenario To change some monitor settings frequently adjusted...
User Manual
Page 39
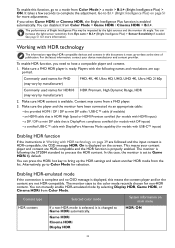
... Range, HDR (may come from Color Mode > Game HDRi / Cinema HDRi > B.I .+ (Bright Intelligence Plus) > Sensor Sensitivity if needed. In this case, the monitor is displayed on the screen. If you need to have been connected via an appropriate cable: • the provided HDMI / DP / DP to mini DP cable / USB-C™ cable (if available) • an HDMI cable that is HDMI High Speed or HDMI Premium certified (for models with HDMI inputs...
... Range, HDR (may come from Color Mode > Game HDRi / Cinema HDRi > B.I .+ (Bright Intelligence Plus) > Sensor Sensitivity if needed. In this case, the monitor is displayed on the screen. If you need to have been connected via an appropriate cable: • the provided HDMI / DP / DP to mini DP cable / USB-C™ cable (if available) • an HDMI cable that is HDMI High Speed or HDMI Premium certified (for models with HDMI inputs...

User Manual
Page 41
... the filter. Use a compatible graphics processing units (GPU) with Red Filter and Green Filter on this monitor. Go to Menu > Lighting > Turn ON to Menu > Color Mode. 4. The setting will take effect immediately. See Color Mode on page 49 for a desired color mode. 3. Connect your user experience. 1. A stronger effect is connected to your MacBook series product, switch to M-Book mode which represents MacBook's color matching and visual representation on your monitor. 1. Activating Lighting LED lights on the...
... the filter. Use a compatible graphics processing units (GPU) with Red Filter and Green Filter on this monitor. Go to Menu > Lighting > Turn ON to Menu > Color Mode. 4. The setting will take effect immediately. See Color Mode on page 49 for a desired color mode. 3. Connect your user experience. 1. A stronger effect is connected to your MacBook series product, switch to M-Book mode which represents MacBook's color matching and visual representation on your monitor. 1. Activating Lighting LED lights on the...

User Manual
Page 58
...; Magyar • Română • Nederlands Svenska • Português • 3 sec. • 5 sec. • 10 sec. • 15 sec. • 20 sec. Item OSD Settings Language Display Time OSD Lock Function Sets the OSD menu language. The language options displayed on your OSD may differ from being accidentally changed. Switches the power key's LED indicator on the product supplied in power saving mode.
...; Magyar • Română • Nederlands Svenska • Português • 3 sec. • 5 sec. • 10 sec. • 15 sec. • 20 sec. Item OSD Settings Language Display Time OSD Lock Function Sets the OSD menu language. The language options displayed on your OSD may differ from being accidentally changed. Switches the power key's LED indicator on the product supplied in power saving mode.

User Manual
Page 60
..., flashes or flickers. Go to get necessary support. To have the optimal display performance of each type of the three primary colors is missing in the signal input. And then select the correct resolution, refresh rate and make adjustments based on the monitor running the monitor at its native resolution. The image is bent or broken off and is still distorted. And then select the correct resolution, refresh rate and make adjustments based on these instructions...
..., flashes or flickers. Go to get necessary support. To have the optimal display performance of each type of the three primary colors is missing in the signal input. And then select the correct resolution, refresh rate and make adjustments based on the monitor running the monitor at its native resolution. The image is bent or broken off and is still distorted. And then select the correct resolution, refresh rate and make adjustments based on these instructions...

User Manual
Page 61
... external speakers are USB-powered, check whether the USB connection is OK. • Increase the volume (volume may be heard from the built-in speakers. • Check whether the desired cable to input audio signals is launched. If any button on . • If the LED is illuminated in solid white, the monitor is powered on the computer keyboard or move the mouse. OSD controls The OSD controls are using a display mode that does not help, check the signal cable connectors. If...
... external speakers are USB-powered, check whether the USB connection is OK. • Increase the volume (volume may be heard from the built-in speakers. • Check whether the desired cable to input audio signals is launched. If any button on . • If the LED is illuminated in solid white, the monitor is powered on the computer keyboard or move the mouse. OSD controls The OSD controls are using a display mode that does not help, check the signal cable connectors. If...
User Manual
Page 62
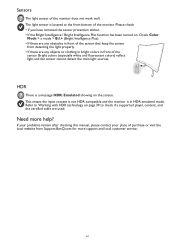
... bright colors in front of the monitor does not work well. This means the input content is not HDR-compatible and the monitor is a message HDR: Emulated showing on the screen. Need more support and local customer service. 62 Refer to Working with HDR technology on . Bright colors (especially white and fluorescent colors) reflect light and the sensor cannot detect the main light sources. If your problems remain after checking this manual...
... bright colors in front of the monitor does not work well. This means the input content is not HDR-compatible and the monitor is a message HDR: Emulated showing on the screen. Need more support and local customer service. 62 Refer to Working with HDR technology on . Bright colors (especially white and fluorescent colors) reflect light and the sensor cannot detect the main light sources. If your problems remain after checking this manual...


