

User Manual
Page 13
... software onto a new computer (without existing monitor driver software), or whether you are upgrading an existing installation (which has security access requirements, network policy settings may prevent you to install the monitor driver software. Follow the wizard instructions until it asks you from installing software on the BenQ LCD Monitor CD-ROM.
... software onto a new computer (without existing monitor driver software), or whether you are upgrading an existing installation (which has security access requirements, network policy settings may prevent you to install the monitor driver software. Follow the wizard instructions until it asks you from installing software on the BenQ LCD Monitor CD-ROM.
User Manual
Page 17
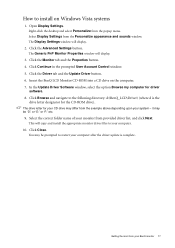
...Right-click the desktop and select Personalize from the Personalize appearance and sounds window. The drive letter for driver software. 8. Select Display Settings from the popup menu. Click the Monitor tab and the Properties button. 4. In the Update Driver Software window, select the option ...differ from the example above depending upon your BenQ monitor 17 Getting the most from provided driver list, and click Next. How to your computer. 10. The Display Settings window will display. 3. Open Display Settings. Click the Advanced Settings button. Select the correct folder name of ...
...Right-click the desktop and select Personalize from the Personalize appearance and sounds window. The drive letter for driver software. 8. Select Display Settings from the popup menu. Click the Monitor tab and the Properties button. 4. In the Update Driver Software window, select the option ...differ from the example above depending upon your BenQ monitor 17 Getting the most from provided driver list, and click Next. How to your computer. 10. The Display Settings window will display. 3. Open Display Settings. Click the Advanced Settings button. Select the correct folder name of ...
User Manual
Page 18
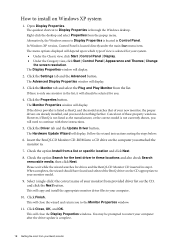
...Properties from the list. Alternatively, the Windows menu to Display Properties is located directly under the main Start menu item. Click the Settings tab and the Advanced button. Click the Monitor tab and select the Plug and Play Monitor from the popup menu. Check the...prompted to your monitor model. 9. The menu options displayed will close the Display Properties windows. The Monitor Properties window will display. 2. However, if BenQ is complete. 18 Getting the most from your system. • Under the Classic view, click Start | Control Panel | Display. • Under ...
...Properties from the list. Alternatively, the Windows menu to Display Properties is located directly under the main Start menu item. Click the Settings tab and the Advanced button. Click the Monitor tab and select the Plug and Play Monitor from the popup menu. Check the...prompted to your monitor model. 9. The menu options displayed will close the Display Properties windows. The Monitor Properties window will display. 2. However, if BenQ is complete. 18 Getting the most from your system. • Under the Classic view, click Start | Control Panel | Display. • Under ...
User Manual
Page 19
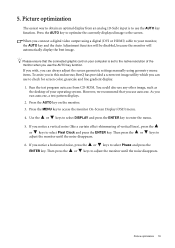
... the monitor will automatically display the best image. If you connect a digital video output using geometry menu items. To assist you in this endeavour, BenQ has provided a screen test image utility which you can use to select Pixel Clock and press the ENTER key. Picture optimization 19 5. You could also... noise, press the or keys to adjust the monitor until the noise disappears. Run the test program auto.exe from an analog (D-Sub) input is set to access the monitor On-Screen Display (OSD) menu. 4. Press the AUTO key on your computer is to your operating system. Use the or...
... the monitor will automatically display the best image. If you connect a digital video output using geometry menu items. To assist you in this endeavour, BenQ has provided a screen test image utility which you can use to select Pixel Clock and press the ENTER key. Picture optimization 19 5. You could also... noise, press the or keys to adjust the monitor until the noise disappears. Run the test program auto.exe from an analog (D-Sub) input is set to access the monitor On-Screen Display (OSD) menu. 4. Press the AUTO key on your computer is to your operating system. Use the or...
User Manual
Page 20
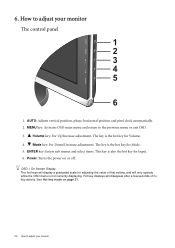
.... MENU key: Activates OSD main menu and return to adjust your monitor The control panel 1 2 3 4 5 6 1. Hot key displays will disappear after a few seconds of that setting, and will display a graduated scale for Input. 6.
.... MENU key: Activates OSD main menu and return to adjust your monitor The control panel 1 2 3 4 5 6 1. Hot key displays will disappear after a few seconds of that setting, and will display a graduated scale for Input. 6.
User Manual
Page 21
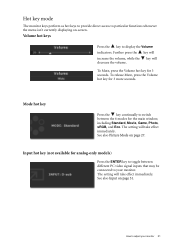
... be connected to particular functions whenever the menu isn't currently displaying on-screen. To Mute, press the Volume hot key for 3 more seconds. The setting will take effect immediately. See also Input on page 27. How to adjust your monitor. To release Mute, press the Volume hot key for 3... seconds. See also Picture Mode on page 31. Mode hot key Press the key continually to display the Volume indicators. The setting will take effect immediately. Hot key mode The monitor keys perform as hot keys to provide direct access to your monitor 21 Further press the...
... be connected to particular functions whenever the menu isn't currently displaying on-screen. To Mute, press the Volume hot key for 3 more seconds. The setting will take effect immediately. See also Input on page 27. How to adjust your monitor. To release Mute, press the Volume hot key for 3... seconds. See also Picture Mode on page 31. Mode hot key Press the key continually to display the Volume indicators. The setting will take effect immediately. Hot key mode The monitor keys perform as hot keys to provide direct access to your monitor 21 Further press the...

User Manual
Page 22
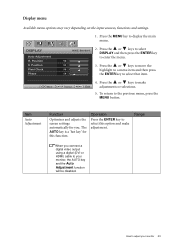
...MENU Exit 1. Audio 5. Main menu mode You can use the OSD (On Screen Display) menu to your region, see "Language on page 32" under "OSD Settings" for more information on each menu, please refer to the following main OSD menu. 1 2 3 4 5 There are five main OSD menus: DISPLAY Auto ... page 25 • Picture Advanced menu on page 27 • Audio menu on page 30 • System menu on the input sources, functions and settings. Position V. For more details. Display 2. Picture Advanced 4. Press the MENU key to adjust your monitor Picture 3. System Use the (up) or (down...
...MENU Exit 1. Audio 5. Main menu mode You can use the OSD (On Screen Display) menu to your region, see "Language on page 32" under "OSD Settings" for more information on each menu, please refer to the following main OSD menu. 1 2 3 4 5 There are five main OSD menus: DISPLAY Auto ... page 25 • Picture Advanced menu on page 27 • Audio menu on page 30 • System menu on the input sources, functions and settings. Position V. For more details. Display 2. Picture Advanced 4. Press the MENU key to adjust your monitor Picture 3. System Use the (up) or (down...
User Manual
Page 23
... be disabled. Display menu Available menu options may vary depending on the input sources, functions and settings. 1. DISPLAY Auto Adjustment H. Position Pixel Clock Phase MODE: Standard 2. Item Auto Adjustment Function Optimizes and adjusts the screen settings automatically for this option and make adjustments or selections. 5. Position V. Move ENTER Select MENU Exit 4. How...
... be disabled. Display menu Available menu options may vary depending on the input sources, functions and settings. 1. DISPLAY Auto Adjustment H. Position Pixel Clock Phase MODE: Standard 2. Item Auto Adjustment Function Optimizes and adjusts the screen settings automatically for this option and make adjustments or selections. 5. Position V. Move ENTER Select MENU Exit 4. How...

User Manual
Page 25
... increase the brightness and press the key to enter the menu. 3. Press the or keys to have softness effect on the input sources, functions and settings. 1. The default value is 2.2 (the standard value for Windows). Picture menu Available menu options may vary depending on the display.
... increase the brightness and press the key to enter the menu. 3. Press the or keys to have softness effect on the input sources, functions and settings. 1. The default value is 2.2 (the standard value for Windows). Picture menu Available menu options may vary depending on the display.

User Manual
Page 26
... the purity degree of the image. (e.g. Press ENTER to enter the Color menu Normal Allows video and still photographs to be altered to change the settings. If you reduce the Blue level the image will become a magenta tint.) Hue: Adjusts the degree of the LCD panel. AMA (E2420HD/ EW2420 only) ... NO • ON • OFF 26 How to the PC industry standard white color. Bluish Applies a cool tint to the image and is factory pre-set to adjust the value. Press the or keys to make the color adjustments. Press the or keys to the news print standard white color. The...
... the purity degree of the image. (e.g. Press ENTER to enter the Color menu Normal Allows video and still photographs to be altered to change the settings. If you reduce the Blue level the image will become a magenta tint.) Hue: Adjusts the degree of the LCD panel. AMA (E2420HD/ EW2420 only) ... NO • ON • OFF 26 How to the PC industry standard white color. Bluish Applies a cool tint to the image and is factory pre-set to adjust the value. Press the or keys to make the color adjustments. Press the or keys to the news print standard white color. The...

User Manual
Page 27
... PC Range Standard OFF 0 RGB RGB(16~235) Move ENTER Select MENU Exit 2. for all running programs. Operation Press the or keys to change the settings. Press the or keys to move the highlight to a menu item and then press the ENTER key to display the main menu. Item Picture Mode... viewing still images. • sRGB - Press the MENU key to select that best suits the type of images shown on the input sources, functions and settings. 1.
... PC Range Standard OFF 0 RGB RGB(16~235) Move ENTER Select MENU Exit 2. for all running programs. Operation Press the or keys to change the settings. Press the or keys to move the highlight to a menu item and then press the ENTER key to display the main menu. Item Picture Mode... viewing still images. • sRGB - Press the MENU key to select that best suits the type of images shown on the input sources, functions and settings. 1.

User Manual
Page 28
...the screen horizontally while 4:3 images will fill the screen vertically. Use this option. Press the or keys to change the settings. • ON • OFF 0 to change the settings. Press the or keys to 5 When the signal source is from a DVI or D-sub source, and the input image...8226; Full • Aspect Or When the signal source is to automatically detect the distribution of an input visual signal, and then to change the settings. The function is from a HDMI or D-Sub (VGA converted from Picture Mode. This feature is displayed without geometric distortion. • Overscan -Slightly...
...the screen horizontally while 4:3 images will fill the screen vertically. Use this option. Press the or keys to change the settings. • ON • OFF 0 to change the settings. Press the or keys to 5 When the signal source is from a DVI or D-sub source, and the input image...8226; Full • Aspect Or When the signal source is to automatically detect the distribution of an input visual signal, and then to change the settings. The function is from a HDMI or D-Sub (VGA converted from Picture Mode. This feature is displayed without geometric distortion. • Overscan -Slightly...

User Manual
Page 29
... properly. • DVI: Color Format is not selectable. Press the ENTER key to RGB. • HDMI: Color Format is automatically set to select this option. Press the ENTER key to change the settings. • RGB • YUV • RGB (0 ~ 255) • RGB (16 ~ 235) How to adjust your monitor ...29 Press the or keys to select this option. Press the or keys to change the settings. Select an option that matches the RGB range setting on the connected HDMI device. In other words, Color Format is YUV. Determines the range of color scales. Color ...
... properly. • DVI: Color Format is not selectable. Press the ENTER key to RGB. • HDMI: Color Format is automatically set to select this option. Press the ENTER key to change the settings. • RGB • YUV • RGB (0 ~ 255) • RGB (16 ~ 235) How to adjust your monitor ...29 Press the or keys to select this option. Press the or keys to change the settings. Select an option that matches the RGB range setting on the connected HDMI device. In other words, Color Format is YUV. Determines the range of color scales. Color ...
User Manual
Page 30
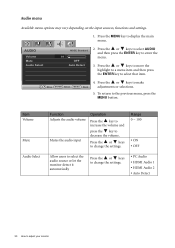
... 10 menu. AUDIO Volume Mute Audio Select MODE: Standard 2. Press the or keys to select AUDIO and then press the ENTER key to change the settings. • PC Audio • HDMI Audio 1 • HDMI Audio 2 • Auto Detect 30 How to display the main menu. Press the or keys to ...• ON • OFF Allow users to select the audio source or let the monitor detect it automatically Press the or keys to change the settings. Item Volume Mute Audio Select Function Adjusts the audio volume Mutes the audio input Operation Press the key to increase the volume and press the...
... 10 menu. AUDIO Volume Mute Audio Select MODE: Standard 2. Press the or keys to select AUDIO and then press the ENTER key to change the settings. • PC Audio • HDMI Audio 1 • HDMI Audio 2 • Auto Detect 30 How to display the main menu. Press the or keys to ...• ON • OFF Allow users to select the audio source or let the monitor detect it automatically Press the or keys to change the settings. Item Volume Mute Audio Select Function Adjusts the audio volume Mutes the audio input Operation Press the key to increase the volume and press the...

User Manual
Page 31
...• HDMI 1 • HDMI 2 How to display the main menu. System menu Available menu options may vary depending on the input sources, functions and settings. 1. Press the MENU key to adjust your video cable connection type. Operation Press the or keys to change the input to that item. Item Input... the or keys to move the highlight to a menu item and then press OFF the ENTER key to enter the menu. SYSTEM Input OSD Settings DDC/CI Auto Poowe Off Information HDMI Auto Switch Reset All Move MODE: Standard D-sub 2. MENU Exit 4. Press the or keys to select...
...• HDMI 1 • HDMI 2 How to display the main menu. System menu Available menu options may vary depending on the input sources, functions and settings. 1. Press the MENU key to adjust your video cable connection type. Operation Press the or keys to change the input to that item. Item Input... the or keys to move the highlight to a menu item and then press OFF the ENTER key to enter the menu. SYSTEM Input OSD Settings DDC/CI Auto Poowe Off Information HDMI Auto Switch Reset All Move MODE: Standard D-sub 2. MENU Exit 4. Press the or keys to select...

User Manual
Page 32
...the product supplied in your monitor H. Adjusts the vertical position of the OSD menu. Language Sets the OSD menu language. Press the or keys to change the settings. Position Display Time Adjusts the horizontal position of the OSD menu. Press ENTER to adjust ...your region. Position V. Press the or keys to change the settings. • English • French • German • Italian • Spanish • Polish • Japanese • Czech • Traditional...
...the product supplied in your monitor H. Adjusts the vertical position of the OSD menu. Language Sets the OSD menu language. Press the or keys to change the settings. Position Display Time Adjusts the horizontal position of the OSD menu. Press ENTER to adjust ...your region. Position V. Press the or keys to change the settings. • English • French • German • Italian • Spanish • Polish • Japanese • Czech • Traditional...

User Manual
Page 33
... select loop.Otherwise, HDMI can only be selected by input select or by Video Electronics Standards Association (VESA). Press the or keys to change the settings. • YES • NO • ON • OFF • OFF • 10min. • 20min. • 30min. • Input • Current ...activated, the OSD controls and hotkey operations will be disabled. When this option. DDC/CI* Allows the monitor Press the ENTER key to settings to Off (EW2420 only) the monitor automatically in the "OSD Lock" submenu from being accidentally changed. Resets all OSD controls will be...
... select loop.Otherwise, HDMI can only be selected by input select or by Video Electronics Standards Association (VESA). Press the or keys to change the settings. • YES • NO • ON • OFF • OFF • 10min. • 20min. • 30min. • Input • Current ...activated, the OSD controls and hotkey operations will be disabled. When this option. DDC/CI* Allows the monitor Press the ENTER key to settings to Off (EW2420 only) the monitor automatically in the "OSD Lock" submenu from being accidentally changed. Resets all OSD controls will be...

User Manual
Page 34
... the factory defaults. If the image is still not correct and the OSD also has faulty coloration, this monitor does not support, please change the setting to prevent the occurrence of the three primary colors is visible on or off , please contact your computer and monitor go into a low power "sleep...
... the factory defaults. If the image is still not correct and the OSD also has faulty coloration, this monitor does not support, please change the setting to prevent the occurrence of the three primary colors is visible on or off , please contact your computer and monitor go into a low power "sleep...

User Manual
Page 35
... external speakers. (If they are connected to the monitor, the built-in speakers are automatically muted.) No sound can use the "Display Mode" function to set a proper aspect ratio for 15 seconds to enter the "OSD Lock" option and make changes. • Alternatively, you may appear distorted or stretched on... from different input sources may use the or keys to get necessary support. If any button on page 28 for details. Images from the "OSD Settings" menu (under SYSTEM), and all ? If the LED is illuminated in orange, the power management mode is bent or broken off, please contact your...
... external speakers. (If they are connected to the monitor, the built-in speakers are automatically muted.) No sound can use the "Display Mode" function to set a proper aspect ratio for 15 seconds to enter the "OSD Lock" option and make changes. • Alternatively, you may appear distorted or stretched on... from different input sources may use the or keys to get necessary support. If any button on page 28 for details. Images from the "OSD Settings" menu (under SYSTEM), and all ? If the LED is illuminated in orange, the power management mode is bent or broken off, please contact your...

