

User Manual
Page 2
... translated into this publication may expose you are for your monitor Power Safety • The AC plug isolates this publication and to make changes from the wall outlet before cleaning. Servicing • Do not attempt to service this product yourself, as opening or removing covers may be used. Please follow these safety instructions for best performance, and long life for ventilation. They must be reproduced...
... translated into this publication may expose you are for your monitor Power Safety • The AC plug isolates this publication and to make changes from the wall outlet before cleaning. Servicing • Do not attempt to service this product yourself, as opening or removing covers may be used. Please follow these safety instructions for best performance, and long life for ventilation. They must be reproduced...
User Manual
Page 3
... to install the monitor on a new computer 14 How to upgrade the monitor on an existing computer 15 How to install on Windows 7 system 16 How to install on Windows Vista systems 17 How to install on Windows XP system 18 Picture optimization ...19 How to adjust your monitor 20 The control panel ...20 Hot key mode ...21 Main menu mode ...22 Troubleshooting ...34 Frequently asked questions (FAQ 34 Need more help...
... to install the monitor on a new computer 14 How to upgrade the monitor on an existing computer 15 How to install on Windows 7 system 16 How to install on Windows Vista systems 17 How to install on Windows XP system 18 Picture optimization ...19 How to adjust your monitor 20 The control panel ...20 Hot key mode ...21 Main menu mode ...22 Troubleshooting ...34 Frequently asked questions (FAQ 34 Need more help...

User Manual
Page 6
Cable clip 5. Lock switch 11 10.USB port x 2 (downstream; Getting to know your monitor D-Sub socket 8. USB port x 1 (upstream; AC Power Input jack 3. connecting to 10 USB devices) 11. HDMI socket x 2 6. Line In and Line Out 4. DVI-D socket 7. connecting to the 12 PC) 12 9. Headphone jack 12.USB port x 2 (downstream; 2. Speakers 2. connecting to USB devices) 13.Headphone hook indicators (two inverted triangles) 14.Control buttons 15.Power button Above diagram may vary depending on the model. 6 Getting to...
Cable clip 5. Lock switch 11 10.USB port x 2 (downstream; Getting to know your monitor D-Sub socket 8. USB port x 1 (upstream; AC Power Input jack 3. connecting to 10 USB devices) 11. HDMI socket x 2 6. Line In and Line Out 4. DVI-D socket 7. connecting to the 12 PC) 12 9. Headphone jack 12.USB port x 2 (downstream; 2. Speakers 2. connecting to USB devices) 13.Headphone hook indicators (two inverted triangles) 14.Control buttons 15.Power button Above diagram may vary depending on the model. 6 Getting to...
User Manual
Page 7
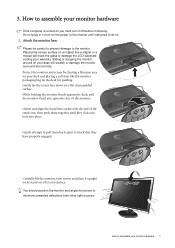
... damage the LCD substrate voiding your monitor hardware 7 You should position the monitor and angle the screen to the monitor. Please be careful to prevent damage to minimize unwanted reflections from other light sources. How to assemble your warranty. Sliding or scraping the monitor around on the power to check that they click and lock into place. Orient and align the stand base socket with...
... damage the LCD substrate voiding your monitor hardware 7 You should position the monitor and angle the screen to the monitor. Please be careful to prevent damage to minimize unwanted reflections from other light sources. How to assemble your warranty. Sliding or scraping the monitor around on the power to check that they click and lock into place. Orient and align the stand base socket with...
User Manual
Page 11
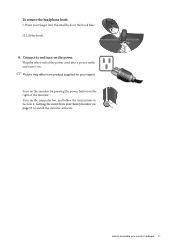
Lift the hook. 8. Connect-to and turn-on page 13 to assemble your finger into a power outlet and turn it on the right of the power cord into the small hole on the hook base. Turn on the computer too, and follow the instructions in Section 4: Getting the most from product supplied for your BenQ monitor on the power. Picture may differ from your region. II. Turn on the monitor by pressing the power button on . Plug the other end of the monitor. To remove the headphone hook: I. How to install the monitor software. Point your monitor hardware 11
Lift the hook. 8. Connect-to and turn-on page 13 to assemble your finger into a power outlet and turn it on the right of the power cord into the small hole on the hook base. Turn on the computer too, and follow the instructions in Section 4: Getting the most from product supplied for your BenQ monitor on the power. Picture may differ from your region. II. Turn on the monitor by pressing the power button on . Plug the other end of the monitor. To remove the headphone hook: I. How to install the monitor software. Point your monitor hardware 11

User Manual
Page 13
...-step instructions for either case however, the very next time you are upgrading an existing installation (which already has existing monitor driver software) with a newer monitor. Furthermore, if your new BenQ color LCD flat screen monitor, you should install the custom BenQ LCD Monitor driver software as a member of Microsoft Windows you are using, and whether you are connecting the monitor and installing the software onto a new computer (without existing monitor driver software), or whether you turn on the BenQ LCD Monitor...
...-step instructions for either case however, the very next time you are upgrading an existing installation (which already has existing monitor driver software) with a newer monitor. Furthermore, if your new BenQ color LCD flat screen monitor, you should install the custom BenQ LCD Monitor driver software as a member of Microsoft Windows you are using, and whether you are connecting the monitor and installing the software onto a new computer (without existing monitor driver software), or whether you turn on the BenQ LCD Monitor...
User Manual
Page 14
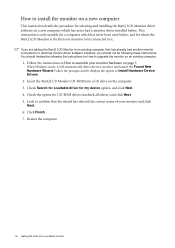
... Next. 5. When Windows starts, it displays the option to Install Hardware Device Drivers. 2. Insert the BenQ LCD Monitor CD-ROM into a CD drive on page 7. Click Finish. 7. Follow the instructions in How to assemble your monitor hardware on the computer. 3. Check Search for a suitable driver for How to upgrade the monitor on an existing computer. 1. How to install the monitor on a new computer This instruction details the procedure...
... Next. 5. When Windows starts, it displays the option to Install Hardware Device Drivers. 2. Insert the BenQ LCD Monitor CD-ROM into a CD drive on page 7. Click Finish. 7. Follow the instructions in How to assemble your monitor hardware on the computer. 3. Check Search for a suitable driver for How to upgrade the monitor on an existing computer. 1. How to install the monitor on a new computer This instruction details the procedure...

User Manual
Page 15
... automate the task and guide you have connected, and letting Windows install the corresponding driver files from your BenQ monitor 15 The BenQ LCD Monitor driver for your Microsoft Windows computer. How to upgrade the monitor on an existing computer This instruction details the procedure for the particular model monitor you through the file selection and installation process. Windows has an Upgrade Device Driver Wizard to install on Windows XP system on page...
... automate the task and guide you have connected, and letting Windows install the corresponding driver files from your BenQ monitor 15 The BenQ LCD Monitor driver for your Microsoft Windows computer. How to upgrade the monitor on an existing computer This instruction details the procedure for the particular model monitor you through the file selection and installation process. Windows has an Upgrade Device Driver Wizard to install on Windows XP system on page...

User Manual
Page 16
... for your BenQ monitor it may be prompted to restart your computer after the driver update is the drive letter designator for driver software. 7. Go to Start, Control Panel, Hardware and Sound, Devices and Printers and right-click the name of your monitor from the example above depending upon your monitor from the menu. 2. Alternatively, right-click the desktop and select Personalize, Display, Devices...
... for your BenQ monitor it may be prompted to restart your computer after the driver update is the drive letter designator for driver software. 7. Go to Start, Control Panel, Hardware and Sound, Devices and Printers and right-click the name of your monitor from the example above depending upon your monitor from the menu. 2. Alternatively, right-click the desktop and select Personalize, Display, Devices...
User Manual
Page 17
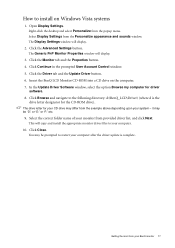
... install on the computer. 7. Select the correct folder name of your computer. 10. Click Continue in the prompted User Account Control window. 5. it may differ from your system - Getting the most from the example above depending upon your BenQ monitor 17 Open Display Settings. Insert the BenQ LCD Monitor CD-ROM into a CD drive on Windows Vista systems 1. Click the Driver tab and the Update Driver button...
... install on the computer. 7. Select the correct folder name of your computer. 10. Click Continue in the prompted User Account Control window. 5. it may differ from your system - Getting the most from the example above depending upon your BenQ monitor 17 Open Display Settings. Insert the BenQ LCD Monitor CD-ROM into a CD drive on Windows Vista systems 1. Click the Driver tab and the Update Driver button...
User Manual
Page 18
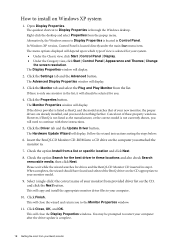
... Category view, click Start | Control Panel | Appearance and Themes | Change the screen resolution. When completes, the wizard should have found and selected the BenQ driver on the CD appropriate to install on the computer you will display. 3. In Windows XP version, Control Panel is through the Windows desktop. Check the option Install from the popup menu. Click Finish. This will display. 2. The Monitor Properties window will display. Click the Properties button. If the driver...
... Category view, click Start | Control Panel | Appearance and Themes | Change the screen resolution. When completes, the wizard should have found and selected the BenQ driver on the CD appropriate to install on the computer you will display. 3. In Windows XP version, Control Panel is through the Windows desktop. Check the option Install from the popup menu. Click Finish. This will display. 2. The Monitor Properties window will display. Click the Properties button. If the driver...
User Manual
Page 19
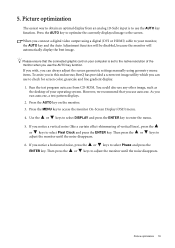
... can always adjust the screen geometric settings manually using a digital (DVI or HDMI) cable to the native resolution of the monitor when you connect a digital video output using geometry menu items. To assist you in this endeavour, BenQ has provided a screen test image utility which you notice a vertical noise (like a curtain effect-shimmering of your monitor, the AUTO key and the Auto Adjustment function will be disabled, because the monitor will automatically display the best image. When you use to enter...
... can always adjust the screen geometric settings manually using a digital (DVI or HDMI) cable to the native resolution of the monitor when you connect a digital video output using geometry menu items. To assist you in this endeavour, BenQ has provided a screen test image utility which you notice a vertical noise (like a curtain effect-shimmering of your monitor, the AUTO key and the Auto Adjustment function will be disabled, because the monitor will automatically display the best image. When you use to enter...
User Manual
Page 20
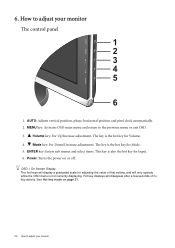
... hot key for Input. 6. Power: Turns the power on page 21. 20 How to adjust your monitor The control panel 1 2 3 4 5 6 1. Hot key displays will disappear after a few seconds of that setting, and will display a graduated scale for Mode. 5. ENTER key: Enters sub menus and select items. This key is not currently displaying. OSD = On Screen Display. 6. See Hot key mode on or off. AUTO: Adjusts vertical position, phase, horizontal position and pixel clock automatically. 2.
... hot key for Input. 6. Power: Turns the power on page 21. 20 How to adjust your monitor The control panel 1 2 3 4 5 6 1. Hot key displays will disappear after a few seconds of that setting, and will display a graduated scale for Mode. 5. ENTER key: Enters sub menus and select items. This key is not currently displaying. OSD = On Screen Display. 6. See Hot key mode on or off. AUTO: Adjusts vertical position, phase, horizontal position and pixel clock automatically. 2.

User Manual
Page 22
... menu on page 27 • Audio menu on page 30 • System menu on page 31 22 How to your region, see "Language on page 32" under "OSD Settings" for more information on the input sources, functions and settings. Press the MENU key to enter the Menu item settings. Picture 3. For more details. Picture Advanced 4. Available menu options may differ from the product supplied to adjust your monitor. Display 2. The OSD menu languages...
... menu on page 27 • Audio menu on page 30 • System menu on page 31 22 How to your region, see "Language on page 32" under "OSD Settings" for more information on the input sources, functions and settings. Press the MENU key to enter the Menu item settings. Picture 3. For more details. Picture Advanced 4. Available menu options may differ from the product supplied to adjust your monitor. Display 2. The OSD menu languages...
User Manual
Page 23
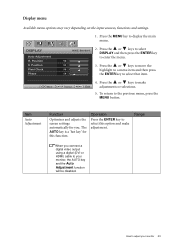
... using a digital (DVI or HDMI) cable to make adjustment. How to enter the menu. 50 52 3. Press the or keys to move the 50 highlight to a menu item and then press 18 the ENTER key to the previous menu, press the MENU button. To return to select that item. Item Auto Adjustment Function Optimizes and adjusts the screen settings automatically for this option and make adjustments or selections. 5. DISPLAY Auto Adjustment H. Range When you . Position Pixel...
... using a digital (DVI or HDMI) cable to make adjustment. How to enter the menu. 50 52 3. Press the or keys to move the 50 highlight to a menu item and then press 18 the ENTER key to the previous menu, press the MENU button. To return to select that item. Item Auto Adjustment Function Optimizes and adjusts the screen settings automatically for this option and make adjustments or selections. 5. DISPLAY Auto Adjustment H. Range When you . Position Pixel...

User Manual
Page 27
... adjust your monitor 27 for all running programs. Operation Press the or keys to change the settings. for better color matching representation with low power consumption by providing minimum brightness for basic PC application. • Movie - Press the or keys to select PICTURE ADVANCED and then press the ENTER key to display the main menu. Picture Mode Senseye Demo Dynamic Contrast Display Mode Color Format HDMI RGB PC Range...
... adjust your monitor 27 for all running programs. Operation Press the or keys to change the settings. for better color matching representation with low power consumption by providing minimum brightness for basic PC application. • Movie - Press the or keys to select PICTURE ADVANCED and then press the ENTER key to display the main menu. Picture Mode Senseye Demo Dynamic Contrast Display Mode Color Format HDMI RGB PC Range...

User Manual
Page 31
... the ENTER key to your monitor 31 Operation Press the or keys to adjust your video cable connection type. Range • DVI • D-sub (VGA) • HDMI 1 • HDMI 2 How to change the input to that appropriate to select that item. System menu Available menu options may vary depending on the input sources, functions and settings. 1. OFF 3. SYSTEM Input OSD Settings DDC/CI Auto Poowe Off Information HDMI Auto Switch Reset All Move MODE: Standard D-sub 2.
... the ENTER key to your monitor 31 Operation Press the or keys to adjust your video cable connection type. Range • DVI • D-sub (VGA) • HDMI 1 • HDMI 2 How to change the input to that appropriate to select that item. System menu Available menu options may vary depending on the input sources, functions and settings. 1. OFF 3. SYSTEM Input OSD Settings DDC/CI Auto Poowe Off Information HDMI Auto Switch Reset All Move MODE: Standard D-sub 2.

User Manual
Page 33
... may use the or keys to the factory default values. Resets all mode, color and geometry settings to select "NO" in the "OSD Lock" submenu from the "OSD Settings" menu, and all the monitor settings from being accidentally changed. To unlock the OSD controls when the OSD is preset to be set through select this option. select this function is activated, the OSD controls and hotkey operations will be disabled. Press the the software...
... may use the or keys to the factory default values. Resets all mode, color and geometry settings to select "NO" in the "OSD Lock" submenu from the "OSD Settings" menu, and all the monitor settings from being accidentally changed. To unlock the OSD controls when the OSD is preset to be set through select this option. select this function is activated, the OSD controls and hotkey operations will be disabled. Press the the software...

User Manual
Page 34
... make adjustments based on these losses by working through the instructions in focus? Select the native resolution. Now check the signal cable connectors. If any pin is missing in green and there is visible on the screen, this monitor does not support, please change the setting to prevent the occurrence of Range" on the screen: • Activate the power management function to let your dealer to get necessary support. If the LED...
... make adjustments based on these losses by working through the instructions in focus? Select the native resolution. Now check the signal cable connectors. If any pin is missing in green and there is visible on the screen, this monitor does not support, please change the setting to prevent the occurrence of Range" on the screen: • Activate the power management function to let your dealer to get necessary support. If the LED...

User Manual
Page 35
... the correct resolution, refresh rate and make adjustments based on the display not illuminated at all OSD controls will be accessible. You are automatically muted.) No sound can use the or keys to the monitor, the built-in speakers are running at its native resolution. The image is still distorted. If that does not help, check the signal cable connectors. The OSD controls are USB-powered, check whether the USB connection is OK. • Increase the volume (volume may be...
... the correct resolution, refresh rate and make adjustments based on the display not illuminated at all OSD controls will be accessible. You are automatically muted.) No sound can use the or keys to the monitor, the built-in speakers are running at its native resolution. The image is still distorted. If that does not help, check the signal cable connectors. The OSD controls are USB-powered, check whether the USB connection is OK. • Increase the volume (volume may be...


