DCP10 User Manual
Page 3
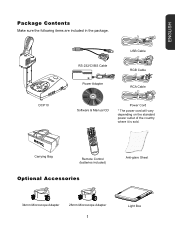
ENGLISH Package Contents Make sure the following items are included in the package. Carrying Bag Remote Control (batteries included) Optional Accessories Anti-glare Sheet 34mm Microscope Adapter 28mm Microscope Adapter 1 Light Box DCP10 RS-232/CVBS Cable Power Adapter USB Cable RGB Cable RCA Cable Software & Manual CD Power Cord * The power cord will vary depending on the standard power outlet of the country where it is sold.
ENGLISH Package Contents Make sure the following items are included in the package. Carrying Bag Remote Control (batteries included) Optional Accessories Anti-glare Sheet 34mm Microscope Adapter 28mm Microscope Adapter 1 Light Box DCP10 RS-232/CVBS Cable Power Adapter USB Cable RGB Cable RCA Cable Software & Manual CD Power Cord * The power cord will vary depending on the standard power outlet of the country where it is sold.
DCP10 User Manual
Page 8
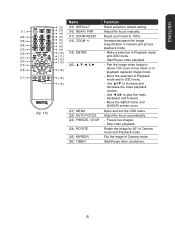
... mode (21) (20) ( 11 ) (12) (13) and OSD menu. - ENGLISH Name Function (2) (15) DEFAULT Reset at factory default setting. (1) (3) (16) NEAR / FAR Adjust the focus manually. (4) (26) (5) (17) ZOOM RESET Reset zoom level to increase and decrease the video playback volume. - Use ◄ &► to play the video backward and forward...
... mode (21) (20) ( 11 ) (12) (13) and OSD menu. - ENGLISH Name Function (2) (15) DEFAULT Reset at factory default setting. (1) (3) (16) NEAR / FAR Adjust the focus manually. (4) (26) (5) (17) ZOOM RESET Reset zoom level to increase and decrease the video playback volume. - Use ◄ &► to play the video backward and forward...
DCP10 User Manual
Page 9
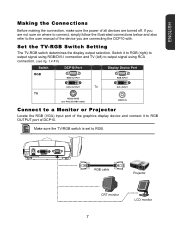
...simply follow the illustrated connections below and also refer to the user manual of the device you are turned off. ENGLISH Making the Connections Before making the connection, make sure the power of all devices are connecting the DCP10 with. Set the TV-RGB Switch Setting The TV-RGB switch ... it to RGB (right) to output signal using RGB/DVI-I connection and TV (left) to output signal using RCA connection. (see fig. 1.4 # 6) Switch DCP10 Port Display Device Port RGB RGB OUTPUT RGB INPUT TV DVI-I OUTPUT To RS232/CVBS (use RS-232/CVBS cable) DVI-I INPUT VIDEO IN Connect...
...simply follow the illustrated connections below and also refer to the user manual of the device you are turned off. ENGLISH Making the Connections Before making the connection, make sure the power of all devices are connecting the DCP10 with. Set the TV-RGB Switch Setting The TV-RGB switch ... it to RGB (right) to output signal using RGB/DVI-I connection and TV (left) to output signal using RCA connection. (see fig. 1.4 # 6) Switch DCP10 Port Display Device Port RGB RGB OUTPUT RGB INPUT TV DVI-I OUTPUT To RS232/CVBS (use RS-232/CVBS cable) DVI-I INPUT VIDEO IN Connect...
DCP10 User Manual
Page 11
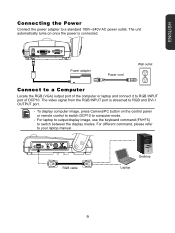
...to RGB and DVI-I OUTPUT port. - RGB cable Desktop Laptop 9 The unit automatically turns on the control panel or remote control to switch DCP10 to a standard 100V~240V AC power outlet. To display computer image, press Camera/PC button on once the power is streamed to switch ... different command, please refer to RGB INPUT port of the computer or laptop and connect it to your laptop manual. Power adapter Power cord Wall outlet Connect to a Computer Locate the RGB (VGA) output port of DCP10. ENGLISH Connecting the Power Connect the power adapter to computer mode. -
...to RGB and DVI-I OUTPUT port. - RGB cable Desktop Laptop 9 The unit automatically turns on the control panel or remote control to switch DCP10 to a standard 100V~240V AC power outlet. To display computer image, press Camera/PC button on once the power is streamed to switch ... different command, please refer to RGB INPUT port of the computer or laptop and connect it to your laptop manual. Power adapter Power cord Wall outlet Connect to a Computer Locate the RGB (VGA) output port of DCP10. ENGLISH Connecting the Power Connect the power adapter to computer mode. -

DCP10 User Manual
Page 18
...; and ◄ to adjust the setting or ▼ and ▲ to select a menu option. 4. Contrast Adjust the contrast level manually between 0 and 63. Basic Menu Screen Function Brightness Adjust brightness level manually between 0 and 255 under bright and dark environments. Press ▼ and ▲ to make a selection and display the setting selection...
...; and ◄ to adjust the setting or ▼ and ▲ to select a menu option. 4. Contrast Adjust the contrast level manually between 0 and 63. Basic Menu Screen Function Brightness Adjust brightness level manually between 0 and 255 under bright and dark environments. Press ▼ and ▲ to make a selection and display the setting selection...
DCP10 User Manual
Page 19
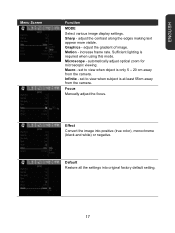
Motion - Microscope - Infinite - set to view when subject is required when using this mode. Focus Manually adjust the focus. Macro - automatically adjust optical zoom for microscopic viewing. increase frame rate. Effect Convert the image into original factory default setting. 17 Sharp - ...
Motion - Microscope - Infinite - set to view when subject is required when using this mode. Focus Manually adjust the focus. Macro - automatically adjust optical zoom for microscopic viewing. increase frame rate. Effect Convert the image into original factory default setting. 17 Sharp - ...
DCP10 User Manual
Page 20
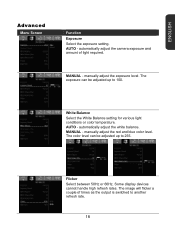
MANUAL - manually adjust the red and blue color level. Flicker Select between 50Hz or 60Hz. automatically adjust the camera exposure and amount of times as the output ... setting for various light conditions or color temperature. The image will flicker a couple of light required. MANUAL - Some display devices cannot handle high refresh rates. ENGLISH Advanced Menu Screen Function Exposure Select the exposure setting. manually adjust the exposure level. AUTO - automatically adjust the white balance. The exposure can be adjusted up...
MANUAL - manually adjust the red and blue color level. Flicker Select between 50Hz or 60Hz. automatically adjust the camera exposure and amount of times as the output ... setting for various light conditions or color temperature. The image will flicker a couple of light required. MANUAL - Some display devices cannot handle high refresh rates. ENGLISH Advanced Menu Screen Function Exposure Select the exposure setting. manually adjust the exposure level. AUTO - automatically adjust the white balance. The exposure can be adjusted up...
DCP10 User Manual
Page 29
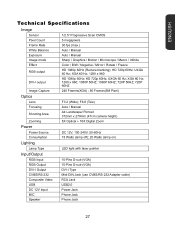
HD 720p 60Hz; F6.8 (Tele) Focusing Auto / Manual Shooting Area A4 Landscape/ Portrait 372mm x 279mm (47cm camera height) Zooming 5X Optical + 16X Digital Zoom Power Power Source DC 12V, 100-240V... DVI-I output HD 1080p 60Hz; ENGLISH Technical Specifications Image Sensor 1/2.5" Progressive Scan CMOS Pixel Count 5 megapixels Frame Rate 30 fps (max.) White Balance Auto / Manual Exposure Auto / Manual Image mode Sharp / Graphics / Motion / Microscope / Macro / Infinite Effect Color / B/W / Negative / Mirror / Rotate / Freeze RGB output HD 1080p 60Hz (Reduce blanking);...
HD 720p 60Hz; F6.8 (Tele) Focusing Auto / Manual Shooting Area A4 Landscape/ Portrait 372mm x 279mm (47cm camera height) Zooming 5X Optical + 16X Digital Zoom Power Power Source DC 12V, 100-240V... DVI-I output HD 1080p 60Hz; ENGLISH Technical Specifications Image Sensor 1/2.5" Progressive Scan CMOS Pixel Count 5 megapixels Frame Rate 30 fps (max.) White Balance Auto / Manual Exposure Auto / Manual Image mode Sharp / Graphics / Motion / Microscope / Macro / Infinite Effect Color / B/W / Negative / Mirror / Rotate / Freeze RGB output HD 1080p 60Hz (Reduce blanking);...
DCP10 User Manual
Page 30
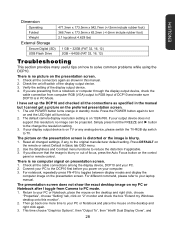
... the computer image on my PC or Notebook after I have set up the DCP10 and checked all the connectors again as specified in standby mode. Press DEFAULT on the remote or select Default in this manual. 2. For notebook, repeatedly press FN+F5 to solve common problems while using ...the DCP10. Check all the connections as shown in Basic tab OSD menu. 2. The unit POWER button turns ...
... the computer image on my PC or Notebook after I have set up the DCP10 and checked all the connectors again as specified in standby mode. Press DEFAULT on the remote or select Default in this manual. 2. For notebook, repeatedly press FN+F5 to solve common problems while using ...the DCP10. Check all the connections as shown in Basic tab OSD menu. 2. The unit POWER button turns ...
DCP10 Data Sheet
Page 1
... Max 80 images (5M); 240 images (XGA) SDHC (32GB Max) / USB Drive (64GB Max) Color / B&W / Negative / Mirror / Freeze Auto/Manual QBOX / QVISOR / Timer Horizontal & Vertical Yes Text / Graphics / High Frame / Marco Marco / Infinite / Microscope Single & Continuous Up to your USB ... Cord, Carrying Bag, Remote Control, Anti-glare sheet x 1 Microscope adapters (34mm & 28mm) Light Box 3 years parts/labor DCP10 12-09-11-BQus BenQ America Corp. 15375 Barranca Parkway. Dimensions (Operating) Dimensions (Folded) Net Weight Power source Power Consumption Compatible Operating System (Qvision Software)...
... Max 80 images (5M); 240 images (XGA) SDHC (32GB Max) / USB Drive (64GB Max) Color / B&W / Negative / Mirror / Freeze Auto/Manual QBOX / QVISOR / Timer Horizontal & Vertical Yes Text / Graphics / High Frame / Marco Marco / Infinite / Microscope Single & Continuous Up to your USB ... Cord, Carrying Bag, Remote Control, Anti-glare sheet x 1 Microscope adapters (34mm & 28mm) Light Box 3 years parts/labor DCP10 12-09-11-BQus BenQ America Corp. 15375 Barranca Parkway. Dimensions (Operating) Dimensions (Folded) Net Weight Power source Power Consumption Compatible Operating System (Qvision Software)...

