
User Manual
Page 2
... by BenQ Corporation. Copyright Copyright © 2015 by external factors such as poor cable quality, unstable power supply, signal interference, or poor grounding, and not limited to the above mentioned external factors. (Applicable for flicker-free models only.) Power Safety Please follow these safety instructions for best performance, and long life for your dealer or local power company. • An approved power cord greater...
... by BenQ Corporation. Copyright Copyright © 2015 by external factors such as poor cable quality, unstable power supply, signal interference, or poor grounding, and not limited to the above mentioned external factors. (Applicable for flicker-free models only.) Power Safety Please follow these safety instructions for best performance, and long life for your dealer or local power company. • An approved power cord greater...

User Manual
Page 4
... ...2 Getting started ...5 Getting to know your monitor 7 Front view...7 Back view ...7 Input and output ports...8 Connection ...10 How to assemble your monitor hardware 12 How to detach the stand and the base 18 Adjusting the monitor height ...20 Rotating the monitor ...21 Viewing angle adjustment ...22 Using the monitor wall mounting kit 23 Getting the most from your BenQ monitor 24 How to install the monitor on a new computer 25 How to upgrade the monitor on an...
... ...2 Getting started ...5 Getting to know your monitor 7 Front view...7 Back view ...7 Input and output ports...8 Connection ...10 How to assemble your monitor hardware 12 How to detach the stand and the base 18 Adjusting the monitor height ...20 Rotating the monitor ...21 Viewing angle adjustment ...22 Using the monitor wall mounting kit 23 Getting the most from your BenQ monitor 24 How to install the monitor on a new computer 25 How to upgrade the monitor on an...
User Manual
Page 15
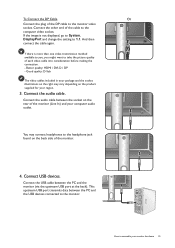
To Connect the DP Cable Or Connect the plug of each video cable into consideration before making the connection. - Connect the USB cable between the PC and the USB devices connected to 1.1. If there is not displayed, go to System, DisplayPort and change the setting to the monitor. Better quality: HDMI / DVI-D / DP - You may vary depending on the rear of the monitor. 4. TV OUT SDIF-OUT PDIF-OUT How to...
To Connect the DP Cable Or Connect the plug of each video cable into consideration before making the connection. - Connect the USB cable between the PC and the USB devices connected to 1.1. If there is not displayed, go to System, DisplayPort and change the setting to the monitor. Better quality: HDMI / DVI-D / DP - You may vary depending on the rear of the monitor. 4. TV OUT SDIF-OUT PDIF-OUT How to...
User Manual
Page 17
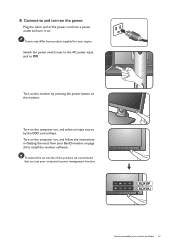
... monitor hardware 17 Switch the power switch next to the AC power input jack to install the monitor software. Turn on the monitor by the OSD control keys. To extend the service life of the power cord into a power outlet and turn -on the computer too, and select an input source by pressing the power button on . Turn on the computer too, and follow the instructions in Getting the most from product supplied for your BenQ monitor...
... monitor hardware 17 Switch the power switch next to the AC power input jack to install the monitor software. Turn on the monitor by the OSD control keys. To extend the service life of the power cord into a power outlet and turn -on the computer too, and select an input source by pressing the power button on . Turn on the computer too, and follow the instructions in Getting the most from product supplied for your BenQ monitor...
User Manual
Page 21
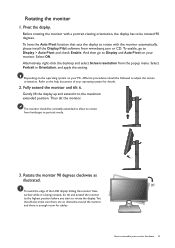
... highest position before you start to rotate with a portrait viewing orientation, the display has to Display and Auto Pivot on your monitor hardware 21 Rotating the monitor 1. Before rotating the monitor with the monitor automatically, please install the Display Pilot software from www.benq.com or CD. And then go to assemble your PC, different procedures should be rotated 90 degrees. Refer to portrait mode. 3. Select...
... highest position before you start to rotate with a portrait viewing orientation, the display has to Display and Auto Pivot on your monitor hardware 21 Rotating the monitor 1. Before rotating the monitor with the monitor automatically, please install the Display Pilot software from www.benq.com or CD. And then go to assemble your PC, different procedures should be rotated 90 degrees. Refer to portrait mode. 3. Select...
User Manual
Page 23
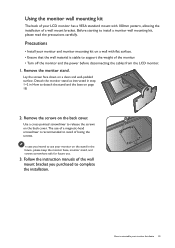
... the wall mount bracket you intend to use of a magnetic-head screwdriver is stable to support the weight of the monitor. • Turn off the monitor and the power before disconnecting the cables from the LCD monitor. 1. Precautions • Install your monitor hardware 23 How to assemble your monitor and monitor mounting kit on the back cover. Remove the screws on a clean and well-padded surface. Follow the instruction manuals of a wall mount bracket. Remove the monitor stand.
... the wall mount bracket you intend to use of a magnetic-head screwdriver is stable to support the weight of the monitor. • Turn off the monitor and the power before disconnecting the cables from the LCD monitor. 1. Precautions • Install your monitor hardware 23 How to assemble your monitor and monitor mounting kit on the back cover. Remove the screws on a clean and well-padded surface. Follow the instruction manuals of a wall mount bracket. Remove the monitor stand.
User Manual
Page 24
... (after connecting the monitor to install the monitor driver software. Follow the wizard instructions until it asks you should install the custom BenQ LCD Monitor driver software as a member of the Administrators group in order to your computer), Windows will automatically recognize the new (or different) hardware, and will determine which process you need to follow to select a monitor model. At that point, click the Have Disk button...
... (after connecting the monitor to install the monitor driver software. Follow the wizard instructions until it asks you should install the custom BenQ LCD Monitor driver software as a member of the Administrators group in order to your computer), Windows will automatically recognize the new (or different) hardware, and will determine which process you need to follow to select a monitor model. At that point, click the Have Disk button...
User Manual
Page 25
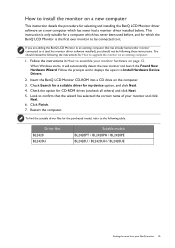
.... 6. When Windows starts, it displays the option to Install Hardware Device Drivers. 2. Check Search for a suitable driver for How to upgrade the monitor on an existing computer. 1. You should not be following table. Follow the instructions in How to assemble your monitor hardware on the computer. 3. Check the option for selecting and installing the BenQ LCD Monitor driver software on a new computer which has never had another monitor connected to it...
.... 6. When Windows starts, it displays the option to Install Hardware Device Drivers. 2. Check Search for a suitable driver for How to upgrade the monitor on an existing computer. 1. You should not be following table. Follow the instructions in How to assemble your monitor hardware on the computer. 3. Check the option for selecting and installing the BenQ LCD Monitor driver software on a new computer which has never had another monitor connected to it...
User Manual
Page 26
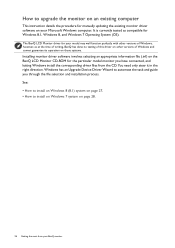
..., BenQ has done no testing of this driver on other versions of Windows and cannot guarantee its operation on those systems. Installing monitor driver software involves selecting an appropriate information file (.inf) on the BenQ LCD Monitor CD-ROM for Windows 8.1, Windows 8, and Windows 7 Operating System (OS). How to upgrade the monitor on an existing computer This instruction details the procedure for manually updating the existing monitor driver software on your BenQ monitor
..., BenQ has done no testing of this driver on other versions of Windows and cannot guarantee its operation on those systems. Installing monitor driver software involves selecting an appropriate information file (.inf) on the BenQ LCD Monitor CD-ROM for Windows 8.1, Windows 8, and Windows 7 Operating System (OS). How to upgrade the monitor on an existing computer This instruction details the procedure for manually updating the existing monitor driver software on your BenQ monitor
User Manual
Page 27
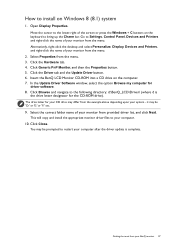
.... Select Properties from your BenQ monitor 27 Getting the most from the menu. 3. Click Browse and navigate to Settings, Control Panel, Devices and Printers and right-click the name of the screen or press the Windows + C buttons on the computer. 7. This will copy and install the appropriate monitor driver files to install on Windows 8 (8.1) system 1. How to your computer. 10. Open Display Properties. Move the cursor...
.... Select Properties from your BenQ monitor 27 Getting the most from the menu. 3. Click Browse and navigate to Settings, Control Panel, Devices and Printers and right-click the name of the screen or press the Windows + C buttons on the computer. 7. This will copy and install the appropriate monitor driver files to install on Windows 8 (8.1) system 1. How to your computer. 10. Open Display Properties. Move the cursor...
User Manual
Page 28
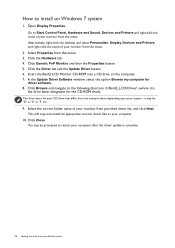
Open Display Properties. Go to the following directory: d:\BenQ_LCD\Driver\ (where d is complete. 28 Getting the most from the menu. Click Generic PnP Monitor, and then the Properties button. 5. Click the Driver tab and the Update Driver button. 6. Click Browse and navigate to Start, Control Panel, Hardware and Sound, Devices and Printers and right-click the name of your monitor from your BenQ monitor Click Close. Select Properties...
Open Display Properties. Go to the following directory: d:\BenQ_LCD\Driver\ (where d is complete. 28 Getting the most from the menu. Click Generic PnP Monitor, and then the Properties button. 5. Click the Driver tab and the Update Driver button. 6. Click Browse and navigate to Start, Control Panel, Hardware and Sound, Devices and Printers and right-click the name of your monitor from your BenQ monitor Click Close. Select Properties...
User Manual
Page 30
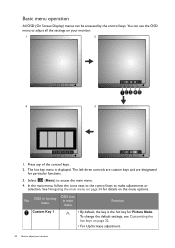
... control keys to access the main menu. 4. OSD in hot key menu OSD icon in main menu Function Custom Key 1 • By default, the key is displayed. To change the default settings, see Customizing the hot keys on page 32. • For Up/Increase adjustment. 30 How to adjust all the settings on the menu options. Basic menu operation All OSD (On Screen Display) menus can use the OSD menu to adjust your monitor...
... control keys to access the main menu. 4. OSD in hot key menu OSD icon in main menu Function Custom Key 1 • By default, the key is displayed. To change the default settings, see Customizing the hot keys on page 32. • For Up/Increase adjustment. 30 How to adjust all the settings on the menu options. Basic menu operation All OSD (On Screen Display) menus can use the OSD menu to adjust your monitor...
User Manual
Page 32
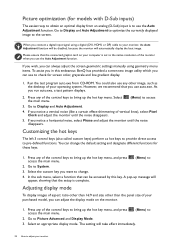
... key menu. If you can use any of the monitor when you connect a digital input signal using a digital (DVI, HDMI, or DP) cable to use auto.exe. If you wish, you can adjust the display mode on your computer is set to the native resolution of the control keys to change the default setting and designate different functions for these keys. 1. Select the main menu. (Menu) to System. 3. Go to Display and Auto Adjustment to optimize the currently displayed image to adjust your...
... key menu. If you can use any of the monitor when you connect a digital input signal using a digital (DVI, HDMI, or DP) cable to use auto.exe. If you wish, you can adjust the display mode on your computer is set to the native resolution of the control keys to change the default setting and designate different functions for these keys. 1. Select the main menu. (Menu) to System. 3. Go to Display and Auto Adjustment to optimize the currently displayed image to adjust your...
User Manual
Page 35
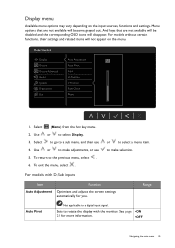
... the menu, select . Item Auto Adjustment Function Optimizes and adjusts the screen settings automatically for more information. •OFF Navigating the main menu 35 For models without certain functions, their settings and related items will become grayed out. Mode: Standard Display Picture Auto Adjustment 50 Auto Pivot Picture Advanced Input Audio H. Position Ergonomics Pixel Clock Eco Phase 1. Select to go to make selection. Use or to a sub menu, and then use 5. To return to a digital input signal. Range Auto Pivot...
... the menu, select . Item Auto Adjustment Function Optimizes and adjusts the screen settings automatically for more information. •OFF Navigating the main menu 35 For models without certain functions, their settings and related items will become grayed out. Mode: Standard Display Picture Auto Adjustment 50 Auto Pivot Picture Advanced Input Audio H. Position Ergonomics Pixel Clock Eco Phase 1. Select to go to make selection. Use or to a sub menu, and then use 5. To return to a digital input signal. Range Auto Pivot...

User Manual
Page 39
Select (Menu) from the hot key menu. 2. Item Function Range Picture Mode Select a picture mode that best suits the type of the dark shades so you could work on the menu. CAD / CAM Enhances the contrast if a CAD / CAM software is used. Mode: Standard Display Picture Mode sRGB 50 Picture Senseye Demo CAD / CAM Picture Advanced Dynamic Contrast Animation Audio Overscan Presentation System Display Mode Standard Ergonomics Color Format Low Blue Light Eco HDMI RGB PC Range Movie Photo 1. Menu options...
Select (Menu) from the hot key menu. 2. Item Function Range Picture Mode Select a picture mode that best suits the type of the dark shades so you could work on the menu. CAD / CAM Enhances the contrast if a CAD / CAM software is used. Mode: Standard Display Picture Mode sRGB 50 Picture Senseye Demo CAD / CAM Picture Advanced Dynamic Contrast Animation Audio Overscan Presentation System Display Mode Standard Ergonomics Color Format Low Blue Light Eco HDMI RGB PC Range Movie Photo 1. Menu options...

User Manual
Page 40
... HDMI, DP, or D-Sub (VGA converted from the display to reduce the risk of an input visual signal, and then to create the optimal contrast. 0 to your eyes. Low Blue Light Decreases the blue light emitted from Component). 40 Navigating the main menu Photo For viewing still images. User Applies a combination of Standard mode, while the right window presents the images under the selected mode from Picture Mode. Displays the preview of screen images...
... HDMI, DP, or D-Sub (VGA converted from the display to reduce the risk of an input visual signal, and then to create the optimal contrast. 0 to your eyes. Low Blue Light Decreases the blue light emitted from Component). 40 Navigating the main menu Photo For viewing still images. User Applies a combination of Standard mode, while the right window presents the images under the selected mode from Picture Mode. Displays the preview of screen images...
User Manual
Page 45
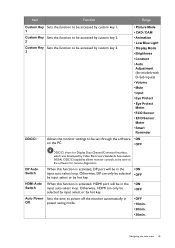
... key 3. 3 • Picture Mode • CAD / CAM • Animation • Low Blue Light • Display Mode • Brightness • Contrast • Auto Adjustment (for models with D-Sub inputs) • Volume • Mute • Input • Eye Protect • Eye Protect Meter • ECO Sensor • ECO Sensor Meter • Smart Reminder DDC/CI Allows the monitor settings to power off the monitor automatically in Off power saving mode. • OFF •...
... key 3. 3 • Picture Mode • CAD / CAM • Animation • Low Blue Light • Display Mode • Brightness • Contrast • Auto Adjustment (for models with D-Sub inputs) • Volume • Mute • Input • Eye Protect • Eye Protect Meter • ECO Sensor • ECO Sensor Meter • Smart Reminder DDC/CI Allows the monitor settings to power off the monitor automatically in Off power saving mode. • OFF •...

User Manual
Page 51
... pixels is permanently black, one or more pixels are permanently white, one or more pixels are permanently red, green, blue or another color. • Clean the LCD screen. • Cycle power on-off. • These are pixels that occurs in focus? You can be seen. Select the native resolution. Go to Picture and Reset Color, and then choose YES to reset the color settings to get necessary support. Now check the signal cable connectors. The image has a faulty coloration...
... pixels is permanently black, one or more pixels are permanently white, one or more pixels are permanently red, green, blue or another color. • Clean the LCD screen. • Cycle power on-off. • These are pixels that occurs in focus? You can be seen. Select the native resolution. Go to Picture and Reset Color, and then choose YES to reset the color settings to get necessary support. Now check the signal cable connectors. The image has a faulty coloration...
User Manual
Page 52
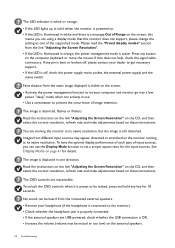
... resolution, refresh rate and make adjustments based on these instructions. No sound can use . • Use a screensaver to prevent the occurrence of image retention. Press any key for the input sources. The LED indicator is white or orange. • If the LED lights up in solid white, the monitor is powered on. • If the LED is illuminated in white and there is a message Out of Range on the screen, this monitor does not support, please change...
... resolution, refresh rate and make adjustments based on these instructions. No sound can use . • Use a screensaver to prevent the occurrence of image retention. Press any key for the input sources. The LED indicator is white or orange. • If the LED lights up in solid white, the monitor is powered on. • If the LED is illuminated in white and there is a message Out of Range on the screen, this monitor does not support, please change...
User Manual
Page 53
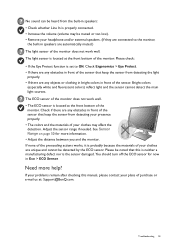
... turn off the ECO sensor for more help? If your problems remain after checking this is neither a manufacturing defect nor is properly connected. • Increase the volume (volume may be muted or too low). • Remove your clothes may affect the detection. Bright colors (especially white and fluorescent colors) reflect light and the sensor cannot detect the main light sources. The ECO sensor of the monitor. Troubleshooting...
... turn off the ECO sensor for more help? If your problems remain after checking this is neither a manufacturing defect nor is properly connected. • Increase the volume (volume may be muted or too low). • Remove your clothes may affect the detection. Bright colors (especially white and fluorescent colors) reflect light and the sensor cannot detect the main light sources. The ECO sensor of the monitor. Troubleshooting...


