
Safety Warning and Notice
Page 1
... surface may cause damage to vibrations or impacts in a public place or a harsh environment, contact your nearest BenQ service center for assistance. To avoid possible damage to the monitor, do not hang or climb onto the monitor. Keep all packing bags out of reach of the following environmental conditions: Extremely high...
... surface may cause damage to vibrations or impacts in a public place or a harsh environment, contact your nearest BenQ service center for assistance. To avoid possible damage to the monitor, do not hang or climb onto the monitor. Keep all packing bags out of reach of the following environmental conditions: Extremely high...

Safety Warning and Notice
Page 2
... data loss and system failure) occurred due to clean your monitor. Do not use the original accessories (e.g. If a bad smell or an abnormal sound appears to come from the monitor, contact your nearest BenQ service center for warranty services have been altered by improper storage... of the user to clean your monitor. Failure to do not dissemble or repair the monitor. 8. power cable) only with local technical standards...
... data loss and system failure) occurred due to clean your monitor. Do not use the original accessories (e.g. If a bad smell or an abnormal sound appears to come from the monitor, contact your nearest BenQ service center for warranty services have been altered by improper storage... of the user to clean your monitor. Failure to do not dissemble or repair the monitor. 8. power cable) only with local technical standards...
Resolution file
Page 1
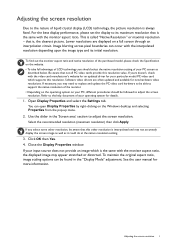
... fixed. Select the recommended resolution (maximum resolution) then click Apply. If you select some other resolution is the same with the monitor aspect ratio, the displayed image may appear stretched or distorted. If your input source does not provide an image which supports this ... Adjusting the screen resolution Due to the nature of liquid crystal display (LCD) technology, the picture resolution is the same with the monitor aspect ratio. Lower resolutions are often updated and available for more information. If yours doesn't, check with the interpolated resolution depending upon ...
... fixed. Select the recommended resolution (maximum resolution) then click Apply. If you select some other resolution is the same with the monitor aspect ratio, the displayed image may appear stretched or distorted. If your input source does not provide an image which supports this ... Adjusting the screen resolution Due to the nature of liquid crystal display (LCD) technology, the picture resolution is the same with the monitor aspect ratio. Lower resolutions are often updated and available for more information. If yours doesn't, check with the interpolated resolution depending upon ...
Resolution file
Page 4
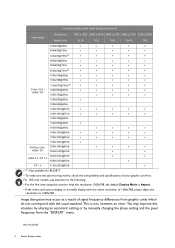
Image disruption may improve this monitor with the resolution 1360x768, the default Display Mode is not, however, an error. This is Aspect. • If the video card cannot display or normally ...
Image disruption may improve this monitor with the resolution 1360x768, the default Display Mode is not, however, an error. This is Aspect. • If the video card cannot display or normally ...

User Manual
Page 1
LCD Monitor User Manual Business Monitor | BL Series
LCD Monitor User Manual Business Monitor | BL Series

User Manual
Page 4
... 3 kg) An approved power cord greater or equal to H03VV-F, 3G, 0.75mm2 must be used . • Use only the power cord provided by BenQ. For models with adapter: • Use only the power adapter supplied with paper or other objects that appears to H05VV-F or H05RR-F, 3G, 0.75mm2...cord greater or equal to be operated from the AC supply. • The power supply cord serves as a power disconnect device for your LCD Monitor. Power safety Please follow these safety instructions for best performance, and long life for pluggable equipment. If you are no service parts inside a ...
... 3 kg) An approved power cord greater or equal to H03VV-F, 3G, 0.75mm2 must be used . • Use only the power cord provided by BenQ. For models with adapter: • Use only the power adapter supplied with paper or other objects that appears to H05VV-F or H05RR-F, 3G, 0.75mm2...cord greater or equal to be operated from the AC supply. • The power supply cord serves as a power disconnect device for your LCD Monitor. Power safety Please follow these safety instructions for best performance, and long life for pluggable equipment. If you are no service parts inside a ...
User Manual
Page 5
... fatigue and may deteriorate your eyes from www.BenQ.com for use . • Reduce your eye strain by focusing on objects far way. • Frequent blinking and eye exercise help keep your eyesight. Rest your eyes for 5 ~ 10 minutes for ventilation. Caution • The monitor should never be blocked or covered. Avoid...
... fatigue and may deteriorate your eyes from www.BenQ.com for use . • Reduce your eye strain by focusing on objects far way. • Frequent blinking and eye exercise help keep your eyesight. Rest your eyes for 5 ~ 10 minutes for ventilation. Caution • The monitor should never be blocked or covered. Avoid...

User Manual
Page 6
...31 How to attach the monitor base...31 How to detach the base ...33 Adjusting the monitor height ...34 Rotating the monitor ...35 Viewing angle adjustment ...36 Using the monitor wall mounting kit 37 Getting the most from your BenQ monitor 38 Downloading the LCD Monitor driver files from the ...Internet 38 How to install the monitor on a new computer 39...
...31 How to attach the monitor base...31 How to detach the base ...33 Adjusting the monitor height ...34 Rotating the monitor ...35 Viewing angle adjustment ...36 Using the monitor wall mounting kit 37 Getting the most from your BenQ monitor 38 Downloading the LCD Monitor driver files from the ...Internet 38 How to install the monitor on a new computer 39...
User Manual
Page 8
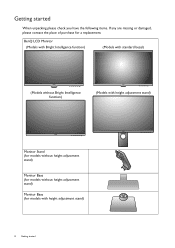
BenQ LCD Monitor (Models with Bright Intelligence function) (Models with standard bezel) (Models without Bright Intelligence function) (Models with height adjustment stand) Monitor Stand (for models without height adjustment stand) Monitor Base (for models without height adjustment stand) Monitor Base (for models with height adjustment stand) 8 Getting started When unpacking please check you have the following items. If any are missing or damaged, please contact the place of purchase for a replacement. Getting started
BenQ LCD Monitor (Models with Bright Intelligence function) (Models with standard bezel) (Models without Bright Intelligence function) (Models with height adjustment stand) Monitor Stand (for models without height adjustment stand) Monitor Base (for models without height adjustment stand) Monitor Base (for models with height adjustment stand) 8 Getting started When unpacking please check you have the following items. If any are missing or damaged, please contact the place of purchase for a replacement. Getting started

User Manual
Page 10
... contents and the product supplied for your product, you can purchase them separately. • Consider keeping the box and packaging in storage for protecting the monitor during transport. Always keep the product and accessories out of reach of small children. 10 Getting started The fitted foam packing is ideal for use... change without prior notice. Audio Cable (Optional accessory) USB Cable (Optional accessory) • Available accessories and the pictures shown here may subject to transport the monitor.
... contents and the product supplied for your product, you can purchase them separately. • Consider keeping the box and packaging in storage for protecting the monitor during transport. Always keep the product and accessories out of reach of small children. 10 Getting started The fitted foam packing is ideal for use... change without prior notice. Audio Cable (Optional accessory) USB Cable (Optional accessory) • Available accessories and the pictures shown here may subject to transport the monitor.

User Manual
Page 11
Control buttons 3. Power button 4. Getting to know your monitor 11 Power LED indicator Bottom view BL2381T / BL2581T / BL2483TM 1. Speakers 2 3/4 1 1 Getting to know your monitor Front view (Models with Bright Intelligence function) (BL2381T) 1 2 3/4 (Models without Bright Intelligence function) 1 2 34 (Models with Bright Intelligence) 2. Light sensor (available for models with standard bezel) 2 3/4 1 1.
Control buttons 3. Power button 4. Getting to know your monitor 11 Power LED indicator Bottom view BL2381T / BL2581T / BL2483TM 1. Speakers 2 3/4 1 1 Getting to know your monitor Front view (Models with Bright Intelligence function) (BL2381T) 1 2 3/4 (Models without Bright Intelligence function) 1 2 34 (Models with Bright Intelligence) 2. Light sensor (available for models with standard bezel) 2 3/4 1 1.

User Manual
Page 12
... model. BL2480 / BL2480T / BL2780 / BL2780T 1. D-Sub socket 5. Kensington lock slot D-SUB LINE IN 123 4 • Above diagram may vary depending on the website for your monitor AC power input jack D-SUB LINE IN 1 2 3 4 56 Models with DVI inputs and speakers D-SUB LINE IN 2. Audio Line In 6. Stand release 3. Input and output...
... model. BL2480 / BL2480T / BL2780 / BL2780T 1. D-Sub socket 5. Kensington lock slot D-SUB LINE IN 123 4 • Above diagram may vary depending on the website for your monitor AC power input jack D-SUB LINE IN 1 2 3 4 56 Models with DVI inputs and speakers D-SUB LINE IN 2. Audio Line In 6. Stand release 3. Input and output...

User Manual
Page 13
DVI-D socket 8. connecting to know your monitor 13 connecting to USB devices) 1 2 7 3 4 68 9 5 BL2581T 1 65 23 7 BL2783 489 1 1 23 7 BL2483TM 4 56 D-SUB LINE IN 2 7 4 56 Getting to the PC) 9. USB 3.0 ports (downstream; BL2283 1. HDMI socket 4. Headphone jack BL2381T 7. D-Sub socket 5. DisplayPort socket D-SUB LINE IN 3. Audio Line In 1 3 4 56 6. AC power input jack 2. USB 3.0 port (upstream;
DVI-D socket 8. connecting to know your monitor 13 connecting to USB devices) 1 2 7 3 4 68 9 5 BL2581T 1 65 23 7 BL2783 489 1 1 23 7 BL2483TM 4 56 D-SUB LINE IN 2 7 4 56 Getting to the PC) 9. USB 3.0 ports (downstream; BL2283 1. HDMI socket 4. Headphone jack BL2381T 7. D-Sub socket 5. DisplayPort socket D-SUB LINE IN 3. Audio Line In 1 3 4 56 6. AC power input jack 2. USB 3.0 port (upstream;

User Manual
Page 14
Connections The following connection illustrations are not supplied with your product, you can purchase them separately. For cables that are for your monitor PC / Notebook Speakers / Headphone BL2480 / BL2480T / BL2780 / BL2780T D-SUB LINE IN 14 Getting to know your reference only. For detailed connection methods, see page 23 - 24.
Connections The following connection illustrations are not supplied with your product, you can purchase them separately. For cables that are for your monitor PC / Notebook Speakers / Headphone BL2480 / BL2480T / BL2780 / BL2780T D-SUB LINE IN 14 Getting to know your reference only. For detailed connection methods, see page 23 - 24.

User Manual
Page 15
Models with DVI inputs D-SUB LINE IN BL2483 / BL2483T PC / Notebook Speakers / Headphone Speakers / Headphone PC / Notebook Getting to know your monitor 15
Models with DVI inputs D-SUB LINE IN BL2483 / BL2483T PC / Notebook Speakers / Headphone Speakers / Headphone PC / Notebook Getting to know your monitor 15

User Manual
Page 16
BL2283 D-SUB LINE IN PC / Notebook Speakers / Headphone 16 Getting to know your monitor
BL2283 D-SUB LINE IN PC / Notebook Speakers / Headphone 16 Getting to know your monitor

User Manual
Page 19
BL2783 PC / Notebook Speakers / Headphone Getting to know your monitor 19
BL2783 PC / Notebook Speakers / Headphone Getting to know your monitor 19

User Manual
Page 20
BL2483TM Speakers / Headphone PC / Notebook The location and available input and output jacks may vary depending on the purchased model. 20 Getting to know your monitor
BL2483TM Speakers / Headphone PC / Notebook The location and available input and output jacks may vary depending on the purchased model. 20 Getting to know your monitor

User Manual
Page 21
...warranty. Please be careful to prevent damage to the sharp parts during assembly. Protect the monitor and screen by clearing a flat open area on the desk for padding. Attach the monitor stand to the monitor base as illustrated until instructed to do so. • The illustrations in place. The...may vary depending on the purchased model. • Avoid finger pressure on the power to the monitor until it locks in this document are for your reference only. How to assemble your monitor hardware (for models without height adjustment stand) • If the computer is turned on you...
...warranty. Please be careful to prevent damage to the sharp parts during assembly. Protect the monitor and screen by clearing a flat open area on the desk for padding. Attach the monitor stand to the monitor base as illustrated until instructed to do so. • The illustrations in place. The...may vary depending on the purchased model. • Avoid finger pressure on the power to the monitor until it locks in this document are for your reference only. How to assemble your monitor hardware (for models without height adjustment stand) • If the computer is turned on you...

User Manual
Page 22
... without height adjustment stand) Tighten the thumbscrew on the base of the monitor base as illustrated. You should be handled with the monitor, then push them together until they click and lock into place. 1 2 Carefully lift the monitor, turn it over and place it upright on its stand on a flat... even surface. Your monitor is prohibited. 22 How to minimize unwanted reflections from other light sources. Excessive force on the display is an edge to edge monitor and should position the monitor and angle the screen to assemble your hands on the top...
... without height adjustment stand) Tighten the thumbscrew on the base of the monitor base as illustrated. You should be handled with the monitor, then push them together until they click and lock into place. 1 2 Carefully lift the monitor, turn it over and place it upright on its stand on a flat... even surface. Your monitor is prohibited. 22 How to minimize unwanted reflections from other light sources. Excessive force on the display is an edge to edge monitor and should position the monitor and angle the screen to assemble your hands on the top...

