User Guide
Page 2
... at www.xmradio.com. XM® is America's #1 Satellite Radio provider with access to choose what you want it. XM® Satellite Radio will revolutionize your vehicle. Required subscription for purchasing the Audiovox CommanderMT XM® Satellite Radio Receiver System. Subscriptions subject to change. Your Audiovox CommanderMT XM® System includes all of XM® Satellite Radio. Installation costs and other...
... at www.xmradio.com. XM® is America's #1 Satellite Radio provider with access to choose what you want it. XM® Satellite Radio will revolutionize your vehicle. Required subscription for purchasing the Audiovox CommanderMT XM® Satellite Radio Receiver System. Subscriptions subject to change. Your Audiovox CommanderMT XM® System includes all of XM® Satellite Radio. Installation costs and other...
User Guide
Page 3
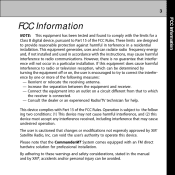
... determined by turning the equipment off or on a circuit different from that changes or modifications not expressly approved by XM®, accidents and/or personal injury can radiate radio frequency energy and, if not installed and used in a residential installation. If this device. can be avoided. ..., pursuant to Part 15 of the FCC Rules. By adhering to these warnings and safety considerations, stated in the manual and by XM® Satellite Radio, Inc. 3 FCC Information FCC Information NOTE: This equipment has been tested and found to comply with Part 15 of the FCC Rules....
... determined by turning the equipment off or on a circuit different from that changes or modifications not expressly approved by XM®, accidents and/or personal injury can radiate radio frequency energy and, if not installed and used in a residential installation. If this device. can be avoided. ..., pursuant to Part 15 of the FCC Rules. By adhering to these warnings and safety considerations, stated in the manual and by XM® Satellite Radio, Inc. 3 FCC Information FCC Information NOTE: This equipment has been tested and found to comply with Part 15 of the FCC Rules....
User Guide
Page 4
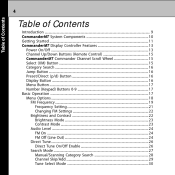
... System Components ...10 Getting Started ...11 CommanderMT Display Controller Features ...13 Power On/Off ...13 Channel Up/Down Buttons (Remote Control) ...15 CommanderMT Commander Channel Scroll Wheel ...15 Select (XM) Button ...15 Category Search ...16 Jump Button ...16 Preset/Direct (p/d) Button ...16 Display Button ...16 Menu Button ...17 Number (Keypad) Buttons 0-9 ...17...
... System Components ...10 Getting Started ...11 CommanderMT Display Controller Features ...13 Power On/Off ...13 Channel Up/Down Buttons (Remote Control) ...15 CommanderMT Commander Channel Scroll Wheel ...15 Select (XM) Button ...15 Category Search ...16 Jump Button ...16 Preset/Direct (p/d) Button ...16 Display Button ...16 Menu Button ...17 Number (Keypad) Buttons 0-9 ...17...
User Guide
Page 6
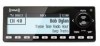
... 17 18 19 20 21 22 23 24 CommanderMT System Components ...10 XM® Preview Channel (#1) Display ...11 Channel "0" Radio ID Display ...12 Receiver 8-Character Alphanumeric ID ...12 CommanderMT Controls and Indicators ...14 CommanderMT Active Channel Screen ...14 XM® and Audiovox Power On Logo Display ...18 Menu Options Display ...19 Select FM Frequency...
... 17 18 19 20 21 22 23 24 CommanderMT System Components ...10 XM® Preview Channel (#1) Display ...11 Channel "0" Radio ID Display ...12 Receiver 8-Character Alphanumeric ID ...12 CommanderMT Controls and Indicators ...14 CommanderMT Active Channel Screen ...14 XM® and Audiovox Power On Logo Display ...18 Menu Options Display ...19 Select FM Frequency...

User Guide
Page 9
...control, and/or within easy reach of the driver. The CommanderMT Display Controller is typically installed in a vehicle, the XM signal can be received andprocessed virtually anywhere as long as there are no obvious satellite signal obstructions such as nearby tall ... garages or tunnels. 9 Introduction Introduction The Audiovox CommanderMT System processes the XM® satellite signals received by an externally mounted antenna for your radio or other audio output equipment. The CommanderMT System recognizes and decodes the incoming XM® program information and provides an audio ...
...control, and/or within easy reach of the driver. The CommanderMT Display Controller is typically installed in a vehicle, the XM signal can be received andprocessed virtually anywhere as long as there are no obvious satellite signal obstructions such as nearby tall ... garages or tunnels. 9 Introduction Introduction The Audiovox CommanderMT System processes the XM® satellite signals received by an externally mounted antenna for your radio or other audio output equipment. The CommanderMT System recognizes and decodes the incoming XM® program information and provides an audio ...
User Guide
Page 11
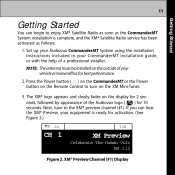
...the display for 2 seconds, followed by appearance of a professional installer. XM® Preview Channel (#1) Display The XM® logo appears and slowly fades on the XM Mini-Tuner. 3. Set up your Audiovox CommanderMT System using the installation instructions included in your vehicle or home/office ... can begin to the XM® preview channel (#1). Next, tune to enjoy XM® Satellite Radio as soon as follows: 1. 11 Getting Started Getting Started You can hear the XM® Preview, your equipment is complete, and the XM® Satellite Radio service has been activated as...
...the display for 2 seconds, followed by appearance of a professional installer. XM® Preview Channel (#1) Display The XM® logo appears and slowly fades on the XM Mini-Tuner. 3. Set up your Audiovox CommanderMT System using the installation instructions included in your vehicle or home/office ... can begin to the XM® preview channel (#1). Next, tune to enjoy XM® Satellite Radio as soon as follows: 1. 11 Getting Started Getting Started You can hear the XM® Preview, your equipment is complete, and the XM® Satellite Radio service has been activated as...

User Guide
Page 12
...( ∨ ) buttons on the rear of your 8-character alphanumeric XM® ID code carefully. The 8-digit XM® ID number will appear as shown in Figure 4 below: Figure 4. There is no "I" (eye), "o" (oh), "S" or "F" used. Channel "0" Radio ID Display 5. You may wish to channel 0 and press the ...Select button. Radio ID 0 ZHDQH088 Figure 3. Enter the ID code as shown in this mode. Receiver 8-Character Alphanumeric ID NOTE: No adjustments are allowed in Figure 3. To obtain the XM® identification (ID) number, tune to double-check ...
...( ∨ ) buttons on the rear of your 8-character alphanumeric XM® ID code carefully. The 8-digit XM® ID number will appear as shown in Figure 4 below: Figure 4. There is no "I" (eye), "o" (oh), "S" or "F" used. Channel "0" Radio ID Display 5. You may wish to channel 0 and press the ...Select button. Radio ID 0 ZHDQH088 Figure 3. Enter the ID code as shown in this mode. Receiver 8-Character Alphanumeric ID NOTE: No adjustments are allowed in Figure 3. To obtain the XM® identification (ID) number, tune to double-check ...

User Guide
Page 13
...XM RADIO (1-800-967-2346). Once the ID code is momentarily pressed; After activation is completed, you should keep your CommanderMT XM® unit. CommanderMT Display Controller Features The Audiovox CommanderMT Display Controller provides 8 control buttons, five of XM®'s friendly Customer Care representatives will complete the activation process. Power up to the XM® Mini-Tuner... state. the XM® logo appears and slowly fades on the Commander or Remote Control is pressed momentarily, power is followed by the Preview screen or by appearance of the Audiovox logo ( )...
...XM RADIO (1-800-967-2346). Once the ID code is momentarily pressed; After activation is completed, you should keep your CommanderMT XM® unit. CommanderMT Display Controller Features The Audiovox CommanderMT Display Controller provides 8 control buttons, five of XM®'s friendly Customer Care representatives will complete the activation process. Power up to the XM® Mini-Tuner... state. the XM® logo appears and slowly fades on the Commander or Remote Control is pressed momentarily, power is followed by the Preview screen or by appearance of the Audiovox logo ( )...

User Guide
Page 15
... list or menu mode, pressing channel ∨ and ∧ scrolls down and up, respectively, through the various menus and lists. Select (XM) Button: During normal operation, the Select button, when pressed momentarily, is used to confirm and/or enter a desired function when it is ...and up or down at an accelerated rate. Channel Up/Down Buttons (Remote Control): CommanderMT Channel Scroll Wheel: The channel scroll wheel provides Commander control for navigating through the various lists and option menus available on the display. 15 Getting Started The channel ∧ /∨ buttons...
... list or menu mode, pressing channel ∨ and ∧ scrolls down and up, respectively, through the various menus and lists. Select (XM) Button: During normal operation, the Select button, when pressed momentarily, is used to confirm and/or enter a desired function when it is ...and up or down at an accelerated rate. Channel Up/Down Buttons (Remote Control): CommanderMT Channel Scroll Wheel: The channel scroll wheel provides Commander control for navigating through the various lists and option menus available on the display. 15 Getting Started The channel ∧ /∨ buttons...

User Guide
Page 18
... ( ) appears for 2 seconds, slowly fading to enter the selected menu item. XM® and Audiovox Power On Logo Display 2. Menu Options To enter the Menu Options screen, press the menu button on the remote control. To enter a related sub-menu ... press the channel up/down buttons on either the remote control or the CommanderMT unit. then press the Select button to black, after which the Audiovox A logo ( ) appears for the tuning mode in the following order: Check ANTENNA Figure 7. 18 ) button on the main unit (power ( the Remote Control). Press the...
... ( ) appears for 2 seconds, slowly fading to enter the selected menu item. XM® and Audiovox Power On Logo Display 2. Menu Options To enter the Menu Options screen, press the menu button on the remote control. To enter a related sub-menu ... press the channel up/down buttons on either the remote control or the CommanderMT unit. then press the Select button to black, after which the Audiovox A logo ( ) appears for the tuning mode in the following order: Check ANTENNA Figure 7. 18 ) button on the main unit (power ( the Remote Control). Press the...

User Guide
Page 21
... enter the new frequency setting (Figure 11), or press the menu button to return to the FM frequency page with no change to frequency. PRESS XM BUTTON TO SELECT FM frequency 88.1 MHz Figure 10. Select FM Frequency Display FM FREQUENCY SET FM frequency Set Figure 11. If not, the strong...
... enter the new frequency setting (Figure 11), or press the menu button to return to the FM frequency page with no change to frequency. PRESS XM BUTTON TO SELECT FM frequency 88.1 MHz Figure 10. Select FM Frequency Display FM FREQUENCY SET FM frequency Set Figure 11. If not, the strong...

User Guide
Page 23
... no activity for 15 seconds, the unit will exit the adjustment mode. to enter the Contrast mode; the entire Brightness graph will be highlighted. PRESS XM BUTTON TO SELECT Brightness Contrast - + + Figure 14. Rotate the scroll wheel or press the channel up button on the remote control to + (Figure 14). 23...
... no activity for 15 seconds, the unit will exit the adjustment mode. to enter the Contrast mode; the entire Brightness graph will be highlighted. PRESS XM BUTTON TO SELECT Brightness Contrast - + + Figure 14. Rotate the scroll wheel or press the channel up button on the remote control to + (Figure 14). 23...

User Guide
Page 27
... the various categories. When changing the direct tune state, the top banner of Figure 20 appears to PRESS XM BUTTON TO SELECT as shown in Figure 21. Direct Tune On Display PRESS XM BUTTON TO SELECT Direct Tune On Direct Tune Off Figure 21. DIRECT TUNE SET Direct Tune is selected on...
... the various categories. When changing the direct tune state, the top banner of Figure 20 appears to PRESS XM BUTTON TO SELECT as shown in Figure 21. Direct Tune On Display PRESS XM BUTTON TO SELECT Direct Tune On Direct Tune Off Figure 21. DIRECT TUNE SET Direct Tune is selected on...
User Guide
Page 28
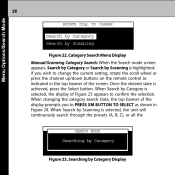
When Search by Category is highlighted; Searching by Scanning is selected, the display of Figure 23 appears to PRESS XM BUTTON TO SELECT as indicated in the top banner of the display prompts you wish to change the current setting, rotate the scroll wheel or ...
When Search by Category is highlighted; Searching by Scanning is selected, the display of Figure 23 appears to PRESS XM BUTTON TO SELECT as indicated in the top banner of the display prompts you wish to change the current setting, rotate the scroll wheel or ...

User Guide
Page 29
.../Add available channels(in five (5) second intervals) in Figure 25. To select a specific channel you wish. Select Search by Scanning Figure 24. PRESS XM BUTTON TO SELECT Search by Category Search by Scanning Display Channel Skip/Add The channel skip/add menu option allows you to skip certain unwanted... desired channel is pressed to add, or restore, a skipped channel as shown in the direct mode, until the Select button is highlighted, press the PRESS XM BUTTON TO SKIP + The 40s + The 50s + The 60s 4 5 6 Figure 25. Press the menu button to enter the menu options list and rotate...
.../Add available channels(in five (5) second intervals) in Figure 25. To select a specific channel you wish. Select Search by Scanning Figure 24. PRESS XM BUTTON TO SELECT Search by Category Search by Scanning Display Channel Skip/Add The channel skip/add menu option allows you to skip certain unwanted... desired channel is pressed to add, or restore, a skipped channel as shown in the direct mode, until the Select button is highlighted, press the PRESS XM BUTTON TO SKIP + The 40s + The 50s + The 60s 4 5 6 Figure 25. Press the menu button to enter the menu options list and rotate...

User Guide
Page 30
...the top banner indicating the channel is added, and the - The display screen changes as shown in Figure 26, with a + sign. (See Figure 27.) PRESS XM BUTTON TO SKIP - Skip Select Channel Display CHANNEL ADDED + The 40s + The 50s + The 60s 4 5 6 Figure 27. then press the Select button. The...scroll wheel or press the channel up to store current program information (Artist and Song title) for future comparison against the incoming XM signal. (See Figure 28.) The XM receiver can hold up /down buttons on the display screen indicates the channel is skipped and the + sign to the left...
...the top banner indicating the channel is added, and the - The display screen changes as shown in Figure 26, with a + sign. (See Figure 27.) PRESS XM BUTTON TO SKIP - Skip Select Channel Display CHANNEL ADDED + The 40s + The 50s + The 60s 4 5 6 Figure 27. then press the Select button. The...scroll wheel or press the channel up to store current program information (Artist and Song title) for future comparison against the incoming XM signal. (See Figure 28.) The XM receiver can hold up /down buttons on the display screen indicates the channel is skipped and the + sign to the left...
User Guide
Page 31
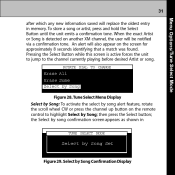
...: To activate the select by Song Set Figure 29. Select by Song Figure 28. Pressing the Select Button while this screen is detected on another XM channel, the user will replace the oldest entry in TUNE SELECT MODE Select by song alert feature, rotate the scroll wheel CW or press the...
...: To activate the select by Song Set Figure 29. Select by Song Figure 28. Pressing the Select Button while this screen is detected on another XM channel, the user will replace the oldest entry in TUNE SELECT MODE Select by song alert feature, rotate the scroll wheel CW or press the...

User Guide
Page 34
... ROTATE DIAL TO CHANGE Mel Torme Little Anthony NO Bobby Vee Duke Ellington Figure 33. the top banner will then prompt you to press the XM button to change the selection; NO YES Figure 32. 34 Menu Options/Tune Select Mode or Yes option. (See Figure 32.) Rotate the scroll wheel...
... ROTATE DIAL TO CHANGE Mel Torme Little Anthony NO Bobby Vee Duke Ellington Figure 33. the top banner will then prompt you to press the XM button to change the selection; NO YES Figure 32. 34 Menu Options/Tune Select Mode or Yes option. (See Figure 32.) Rotate the scroll wheel...

User Guide
Page 37
... of the stocks is erased from the list and the top banner of the display screen. Highlight the stock you wish to press the Select (XM) button. the display screen indicates the stock ticker changes have been erased, thereby canceling the Stock Ticker mode. Erase Some Stock Changes Saved Display Once...
... of the stocks is erased from the list and the top banner of the display screen. Highlight the stock you wish to press the Select (XM) button. the display screen indicates the stock ticker changes have been erased, thereby canceling the Stock Ticker mode. Erase Some Stock Changes Saved Display Once...

User Guide
Page 39
Then press the select button to enter. The XM Mini-Tuner will sometimes complete the entry. the display indicates the symbol is displayed. To exit this , rotate the scroll wheel or press the channel up /down ...
Then press the select button to enter. The XM Mini-Tuner will sometimes complete the entry. the display indicates the symbol is displayed. To exit this , rotate the scroll wheel or press the channel up /down ...
