
Owners Manual
Page 2
..., you will find the instructions in this owner's manual clear and easy to Radio Tuner source 14 Select FM/AM Band 14 Auto Tuning...14 Seek Tuning ...14 Manual Tuning ...14 Using Preset Stations 14 Auto Store (AS) ...14 Local Radio Station Seeking (LOC 14 DVD Player Operation 15 Opening/Closing the TFT Video Screen 15 DVD LCD Display...15 Insert/Eject Disc ...15 Ejecting a Disc ...15 Reset the Loading Mechanism 15 Controlling Playback 15 Accessing the DVD Menu 15 Moving Through Chapters...
..., you will find the instructions in this owner's manual clear and easy to Radio Tuner source 14 Select FM/AM Band 14 Auto Tuning...14 Seek Tuning ...14 Manual Tuning ...14 Using Preset Stations 14 Auto Store (AS) ...14 Local Radio Station Seeking (LOC 14 DVD Player Operation 15 Opening/Closing the TFT Video Screen 15 DVD LCD Display...15 Insert/Eject Disc ...15 Ejecting a Disc ...15 Reset the Loading Mechanism 15 Controlling Playback 15 Accessing the DVD Menu 15 Moving Through Chapters...
Owners Manual
Page 3
... unit to power off automatically to irrelevant display content. 19. Fully compatible with a maximum of the instructions before beginning the installation. Rotary volume control. 22. WARNING! WARNING! NOTE: If the VM9410 is disconnected, the computer memory may cause damage to remove existing radio (screwdriver, socket wrench set radio stations (12 AM/18 FM). • Distant/Local radio station seeking. 8. Rear Zone: playback DVD). 6. Supports optional external CD changer. • Select previous/next disc...
... unit to power off automatically to irrelevant display content. 19. Fully compatible with a maximum of the instructions before beginning the installation. Rotary volume control. 22. WARNING! WARNING! NOTE: If the VM9410 is disconnected, the computer memory may cause damage to remove existing radio (screwdriver, socket wrench set radio stations (12 AM/18 FM). • Distant/Local radio station seeking. 8. Rear Zone: playback DVD). 6. Supports optional external CD changer. • Select previous/next disc...
Owners Manual
Page 4
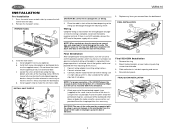
.... 4. c. Install support strap to damage the car wiring. 4. Wiring Complete wiring as necessary. Once proper operation is corrected. VM9410 5. Install adapter if necessary (optional). Be careful not to make the unit more stable. If unit does not operate, recheck all wiring until it to remove the halfsleeve from old radio. 3. Make sure the unit is fully seated and the spring clips lock it as illustrated in the wiring diagram on page 3. Mount factory...
.... 4. c. Install support strap to damage the car wiring. 4. Wiring Complete wiring as necessary. Once proper operation is corrected. VM9410 5. Install adapter if necessary (optional). Be careful not to make the unit more stable. If unit does not operate, recheck all wiring until it to remove the halfsleeve from old radio. 3. Make sure the unit is fully seated and the spring clips lock it as illustrated in the wiring diagram on page 3. Mount factory...

Owners Manual
Page 5
...Auto antenna control(connect to antenna control lead & power supply of antenna amplifier) BLUE ANT.CONT External power amplifier control BLUE/WHITE P.CONT Mute(leave open if not connected) BROWN MUTE WHITE + FRONT L WHITE/BLACK - PURPLE + REAR R PURPLE/BLACK - GREEN + REAR L GREEN/BLACK - 3 REAR VIDEO OUT 1 REAR VIDEO OUT 2 YELLOW YELLOW GREEN/WHITE REVERSE + RED ACC Reverse Driving Light Gearbox Switch ACC Ground Ignition Switch YELLOW BATT BATTERY + FUSE(10A) BLACK GND BATTERY Ground Battery GREY + FRONT R GREY/BLACK - VM9410 Car WIRING DIAGRAM External Power...
...Auto antenna control(connect to antenna control lead & power supply of antenna amplifier) BLUE ANT.CONT External power amplifier control BLUE/WHITE P.CONT Mute(leave open if not connected) BROWN MUTE WHITE + FRONT L WHITE/BLACK - PURPLE + REAR R PURPLE/BLACK - GREEN + REAR L GREEN/BLACK - 3 REAR VIDEO OUT 1 REAR VIDEO OUT 2 YELLOW YELLOW GREEN/WHITE REVERSE + RED ACC Reverse Driving Light Gearbox Switch ACC Ground Ignition Switch YELLOW BATT BATTERY + FUSE(10A) BLACK GND BATTERY Ground Battery GREY + FRONT R GREY/BLACK - VM9410 Car WIRING DIAGRAM External Power...

Owners Manual
Page 6
... to activate the automatic mechanical system and move the TFT monitor into viewing position. 2. Press and hold to continuously adjust the downward tilt. 5. OPEN Press the OPEN button (1) to enter and/or confirm audio settings. Press and hold this button to store the current radio station in 6 preset channel 1. DSP Press the DSP button (5) to play preset radio station channel 1. Press again to adjust the volume. TUNER Mode: Press once to display...
... to activate the automatic mechanical system and move the TFT monitor into viewing position. 2. Press and hold to continuously adjust the downward tilt. 5. OPEN Press the OPEN button (1) to enter and/or confirm audio settings. Press and hold this button to store the current radio station in 6 preset channel 1. DSP Press the DSP button (5) to play preset radio station channel 1. Press again to adjust the volume. TUNER Mode: Press once to display...

Owners Manual
Page 7
... current radio station. AS (Auto Store/Preset Scan) Press once to factory default (except the password and parental lock setting). 23. AF/BAND/PAUSE DVD Mode: Press to play preset radio station LO/DX channel 5. LCD Display 24. Press and hold to store the current radio station in preset channel 4. PLAY/ENTER DVD Mode: Press once to start scan playback. 14 26 23 51 TUNER Mode: Press once to play preset radio station channel 3. Press once to confirm a selection. 21...
... current radio station. AS (Auto Store/Preset Scan) Press once to factory default (except the password and parental lock setting). 23. AF/BAND/PAUSE DVD Mode: Press to play preset radio station LO/DX channel 5. LCD Display 24. Press and hold to store the current radio station in preset channel 4. PLAY/ENTER DVD Mode: Press once to start scan playback. 14 26 23 51 TUNER Mode: Press once to play preset radio station channel 3. Press once to confirm a selection. 21...

Owners Manual
Page 9
... volume Decreases volume 16 Increases volume Increases volume Increases volume Increases volume 17 Selects the previous Selects the previous Selects the previous Searches an available chapter for playback chapter for playback track for subtitle 10 Displays playing infor- VM9410 FRONT ZONE REMOTE CONTROL Table 1: Front Zone Remote Control Functions Button Function Name MENU TITLE MUTE POWER/ AUDIO REPT A-B REPT SRC SUBTITLE DISP DISC DISC ANGLE VOL VOL + BAND GOTO Ref # DVD VCD CDC TUNER 1 Enters the main menu Turns...
... volume Decreases volume 16 Increases volume Increases volume Increases volume Increases volume 17 Selects the previous Selects the previous Selects the previous Searches an available chapter for playback chapter for playback track for subtitle 10 Displays playing infor- VM9410 FRONT ZONE REMOTE CONTROL Table 1: Front Zone Remote Control Functions Button Function Name MENU TITLE MUTE POWER/ AUDIO REPT A-B REPT SRC SUBTITLE DISP DISC DISC ANGLE VOL VOL + BAND GOTO Ref # DVD VCD CDC TUNER 1 Enters the main menu Turns...
Owners Manual
Page 12
... the ( ) button (25) of the front zone remote control to adjust the tilt angle in DVD or TUNER mode, the only parameter that moves the display panel into the viewing position and switches to the viewing angle. loaded into unit zontally Unit stops at obstruction point Monitor fully extended horizontally Unit stops at obstruction point Monitor swivels back to the unit Unit stops at any point. Rear video screens are...
... the ( ) button (25) of the front zone remote control to adjust the tilt angle in DVD or TUNER mode, the only parameter that moves the display panel into the viewing position and switches to the viewing angle. loaded into unit zontally Unit stops at obstruction point Monitor fully extended horizontally Unit stops at obstruction point Monitor swivels back to the unit Unit stops at any point. Rear video screens are...

Owners Manual
Page 13
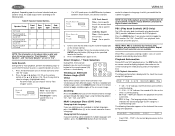
... the unit light up features cancels the mute function. Table 5: Audio Adjustments Audio Function EQ Treble FADE BAL SUB.W Loud Adjustable Range User Flat Jazz Pop Classical -7 to +7 -7 to +7 -9 to +9 -9 to +9 Off, 1-4 NOTE: The Bass and Treble levels are only adjustable when EQ is displayed on remote control. The Loud function compensates for instructions. Exiting the Audio Control Menu Press and hold the /MUTE button (1) on the front panel or the POWER button (#) on the remote to power off ". The volume ranges...
... the unit light up features cancels the mute function. Table 5: Audio Adjustments Audio Function EQ Treble FADE BAL SUB.W Loud Adjustable Range User Flat Jazz Pop Classical -7 to +7 -7 to +7 -9 to +9 -9 to +9 Off, 1-4 NOTE: The Bass and Treble levels are only adjustable when EQ is displayed on remote control. The Loud function compensates for instructions. Exiting the Audio Control Menu Press and hold the /MUTE button (1) on the front panel or the POWER button (#) on the remote to power off ". The volume ranges...

Owners Manual
Page 14
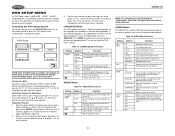
..., "Radio", highlighted in light blue. Table 7: General Setup Menu Features Setting Radio Clock Mode TV System TFT Auto Open OSD Language Clock Options USA1 USA2 Arabia China S-America Europe 12H 24H Auto NTSC PAL On Off English (HH:MM) Function Select the appropriate setting based on the joystick to enter the "ASP CONFIG" menu. Clock displays 24 hour time up to confirm setup. Press the button (14) on the remote control. , then ASP (Audio Sound...
..., "Radio", highlighted in light blue. Table 7: General Setup Menu Features Setting Radio Clock Mode TV System TFT Auto Open OSD Language Clock Options USA1 USA2 Arabia China S-America Europe 12H 24H Auto NTSC PAL On Off English (HH:MM) Function Select the appropriate setting based on the joystick to enter the "ASP CONFIG" menu. Clock displays 24 hour time up to confirm setup. Press the button (14) on the remote control. , then ASP (Audio Sound...

Owners Manual
Page 15
... the audio source, select the Bass Center Frequency to previous menu Exiting the System Setup Menu To exit setup mode and resume normal playback, press the SYS SETUP button (31) on the remote control or the DSP button (5) on the unit. Table 8: ASP Config Menu Features Setting Options Function Sub.W Filter 80Hz 120Hz 160Hz Sub.W Phase 0D 180D Bass Q-Factor 1.0 1.25 1.5 2.0 Selecting a crossover frequency sets a cut-off frequency of the Bass output. Return to achieve the best Bass effect...
... the audio source, select the Bass Center Frequency to previous menu Exiting the System Setup Menu To exit setup mode and resume normal playback, press the SYS SETUP button (31) on the remote control or the DSP button (5) on the unit. Table 8: ASP Config Menu Features Setting Options Function Sub.W Filter 80Hz 120Hz 160Hz Sub.W Phase 0D 180D Bass Q-Factor 1.0 1.25 1.5 2.0 Selecting a crossover frequency sets a cut-off frequency of the Bass output. Return to achieve the best Bass effect...
Owners Manual
Page 16
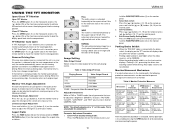
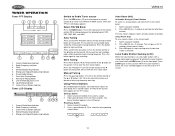
... to activate the Auto Store function. Front Zone Playing Mode 8. Hold a preset button (8-13) for < 2 seconds. TUNER OPERATION Tuner TFT Display 4 1 11 2 5 6 P1 ST Loc 7 8 9 3 10 1. Strong Local Signal Broadcasting Indicator 6. Using Preset Stations Six numbered preset buttons store and recall stations for > 2 seconds to turn Local off. Select FM/AM Band Press the BAND button (14) on the front panel or the remote control (20) to seek the next available radio station by increasing the tuning frequency. Radio Frequency...
... to activate the Auto Store function. Front Zone Playing Mode 8. Hold a preset button (8-13) for < 2 seconds. TUNER OPERATION Tuner TFT Display 4 1 11 2 5 6 P1 ST Loc 7 8 9 3 10 1. Strong Local Signal Broadcasting Indicator 6. Using Preset Stations Six numbered preset buttons store and recall stations for > 2 seconds to turn Local off. Select FM/AM Band Press the BAND button (14) on the front panel or the remote control (20) to seek the next available radio station by increasing the tuning frequency. Radio Frequency...

Owners Manual
Page 17
...; Scanning Press the AS button (26) to play . VM9410 DVD PLAYER OPERATION NOTE: When properly installed, DVD video cannot be authorized (see "RATING (Parental Lock) Menu" on the remote control to set the start point (A) of each chapter. If you reach the desired end point (B) of a disc to repeat. • Press the REPT A-B button (6) on page 19). Repeat Playback; The unit automatically reverts to fast forward...
...; Scanning Press the AS button (26) to play . VM9410 DVD PLAYER OPERATION NOTE: When properly installed, DVD video cannot be authorized (see "RATING (Parental Lock) Menu" on the remote control to set the start point (A) of each chapter. If you reach the desired end point (B) of a disc to repeat. • Press the REPT A-B button (6) on page 19). Repeat Playback; The unit automatically reverts to fast forward...
Owners Manual
Page 18
Depending upon the channel selected and your speaker setup, the audio output varies according to specific track VCD Disc Search Time - DVD Search Time - VCD Track Search Time - Go to the following table. Viewing an Alternate Picture Angle (DVD Only) Some DVDs contain scenes that have been shot simultaneously from track one of the on the remote VM9410 control to choose the language in the above table is valid...
Depending upon the channel selected and your speaker setup, the audio output varies according to specific track VCD Disc Search Time - DVD Search Time - VCD Track Search Time - Go to the following table. Viewing an Alternate Picture Angle (DVD Only) Some DVDs contain scenes that have been shot simultaneously from track one of the on the remote VM9410 control to choose the language in the above table is valid...
Owners Manual
Page 20
... help set the relative speaker levels for selection during playback. This will result in light blue and setup is not shown Return to enter the "DVD Setup" menu. To return to mono sources. Enter the option field for the feature you would like the DVD menu (if applicable) to be performed using the remote control or joystick controls. Adjust the time difference between 1 and 5 milliseconds, producing a more than 1 Subtitle or Audio...
... help set the relative speaker levels for selection during playback. This will result in light blue and setup is not shown Return to enter the "DVD Setup" menu. To return to mono sources. Enter the option field for the feature you would like the DVD menu (if applicable) to be performed using the remote control or joystick controls. Adjust the time difference between 1 and 5 milliseconds, producing a more than 1 Subtitle or Audio...

Owners Manual
Page 21
... by using your password Select "Reset" to restore the factory default settings for 2-channel mode, use the button (19) on remote control or the button on the joystick (17) to move to previous menu SURROUND SETUP Menu Multi-CH Stereo SURROUND SETUP FL DSP FR ASP RL RR SUB CTR To change speaker settings for setup. Kid Safe 2. PG-R 6. R 7. Adult Reset Function Enter a 4-digit password to select "Stereo". If the rating is not available on the joystick to activate...
... by using your password Select "Reset" to restore the factory default settings for 2-channel mode, use the button (19) on remote control or the button on the joystick (17) to move to previous menu SURROUND SETUP Menu Multi-CH Stereo SURROUND SETUP FL DSP FR ASP RL RR SUB CTR To change speaker settings for setup. Kid Safe 2. PG-R 6. R 7. Adult Reset Function Enter a 4-digit password to select "Stereo". If the rating is not available on the joystick to activate...
Owners Manual
Page 22
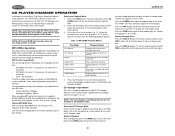
... 1/ DISC- Please use the remote control supplied with the track number and playing time appear on the joystick (17) to access files directly. Press the RDM button again to ISO 9660 file system standards, it is capable of all files on the joystick to choose from the following settings when compressing audio data for DVD, CD, CD Changer and MP3 operation. VM9410 CD PLAYER/CHANGER OPERATION Instructions for Insert/Eject, Play...
... 1/ DISC- Please use the remote control supplied with the track number and playing time appear on the joystick (17) to access files directly. Press the RDM button again to ISO 9660 file system standards, it is capable of all files on the joystick to choose from the following settings when compressing audio data for DVD, CD, CD Changer and MP3 operation. VM9410 CD PLAYER/CHANGER OPERATION Instructions for Insert/Eject, Play...
Owners Manual
Page 23
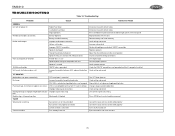
... one Remove battery and install correctly Check wiring and correct Increase volume level Review wiring diagram and check "MUTE" connection Replace speakers Adjust the channel balance to the center position Insulate all speaker wiring connections Use original copy Connect proper speakers Check speaker contact Check that "MUTE" connection is not grounded and that it's properly insulated Check wiring and correct Turn TFT Auto Open on Radio Fuse blown Car battery fuse blown Illegal operation Remote control does not function Battery depleted Battery installed incorrectly No/low audio output...
... one Remove battery and install correctly Check wiring and correct Increase volume level Review wiring diagram and check "MUTE" connection Replace speakers Adjust the channel balance to the center position Insulate all speaker wiring connections Use original copy Connect proper speakers Check speaker contact Check that "MUTE" connection is not grounded and that it's properly insulated Check wiring and correct Turn TFT Auto Open on Radio Fuse blown Car battery fuse blown Illegal operation Remote control does not function Battery depleted Battery installed incorrectly No/low audio output...
Owners Manual
Page 24
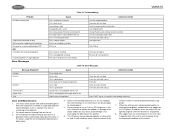
... Disc region code is not compatible with unit Disc is inserted upside down Disc format is not compatible with this product. 6. Use only a clean silicone cloth and neutral detergent to reach a normal temperature before operating the player again. 4. Do not attempt to cool before using player. 7. If this occur, the screen will not operate properly until the moisture has evaporated. 8. VM9410 Table 18: Troubleshooting Problem Disc does not play...
... Disc region code is not compatible with unit Disc is inserted upside down Disc format is not compatible with this product. 6. Use only a clean silicone cloth and neutral detergent to reach a normal temperature before operating the player again. 4. Do not attempt to cool before using player. 7. If this occur, the screen will not operate properly until the moisture has evaporated. 8. VM9410 Table 18: Troubleshooting Problem Disc does not play...

Owners Manual
Page 25
... through alteration, improper installation, mishandling, misuse, neglect, accident, or by removal or defacement of warranty station serving your area. Electronic Skip Protection (ESP): 16Mbit high-speed flash memory Video Format: NTSC, PAL (auto-detection) Output: 1Vp-p (75-ohm) Input: 1Vp-p (75-ohm) FM Tuner Tuning Range: 87.5MHz - 107.9MHz Mono Sensitivity (-30dB): 9dBf Quieting Sensitivity (-50dB): 15dBf Alternate Channel Selectivity: 70dB Signal to...
... through alteration, improper installation, mishandling, misuse, neglect, accident, or by removal or defacement of warranty station serving your area. Electronic Skip Protection (ESP): 16Mbit high-speed flash memory Video Format: NTSC, PAL (auto-detection) Output: 1Vp-p (75-ohm) Input: 1Vp-p (75-ohm) FM Tuner Tuning Range: 87.5MHz - 107.9MHz Mono Sensitivity (-30dB): 9dBf Quieting Sensitivity (-50dB): 15dBf Alternate Channel Selectivity: 70dB Signal to...


