Operating Instructions
Page 3
... If you take a few minutes to look through it, you'll learn how to follow. We hope you will find the instructions in this owner's manual clear and easy to use all the features of your new Jensen VM9314 Mobile Multimedia Receiver for choosing a Jensen product. VM9314 CONTENTS Thank you for maximum enjoyment.
... If you take a few minutes to look through it, you'll learn how to follow. We hope you will find the instructions in this owner's manual clear and easy to use all the features of your new Jensen VM9314 Mobile Multimedia Receiver for choosing a Jensen product. VM9314 CONTENTS Thank you for maximum enjoyment.

Operating Instructions
Page 7
...traffic accident (except when using for rear view video camera) never use irregular discs. WARNING! To prevent damage to the TFT monitor. VVARNINGS VM9314 WARNING! WARNING! WARNING! WARNING! WARNING! To reduce the risk of federal law. WARNING! To prevent damage to moisture or water. Never ...shock or fire, never expose this unit to the core mechanism, please do not push, pull or swivel the monitor manually. 4 Never use the video display function while driving the vehicle. The monitor employs an automatic motorized mechanism. Never disassemble or adjust ...
...traffic accident (except when using for rear view video camera) never use irregular discs. WARNING! To prevent damage to the TFT monitor. VVARNINGS VM9314 WARNING! WARNING! WARNING! WARNING! WARNING! To reduce the risk of federal law. WARNING! To prevent damage to moisture or water. Never ...shock or fire, never expose this unit to the core mechanism, please do not push, pull or swivel the monitor manually. 4 Never use the video display function while driving the vehicle. The monitor employs an automatic motorized mechanism. Never disassemble or adjust ...

Operating Instructions
Page 14
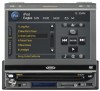
... the viewing position. If "TFT Auto Open" is set to "Auto" when the unit is turned on, the monitor automatically moves to the viewing position. VM9314 USING THE TFT MONITOR Open/Close TFT Monitor Open TFT Monitor Press the OPEN button (15) on the front panel or press the (tAJ) button... (25) on the remote control to "Manual", the TFT will not close when the key is turned off. TFT Monitor Auto Open If "TFT Auto Open" is set to activate the mechanism...
... the viewing position. If "TFT Auto Open" is set to "Auto" when the unit is turned on, the monitor automatically moves to the viewing position. VM9314 USING THE TFT MONITOR Open/Close TFT Monitor Open TFT Monitor Press the OPEN button (15) on the front panel or press the (tAJ) button... (25) on the remote control to "Manual", the TFT will not close when the key is turned off. TFT Monitor Auto Open If "TFT Auto Open" is set to activate the mechanism...

Operating Instructions
Page 25
... the enter key. Feature is not displayed when 24-hour Clock Mode is completed. SCREEN Sub-menu Features Setting Options Function TFT Auto Open Auto Manual Off Auto Dimmer On The TFT panel automatically opens when the unit is turned on. \/Vnen the ignition is turned OFF, the TFT panel DOES... button (15) to 23:59. Clock displays 24 hour time up to open the TFT panel. Backlight 0-12 TS Calibration Adjust Screen remains a constant brightness. VM9314 TIME Sub-menu Features Setting Clock Mode Month Day Year Hour Minutes AM/PM Options Function 12-hour 24-hour Jan-Dec 01-31 20__...
... the enter key. Feature is not displayed when 24-hour Clock Mode is completed. SCREEN Sub-menu Features Setting Options Function TFT Auto Open Auto Manual Off Auto Dimmer On The TFT panel automatically opens when the unit is turned on. \/Vnen the ignition is turned OFF, the TFT panel DOES... button (15) to 23:59. Clock displays 24 hour time up to open the TFT panel. Backlight 0-12 TS Calibration Adjust Screen remains a constant brightness. VM9314 TIME Sub-menu Features Setting Clock Mode Month Day Year Hour Minutes AM/PM Options Function 12-hour 24-hour Jan-Dec 01-31 20__...

Operating Instructions
Page 29
... connection to open the keypad and enter the pairing code or pass key required for selection during playback. Kid Safe 2. R 7. VM9314 BT (Bluetooth) Sub-menu Features setting Options Function Bluetooth On Off Auto On Answer Off Enable Bluetooth function. The unit automatically answers... all phones/deVices require a pairing code. NO TE: After entering a correct password in English when available. v;ous password. 26 Manually answer calls by touching the ~~ icon when disconnected. Touch the keypad icon to your paired phone is "1234". PG-13 5. The password...
... connection to open the keypad and enter the pairing code or pass key required for selection during playback. Kid Safe 2. R 7. VM9314 BT (Bluetooth) Sub-menu Features setting Options Function Bluetooth On Off Auto On Answer Off Enable Bluetooth function. The unit automatically answers... all phones/deVices require a pairing code. NO TE: After entering a correct password in English when available. v;ous password. 26 Manually answer calls by touching the ~~ icon when disconnected. Touch the keypad icon to your paired phone is "1234". PG-13 5. The password...
Operating Instructions
Page 68
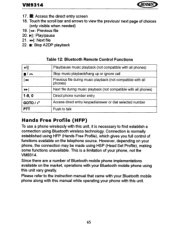
... came with your Bluetooth mobile phone along with this manual while operating your Bluetooth mobile phone using HFP (Hands Free Profile), which gives you full control of Bluetooth mobile phone implementations available on the telephone source. VM9314 17. Since there are a number of functions available on the market, operations with your phone...
... came with your Bluetooth mobile phone along with this manual while operating your Bluetooth mobile phone using HFP (Hands Free Profile), which gives you full control of Bluetooth mobile phone implementations available on the telephone source. VM9314 17. Since there are a number of functions available on the market, operations with your phone...
Operating Instructions
Page 69
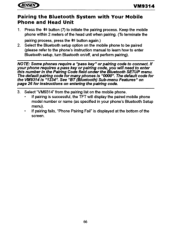
... displayed at the bottom of the head unit when pairing. (To terminate the .» pairing process, press the button again.) 2. Select 'VM9314" from the pairing list on the mobile phone. • If pairing is successful, the TFT will need to connect. See "BT (Bluetooth) Sub-menu...many phones is "0000". Keep the mobile phone within 2 meters of the screen. 66 Select the Bluetooth setup option on /off, and perform pairing). VM9314 Pairing the Bluetooth System with Your Mobile Phone and Head Unit .» 1. Press the button (7) to enter Bluetooth setup, turn Bluetooth on the mobile ...
... displayed at the bottom of the head unit when pairing. (To terminate the .» pairing process, press the button again.) 2. Select 'VM9314" from the pairing list on the mobile phone. • If pairing is successful, the TFT will need to connect. See "BT (Bluetooth) Sub-menu...many phones is "0000". Keep the mobile phone within 2 meters of the screen. 66 Select the Bluetooth setup option on /off, and perform pairing). VM9314 Pairing the Bluetooth System with Your Mobile Phone and Head Unit .» 1. Press the button (7) to enter Bluetooth setup, turn Bluetooth on the mobile ...

Operating Instructions
Page 82
... operation and viewing could interfere with Battery 3.5mm to 3.5mm Media Adaptor Cable Owners Manual Installation Guide Tools and Supplies You will need these tools and supplies to install your VM9314: Torx type, flat-head and Philips screwdrivers Wire cutters and strippers Tools to remove existing... tool Volt meter/test light Crimp connections 18 gauge wire for power connections 16 - 18 gauge speaker wire WARNING! VM9314 What's in the Box VM9314 Head Unit Single 01 N Sleeve Wiring Harness Parking Brake Sensor Extension Wire Mounting Hardware3 Voice control microphone with mounting brackets...
... operation and viewing could interfere with Battery 3.5mm to 3.5mm Media Adaptor Cable Owners Manual Installation Guide Tools and Supplies You will need these tools and supplies to install your VM9314: Torx type, flat-head and Philips screwdrivers Wire cutters and strippers Tools to remove existing... tool Volt meter/test light Crimp connections 18 gauge wire for power connections 16 - 18 gauge speaker wire WARNING! VM9314 What's in the Box VM9314 Head Unit Single 01 N Sleeve Wiring Harness Parking Brake Sensor Extension Wire Mounting Hardware3 Voice control microphone with mounting brackets...

Operating Instructions
Page 94
...excessive temperature, extreme environmental conditions or external natural causes Please review the "Care and Maintenance" section of your Installation and Operation Manual for additional information regarding the proper use , be repaired or replaced with a new or reconditioned product (at 1-800323-4815...the Company at the Company's option) without charge for parts and repair labor. Limited Warranty CD or Multimedia Radios/Headunits Audiovox Electronics Corporation ("the Company") is authorized to assume for the Company any questions. No person or representative is committed to...
...excessive temperature, extreme environmental conditions or external natural causes Please review the "Care and Maintenance" section of your Installation and Operation Manual for additional information regarding the proper use , be repaired or replaced with a new or reconditioned product (at 1-800323-4815...the Company at the Company's option) without charge for parts and repair labor. Limited Warranty CD or Multimedia Radios/Headunits Audiovox Electronics Corporation ("the Company") is authorized to assume for the Company any questions. No person or representative is committed to...


