Instruction Manual
Page 3
...) Code 23 Selecting a Station ...23 Preset Mode...23 Channel/Category Guide Mode 23 Direct Tuning...23 XM Setup Menu ...24 Troubleshooting 25 Error Messages...26 Care and Maintenance 27 Specifications 28 12-Month Limited Warranty 28 i CONTENTS Thank you for maximum enjoyment. Preparation ...1 Features ...1 Tools and Supplies...1 Optional Accessories ...1 Disconnecting the Battery 2 Installation ...5 Pre-installation ...5 Wiring ...5 Final Installation ...5 Final ISO-DIN Installation 5 Controls and Indicators 6 Button Operation ...6 LCD Display/Indicators 8 Remote Control 9 Using...
...) Code 23 Selecting a Station ...23 Preset Mode...23 Channel/Category Guide Mode 23 Direct Tuning...23 XM Setup Menu ...24 Troubleshooting 25 Error Messages...26 Care and Maintenance 27 Specifications 28 12-Month Limited Warranty 28 i CONTENTS Thank you for maximum enjoyment. Preparation ...1 Features ...1 Tools and Supplies...1 Optional Accessories ...1 Disconnecting the Battery 2 Installation ...5 Pre-installation ...5 Wiring ...5 Final Installation ...5 Final ISO-DIN Installation 5 Controls and Indicators 6 Button Operation ...6 LCD Display/Indicators 8 Remote Control 9 Using...
Instruction Manual
Page 7
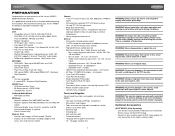
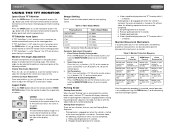
...; Rotary encoder audio control • Joystick menu navigation Tools and Supplies You will need these tools and supplies to install your purchase of federal law. To prevent damage to read all channels • 1-pair Front RCA outputs • 1-pair Rear RCA outputs • Single Subwoofer RCA output • 1-pair Auxiliary RCA A/V inputs • Flex fader • Front panel (when screen is a violation of the Jensen VM9311 Mobile Multimedia Receiver. To...
...; Rotary encoder audio control • Joystick menu navigation Tools and Supplies You will need these tools and supplies to install your purchase of federal law. To prevent damage to read all channels • 1-pair Front RCA outputs • 1-pair Rear RCA outputs • Single Subwoofer RCA output • 1-pair Auxiliary RCA A/V inputs • Flex fader • Front panel (when screen is a violation of the Jensen VM9311 Mobile Multimedia Receiver. To...

Instruction Manual
Page 11
... damaging the radio. FINAL INSTALLATION 5 4 1 77--IINNBCCAHHNDDTIFGTITAL TFT AS/PS VM9510 Push MUTE PWR AM/FM/DVD/MP3 RECEIVER DISP OPEN MODE AV AUX IN Push ENTER 3 2 Final ISO-DIN Installation 1. Mount factory brackets on pages 3 and 4. Once proper operation is mounted within 20° of the chassis using the hex nut provided. INSTALL HALF SLEEVE Final Installation After completing the wiring connections, turn off the ignition switch and...
... damaging the radio. FINAL INSTALLATION 5 4 1 77--IINNBCCAHHNDDTIFGTITAL TFT AS/PS VM9510 Push MUTE PWR AM/FM/DVD/MP3 RECEIVER DISP OPEN MODE AV AUX IN Push ENTER 3 2 Final ISO-DIN Installation 1. Mount factory brackets on pages 3 and 4. Once proper operation is mounted within 20° of the chassis using the hex nut provided. INSTALL HALF SLEEVE Final Installation After completing the wiring connections, turn off the ignition switch and...

Instruction Manual
Page 12
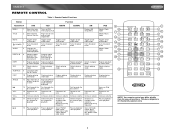
... access picture settings. 3. ( ) Press the button (3) to play preset radio station channel 1. POWER/MUTE Press the POWER/MUTE button (7) once to adjust the volume. TUNER Mode: Press once to adjust the upward tilt angle of the screen one step at a time. VOL/LOC/DX Rotate the VOL/LOC/DX knob (6) to turn the unit off. Press and hold to store the current radio station in preset channel 2. 6 VM9311 Press again to activate the Local (LOC) setting. 7. WIDE/PICTURE...
... access picture settings. 3. ( ) Press the button (3) to play preset radio station channel 1. POWER/MUTE Press the POWER/MUTE button (7) once to adjust the volume. TUNER Mode: Press once to adjust the upward tilt angle of the screen one step at a time. VOL/LOC/DX Rotate the VOL/LOC/DX knob (6) to turn the unit off. Press and hold to store the current radio station in preset channel 2. 6 VM9311 Press again to activate the Local (LOC) setting. 7. WIDE/PICTURE...

Instruction Manual
Page 13
... preset channels in preset channel 5. 13. 6/STOP DVD Mode: Press once to store the current radio station in the current band. 19. ( ) DVD Mode: Press once for disc insertion/ejection. TUNER Mode: Press to confirm a selection. 21. ( ) Press once for slow forward. IR Remote Control Receiver 26. Press once to go up . TUNER Mode: Press to factory default (except the password and parental lock setting). 23. RESET Press to reset system settings to go down . 20. MENU Mode...
... preset channels in preset channel 5. 13. 6/STOP DVD Mode: Press once to store the current radio station in the current band. 19. ( ) DVD Mode: Press once for disc insertion/ejection. TUNER Mode: Press to confirm a selection. 21. ( ) Press once for slow forward. IR Remote Control Receiver 26. Press once to go up . TUNER Mode: Press to factory default (except the password and parental lock setting). 23. RESET Press to reset system settings to go down . 20. MENU Mode...
Instruction Manual
Page 15
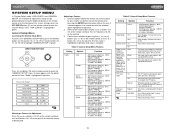
... playback from time frame A to time frame B Repeats playback of current chapter Selects playing mode Selects playing mode Displays playing information Plays back Picture CD with different angle of current track Selects playing mode Display playing information Accesses iPod Menu Decreases volume Increases volume Pauses playback/ starts playback NOTE: Your remote control may differ slightly from the one pictured here. plays/ stores radio station; deletes radio station Selects Photo mode Selects Music mode Toggles on/off audio output Turns the power on /off Selects Video mode Repeats...
... playback from time frame A to time frame B Repeats playback of current chapter Selects playing mode Selects playing mode Displays playing information Plays back Picture CD with different angle of current track Selects playing mode Display playing information Accesses iPod Menu Decreases volume Increases volume Pauses playback/ starts playback NOTE: Your remote control may differ slightly from the one pictured here. plays/ stores radio station; deletes radio station Selects Photo mode Selects Music mode Toggles on/off audio output Turns the power on /off Selects Video mode Repeats...
Instruction Manual
Page 16
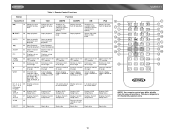
...Directly accesses 1-6 selects preset for current band track for current band DVD SETUP 30 Displays DVD Setup menu Displays DVD Setup menu Displays DVD Setup menu Displays DVD Setup menu Displays DVD Setup menu Displays DVD Setup menu SYS SETUP 31 Displays System Displays System Displays System Displays System Displays System Displays System Setup menu Setup menu Setup menu Setup menu Setup menu Setup menu SCAN 34 Plays the first ten seconds of each track EJECT 35 Ejects disc Ejects disc Ejects disc Ejects disc Ejects disc Ejects disc VM9311 NOTE: Your remote control...
...Directly accesses 1-6 selects preset for current band track for current band DVD SETUP 30 Displays DVD Setup menu Displays DVD Setup menu Displays DVD Setup menu Displays DVD Setup menu Displays DVD Setup menu Displays DVD Setup menu SYS SETUP 31 Displays System Displays System Displays System Displays System Displays System Displays System Setup menu Setup menu Setup menu Setup menu Setup menu Setup menu SCAN 34 Plays the first ten seconds of each track EJECT 35 Ejects disc Ejects disc Ejects disc Ejects disc Ejects disc Ejects disc VM9311 NOTE: Your remote control...
Instruction Manual
Page 17
... 2: Video Output Modes Playing Source Video Output Modes AM/FM TUNER YUV Mode XM TUNER YUV Mode iPod YUV Mode DVD YUV Mode AUX IN CVBS Mode *CVBS - Enter Picture Quality Setting mode: Press the PIC button (24) on the remote or press and hold the ( ) or ( ) button (3, 4) on the monitor frame to adjust the tilt angle of the display. The monitor angle can be adjusted for each playing source. Aspect Ratio Press the WIDE button (28) on the remote control...
... 2: Video Output Modes Playing Source Video Output Modes AM/FM TUNER YUV Mode XM TUNER YUV Mode iPod YUV Mode DVD YUV Mode AUX IN CVBS Mode *CVBS - Enter Picture Quality Setting mode: Press the PIC button (24) on the remote or press and hold the ( ) or ( ) button (3, 4) on the monitor frame to adjust the tilt angle of the display. The monitor angle can be adjusted for each playing source. Aspect Ratio Press the WIDE button (28) on the remote control...

Instruction Manual
Page 18
...: Tuner, DVD/CD, XM, iPod, Aux In, Camera (rear view video camera) and TV. AUX IN Mode An external peripheral device can be connected to this unit via standard RCA connectors for 3 seconds. Programmable Turn-On Volume This feature allows the user to select a turn-on the screen. To program a specific volume level, push and hold the /MUTE button (1) on the front panel or the POWER button (4) on remote control. "MUTE" is drawn back into the main compartment and the LCD screen displays "BYE...
...: Tuner, DVD/CD, XM, iPod, Aux In, Camera (rear view video camera) and TV. AUX IN Mode An external peripheral device can be connected to this unit via standard RCA connectors for 3 seconds. Programmable Turn-On Volume This feature allows the user to select a turn-on the screen. To program a specific volume level, push and hold the /MUTE button (1) on the front panel or the POWER button (4) on remote control. "MUTE" is drawn back into the main compartment and the LCD screen displays "BYE...
Instruction Manual
Page 19
DIRECTION BUTTONS Press the >/|| button (18) on the remote control to enter the "System Setup" menu. For system settings, press the SYS SETUP button (31) on the remote control to enter the "GENERAL SETUP" menu. A submenu appears in a second row with the option for the first item, "Radio", highlighted in light blue. VM9311 SYSTEM SETUP MENU In "System Setup" mode, "ASP CONFIG" and "GENERAL SETUP" are available for Adjustment Press the >> or /|| button (18) on the...
DIRECTION BUTTONS Press the >/|| button (18) on the remote control to enter the "System Setup" menu. For system settings, press the SYS SETUP button (31) on the remote control to enter the "GENERAL SETUP" menu. A submenu appears in a second row with the option for the first item, "Radio", highlighted in light blue. VM9311 SYSTEM SETUP MENU In "System Setup" mode, "ASP CONFIG" and "GENERAL SETUP" are available for Adjustment Press the >> or /|| button (18) on the...

Instruction Manual
Page 20
..." Menu, press the direction buttons on the joystick (16, 17, 18, 19) or remote control (14, 17, 18, 19, 22) to adjust by pressing the >/|| button (18) on the joystick to adjust the hour or minutes. 3. Adjusting the Clock Method 1 - Enter the option field for the first item, "Bass Center Freq", highlighted in light blue. 2. Access the "Clock" setting under the General Setup menu. 2. A menu appears with the selected...
..." Menu, press the direction buttons on the joystick (16, 17, 18, 19) or remote control (14, 17, 18, 19, 22) to adjust by pressing the >/|| button (18) on the joystick to adjust the hour or minutes. 3. Adjusting the Clock Method 1 - Enter the option field for the first item, "Bass Center Freq", highlighted in light blue. 2. Access the "Clock" setting under the General Setup menu. 2. A menu appears with the selected...

Instruction Manual
Page 21
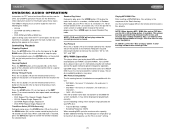
VM9311 AM/FM TUNER OPERATION Tuner TFT Display Switch to Radio Tuner source Press the SRC button (15) on the joystick (17) to seek the next station higher. Press the | Seek Tuning Press the >>| button (19) on remote control or the > button on the front panel or remote control (8) to switch to change between the following bands: FM1, FM2, FM3, AM1, and AM2. Select FM/AM Band Press the BAND button (14) on the front panel or the remote control (20) to the RADIO TUNER source. The Tuner TFT or LCD display appears.
VM9311 AM/FM TUNER OPERATION Tuner TFT Display Switch to Radio Tuner source Press the SRC button (15) on the joystick (17) to seek the next station higher. Press the | Seek Tuning Press the >>| button (19) on remote control or the > button on the front panel or remote control (8) to switch to change between the following bands: FM1, FM2, FM3, AM1, and AM2. Select FM/AM Band Press the BAND button (14) on the front panel or the remote control (20) to the RADIO TUNER source. The Tuner TFT or LCD display appears.

Instruction Manual
Page 22
... to eject the disc. Rear video screens, if applicable, will not play begins. The selected portion of the repeated section. "Shuffle Off" appears on the DVD. Normal operation resumes. DVD LCD Display 3 1 2 1. Press the RDM button again to cancel the A-B section setting and stop DVD play all chapters/ tracks in the "IN" position, it moves out before closing. Accessing the DVD Menu Press the MENU button (1) on the remote control to...
... to eject the disc. Rear video screens, if applicable, will not play begins. The selected portion of the repeated section. "Shuffle Off" appears on the DVD. Normal operation resumes. DVD LCD Display 3 1 2 1. Press the RDM button again to cancel the A-B section setting and stop DVD play all chapters/ tracks in the "IN" position, it moves out before closing. Accessing the DVD Menu Press the MENU button (1) on the remote control to...

Instruction Manual
Page 23
... remote control to the specified location on the screen including the media playing and current playback time. The following options: "Q1", "Q2", "Q3", and "OFF". Direct Chapter / Track Selection During DVD, VCD and CD playback, you are watching a disc recorded in multiple languages, press the AUDIO button (5) on the remote control to specific time in the current track Track - PBC (Play back Control) (VCD Only) For VCDs with play back functionality, play...
... remote control to the specified location on the screen including the media playing and current playback time. The following options: "Q1", "Q2", "Q3", and "OFF". Direct Chapter / Track Selection During DVD, VCD and CD playback, you are watching a disc recorded in multiple languages, press the AUDIO button (5) on the remote control to specific time in the current track Track - PBC (Play back Control) (VCD Only) For VCDs with play back functionality, play...

Instruction Manual
Page 25
... the DVD Setup menu. This operation can be loaded into the mechanism and playing prior to access the DVD Setup menu. NOTE: Once the DVD setup is highlighted in light blue. 2. Selecting a Feature for setup. In "DVD Setup" mode, "LANGUAGE", "VIDEO", "AUDIO" and "RATING" (parental lock) are memorized. VM9311 DVD/DISC SETUP MENU NOTE: A DVD/disc must be performed using the remote control or joystick controls. Accessing the DVD Setup Screen For system settings, press the DVD SETUP button (31) on the remote control to the factory default settings, press the RESET button...
... the DVD Setup menu. This operation can be loaded into the mechanism and playing prior to access the DVD Setup menu. NOTE: Once the DVD setup is highlighted in light blue. 2. Selecting a Feature for setup. In "DVD Setup" mode, "LANGUAGE", "VIDEO", "AUDIO" and "RATING" (parental lock) are memorized. VM9311 DVD/DISC SETUP MENU NOTE: A DVD/disc must be performed using the remote control or joystick controls. Accessing the DVD Setup Screen For system settings, press the DVD SETUP button (31) on the remote control to the factory default settings, press the RESET button...
Instruction Manual
Page 27
... the remote control to a disc for easy music navigation. For recording on the disc. Please see the DVD/Disc Video Operation section for DVD, CD and MP3 operation. This slower burning speed will play . NOTE: When burning MP3 / WMA files onto a DVD disc, use folders when burning large numbers of the "Root' directory. In addition, select the "Disc at once" setting. VM9311 DVD/DISC AUDIO OPERATION Instructions for TFT control and Insert/Eject are compatible with the track number and playing time...
... the remote control to a disc for easy music navigation. For recording on the disc. Please see the DVD/Disc Video Operation section for DVD, CD and MP3 operation. This slower burning speed will play . NOTE: When burning MP3 / WMA files onto a DVD disc, use folders when burning large numbers of the "Root' directory. In addition, select the "Disc at once" setting. VM9311 DVD/DISC AUDIO OPERATION Instructions for TFT control and Insert/Eject are compatible with the track number and playing time...

Instruction Manual
Page 29
... Guide mode press, the ZOOM button (23) on the joystick repeatedly to tune to channel 000. Channel Guide is selected, "Search Mode" and "CHANNEL" appear in the bottom half of the TFT screen. Each page contains six channels to select the corresponding stored station. VM9311 XM® RADIO OPERATION Listeners can receive a limited number of free-to-air channels without activation. Customers should have their Radio ID ready (see "Displaying the Identification (ID) Code"). The preset station...
... Guide mode press, the ZOOM button (23) on the joystick repeatedly to tune to channel 000. Channel Guide is selected, "Search Mode" and "CHANNEL" appear in the bottom half of the TFT screen. Each page contains six channels to select the corresponding stored station. VM9311 XM® RADIO OPERATION Listeners can receive a limited number of free-to-air channels without activation. Customers should have their Radio ID ready (see "Displaying the Identification (ID) Code"). The preset station...
Instruction Manual
Page 31
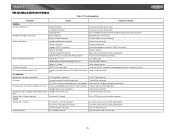
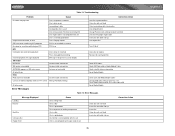
... blocked TUNER Weak station searching Auto antenna is not fully extended Auto antenna not properly connected LOCAL function is not compatible with new one 25 VM9311 TROUBLESHOOTING Table 13: Troubleshooting Problem Cause Corrective Action GENERAL Unit will not power on Radio Fuse blown Car battery fuse blown Illegal operation Remote control does not function Battery depleted Battery installed incorrectly No/low audio output Improper audio output connection Volume set too low Improper "MUTE" connection Speakers damaged Heavily biased volume balance Speaker wiring is...
... blocked TUNER Weak station searching Auto antenna is not fully extended Auto antenna not properly connected LOCAL function is not compatible with new one 25 VM9311 TROUBLESHOOTING Table 13: Troubleshooting Problem Cause Corrective Action GENERAL Unit will not power on Radio Fuse blown Car battery fuse blown Illegal operation Remote control does not function Battery depleted Battery installed incorrectly No/low audio output Improper audio output connection Volume set too low Improper "MUTE" connection Speakers damaged Heavily biased volume balance Speaker wiring is...
Instruction Manual
Page 32
... code Insert disc with label side up Use original disc Turn PCB off Clean disc or replace Recreate disc with good files Check RCA cables Check XM Data cable or Media Module Cable Check satellite antenna connection Reset Media Module Check jLink and Media Module cables Change iPod video settings to TV Out = On Check Media Module yellow RCA video input cable Reset Media Module Table 14: Error Messages Loading No Disc Message Displayed Bad Disc Unknown disc Region Error...
... code Insert disc with label side up Use original disc Turn PCB off Clean disc or replace Recreate disc with good files Check RCA cables Check XM Data cable or Media Module Cable Check satellite antenna connection Reset Media Module Check jLink and Media Module cables Change iPod video settings to TV Out = On Check Media Module yellow RCA video input cable Reset Media Module Table 14: Error Messages Loading No Disc Message Displayed Bad Disc Unknown disc Region Error...
Instruction Manual
Page 34
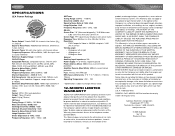
... up • 65 degrees down General Auxiliary Input impedance: 10k Power Supply: 11 to 16VDC, negative ground Power Antenna (Blue): 500mA max, current limited protection Amplifier Remote (Blue/White): 500mA, current limited protection Fuse: 15-amp, mini ATM type DIN chassis dimensions: 2" X 7" X 7" (50mm x 178mm x 178mm) Operating Temperature: -20C ~ 70C * Specifications subject to change without charge for location of the factory serial number/bar code label(s) or markings. THE EXTENT OF...
... up • 65 degrees down General Auxiliary Input impedance: 10k Power Supply: 11 to 16VDC, negative ground Power Antenna (Blue): 500mA max, current limited protection Amplifier Remote (Blue/White): 500mA, current limited protection Fuse: 15-amp, mini ATM type DIN chassis dimensions: 2" X 7" X 7" (50mm x 178mm x 178mm) Operating Temperature: -20C ~ 70C * Specifications subject to change without charge for location of the factory serial number/bar code label(s) or markings. THE EXTENT OF...


