
Owners Manual
Page 1
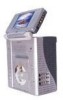
VBP5000 VIDEO IN A BAG SYSTEM WITH 5.6" LCD MONITOR VCP & DVD PLAYER
VBP5000 VIDEO IN A BAG SYSTEM WITH 5.6" LCD MONITOR VCP & DVD PLAYER
Owners Manual
Page 2
...: The AC Adaptor will assist you can be utilized and stored separately from the main unit. INTRODUCTION Thank you for use . The VBP5000 utilizes state of reliable, trouble-free service. The LCD monitor is designed for later use in installing the system properly to operation. A.... the best equipment performance. The system's main features include a 5.6" Liquid Crystal Display (LCD) Monitor Video Cassette Payer (VCP) and a DVD Player. All documentation should be purchased and added to the system setup* allowing you do not allow children to unfasten seat-belts to change video ...
...: The AC Adaptor will assist you can be utilized and stored separately from the main unit. INTRODUCTION Thank you for use . The VBP5000 utilizes state of reliable, trouble-free service. The LCD monitor is designed for later use in installing the system properly to operation. A.... the best equipment performance. The system's main features include a 5.6" Liquid Crystal Display (LCD) Monitor Video Cassette Payer (VCP) and a DVD Player. All documentation should be purchased and added to the system setup* allowing you do not allow children to unfasten seat-belts to change video ...
Owners Manual
Page 4
... do not expose this manual. Operate the "Video in a Bag" System with the instructions and illustrations provided in the event of the VBP5000 system (Monitor/VCP/DVD Player). Do not use . The "S" hooks and all straps must be mounted for about one hour before operating the unit, or remove the...turned on until the moisture evaporates. 2. If the unit is intended to rain or moisture. INSTALLATION Ensure that the LCD Monitor, VCP, DVD Player, Bag and Pouch are installed in accordance with the bag open to secure the system in the vehicle in this appliance to be fastened ...
... do not expose this manual. Operate the "Video in a Bag" System with the instructions and illustrations provided in the event of the VBP5000 system (Monitor/VCP/DVD Player). Do not use . The "S" hooks and all straps must be mounted for about one hour before operating the unit, or remove the...turned on until the moisture evaporates. 2. If the unit is intended to rain or moisture. INSTALLATION Ensure that the LCD Monitor, VCP, DVD Player, Bag and Pouch are installed in accordance with the bag open to secure the system in the vehicle in this appliance to be fastened ...
Owners Manual
Page 7
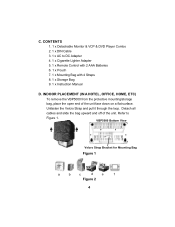
... Bracket for Mounting Bag Figure 1 a b c d e f Figure 2 4 INDOOR PLACEMENT (IN A HOTEL, OFFICE, HOME, ETC) To remove the VBP5000 from the protective mounting/storage bag, place the open end of the unit. CONTENTS 1. 1 x Detachable Monitor & VCP & DVD Player Combo 2. 1 x DIN Cable 3. 1 x AC to Figure 1. Unfasten the Velcro Strap and pull it through the loop. Detach...
... Bracket for Mounting Bag Figure 1 a b c d e f Figure 2 4 INDOOR PLACEMENT (IN A HOTEL, OFFICE, HOME, ETC) To remove the VBP5000 from the protective mounting/storage bag, place the open end of the unit. CONTENTS 1. 1 x Detachable Monitor & VCP & DVD Player Combo 2. 1 x DIN Cable 3. 1 x AC to Figure 1. Unfasten the Velcro Strap and pull it through the loop. Detach...

Owners Manual
Page 12
fully place the system with the screen facing either front (refer to Figure 8a) or rear (refer to move around. Finally uncover the attached monitor and adjust the screen for a de- Then secure and adjust the safety belt so that the unit is not free to Figure 8b). Care- Guide the vehicles safety belt through the short strap sewn on the back seat. The Monitor can be inserted into the slot with the DVD facing up on the bottom of the mounting bag. sired viewing angle. *Optional Second Video Monitor Part #VBDV56 Figure 9 9 3. On the Back Seat a b Figure 8 a.
fully place the system with the screen facing either front (refer to Figure 8a) or rear (refer to move around. Finally uncover the attached monitor and adjust the screen for a de- Then secure and adjust the safety belt so that the unit is not free to Figure 8b). Care- Guide the vehicles safety belt through the short strap sewn on the back seat. The Monitor can be inserted into the slot with the DVD facing up on the bottom of the mounting bag. sired viewing angle. *Optional Second Video Monitor Part #VBDV56 Figure 9 9 3. On the Back Seat a b Figure 8 a.
Owners Manual
Page 18
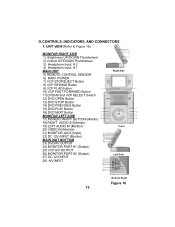
... VCP STOP/EJECT Button 8) VCP REWIND Button 9) VCP PLAY Button 10) VCP FAST FORWARD Button 11) DVD/AV and VCP SELECT Switch 12) DVD OPEN Button 13) DVD STOP Button 14) DVD PREVIOUS Button 15) DVD PLAY Button 16) DVD NEXT Button MONITOR LEFT SIDE 17) POWER ON/OFF BUTTON (Monitor) 18) RIGHT AUDIO IN (Monitor...) 19) LEFT AUDIO IN (Monitor) 20) VIDEO IN (Monitor) 21) MONITOR JACK (Input) 22) DC 12V INPUT (Monitor) MAIN UNIT BOTTOM 23) DVD/AV OUTPUT 24) MONITOR PORT #1 (Output) 25) VCP A/V OUTPUT 26) MONITOR PORT #2 (Output) 27) DC 12V INPUT 28) A/V INPUT Right Side Front Left Side...
... VCP STOP/EJECT Button 8) VCP REWIND Button 9) VCP PLAY Button 10) VCP FAST FORWARD Button 11) DVD/AV and VCP SELECT Switch 12) DVD OPEN Button 13) DVD STOP Button 14) DVD PREVIOUS Button 15) DVD PLAY Button 16) DVD NEXT Button MONITOR LEFT SIDE 17) POWER ON/OFF BUTTON (Monitor) 18) RIGHT AUDIO IN (Monitor...) 19) LEFT AUDIO IN (Monitor) 20) VIDEO IN (Monitor) 21) MONITOR JACK (Input) 22) DC 12V INPUT (Monitor) MAIN UNIT BOTTOM 23) DVD/AV OUTPUT 24) MONITOR PORT #1 (Output) 25) VCP A/V OUTPUT 26) MONITOR PORT #2 (Output) 27) DC 12V INPUT 28) A/V INPUT Right Side Front Left Side...

Owners Manual
Page 19
...Figure 17) 1) POWER Button 2) DISPLAY Button 3) DVD ANGLE Button 4) DVD SUBTITLE Button 5) DVD AUDIO Button 6) DVD ZOOM Button 7) DVD UP/DOWN/LEFT/RIGHT/ ENTER Buttons 8) DVD MENU Button 9) DVD Return Button 10) DVD A-B Button 11) DVD NEXT Button 12) DVD PREVIOUS Button 13) DVD REVERSE Button 14) DVD FORWARD Button 15) VCP EJECT Button * 16)... VCP POWER Button 17) VCP PAUSE Button 18) VCP STOP Button 19) DVD NUMBER Button 20) DVD SETUP Button 21) DVD REPEAT Button 22) DVD PAUSE Button 23) DVD PLAY Button 24) DVD STOP Button 25) DVD SLOW Button 26) VCP PLAY Button 27) VCP FAST FORWARD Button 28)...
...Figure 17) 1) POWER Button 2) DISPLAY Button 3) DVD ANGLE Button 4) DVD SUBTITLE Button 5) DVD AUDIO Button 6) DVD ZOOM Button 7) DVD UP/DOWN/LEFT/RIGHT/ ENTER Buttons 8) DVD MENU Button 9) DVD Return Button 10) DVD A-B Button 11) DVD NEXT Button 12) DVD PREVIOUS Button 13) DVD REVERSE Button 14) DVD FORWARD Button 15) VCP EJECT Button * 16)... VCP POWER Button 17) VCP PAUSE Button 18) VCP STOP Button 19) DVD NUMBER Button 20) DVD SETUP Button 21) DVD REPEAT Button 22) DVD PAUSE Button 23) DVD PLAY Button 24) DVD STOP Button 25) DVD SLOW Button 26) VCP PLAY Button 27) VCP FAST FORWARD Button 28)...
Owners Manual
Page 20
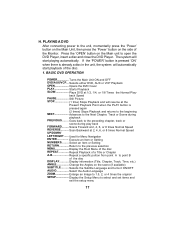
... the unit, momentarily press the 'Power' button on the Main Unit, then press the 'Power' button on the Main unit to open the DVD Player, insert a disc and close the DVD Player. back Speed PAUSE Still Picture STOP 1 time) Stops Playback and will resume at 2, 4, 6, or 8 times Normal Speed REVERSE.......... Scan Backward at 1/2, 1/4, or...
... the unit, momentarily press the 'Power' button on the Main Unit, then press the 'Power' button on the Main unit to open the DVD Player, insert a disc and close the DVD Player. back Speed PAUSE Still Picture STOP 1 time) Stops Playback and will resume at 2, 4, 6, or 8 times Normal Speed REVERSE.......... Scan Backward at 1/2, 1/4, or...

Owners Manual
Page 21
... after 3 seconds if no buttons are pressed. Title Remaining Time Screen Display 18 During playback press 'DISPLAY' to select disc playback options using the DVD menu. 3. When you to display the current Title Number (1), the total Number of Titles (2), the current Chapter Number (3), the total Number of the... title. Some DVDs only allow you play a DVD, a root menu of the disc will appear on the screen of the menu vary from disc to start playing. Press MENU during...
... after 3 seconds if no buttons are pressed. Title Remaining Time Screen Display 18 During playback press 'DISPLAY' to select disc playback options using the DVD menu. 3. When you to display the current Title Number (1), the total Number of Titles (2), the current Chapter Number (3), the total Number of the... title. Some DVDs only allow you play a DVD, a root menu of the disc will appear on the screen of the menu vary from disc to start playing. Press MENU during...

Owners Manual
Page 29
SKIPPING SONGS Use the Next ( uu ) button on the Remote Control to navigate through the folder list on your DVD player. SELECTING FOLDERS AND SONGS When an MP3 disc is a format for storing digital audio. MP3 MP3 MP3 MP3 MP3 SMART NAV Screen Display 3. Press the ...button again to move to the next song. 5. PLAYING MP3 DISCS MP3 is inserted in the player, the SMART NAV screen will appear automatically. The SMART NAV screen is highlighted, press 'ENTER' (the folder list shifts to change folders and songs as...
SKIPPING SONGS Use the Next ( uu ) button on the Remote Control to navigate through the folder list on your DVD player. SELECTING FOLDERS AND SONGS When an MP3 disc is a format for storing digital audio. MP3 MP3 MP3 MP3 MP3 SMART NAV Screen Display 3. Press the ...button again to move to the next song. 5. PLAYING MP3 DISCS MP3 is inserted in the player, the SMART NAV screen will appear automatically. The SMART NAV screen is highlighted, press 'ENTER' (the folder list shifts to change folders and songs as...

Owners Manual
Page 39
... fast forward indicator lamp will rewind at a very high speed without any picture or sound. BASIC VIDEO CASSETTE OPERATION Power Turn the unit ON/OFF DVD/AUX/VCP Choose the VCP mode Play To playback tape Stop/Eject To stop mode, the tape will blink. Press it in the playback mode...
... fast forward indicator lamp will rewind at a very high speed without any picture or sound. BASIC VIDEO CASSETTE OPERATION Power Turn the unit ON/OFF DVD/AUX/VCP Choose the VCP mode Play To playback tape Stop/Eject To stop mode, the tape will blink. Press it in the playback mode...

Owners Manual
Page 40
... and the brightness control on the side of the monitor, which takes priority over both AV input into the main unit and the built-in DVD player. Plug the video output from your game system into the yellow video jack and the Audio L and Audio R into the applicable jacks on the monitor... individual preference. 37 Adjust the volume control and the brightness control on the side of the main unit, which takes priority over the built-in DVD player.
... and the brightness control on the side of the monitor, which takes priority over both AV input into the main unit and the built-in DVD player. Plug the video output from your game system into the yellow video jack and the Audio L and Audio R into the applicable jacks on the monitor... individual preference. 37 Adjust the volume control and the brightness control on the side of the main unit, which takes priority over the built-in DVD player.

Owners Manual
Page 42
M. SPECIFICATION Color system: NTSC Screen size: 5.6" Disc format: DVD/CD/MP3 DVD video format: Horizontal 720 pixel, vertical 480 pixel (NTSC) Frequency response: DVD (PCM 96 kHz/24 bits ): 20 Hz to 44 kHz DVD (PCM 48 kHz): 20 Hz to 22 kHz CD: 20 Hz to 20 kHz Tape Width: 12.7mm Tape Speed... 11 V to Red. 2. Using VIDEO, AUDIO L, AUDIO R outputs for connection to any monitor (Refer to Figure 18) Match the color-coded plugs to the appropriate DVD OUT jacks or VCP OUT jacks on the side of the main unit: Yellow (VIDEO) to Yellow, White (AUDIO L) to White, and Red (AUDIO R) to...
M. SPECIFICATION Color system: NTSC Screen size: 5.6" Disc format: DVD/CD/MP3 DVD video format: Horizontal 720 pixel, vertical 480 pixel (NTSC) Frequency response: DVD (PCM 96 kHz/24 bits ): 20 Hz to 44 kHz DVD (PCM 48 kHz): 20 Hz to 22 kHz CD: 20 Hz to 20 kHz Tape Width: 12.7mm Tape Speed... 11 V to Red. 2. Using VIDEO, AUDIO L, AUDIO R outputs for connection to any monitor (Refer to Figure 18) Match the color-coded plugs to the appropriate DVD OUT jacks or VCP OUT jacks on the side of the main unit: Yellow (VIDEO) to Yellow, White (AUDIO L) to White, and Red (AUDIO R) to...


