
Installation Guide
Page 2
... make a wrong turn, the system can provide easy access to -date regarding traffic situations. SIRIUS Traffic conveys navigational traffic information for model compatibility. Your new SIRIUS Radio Plus Traffic Tuner is available as part of world-class sports, news and entertainment. Worth, Detroit, Houston, Los Angeles, Miami/Ft. Congratulations on a compatible navigation system. Best of the SIR-ALP10T, the Alpine Compatible SIRIUS Satellite Radio Plus Traffic Tuner...
... make a wrong turn, the system can provide easy access to -date regarding traffic situations. SIRIUS Traffic conveys navigational traffic information for model compatibility. Your new SIRIUS Radio Plus Traffic Tuner is available as part of world-class sports, news and entertainment. Worth, Detroit, Houston, Los Angeles, Miami/Ft. Congratulations on a compatible navigation system. Best of the SIR-ALP10T, the Alpine Compatible SIRIUS Satellite Radio Plus Traffic Tuner...
Installation Guide
Page 3
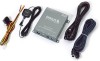
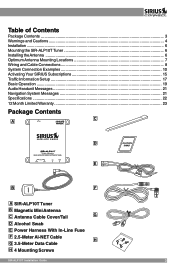
...SIR-ALP10T Tuner 6 Installing the Antenna ...6 Optimum Antenna Mounting Locations 7 Wiring and Cable Connections 8 System Connection Examples 10 Activating Your SIRIUS Subscriptions 15 Traffic Information Setup ...17 Basic Operation ...19 Audio Headunit Messages 21 Navigation System Messages 21 Specifications ...22 12 Month Limited Warranty 23 Package Contents C A D DATA E B F A SIR-ALP10T Tuner B Magnetic Mini Antenna C Antenna Cable Cover/Tail G D Alcohol Swab E Power Harness With In-Line Fuse F 2.5-Meter Ai-NET Cable H G 3.5-Meter Data Cable H 4 Mounting Screws SIR-ALP10T...
...SIR-ALP10T Tuner 6 Installing the Antenna ...6 Optimum Antenna Mounting Locations 7 Wiring and Cable Connections 8 System Connection Examples 10 Activating Your SIRIUS Subscriptions 15 Traffic Information Setup ...17 Basic Operation ...19 Audio Headunit Messages 21 Navigation System Messages 21 Specifications ...22 12 Month Limited Warranty 23 Package Contents C A D DATA E B F A SIR-ALP10T Tuner B Magnetic Mini Antenna C Antenna Cable Cover/Tail G D Alcohol Swab E Power Harness With In-Line Fuse F 2.5-Meter Ai-NET Cable H G 3.5-Meter Data Cable H 4 Mounting Screws SIR-ALP10T...
Installation Guide
Page 4
... the receiving antenna. • Consult the dealer or an experienced technician for help. 4 SIR-ALP10T Installation Guide DO NOT INSTALL THE UNIT TO HIGH LEVELS OF HUMIDITY, MOISTURE OR DUST. DO NOT INSTALL IN LOCATIONS THAT MIGHT HINDER VEHICLE OPERATION. Failure to radio communications if it is encouraged to try to comply with these functions. This equipment may cause harmful interference to make proper connections may result...
... the receiving antenna. • Consult the dealer or an experienced technician for help. 4 SIR-ALP10T Installation Guide DO NOT INSTALL THE UNIT TO HIGH LEVELS OF HUMIDITY, MOISTURE OR DUST. DO NOT INSTALL IN LOCATIONS THAT MIGHT HINDER VEHICLE OPERATION. Failure to radio communications if it is encouraged to try to comply with these functions. This equipment may cause harmful interference to make proper connections may result...
Installation Guide
Page 5
... the wire's insulation from moving parts or sharp pointed edges. Use of the vehicle's computercontrolled devices. USE CAUTION IF YOU NEED TO DISCONNECT THE BATTERY TERMINAL. INSTALL THE WIRING SO THAT IT IS NOT CRIMPED OR PINCHED BY SCREWS OR SHARP METAL EDGES. USE THE SPECIFIED ACCESSORY PARTS AND INSTALL THE PRODUCT SECURELY. SIR-ALP10T OInpsetaralltaitoionnanGduiIdnestallation Guide 55 Return the unit to the wiring. Route the cables away...
... the wire's insulation from moving parts or sharp pointed edges. Use of the vehicle's computercontrolled devices. USE CAUTION IF YOU NEED TO DISCONNECT THE BATTERY TERMINAL. INSTALL THE WIRING SO THAT IT IS NOT CRIMPED OR PINCHED BY SCREWS OR SHARP METAL EDGES. USE THE SPECIFIED ACCESSORY PARTS AND INSTALL THE PRODUCT SECURELY. SIR-ALP10T OInpsetaralltaitoionnanGduiIdnestallation Guide 55 Return the unit to the wiring. Route the cables away...
Installation Guide
Page 6
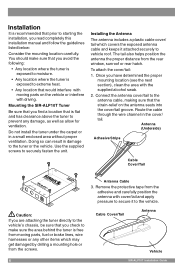
... you read completely this installation manual and follow the guidelines listed below: Consider the mounting location carefully. Installation It is recommended that prior to vehicle roof. Cable Cover/Tail Antenna Vehicle 6 SIR-ALP10T Installation Guide Route the cable through the wire channel in a small enclosed area without proper ventilation. Antenna (Underside) Adhesive Strips Cable Cover/Tail Antenna Cable 3. The tail also helps position the antenna the proper distance from the...
... you read completely this installation manual and follow the guidelines listed below: Consider the mounting location carefully. Installation It is recommended that prior to vehicle roof. Cable Cover/Tail Antenna Vehicle 6 SIR-ALP10T Installation Guide Route the cable through the wire channel in a small enclosed area without proper ventilation. Antenna (Underside) Adhesive Strips Cable Cover/Tail Antenna Cable 3. The tail also helps position the antenna the proper distance from the...
Installation Guide
Page 7
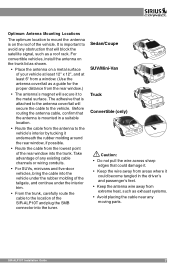
... secure it to the metal surface. Optimum Antenna Mounting Locations The optimum location to mount the antenna is on the roof of the SIR-ALP10T and plug the SMB connector into the tuner. Before routing the antenna cable, confirm that could damage it. • Keep the wire away from areas where it underneath the rubber molding around the rear window, if possible. • Route the...
... secure it to the metal surface. Optimum Antenna Mounting Locations The optimum location to mount the antenna is on the roof of the SIR-ALP10T and plug the SMB connector into the tuner. Before routing the antenna cable, confirm that could damage it. • Keep the wire away from areas where it underneath the rubber molding around the rear window, if possible. • Route the...
Installation Guide
Page 8
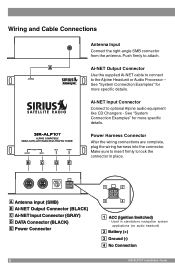
... 4 No Connection SIR-ALP10T Installation Guide A Antenna Input (SMB) B Ai-NET Output Connector (BLACK) C Ai-NET Input Connector (GRAY) D DATA Connector (BLACK) E Power Connector 8 1 2 3 4 1 ACC (Ignition Switched) - Used in place. Make sure to insert firmly to optional Alpine audio equipment like CD Changers - Power Harness Connector After the wiring connections are complete, plug the wiring harness into the connector. Wiring and Cable Connections A DATA B C DE Antenna Input Connect the right-angle SMB connector from the antenna. Ai-NET Output Connector Use the supplied...
... 4 No Connection SIR-ALP10T Installation Guide A Antenna Input (SMB) B Ai-NET Output Connector (BLACK) C Ai-NET Input Connector (GRAY) D DATA Connector (BLACK) E Power Connector 8 1 2 3 4 1 ACC (Ignition Switched) - Used in place. Make sure to insert firmly to optional Alpine audio equipment like CD Changers - Power Harness Connector After the wiring connections are complete, plug the wiring harness into the connector. Wiring and Cable Connections A DATA B C DE Antenna Input Connect the right-angle SMB connector from the antenna. Ai-NET Output Connector Use the supplied...
Installation Guide
Page 9
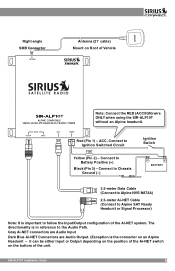
... RED (ACC/IGN) wire ONLY when using the SIR-ALP10T without an Alpine headunit. Connect to Ignition Switched Circuit Ignition Switch Yellow (Pin 2) - Connect to Chassis Ground (-) 3.5-meter Data Cable (Connect to Alpine NVE-N872A) 2.5-meter Ai-NET Cable (Connect to Alpine SAT Ready Headunit or Signal Processor) Note: It is important to the Audio Path. Right-angle SMB Connector Antenna (21' cable) Mount on Roof of the...
... RED (ACC/IGN) wire ONLY when using the SIR-ALP10T without an Alpine headunit. Connect to Ignition Switched Circuit Ignition Switch Yellow (Pin 2) - Connect to Chassis Ground (-) 3.5-meter Data Cable (Connect to Alpine NVE-N872A) 2.5-meter Ai-NET Cable (Connect to Alpine SAT Ready Headunit or Signal Processor) Note: It is important to the Audio Path. Right-angle SMB Connector Antenna (21' cable) Mount on Roof of the...
Installation Guide
Page 10
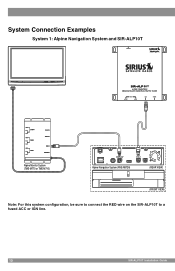
System Connection Examples System 1: Alpine Navigation System and SIR-ALP10T DATA Alpine Monitor System (TME-M770 or TME-M710) DISPLAY EX-2 Alpine Navigation System (NVE-N872A) (REAR VIEW) (FRONT VIEW) Note: For this system configuration, be sure to connect the RED wire on the SIR-ALP10T to a fused ACC or IGN line. 10 SIR-ALP10T Installation Guide
System Connection Examples System 1: Alpine Navigation System and SIR-ALP10T DATA Alpine Monitor System (TME-M770 or TME-M710) DISPLAY EX-2 Alpine Navigation System (NVE-N872A) (REAR VIEW) (FRONT VIEW) Note: For this system configuration, be sure to connect the RED wire on the SIR-ALP10T to a fused ACC or IGN line. 10 SIR-ALP10T Installation Guide
Installation Guide
Page 11
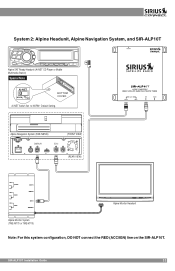
SIR-ALP10T OInpsetaralltaitoionnanGduiIdnestallation Guide 1111 System 2: Alpine Headunit, Alpine Navigation System, and SIR-ALP10T Alpine SAT Ready Headunit (Ai-NET CD Player or Mobile Multimedia Station) Special Note Ai-NET BOTTOM NORM EQ DIV COVER DATA Ai-NET Switch Set to NORM~ Default Setting. Alpine Navigation System (NVE-N872A) DISPLAY EX-2 (FRONT VIEW) (REAR VIEW) Alpine Monitor Headunit Alpine Monitor System (TME-M770 or TME-M710) Note: For this system configuration, DO NOT connect the RED (ACC/IGN) line on the SIR-ALP10T.
SIR-ALP10T OInpsetaralltaitoionnanGduiIdnestallation Guide 1111 System 2: Alpine Headunit, Alpine Navigation System, and SIR-ALP10T Alpine SAT Ready Headunit (Ai-NET CD Player or Mobile Multimedia Station) Special Note Ai-NET BOTTOM NORM EQ DIV COVER DATA Ai-NET Switch Set to NORM~ Default Setting. Alpine Navigation System (NVE-N872A) DISPLAY EX-2 (FRONT VIEW) (REAR VIEW) Alpine Monitor Headunit Alpine Monitor System (TME-M770 or TME-M710) Note: For this system configuration, DO NOT connect the RED (ACC/IGN) line on the SIR-ALP10T.

Installation Guide
Page 12
...-N872A) DISPLAY EX-2 (FRONT VIEW) (REAR VIEW) Alpine Monitor Headunit Alpine Monitor System (TME-M770 or TME-M710) Note: For this system configuration, DO NOT connect the RED (ACC/IGN) line on the SIR-ALP10T. 12 SIR-ALP10T Installation Guide System Connection Examples (Continued) System 3: Alpine Headunit, Alpine Navigation System, CD Changer or IPOD Interface, and SIR-ALP10T Alpine SAT Ready Headunit (Ai-NET CD Player or...
...-N872A) DISPLAY EX-2 (FRONT VIEW) (REAR VIEW) Alpine Monitor Headunit Alpine Monitor System (TME-M770 or TME-M710) Note: For this system configuration, DO NOT connect the RED (ACC/IGN) line on the SIR-ALP10T. 12 SIR-ALP10T Installation Guide System Connection Examples (Continued) System 3: Alpine Headunit, Alpine Navigation System, CD Changer or IPOD Interface, and SIR-ALP10T Alpine SAT Ready Headunit (Ai-NET CD Player or...
Installation Guide
Page 15
... your Alpine headunit owners manual for the SIRIUS Traffic service - Note: It is completed. Make sure that the SIR-ALP10T is properly connected, and that the headunit is the Audio SID for the SIRIUS Radio service, for example, "Data SID: 123456789012". NOTE: Don't push any buttons or perform any operations until the SIR-ALP10T channel update is possible to a different audio source.) 3. Use the UP/DN buttons to receive the SIRIUS satellite signal. 2. Note: You...
... your Alpine headunit owners manual for the SIRIUS Traffic service - Note: It is completed. Make sure that the SIR-ALP10T is properly connected, and that the headunit is the Audio SID for the SIRIUS Radio service, for example, "Data SID: 123456789012". NOTE: Don't push any buttons or perform any operations until the SIR-ALP10T channel update is possible to a different audio source.) 3. Use the UP/DN buttons to receive the SIRIUS satellite signal. 2. Note: You...
Installation Guide
Page 16
... the operator with the traffic information setup. 16 SIR-ALP10T Installation Guide Once the subscription process is completed, your audio and/or navigation system is displayed, touch the Traffic Information selection, or select it by tilting the joystick to highlight it by tilting the joystick to use. 6. If you have a receiver on which you want to continue with both a SIRIUS Radio service subscription and a SIRIUS Traffic service...
... the operator with the traffic information setup. 16 SIR-ALP10T Installation Guide Once the subscription process is completed, your audio and/or navigation system is displayed, touch the Traffic Information selection, or select it by tilting the joystick to highlight it by tilting the joystick to use. 6. If you have a receiver on which you want to continue with both a SIRIUS Radio service subscription and a SIRIUS Traffic service...
Installation Guide
Page 17
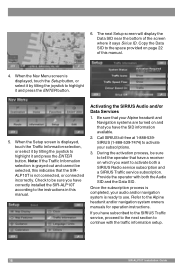
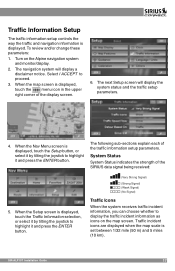
... the Setup screen is displayed. To review and/or change these parameters: 1. Turn on the map screen. Traffic incident icons are displayed when the map scale is displayed, touch the menu icon in the upper right corner of the display screen. 6. When the map screen is set between 1/32 mile (50 m) and 5 miles (10 km). SIR-ALP10T OInpsetaralltaitoionnanGduiIdnestallation Guide 1177 The following sub-sections explain each of the SIRIUS...
... the Setup screen is displayed. To review and/or change these parameters: 1. Turn on the map screen. Traffic incident icons are displayed when the map scale is displayed, touch the menu icon in the upper right corner of the display screen. 6. When the map screen is set between 1/32 mile (50 m) and 5 miles (10 km). SIR-ALP10T OInpsetaralltaitoionnanGduiIdnestallation Guide 1177 The following sub-sections explain each of the SIRIUS...
Installation Guide
Page 18
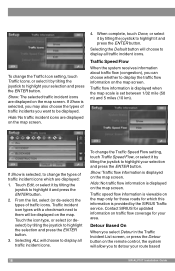
... traffic flow coverage for your route based 18 SIR-ALP10T Installation Guide Traffic incident icon types with a checkmark next to them will choose to display all traffic incident icons. Selecting ALL will be displayed. Contact SIRIUS for which are displayed on the map screen. To change the Traffic Icon setting, touch Traffic Icons, or select it by tilting the joystick to highlight your...
... traffic flow coverage for your route based 18 SIR-ALP10T Installation Guide Traffic incident icon types with a checkmark next to them will choose to display all traffic incident icons. Selecting ALL will be displayed. Contact SIRIUS for which are displayed on the map screen. To change the Traffic Icon setting, touch Traffic Icons, or select it by tilting the joystick to highlight your...
Installation Guide
Page 19
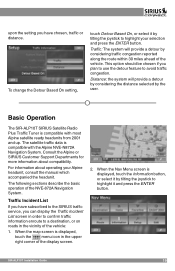
... about compatibility. To change the Detour Based On setting, touch Detour Based On, or select it by considering the distance selected by tilting the joystick to highlight your Alpine headunit, consult the manual which accompanied the headunit. Basic Operation The SIR-ALP10T SIRIUS Satellite Radio Plus Traffic Tuner is compatible with most Alpine satellite ready headunits from 2001 and up. When the map screen is displayed, touch...
... about compatibility. To change the Detour Based On setting, touch Detour Based On, or select it by considering the distance selected by tilting the joystick to highlight your Alpine headunit, consult the manual which accompanied the headunit. Basic Operation The SIR-ALP10T SIRIUS Satellite Radio Plus Traffic Tuner is compatible with most Alpine satellite ready headunits from 2001 and up. When the map screen is displayed, touch...
Installation Guide
Page 21
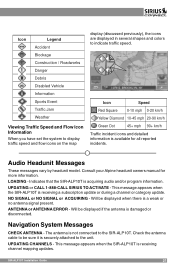
... flow icons on the map display (discussed previously), the icons are displayed in several shapes and colors to the unit. Audio Headunit Messages These messages vary by headunit model. ANTENNA or ANTENNA ERROR - Will be sure it is receiving channel mapping updates. Check the antenna cable to be displayed if the antenna is not connected to the SIR-ALP10T. This message appears when the SIR-ALP10T is securely attached to indicate...
... flow icons on the map display (discussed previously), the icons are displayed in several shapes and colors to the unit. Audio Headunit Messages These messages vary by headunit model. ANTENNA or ANTENNA ERROR - Will be sure it is receiving channel mapping updates. Check the antenna cable to be displayed if the antenna is not connected to the SIR-ALP10T. This message appears when the SIR-ALP10T is securely attached to indicate...
Installation Guide
Page 22
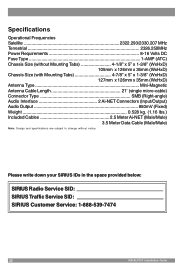
... Service: 1-888-539-7474 22 SIR-ALP10T Installation Guide Specifications Operational Frequencies Satellite 2322.293/2330.207 MHz Terrestrial 2326.250MHz Power Requirements 8-16 Volts DC Fuse Type 1-AMP (ATC) Chassis Size (without Mounting Tabs 4-1/8" x 5" x 1-3/8" (WxHxD) 105mm x 126mm x 35mm (WxHxD) Chassis Size (with Mounting Tabs 4-7/8" x 5" x 1-3/8" (WxHxD) 127mm x 126mm x 35mm (WxHxD) Antenna Type Mini-Magnetic Antenna Cable Length 21' (single micro-cable) Connector Type SMB (Right-angle) Audio Interface 2 Ai-NET Connectors (Input/Output) Audio Output...
... Service: 1-888-539-7474 22 SIR-ALP10T Installation Guide Specifications Operational Frequencies Satellite 2322.293/2330.207 MHz Terrestrial 2326.250MHz Power Requirements 8-16 Volts DC Fuse Type 1-AMP (ATC) Chassis Size (without Mounting Tabs 4-1/8" x 5" x 1-3/8" (WxHxD) 105mm x 126mm x 35mm (WxHxD) Chassis Size (with Mounting Tabs 4-7/8" x 5" x 1-3/8" (WxHxD) 127mm x 126mm x 35mm (WxHxD) Antenna Type Mini-Magnetic Antenna Cable Length 21' (single micro-cable) Connector Type SMB (Right-angle) Audio Interface 2 Ai-NET Connectors (Input/Output) Audio Output...

Installation Guide
Page 23
...) SIR-ALP10T OInpsetaralltaitoionnanGduiIdnestallation Guide 2233 To obtain repair or replacement within 12 months from state to the location shown below under normal use and conditions, be proven defective in lieu of all other than expressed herein in the opinion of the Company, has suffered or been damaged through alteration, improper installation, mishandling, misuse, neglect, accident, or by removal or...
...) SIR-ALP10T OInpsetaralltaitoionnanGduiIdnestallation Guide 2233 To obtain repair or replacement within 12 months from state to the location shown below under normal use and conditions, be proven defective in lieu of all other than expressed herein in the opinion of the Company, has suffered or been damaged through alteration, improper installation, mishandling, misuse, neglect, accident, or by removal or...
Installation Guide
Page 24
SIRIUS Satellite Radio 1221 Avenue of Sirius Satellite Radio Inc. SIR-ALP10T Manual (102405b) ® "SIRIUS" and the SIRIUS dog logo are registered trademarks of the Americas New York, NY 10020 (888) 539-7474 www.sirius.com © 2005 SIRIUS Satellite Radio Inc.
SIRIUS Satellite Radio 1221 Avenue of Sirius Satellite Radio Inc. SIR-ALP10T Manual (102405b) ® "SIRIUS" and the SIRIUS dog logo are registered trademarks of the Americas New York, NY 10020 (888) 539-7474 www.sirius.com © 2005 SIRIUS Satellite Radio Inc.


