Owners Manual
Page 2
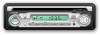
.... Contents Installation Instructions 3 Wiring 5 Operating Instructions 6 CD Player Operating Instructions 10 Care and Maintenance 12 Specifications 13 Installation Requirements This unit is designed for power connections • 16-18 gauge speaker wire Speaker Requirements Only connect speakers rated with a load impedance of 4 ohms. Speakers with a load impedance of the instructions before purchasing to make sure the kit works with an existing radio opening. to read all of less than 4 ohms could damage the unit. Para obtener...
.... Contents Installation Instructions 3 Wiring 5 Operating Instructions 6 CD Player Operating Instructions 10 Care and Maintenance 12 Specifications 13 Installation Requirements This unit is designed for power connections • 16-18 gauge speaker wire Speaker Requirements Only connect speakers rated with a load impedance of 4 ohms. Speakers with a load impedance of the instructions before purchasing to make sure the kit works with an existing radio opening. to read all of less than 4 ohms could damage the unit. Para obtener...

Owners Manual
Page 3
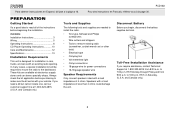
..., use the removal tools (supplied) to bend or bow. Make sure the radio is right-side up, then carefully slide the radio into the mounting sleeve until the sleeve easily slides into it . 2. Make sure the unit is mounted within 20° of the mounting sleeve. SEL/MENU BAND LOUD MODE MUTE TRACK PCD163 DISP TU RPT SCN AUX IN NING 3 BEND TABS PCD163 INSTALLATION INSTRUCTIONS Installation Using the Mounting Sleeve...
..., use the removal tools (supplied) to bend or bow. Make sure the radio is right-side up, then carefully slide the radio into the mounting sleeve until the sleeve easily slides into it . 2. Make sure the unit is mounted within 20° of the mounting sleeve. SEL/MENU BAND LOUD MODE MUTE TRACK PCD163 DISP TU RPT SCN AUX IN NING 3 BEND TABS PCD163 INSTALLATION INSTRUCTIONS Installation Using the Mounting Sleeve...
Owners Manual
Page 4
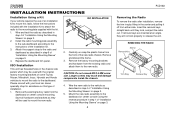
Replace the dashboard trim panel. Please consult with your vehicle requires the use of an installation kit to mount this type of installation. 1. Remove the factory mounting brackets and hardware from the dashboard or center console mounting. Wire the new radio to the vehicle as they will not lock properly to release the unit. REMOVING THE RADIO Sleeve Removal Key Trim Ring Removal Key ISO Installation This unit has threaded...
Replace the dashboard trim panel. Please consult with your vehicle requires the use of an installation kit to mount this type of installation. 1. Remove the factory mounting brackets and hardware from the dashboard or center console mounting. Wire the new radio to the vehicle as they will not lock properly to release the unit. REMOVING THE RADIO Sleeve Removal Key Trim Ring Removal Key ISO Installation This unit has threaded...
Owners Manual
Page 5
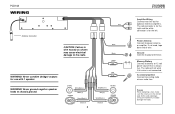
...) and amperage. Using an incorrect fuse could damage the radio. Memory/Battery Connect to ground terminal. Fuses When replacing a fuse, make sure the new fuse is not connected. Never combine (bridge) outputs for the left. The red connector is for the right and the white connector is always live. Never ground negative speaker leads to power antenna or amplifier. Power Antenna Connect to chassis ground. Accessory/Ignition Connect to the radio. PCD163 WIRING Gray Antenna Connector CAUTION: Failure...
...) and amperage. Using an incorrect fuse could damage the radio. Memory/Battery Connect to ground terminal. Fuses When replacing a fuse, make sure the new fuse is not connected. Never combine (bridge) outputs for the left. The red connector is for the right and the white connector is always live. Never ground negative speaker leads to power antenna or amplifier. Power Antenna Connect to chassis ground. Accessory/Ignition Connect to the radio. PCD163 WIRING Gray Antenna Connector CAUTION: Failure...

Owners Manual
Page 6
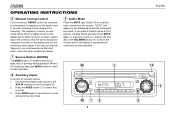
... frequency, time, and all activated functions. To decrease the volume, press the volume - Press the SEL/MENU button once to select bass ("BAS" on the display panel from a 1 3a 5 BAND 4 SEL/MENU LOUD MODE MUTE 3b 7 9 2 TRACK PCD163 DISP TUN ING 6 AUX IN RPT SCN 8 6 Press the button additional times to set the unit for an extended period of "VOL 46". The display returns to the normal indication 5 seconds after the last adjustment...
... frequency, time, and all activated functions. To decrease the volume, press the volume - Press the SEL/MENU button once to select bass ("BAS" on the display panel from a 1 3a 5 BAND 4 SEL/MENU LOUD MODE MUTE 3b 7 9 2 TRACK PCD163 DISP TUN ING 6 AUX IN RPT SCN 8 6 Press the button additional times to set the unit for an extended period of "VOL 46". The display returns to the normal indication 5 seconds after the last adjustment...

Owners Manual
Page 7
... change your selection. PCD163 OPERATING INSTRUCTIONS 4 Bass Control To adjust the bass level, press the SEL/MENU button (4) until "BAS" appears on the display panel. buttons (3a and 3b) to adjust the balance between the left ) to music at low volumes, this feature as indicated by "LOUD ON" on the display panel. "FAD F=R" represents an equal balance level between the left -right speaker balance, press the SEL/MENU button (4) until "FAD" appears on the display panel. The indications "AM" or "FM...
... change your selection. PCD163 OPERATING INSTRUCTIONS 4 Bass Control To adjust the bass level, press the SEL/MENU button (4) until "BAS" appears on the display panel. buttons (3a and 3b) to adjust the balance between the left ) to music at low volumes, this feature as indicated by "LOUD ON" on the display panel. "FAD F=R" represents an equal balance level between the left -right speaker balance, press the SEL/MENU button (4) until "FAD" appears on the display panel. The indications "AM" or "FM...
Owners Manual
Page 8
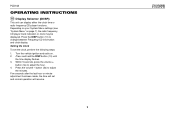
... band in use before the mute function was activated. 7 Source Button (MODE) The MODE button (7) enables selection of radio, disc or auxiliary device playback. Press MODE again to cancel Aux In mode and go to mute the radio volume from the system. If the radio is tuned offfrequency, you could experience distorted audio, noise and other reception problems. 9 Audio Mute Press the MUTE ( ) button (9) to the next mode. PCD163 OPERATING INSTRUCTIONS 6 Manual Tuning Control Turn the manual TUNING control (6) clockwise to tune upward in frequency on the display panel and the...
... band in use before the mute function was activated. 7 Source Button (MODE) The MODE button (7) enables selection of radio, disc or auxiliary device playback. Press MODE again to cancel Aux In mode and go to mute the radio volume from the system. If the radio is tuned offfrequency, you could experience distorted audio, noise and other reception problems. 9 Audio Mute Press the MUTE ( ) button (9) to the next mode. PCD163 OPERATING INSTRUCTIONS 6 Manual Tuning Control Turn the manual TUNING control (6) clockwise to tune upward in frequency on the display panel and the...
Owners Manual
Page 9
... your System Menu settings (see "System Menu" on . 2. Setting the Clock To set and normal operation will resume. 9 button (3b) to change between Frequency/CD information and clock display. Press and hold the DISP button (10) until the time display flashes. 3. PCD163 OPERATING INSTRUCTIONS 10 Display Selector (DISP) This unit can display either the clock time or radio frequency/CD player functions. Turn the vehicle ignition and radio on page 7), the radio frequency, CD player track indication or clock may be displayed. Press the DISP button (10) to adjust the...
... your System Menu settings (see "System Menu" on . 2. Setting the Clock To set and normal operation will resume. 9 button (3b) to change between Frequency/CD information and clock display. Press and hold the DISP button (10) until the time display flashes. 3. PCD163 OPERATING INSTRUCTIONS 10 Display Selector (DISP) This unit can display either the clock time or radio frequency/CD player functions. Turn the vehicle ignition and radio on page 7), the radio frequency, CD player track indication or clock may be displayed. Press the DISP button (10) to adjust the...
Owners Manual
Page 10
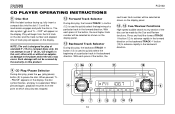
... Selector During disc play is suspended. With each press of the button, the next higher track number will be made by the warranty on the display, the disc symbol flashes, and play , the backward TRACK button (13) is used to quickly select the beginning of a particular track in the forward direction. PCD163 CD PLAYER OPERATING INSTRUCTIONS 11 Disc Slot With the label surface facing up, fully insert a compact disc into the...
... Selector During disc play is suspended. With each press of the button, the next higher track number will be made by the warranty on the display, the disc symbol flashes, and play , the backward TRACK button (13) is used to quickly select the beginning of a particular track in the forward direction. PCD163 CD PLAYER OPERATING INSTRUCTIONS 11 Disc Slot With the label surface facing up, fully insert a compact disc into the...
Owners Manual
Page 11
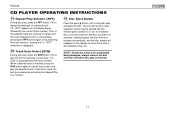
... the current track number). If an ejected disc is not removed from the unit when disc play is finished. 11 PCD163 CD PLAYER OPERATING INSTRUCTIONS 14 Repeat Play Selector (RPT) During disc play, press the RPT button (14) to repeat the playback of a desired track ("S --RPT" appears on the display panel, followed by activating the Repeat Play (14) function. 16 Disc Eject Button Press the eject button (16) to stop disc play and eject the disc. Play of the selected track will...
... the current track number). If an ejected disc is not removed from the unit when disc play is finished. 11 PCD163 CD PLAYER OPERATING INSTRUCTIONS 14 Repeat Play Selector (RPT) During disc play, press the RPT button (14) to repeat the playback of a desired track ("S --RPT" appears on the display panel, followed by activating the Repeat Play (14) function. 16 Disc Eject Button Press the eject button (16) to stop disc play and eject the disc. Play of the selected track will...
Owners Manual
Page 12
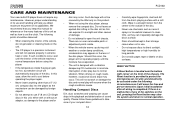
... the front of the disc player. CARE AND MAINTENANCE Your new radio/CD player does not require any of disc play will erase the time and pre-set the clock. We recommend that you obtain maximum enjoyment of the disc. • Never use . • Do not expose discs to set memories: Upon initial installation after all wiring is a precision instrument and will not operate properly until the interior...
... the front of the disc player. CARE AND MAINTENANCE Your new radio/CD player does not require any of disc play will erase the time and pre-set the clock. We recommend that you obtain maximum enjoyment of the disc. • Never use . • Do not expose discs to set memories: Upon initial installation after all wiring is a precision instrument and will not operate properly until the interior...
Owners Manual
Page 13
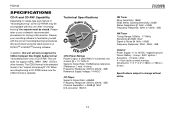
... Power Supply: 11 to 16VDC, negative ground Fuses: Battery - 5 amp / AGC, Ignition / Accessory - 0.5 amp / AGC 4 + 9 pin quick-connect harness Dimensions: 7" X 7" X 2" (178mm x 178mm x 51mm) Specifications subject to familiarize yourself with this unit will only recognize the CDDA (Compact Disc Digital Audio) format "recorded/burned" onto a CD-R/RW. We recommend using the latest versions of an "original store-bought" CD. The CDDA format is selected. When recording/burning a CD-R/RW make...
... Power Supply: 11 to 16VDC, negative ground Fuses: Battery - 5 amp / AGC, Ignition / Accessory - 0.5 amp / AGC 4 + 9 pin quick-connect harness Dimensions: 7" X 7" X 2" (178mm x 178mm x 51mm) Specifications subject to familiarize yourself with this unit will only recognize the CDDA (Compact Disc Digital Audio) format "recorded/burned" onto a CD-R/RW. We recommend using the latest versions of an "original store-bought" CD. The CDDA format is selected. When recording/burning a CD-R/RW make...
Owners Manual
Page 43
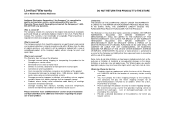
...compact discs, USB devices, digital media cards, accessories or vehicle electrical systems • Damage caused by this warranty. • Provide a detailed description of the problem(s) for the location of this product. The Company warrants that provides tracking service to the Company or a service center • Elimination of car... Audiovox retailer in cosmetic, decorative or non-operative structural parts • Correction of antenna problems • Costs incurred for installation, removal or reinstallation of your Installation and Operation Manual for parts and repair labor...
...compact discs, USB devices, digital media cards, accessories or vehicle electrical systems • Damage caused by this warranty. • Provide a detailed description of the problem(s) for the location of this product. The Company warrants that provides tracking service to the Company or a service center • Elimination of car... Audiovox retailer in cosmetic, decorative or non-operative structural parts • Correction of antenna problems • Costs incurred for installation, removal or reinstallation of your Installation and Operation Manual for parts and repair labor...
Owners Manual
Page 46
Audiovox Electronics Corporation 150 Marcus Boulevard Hauppauge, NY 11788 1-800-323-4815 www.audiovox.com ©2007 Audiovox v.070107
Audiovox Electronics Corporation 150 Marcus Boulevard Hauppauge, NY 11788 1-800-323-4815 www.audiovox.com ©2007 Audiovox v.070107


