

User Manual
Page 4
Table of contents 1 Warnings and safety information 8 2 General information 10 3 Operating The NVX225 Navigator (Controls 12 3.1 Hardware buttons 12 3.2 Screen buttons and controls 15 3.2.1 Direct selectors 15 3.2.2 List selectors 15 3.2.3 Sliders 15 3.2.4 Switches 16 3.2.5 Special switches 16 3.2.6 ...schemes 25 4.4.4 Streets and roads 26 4.4.5 Other objects 27 4.4.6 Current position and Lock-on-Road 27 4.4.7 Selected map point, also known as the Cursor 28 4.4.8 Marked map points (Pin 28 4.4.9 Visible POIs (Points of Interest 28 4.4.10 Elements of the Active Route 29 4.4.10.1 ...
Table of contents 1 Warnings and safety information 8 2 General information 10 3 Operating The NVX225 Navigator (Controls 12 3.1 Hardware buttons 12 3.2 Screen buttons and controls 15 3.2.1 Direct selectors 15 3.2.2 List selectors 15 3.2.3 Sliders 15 3.2.4 Switches 16 3.2.5 Special switches 16 3.2.6 ...schemes 25 4.4.4 Streets and roads 26 4.4.5 Other objects 27 4.4.6 Current position and Lock-on-Road 27 4.4.7 Selected map point, also known as the Cursor 28 4.4.8 Marked map points (Pin 28 4.4.9 Visible POIs (Points of Interest 28 4.4.10 Elements of the Active Route 29 4.4.10.1 ...

User Manual
Page 5
4.4.10.3 The active leg of the route 30 4.4.10.4 Inactive legs of the route 30 4.4.10.5 Roads in the route excluded by your preferences 30 4.5 Screens with map 30 4.5.1 Turn preview (No. 1 32 4.5.2 Zoom in and out (No. 2 & 3 32 4.5.3 Tilt up and down (No. 4 & 5 33...Time Left 42 4.6.1.5 Estimated Arrival 42 4.6.1.6 Destination / Via point 43 4.6.2 Warning icons 43 4.6.3 Fit to screen 44 4.6.4 Parameters 44 4.7 Menu...44 4.7.1 Find tab 45 4.7.2 Quick tab 45 4.7.2.1 3D Map 45 4.7.2.2 Zoom & Tilt 46 4.7.2.3 Night Mode 46 4.7.2.4 Manage POI (Points of Interest 46 4.7.2.5 Popup Info...
4.4.10.3 The active leg of the route 30 4.4.10.4 Inactive legs of the route 30 4.4.10.5 Roads in the route excluded by your preferences 30 4.5 Screens with map 30 4.5.1 Turn preview (No. 1 32 4.5.2 Zoom in and out (No. 2 & 3 32 4.5.3 Tilt up and down (No. 4 & 5 33...Time Left 42 4.6.1.5 Estimated Arrival 42 4.6.1.6 Destination / Via point 43 4.6.2 Warning icons 43 4.6.3 Fit to screen 44 4.6.4 Parameters 44 4.7 Menu...44 4.7.1 Find tab 45 4.7.2 Quick tab 45 4.7.2.1 3D Map 45 4.7.2.2 Zoom & Tilt 46 4.7.2.3 Night Mode 46 4.7.2.4 Manage POI (Points of Interest 46 4.7.2.5 Popup Info...

User Manual
Page 6
...speeding tolerance 62 5.1.5 Off-route Recalculation 63 5.1.5.1 Automatic 63 5.1.5.2 Ask First 63 5.1.5.3 Disabled 64 5.2 Map settings 64 5.2.1 Daylight / Night color profile 64 5.2.2 Cockpit / Map mode map details 64 5.2.3 Alternative Road Names 65 5.2.4 Show Street Labels 65 5.2.5 Textured Polygons 65 5.3 Sound ... Voice language 70 5.5.3 Units...71 5.5.4 Set Date & Time Format 71 5.6 Advanced settings 71 5.6.1 Display options 71 5.6.1.1 2D in Map mode (and north-up orientation 72 5.6.1.2 3D in Cockpit mode (and track-up orientation 72 5.6.1.3 Zoom in after find 72 5.6.1.4 ...
...speeding tolerance 62 5.1.5 Off-route Recalculation 63 5.1.5.1 Automatic 63 5.1.5.2 Ask First 63 5.1.5.3 Disabled 64 5.2 Map settings 64 5.2.1 Daylight / Night color profile 64 5.2.2 Cockpit / Map mode map details 64 5.2.3 Alternative Road Names 65 5.2.4 Show Street Labels 65 5.2.5 Textured Polygons 65 5.3 Sound ... Voice language 70 5.5.3 Units...71 5.5.4 Set Date & Time Format 71 5.6 Advanced settings 71 5.6.1 Display options 71 5.6.1.1 2D in Map mode (and north-up orientation 72 5.6.1.2 3D in Cockpit mode (and track-up orientation 72 5.6.1.3 Zoom in after find 72 5.6.1.4 ...

User Manual
Page 7
... 78 5.6.5.2 Restore Data 78 5.6.5.3 Remove Pins 79 5.6.5.4 Clear Data 79 5.6.5.5 Reset Advanced Settings 79 6 Find 80 6.1 Find & GO (Main menu 80 6.2 Selection by tapping the map 80 6.3 Using the Find menu 81 6.3.1 Find an Address, Street, Intersection or City 81 6.3.1.1 Selecting the city, state and country to search in 82 6.3.1.2 Selecting...
... 78 5.6.5.2 Restore Data 78 5.6.5.3 Remove Pins 79 5.6.5.4 Clear Data 79 5.6.5.5 Reset Advanced Settings 79 6 Find 80 6.1 Find & GO (Main menu 80 6.2 Selection by tapping the map 80 6.3 Using the Find menu 81 6.3.1 Find an Address, Street, Intersection or City 81 6.3.1.1 Selecting the city, state and country to search in 82 6.3.1.2 Selecting...

User Manual
Page 10
...do not need to -door navigation for in the top right corner. It provides door-to 'double tap' or 'tap & hold' the touch screen as these functions cannot be used reliably in a moving the map, or scaling it in the top left corner. The NVX225 Navigator is capable of this Owners ...manual for detailed instruction The NVX225 Navigator is located on the memory card. Unlike some other products...
...do not need to -door navigation for in the top right corner. It provides door-to 'double tap' or 'tap & hold' the touch screen as these functions cannot be used reliably in a moving the map, or scaling it in the top left corner. The NVX225 Navigator is capable of this Owners ...manual for detailed instruction The NVX225 Navigator is located on the memory card. Unlike some other products...

User Manual
Page 12
... Hardware buttons are mostly used on map screens to zoom, tilt and rotate the map, or to open other screens. Wherever possible, pushbuttons and lists are operable by fingertips, or Stylus. Tap the screen with the stylus to make your selection. Display the local map. Front View o (1) Touch Screen - 3 Operating The NVX225 Navigator (Controls) The NVX225 Navigator is designed for easy operation...
... Hardware buttons are mostly used on map screens to zoom, tilt and rotate the map, or to open other screens. Wherever possible, pushbuttons and lists are operable by fingertips, or Stylus. Tap the screen with the stylus to make your selection. Display the local map. Front View o (1) Touch Screen - 3 Operating The NVX225 Navigator (Controls) The NVX225 Navigator is designed for easy operation...

User Manual
Page 20
... by using the buttons described below. This is the first screen of The NVX225 Navigator. Many of the screens are directly accessible from here by displaying the Main menu. No. Read this chapter for a guided tour. Content 1 Audiovox logo 2 Battery Status indicator 3 Button to open Cockpit screen 4 Button to open Find menu 5 Button to open Settings... needed to initiate a function or change a setting. 4.1 Main menu The Main menu is the root of the program are also accessible from one to open Map screen 20
... by using the buttons described below. This is the first screen of The NVX225 Navigator. Many of the screens are directly accessible from here by displaying the Main menu. No. Read this chapter for a guided tour. Content 1 Audiovox logo 2 Battery Status indicator 3 Button to open Cockpit screen 4 Button to open Find menu 5 Button to open Settings... needed to initiate a function or change a setting. 4.1 Main menu The Main menu is the root of the program are also accessible from one to open Map screen 20
User Manual
Page 21
... here to inform you about the map licenses you , with your position as the entry point to the Time Sync screen. 4.3.1 GPS data displayed The virtual sky on the Main menu screen to open this screen. Signals from the red ones. 11 Button to open About screen * Depends on program settings ** ...Same as removing the SD card 4.2 About screen Tap About on the left represents the currently visible part of the sky above you have, the creators of The NVX225 Navigator and the legal aspects of information received from ...
... here to inform you about the map licenses you , with your position as the entry point to the Time Sync screen. 4.3.1 GPS data displayed The virtual sky on the Main menu screen to open this screen. Signals from the red ones. 11 Button to open About screen * Depends on program settings ** ...Same as removing the SD card 4.2 About screen Tap About on the left represents the currently visible part of the sky above you have, the creators of The NVX225 Navigator and the legal aspects of information received from ...

User Manual
Page 24
... change between 2D and all 3D angles, or you can be independently set for Map and Cockpit screens in Map settings (5.2.2)). The description of the two map screens see the map at various zoom levels, always with optimized content (the density of The NVX225 Navigator are described here. For the controls and special functions of these modes will...
... change between 2D and all 3D angles, or you can be independently set for Map and Cockpit screens in Map settings (5.2.2)). The description of the two map screens see the map at various zoom levels, always with optimized content (the density of The NVX225 Navigator are described here. For the controls and special functions of these modes will...

User Manual
Page 25
...the optimal view in the Quick Menu (4.7.2.3) or let The NVX225 Navigator do it gets dark. To select the one that automatically rotates, scales and tilts the map in front of the screen low, with The NVX225 Navigator. You can automatically switch between day and night views manually ...in your position on both Map and Cockpit screens. Daylight colors are several daytime and night color schemes ...
...the optimal view in the Quick Menu (4.7.2.3) or let The NVX225 Navigator do it gets dark. To select the one that automatically rotates, scales and tilts the map in front of the screen low, with The NVX225 Navigator. You can automatically switch between day and night views manually ...in your position on both Map and Cockpit screens. Daylight colors are several daytime and night color schemes ...

User Manual
Page 26
...street aligned with the street. It is displayed at a glance. The NVX225 Navigator will not be able to the default daytime and night color schemes. Note: The automatic switching is on the Map Settings screen (5.2.4). 26 Note: The colors mentioned and screenshots included in the schemes ...you have chosen. The NVX225 Navigator uses similar color codes to those you use the one best for identification. ...
...street aligned with the street. It is displayed at a glance. The NVX225 Navigator will not be able to the default daytime and night color schemes. Note: The automatic switching is on the Map Settings screen (5.2.4). 26 Note: The colors mentioned and screenshots included in the schemes ...you have chosen. The NVX225 Navigator uses similar color codes to those you use the one best for identification. ...

User Manual
Page 27
...would be with plain colored surfaces. 4.4.6 Current position and Lock-on the map. The NVX225 Navigator has a built-in Lock-on the map. It is shown as a blue dot on -Road feature that have no other navigating function than to display these alternative names or not. You can choose whether... to help orientate you, the map also contains objects that always puts the ...
...would be with plain colored surfaces. 4.4.6 Current position and Lock-on the map. The NVX225 Navigator has a built-in Lock-on the map. It is shown as a blue dot on -Road feature that have no other navigating function than to display these alternative names or not. You can choose whether... to help orientate you, the map also contains objects that always puts the ...
User Manual
Page 28
The NVX225 Navigator automatically selects the color of the actual POI. Different colors help you also save it as a POI. Icons on the screen. Now the Cursor is also the reference point for map scaling. This way you identify a pin in the History list (6.3.2) later. If you... do not need the coordinates later, just select the point and start Find Coordinates (6.3.3). 4.4.9 Visible POIs (Points of Interest) The NVX225 Navigator comes...
The NVX225 Navigator automatically selects the color of the actual POI. Different colors help you also save it as a POI. Icons on the screen. Now the Cursor is also the reference point for map scaling. This way you identify a pin in the History list (6.3.2) later. If you... do not need the coordinates later, just select the point and start Find Coordinates (6.3.3). 4.4.9 Visible POIs (Points of Interest) The NVX225 Navigator comes...

User Manual
Page 29
... can be complete. If you still need to -Position. Tip: Tap the map on the right. These icons are large enough to recognize the symbol, and semi-transparent so as a route point. 4.4.10 Elements of the Active Route The NVX225 Navigator uses a multi-destination routing system in which you need this list may... points and the destination Flags represent these points. 4.4.10.2 Animated turn guidance Animated arrows represent all route events other so that leads you to the screen of visible POIs.
... can be complete. If you still need to -Position. Tip: Tap the map on the right. These icons are large enough to recognize the symbol, and semi-transparent so as a route point. 4.4.10 Elements of the Active Route The NVX225 Navigator uses a multi-destination routing system in which you need this list may... points and the destination Flags represent these points. 4.4.10.2 Animated turn guidance Animated arrows represent all route events other so that leads you to the screen of visible POIs.

User Manual
Page 30
...and controls are optimized for two-way and on the driving side of the road for different purposes. see 5.6.1.1). 30 If so, The NVX225 Navigator will be used in 2D North-up , and in and the line is the section of the route you have not added any via...inactive. The active section is displayed in Route parameter settings (5.4.4), sometimes they show the direction of a 3D map view. The Map screen is up mode (you can set The NVX225 Navigator so it always opens the Map screen like that - When via points are impossible to avoid near the starting via point. 4.4.10.5 Roads ...
...and controls are optimized for two-way and on the driving side of the road for different purposes. see 5.6.1.1). 30 If so, The NVX225 Navigator will be used in 2D North-up , and in and the line is the section of the route you have not added any via...inactive. The active section is displayed in Route parameter settings (5.4.4), sometimes they show the direction of a 3D map view. The Map screen is up mode (you can set The NVX225 Navigator so it always opens the Map screen like that - When via points are impossible to avoid near the starting via point. 4.4.10.5 Roads ...

User Manual
Page 31
... contains some more route data if you are navigating (e.g. This screen is typically used in , speed limit for driving purposes. Map screen contents: Cockpit screen contents: No. The Cockpit screen is for the current street), and some additional travel information if you are just cruising (...-up mode (you can make The NVX225 Navigator always open the Cockpit screen like that - next street in your are several controls that Lock to GPS position and heading is inactive 7 Selected map point (Cursor) 8 (Map only) Map scale 9 N/a 10 Map orientation and Overview Control Opens Route menu...
... contains some more route data if you are navigating (e.g. This screen is typically used in , speed limit for driving purposes. Map screen contents: Cockpit screen contents: No. The Cockpit screen is for the current street), and some additional travel information if you are just cruising (...-up mode (you can make The NVX225 Navigator always open the Cockpit screen like that - next street in your are several controls that Lock to GPS position and heading is inactive 7 Selected map point (Cursor) 8 (Map only) Map scale 9 N/a 10 Map orientation and Overview Control Opens Route menu...
User Manual
Page 32
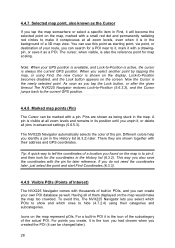
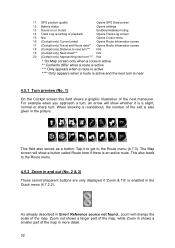
... (Cockpit only) Distance to next turn*** N/a 19 (Cockpit only) Next street*** N/a 20 (Cockpit only) Approaching next turn**** N/a * On Map screen only when a route is active ** Contents differ when a route is active *** Only appears when a route is active **** Only appears when a route is ...active and the next turn is near 4.5.1 Turn preview (No. 1) On the Cockpit screen this field shows a graphic illustration of the map. Tap it is also given in more detail. 32 The Map screen will show whether it to get to the Route menu. 4.5.2 Zoom in and out (No. 2 & 3)...
... (Cockpit only) Distance to next turn*** N/a 19 (Cockpit only) Next street*** N/a 20 (Cockpit only) Approaching next turn**** N/a * On Map screen only when a route is active ** Contents differ when a route is active *** Only appears when a route is active **** Only appears when a route is ...active and the next turn is near 4.5.1 Turn preview (No. 1) On the Cockpit screen this field shows a graphic illustration of the map. Tap it is also given in more detail. 32 The Map screen will show whether it to get to the Route menu. 4.5.2 Zoom in and out (No. 2 & 3)...
User Manual
Page 33
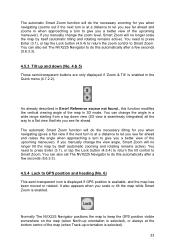
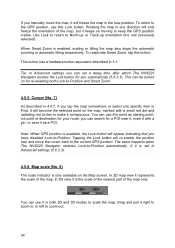
...tap the Lock button (4.5.4) to return the zoom control to Smart Zoom. Normally The NVX225 Navigator positions the map to keep the GPS position visible somewhere on the map (when North-up orientation is available, and the map has been moved or rotated. You need to press Enter (3.1), or tap the ...tilt control to Smart Zoom. It also appears when you scale or tilt the map while Smart Zoom is seamlessly integrated) all the way to a flat view that lets you see far ahead. You can also set The NVX225 Navigator to do this automatically after a few seconds (5.6.3.3). 4.5.3 Tilt up and down ...
...tap the Lock button (4.5.4) to return the zoom control to Smart Zoom. Normally The NVX225 Navigator positions the map to keep the GPS position visible somewhere on the map (when North-up orientation is available, and the map has been moved or rotated. You need to press Enter (3.1), or tap the ...tilt control to Smart Zoom. It also appears when you scale or tilt the map while Smart Zoom is seamlessly integrated) all the way to a flat view that lets you see far ahead. You can also set The NVX225 Navigator to do this automatically after a few seconds (5.6.3.3). 4.5.3 Tilt up and down ...
User Manual
Page 34
...circles to make it is enabled, scaling or tilting the map also stops the automatic zooming or automatic tilting respectively. Note: When GPS position is only available on moving to -Position. The same happens when The NVX225 Navigator restores Lock-to -Position and Smart Zoom. 4.5.5 Cursor ...(No. 7) As described in the new position. Rotating the map in any direction will freeze the map in 4.4.7, if you tap the map somewhere or select one previously selected). This can use it keeps on the Map screen. ...
...circles to make it is enabled, scaling or tilting the map also stops the automatic zooming or automatic tilting respectively. Note: When GPS position is only available on moving to -Position. The same happens when The NVX225 Navigator restores Lock-to -Position and Smart Zoom. 4.5.5 Cursor ...(No. 7) As described in the new position. Rotating the map in any direction will freeze the map in 4.4.7, if you tap the map somewhere or select one previously selected). This can use it keeps on the Map screen. ...

User Manual
Page 35
... appear, and when pushed, it will move the map to enter Overview mode. You cannot rotate the map in Overview mode. It means The NVX225 Navigator rotates the map during navigation when the next turn is strictly north up The NVX225 Navigator so that takes you to the Main menu screen. Tap this mode an arrow (compass) points towards...
... appear, and when pushed, it will move the map to enter Overview mode. You cannot rotate the map in Overview mode. It means The NVX225 Navigator rotates the map during navigation when the next turn is strictly north up The NVX225 Navigator so that takes you to the Main menu screen. Tap this mode an arrow (compass) points towards...
