Owners Manual
Page 1
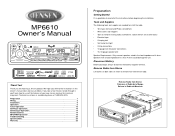
... Player Operation 15 CD Changer Operation 17 Remote Control 17 MP3/WMA Operation 18 Troubleshooting 23 Specifications 23 Warranty 23 Preparation Getting Started It's a good idea to remove existing radio (screwdriver, socket wrench set or other tools) • Electrical tape • Crimping tool • Volt meter/test light • Crimp connections • 18 gauge wire for power connections • 16-18 gauge speaker wire Speaker Requirements: Only connect speakers rated in this owner's manual...
... Player Operation 15 CD Changer Operation 17 Remote Control 17 MP3/WMA Operation 18 Troubleshooting 23 Specifications 23 Warranty 23 Preparation Getting Started It's a good idea to remove existing radio (screwdriver, socket wrench set or other tools) • Electrical tape • Crimping tool • Volt meter/test light • Crimp connections • 18 gauge wire for power connections • 16-18 gauge speaker wire Speaker Requirements: Only connect speakers rated in this owner's manual...

Owners Manual
Page 3
... the car. 1. If not used, tape bare end of chassis. 3. Memory/Battery (yellow wire) - Auxiliary Input Cable (yellow) 11. Antenna 12. Reconnect Battery When wiring is the correct type and amperage. Power Antenna (dark blue wire) - Connect to Amplifier 10. Right rear speaker 9. Ground (black wire) - RCA Outputs to battery or 12 volt power source that is not connected. 4. Connect to power antenna or amplifier. Right front speaker 7. Wiring Diagram / Color Codes 1. Connect to existing radio wire or radio fuse. 5. CD Changer Fuses When replacing a fuse, make sure...
... the car. 1. If not used, tape bare end of chassis. 3. Memory/Battery (yellow wire) - Auxiliary Input Cable (yellow) 11. Antenna 12. Reconnect Battery When wiring is the correct type and amperage. Power Antenna (dark blue wire) - Connect to Amplifier 10. Right rear speaker 9. Ground (black wire) - RCA Outputs to battery or 12 volt power source that is not connected. 4. Connect to power antenna or amplifier. Right front speaker 7. Wiring Diagram / Color Codes 1. Connect to existing radio wire or radio fuse. 5. CD Changer Fuses When replacing a fuse, make sure...
Owners Manual
Page 23
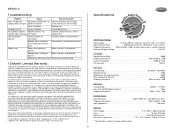
... General Power Supply 11 to 16VDC, negative ground Fuse 15 amp, ATO type Wire Harness 20-pin quick-disconnect DIN chassis dimensions 7" X 7" X 2" (178mm x 178mm x 51mm) ** Specifications subject to Noise Ratio 70dBA below . check vehicle fuse with test light Replace fuse Check/replace fuse Connect speaker harness; This Warranty does not extend to the elimination of car static or motor noise, to correction of antenna problems, to costs incurred for installation, removal...
... General Power Supply 11 to 16VDC, negative ground Fuse 15 amp, ATO type Wire Harness 20-pin quick-disconnect DIN chassis dimensions 7" X 7" X 2" (178mm x 178mm x 51mm) ** Specifications subject to Noise Ratio 70dBA below . check vehicle fuse with test light Replace fuse Check/replace fuse Connect speaker harness; This Warranty does not extend to the elimination of car static or motor noise, to correction of antenna problems, to costs incurred for installation, removal...

Owners Manual
Page 26
Audiovox Electronics Corporation 150 Marcus Boulevard Hauppauge, NY 11788 1-800-323-4815 www.jensen.com © 2005 Audiovox v.012105
Audiovox Electronics Corporation 150 Marcus Boulevard Hauppauge, NY 11788 1-800-323-4815 www.jensen.com © 2005 Audiovox v.012105


