Operation Manual
Page 35
Features - DVD Basics - Controls and Indicators Diagram - Operation - CONTENT - Settings and Adjustments - Important Warnings and Safety Precaution - Main Function Descriptions - Optional Accessories - Turning the MMD102 on or off - Playing MP3 Discs - Specifications - DVD Function Descriptions - Guarantee conditions, warranty card p. 36 p. 38 p. 38 p. 39 p. 40 p. 41 p. 46 p. 47 p. 51 p. 52 p. 53 p. 59 p. 61 p. 63 p. 65 p. 100 Troubleshooting - Playing DVDs - Remote Control Operation -
Features - DVD Basics - Controls and Indicators Diagram - Operation - CONTENT - Settings and Adjustments - Important Warnings and Safety Precaution - Main Function Descriptions - Optional Accessories - Turning the MMD102 on or off - Playing MP3 Discs - Specifications - DVD Function Descriptions - Guarantee conditions, warranty card p. 36 p. 38 p. 38 p. 39 p. 40 p. 41 p. 46 p. 47 p. 51 p. 52 p. 53 p. 59 p. 61 p. 63 p. 65 p. 100 Troubleshooting - Playing DVDs - Remote Control Operation -
Operation Manual
Page 37
...Note: Both the DVD-Player and discs are coded by region. DVD's with other region codes cannot be accomplished using the remote control unit, while seatbelts remain fastened. Congratulations on your Movies 2 Go entertainment system but remember safety of all passengers remains the... full understanding of video entertainment in the mobile environment. Please read the directions that follow to familiarize yourself with DVD player. The MMD102 has been designed to the system. Safety Precaution For safety reasons, when changing video media it at appropriate collection points provided in ...
...Note: Both the DVD-Player and discs are coded by region. DVD's with other region codes cannot be accomplished using the remote control unit, while seatbelts remain fastened. Congratulations on your Movies 2 Go entertainment system but remember safety of all passengers remains the... full understanding of video entertainment in the mobile environment. Please read the directions that follow to familiarize yourself with DVD player. The MMD102 has been designed to the system. Safety Precaution For safety reasons, when changing video media it at appropriate collection points provided in ...
Operation Manual
Page 38
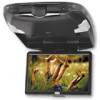
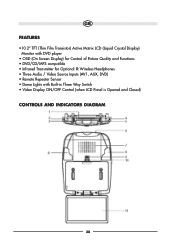
FEATURES •10.2" TFT (Thin Film Transistor) Active Matrix LCD (Liquid Crystal Display) Monitor with DVD player • OSD (On Screen Display) for Control of Picture Quality and Functions • DVD/CD/MP3 compatible • Infrared Transmitter for Optional IR Wireless Headphones • Three Audio / Video Source Inputs (AV1, AUX, DVD) • Remote Repeater Sensor • Dome Lights with Built-in Three Way Switch • Video Display ON/OFF Control (when LCD Panel is Opened and Closed) CONTROLS AND INDICATORS DIAGRAM 38
FEATURES •10.2" TFT (Thin Film Transistor) Active Matrix LCD (Liquid Crystal Display) Monitor with DVD player • OSD (On Screen Display) for Control of Picture Quality and Functions • DVD/CD/MP3 compatible • Infrared Transmitter for Optional IR Wireless Headphones • Three Audio / Video Source Inputs (AV1, AUX, DVD) • Remote Repeater Sensor • Dome Lights with Built-in Three Way Switch • Video Display ON/OFF Control (when LCD Panel is Opened and Closed) CONTROLS AND INDICATORS DIAGRAM 38
Operation Manual
Page 39
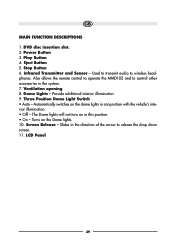
... system. 7. Three Position Dome Light Switch • Auto - Power Button 3. Turns on the dome lights in this position. • On - Eject Button 5. Also allows the remote control to operate the MMD102 and to control other accessories in the direction of the arrow to wireless headphones. MAIN FUNCTION DESCRIPTIONS 1.
... system. 7. Three Position Dome Light Switch • Auto - Power Button 3. Turns on the dome lights in this position. • On - Eject Button 5. Also allows the remote control to operate the MMD102 and to control other accessories in the direction of the arrow to wireless headphones. MAIN FUNCTION DESCRIPTIONS 1.
Operation Manual
Page 40
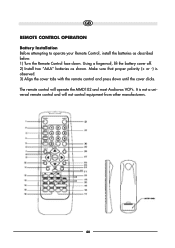
Using a fingernail, lift the battery cover off. 2) Install two "AAA" batteries as described below. 1) Turn the Remote Control face down until the cover clicks. Make sure that proper polarity (+ or -) is not a universal remote control and will operate the MMD102 and most Audiovox VCP's. REMOTE CONTROL OPERATION Battery Installation Before attempting to operate your Remote Control, install the batteries as shown. It is observed. 3) Align the cover tabs with the remote control and press down . The remote control will not control equipment from other manufacturers. 40
Using a fingernail, lift the battery cover off. 2) Install two "AAA" batteries as described below. 1) Turn the Remote Control face down until the cover clicks. Make sure that proper polarity (+ or -) is not a universal remote control and will operate the MMD102 and most Audiovox VCP's. REMOTE CONTROL OPERATION Battery Installation Before attempting to operate your Remote Control, install the batteries as shown. It is observed. 3) Align the cover tabs with the remote control and press down . The remote control will not control equipment from other manufacturers. 40
Operation Manual
Page 41
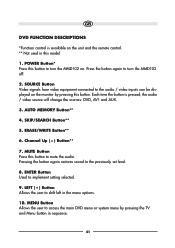
... / video inputs can be displayed on the monitor by pressing the TV and Menu button in sequence. 41 Press the button again to turn the MMD102 off. 2. Each time the button is available on . ERASE/WRITE Button** 6. ENTER Button Used to the previously set level. 8. Channel Up ( ) Button**... 7. MENU Button Allows the user to shift left in this button to turn the MMD102 on the unit and the remote control. ** Not used in the menu options. 10. MUTE Button Press this button. LEFT ( ) Button Allows the user to access the...
... / video inputs can be displayed on the monitor by pressing the TV and Menu button in sequence. 41 Press the button again to turn the MMD102 off. 2. Each time the button is available on . ERASE/WRITE Button** 6. ENTER Button Used to the previously set level. 8. Channel Up ( ) Button**... 7. MENU Button Allows the user to shift left in this button to turn the MMD102 on the unit and the remote control. ** Not used in the menu options. 10. MUTE Button Press this button. LEFT ( ) Button Allows the user to access the...
Operation Manual
Page 42
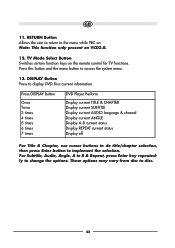
... Switches certain function keys on VCD2.0. 12. Press this button and the menu button to implement the selection. Note: This function only present on the remote control for TV functions.
... Switches certain function keys on VCD2.0. 12. Press this button and the menu button to implement the selection. Note: This function only present on the remote control for TV functions.
Operation Manual
Page 43
.... STOP ( ) Button* DVD disc play mode while a disc is loaded into the disc compartment. 20. DVD Mode Select button Switches certain function keys on the remote control for DVD functions. 22. PAUSE (II) Button Allows the user to the previous chapter or track. 16. PLAY ( ) Button* Press this button to search...
.... STOP ( ) Button* DVD disc play mode while a disc is loaded into the disc compartment. 20. DVD Mode Select button Switches certain function keys on the remote control for DVD functions. 22. PAUSE (II) Button Allows the user to the previous chapter or track. 16. PLAY ( ) Button* Press this button to search...
Operation Manual
Page 46
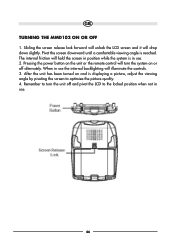
... release lock forward will unlock the LCD screen and it will turn the unit off alternately. Pressing the power button on the unit or the remote control will drop down slightly. The internal friction will hold the screen in position while the system is in use the internal backlighting will illuminate... angle by pivoting the screen to turn the system on and is reached. When in use . 46 Remember to optimize the picture quality. 4. TURNING THE MMD102 ON OR OFF 1.
... release lock forward will unlock the LCD screen and it will turn the unit off alternately. Pressing the power button on the unit or the remote control will drop down slightly. The internal friction will hold the screen in position while the system is in use the internal backlighting will illuminate... angle by pivoting the screen to turn the system on and is reached. When in use . 46 Remember to optimize the picture quality. 4. TURNING THE MMD102 ON OR OFF 1.
Operation Manual
Page 48
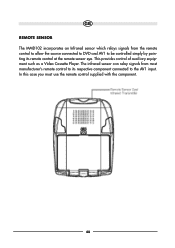
REMOTE SENSOR The MMD102 incorporates an Infrared sensor which relays signals from most manufacturer's remote control to its respective component connected to be controlled simply by pointing its remote control at the remote sensor eye. This provides control of auxiliary equipment such as a Video Cassette Player. In this case you must use the remote control supplied with the component. 48 The infrared sensor can relay signals from the remote control to allow the source connected to DVD and AV1 to the AV1 input.
REMOTE SENSOR The MMD102 incorporates an Infrared sensor which relays signals from most manufacturer's remote control to its respective component connected to be controlled simply by pointing its remote control at the remote sensor eye. This provides control of auxiliary equipment such as a Video Cassette Player. In this case you must use the remote control supplied with the component. 48 The infrared sensor can relay signals from the remote control to allow the source connected to DVD and AV1 to the AV1 input.
Operation Manual
Page 49
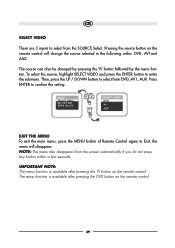
... be changed by pressing the TV button followed by the menu button. EXIT THE MENU To exit the main menu, press the MENU button of Remote Control again to select from DVD, AV1, AUX. Then, press the UP / DOWN button to Exit, the menu will change the source selected in ... the screen automatically if you do not press any button within a few seconds. The setup function is available after pressing the DVD button on the remote control will disappear. SELECT VIDEO There are 3 inputs to confirm the setting. To select the source, highlight SELECT VIDEO and press the ENTER button to...
... be changed by pressing the TV button followed by the menu button. EXIT THE MENU To exit the main menu, press the MENU button of Remote Control again to select from DVD, AV1, AUX. Then, press the UP / DOWN button to Exit, the menu will change the source selected in ... the screen automatically if you do not press any button within a few seconds. The setup function is available after pressing the DVD button on the remote control will disappear. SELECT VIDEO There are 3 inputs to confirm the setting. To select the source, highlight SELECT VIDEO and press the ENTER button to...
Operation Manual
Page 50
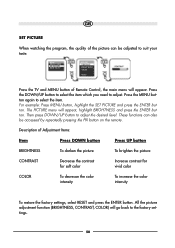
These functions can be accessed by repeatedly pressing the PIX button on the remote. All the picture adjustment function (BRIGHTNESS, CONTRAST, COLOR) will appear, highlight BRIGHTNESS and press the ENTER button. Press the MENU button again to adjust the ... the factory settings. 50 SET PICTURE When watching the program, the quality of the picture can also be adjusted to suit your taste. Description of Remote Control, the main menu will appear. Then press DOWN/UP button to select the item. Press the DOWN/UP button to select the item which...
These functions can be accessed by repeatedly pressing the PIX button on the remote. All the picture adjustment function (BRIGHTNESS, CONTRAST, COLOR) will appear, highlight BRIGHTNESS and press the ENTER button. Press the MENU button again to adjust the ... the factory settings. 50 SET PICTURE When watching the program, the quality of the picture can also be adjusted to suit your taste. Description of Remote Control, the main menu will appear. Then press DOWN/UP button to select the item. Press the DOWN/UP button to select the item which...
Operation Manual
Page 51
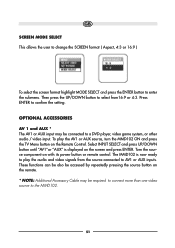
... until "AV1"or "AUX" is now ready to play the AV1 or AUX source, turn the MMD102 ON and press the TV Menu button on the screen and press ENTER. Turn the source component on the remote. * NOTE: Additional Accessory Cable may be required to connect more than one video source to... a DVD player, video game system, or other audio / video input. OPTIONAL ACCESSORIES AV 1 and AUX * The AV1 or AUX input may be connected to the MMD102. 51 SCREEN MODE SELECT This...
... until "AV1"or "AUX" is now ready to play the AV1 or AUX source, turn the MMD102 ON and press the TV Menu button on the screen and press ENTER. Turn the source component on the remote. * NOTE: Additional Accessory Cable may be required to connect more than one video source to... a DVD player, video game system, or other audio / video input. OPTIONAL ACCESSORIES AV 1 and AUX * The AV1 or AUX input may be connected to the MMD102. 51 SCREEN MODE SELECT This...
Operation Manual
Page 53
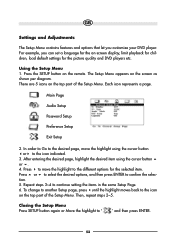
... to confirm the selection. 5. In order to Go to the desired page, move the highlight to the icon indicated. 3. The Setup Menu appears on the remote. There are 5 icons on the top part of the Setup Menu. After entering the desired page, highlight the desired item using the cursor button or...
... to confirm the selection. 5. In order to Go to the desired page, move the highlight to the icon indicated. 3. The Setup Menu appears on the remote. There are 5 icons on the top part of the Setup Menu. After entering the desired page, highlight the desired item using the cursor button or...
Operation Manual
Page 59
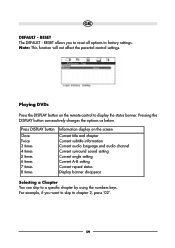
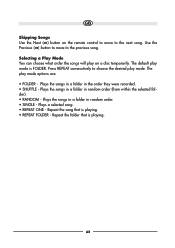
... Selecting a Chapter You can skip to display the status banner. Press DISPLAY button Once Twice 3 times 4 times 5 times 6 times 7 times 8 times Information display on the remote control to a specific chapter by using the numbers keys. DEFAULT -
... Selecting a Chapter You can skip to display the status banner. Press DISPLAY button Once Twice 3 times 4 times 5 times 6 times 7 times 8 times Information display on the remote control to a specific chapter by using the numbers keys. DEFAULT -
Operation Manual
Page 61
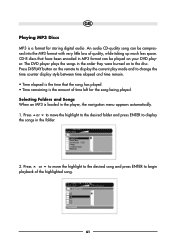
... left for storing digital audio. CD-R discs that the song has played • Time remaining is loaded in the order they were burned on the remote to display the current play mode and to begin playback of quality, while taking up much less space. The DVD player plays the songs in...
... left for storing digital audio. CD-R discs that the song has played • Time remaining is loaded in the order they were burned on the remote to display the current play mode and to begin playback of quality, while taking up much less space. The DVD player plays the songs in...
Operation Manual
Page 62
... in a folder in random order. • SINGLE - Plays the songs in a folder in the order they were recorded. • SHUFFLE - The default play on the remote control to move to the next song. Use the Previous ( ) button to move to the previous song. Repeat the song that is playing. 62 Selecting...
... in a folder in random order. • SINGLE - Plays the songs in a folder in the order they were recorded. • SHUFFLE - The default play on the remote control to move to the next song. Use the Previous ( ) button to move to the previous song. Repeat the song that is playing. 62 Selecting...
Operation Manual
Page 63
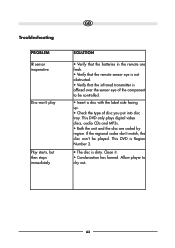
...; Condensation has formed. Troubleshooting PROBLEM IR sensor inoperative Disc won't play Play starts, but then stops immediately SOLUTION • Verify that the batteries in the remote are coded by region. This DVD only plays digital video discs, audio CDs and MP3s. • Both the unit and the disc are fresh. •...
...; Condensation has formed. Troubleshooting PROBLEM IR sensor inoperative Disc won't play Play starts, but then stops immediately SOLUTION • Verify that the batteries in the remote are coded by region. This DVD only plays digital video discs, audio CDs and MP3s. • Both the unit and the disc are fresh. •...


