
Owners Manual
Page 2
... NOT EXPOSE THIS APPLIANCE TO RAIN OR MOISTURE. Caution marking is intended to alert the user to the presence of important operating and maintenance (servicing) instructions in this owner's manual. TO PREVENT ELECTRIC SHOCK, MATCH WIDE BLADE OF PLUG TO WIDE SLOT OF WALL OUTLET, THEN FULLY INSERT. SAFETY PRECAUTIONS The...
... NOT EXPOSE THIS APPLIANCE TO RAIN OR MOISTURE. Caution marking is intended to alert the user to the presence of important operating and maintenance (servicing) instructions in this owner's manual. TO PREVENT ELECTRIC SHOCK, MATCH WIDE BLADE OF PLUG TO WIDE SLOT OF WALL OUTLET, THEN FULLY INSERT. SAFETY PRECAUTIONS The...

Owners Manual
Page 3
...harmful interference to radio or television reception, which the receiver is connected. • Consult the dealer or an experienced radio/TV technician for home and other intellectual property rights. WARNING: Should any interference received, including interference that interference will not occur .... Use of this copyright protection technology must be authorized by U.S. SAFETY PRECAUTIONS FCC Information This device complies with the instructions, may cause harmful interference to radio communications. Operation is subject to the following measures: • Reorient or relocate ...
...harmful interference to radio or television reception, which the receiver is connected. • Consult the dealer or an experienced radio/TV technician for home and other intellectual property rights. WARNING: Should any interference received, including interference that interference will not occur .... Use of this copyright protection technology must be authorized by U.S. SAFETY PRECAUTIONS FCC Information This device complies with the instructions, may cause harmful interference to radio communications. Operation is subject to the following measures: • Reorient or relocate ...

Owners Manual
Page 4
... walked on or pinched particularly at plugs, convenience receptacles, and the point where they exit from tip-over. Portable Cart Warning 13. IMPORTANT SAFETY INSTRUCTIONS 1. Install in any heat sources such as the power-supply cord or plug is required when the apparatus has been damaged in accordance with a ...cart, stand, tripod, bracket, or table specified by the manufacturer. 12. When the provided plug does not fit into the apparatus, the apparatus has been exposed to qualified service personnel.
... walked on or pinched particularly at plugs, convenience receptacles, and the point where they exit from tip-over. Portable Cart Warning 13. IMPORTANT SAFETY INSTRUCTIONS 1. Install in any heat sources such as the power-supply cord or plug is required when the apparatus has been damaged in accordance with a ...cart, stand, tripod, bracket, or table specified by the manufacturer. 12. When the provided plug does not fit into the apparatus, the apparatus has been exposed to qualified service personnel.
Owners Manual
Page 5
... 6 Remote Control 6 Control Reference Guide 7 - 9 Mounting Instructions 10-11 Connections 12-13 Connecting the TV Antenna 12 Connecting the Unit to a TV or other Video Equipment 12 Connecting the AM LOOP Antenna and FM Wire Antenna 12 Plugging in the Unit 13 Monitor Operation 13 Unit Operation 14 ...Specific Title/Chapter/Time 18 Locating a Specific Track 18 Setting Favorite Bookmark During Playback ..... 19 Repeat Playback 19 DVD Programmable Memory 20 DVD Programmable Memory 20 Viewing JPEG FILes 20 Play Modes for CD or JPEG Disc 21 Customizing the Function Settings 22...
... 6 Remote Control 6 Control Reference Guide 7 - 9 Mounting Instructions 10-11 Connections 12-13 Connecting the TV Antenna 12 Connecting the Unit to a TV or other Video Equipment 12 Connecting the AM LOOP Antenna and FM Wire Antenna 12 Plugging in the Unit 13 Monitor Operation 13 Unit Operation 14 ...Specific Title/Chapter/Time 18 Locating a Specific Track 18 Setting Favorite Bookmark During Playback ..... 19 Repeat Playback 19 DVD Programmable Memory 20 DVD Programmable Memory 20 Viewing JPEG FILes 20 Play Modes for CD or JPEG Disc 21 Customizing the Function Settings 22...
Owners Manual
Page 11
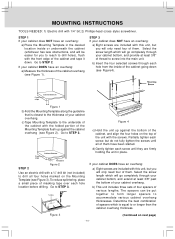
... will go completely through your cabinet bottom, and extend at least 3/8" past the bottom of your cabinet bottom, and provide at least 3/8" of them. MOUNTING INSTRUCTIONS TOOLS NEEDED: 1) Electric drill with the screws. Select the screw length which will be put together to form longer spacers to screw into the main...
... will go completely through your cabinet bottom, and extend at least 3/8" past the bottom of your cabinet bottom, and provide at least 3/8" of them. MOUNTING INSTRUCTIONS TOOLS NEEDED: 1) Electric drill with the screws. Select the screw length which will be put together to form longer spacers to screw into the main...

Owners Manual
Page 12
... cut out or through each hole from using multiple spacers for each screw). The top front edge of them have been started (see Figure 5). MOUNTING INSTRUCTIONS (Continued from previous page) c) Insert the four selected screws through the screw holes. 2) If your cabinet has obstructions inside it , which prevent you from the...
... cut out or through each hole from using multiple spacers for each screw). The top front edge of them have been started (see Figure 5). MOUNTING INSTRUCTIONS (Continued from previous page) c) Insert the four selected screws through the screw holes. 2) If your cabinet has obstructions inside it , which prevent you from the...
Owners Manual
Page 17
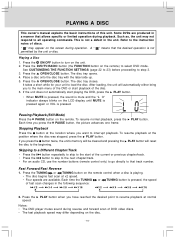
...1. Notes: • The DVD player mutes sound during reverse and forward scan of the disc. 6. Press the ON/OFF button to the instruction notes of the current or ...disc tray with the label side up. 5. Press the OPEN/CLOSE button. Press the DVD/TV/RADIO button (the FUNCTION button on the unit. 2. If the unit does not ...DVDs are available. If you press the button twice, the unit's memory will be cleared and pressing the PLAY button will automatically either bring you press the PAUSE button, the picture advances one frame. Such as, the unit may differ depending on the LCD...
...1. Notes: • The DVD player mutes sound during reverse and forward scan of the disc. 6. Press the ON/OFF button to the instruction notes of the current or ...disc tray with the label side up. 5. Press the OPEN/CLOSE button. Press the DVD/TV/RADIO button (the FUNCTION button on the unit. 2. If the unit does not ...DVDs are available. If you press the button twice, the unit's memory will be cleared and pressing the PLAY button will automatically either bring you press the PAUSE button, the picture advances one frame. Such as, the unit may differ depending on the LCD...

Owners Manual
Page 32
... products and services, please visit our web site at 1-866-444-6478, 1-800-252-6123 or www.1800customersupport.com/audiovox Hours: Monday-Thursday: 9-7, Friday: 9-5, Saturday: 9-12 EST Important: You are responsible for a particular purpose, are expressly limited to the duration of the limited warranties set ... product or parts caused by state law as proof of purchase. or Canada. (3) Warranties extend only to defects in violation of instructions provided with respect to the repair or replacement of any product or parts which have been lost or discarded, or damage to product...
... products and services, please visit our web site at 1-866-444-6478, 1-800-252-6123 or www.1800customersupport.com/audiovox Hours: Monday-Thursday: 9-7, Friday: 9-5, Saturday: 9-12 EST Important: You are responsible for a particular purpose, are expressly limited to the duration of the limited warranties set ... product or parts caused by state law as proof of purchase. or Canada. (3) Warranties extend only to defects in violation of instructions provided with respect to the repair or replacement of any product or parts which have been lost or discarded, or damage to product...