

Operation Manual
Page 2
... Basic Operations...20 Changing Channels ...20 Adjusting the Volume ...20 Selecting Input Source Signal ...21 Selecting a Menu Language...21 Setting Picture...22 Customizing the Picture ...22 Using the Preset Picture Mode ...22 Setting System...23 Setting System In TV Mode ...23 Adjusting Screen Aspect ...23 Reducing Picture Noise ...23 VCR mode ...23 Loading Default Values ...23 Setting System In VGA Mode ...24 Changing the Position of Image ...24 Adjusting Clock and Phase ...24 Adjusting the Picture Automatically...24 Adjusting Screen Aspect ...25 Displaying Resolution...
... Basic Operations...20 Changing Channels ...20 Adjusting the Volume ...20 Selecting Input Source Signal ...21 Selecting a Menu Language...21 Setting Picture...22 Customizing the Picture ...22 Using the Preset Picture Mode ...22 Setting System...23 Setting System In TV Mode ...23 Adjusting Screen Aspect ...23 Reducing Picture Noise ...23 VCR mode ...23 Loading Default Values ...23 Setting System In VGA Mode ...24 Changing the Position of Image ...24 Adjusting Clock and Phase ...24 Adjusting the Picture Automatically...24 Adjusting Screen Aspect ...25 Displaying Resolution...

Operation Manual
Page 3
...-Picture...31 Using Hotkeys...32 Setting Sleep Timer ...32 Setting Audio Mode...32 Adjusting Back Light of the Panel ...32 Freezing Picture...32 Viewing Closed Captions...33 Turning Closed Caption On or Off...33 Setting Closed Caption...33 Setting CC When Mute ...33 Adjusting Child Lock Settings...34 Child Lock ...34 Turning Child Lock On or Off ...36 Changing the Password ...36 Adjusting the Movie Rating ...36 Adjusting the TV Rating ...36 Adjusting Canadian English Rating ...37 Adjusting Canadian French Rating ...37 Troubleshooting ...38 Care and Maintenance ...39 Specification...
...-Picture...31 Using Hotkeys...32 Setting Sleep Timer ...32 Setting Audio Mode...32 Adjusting Back Light of the Panel ...32 Freezing Picture...32 Viewing Closed Captions...33 Turning Closed Caption On or Off...33 Setting Closed Caption...33 Setting CC When Mute ...33 Adjusting Child Lock Settings...34 Child Lock ...34 Turning Child Lock On or Off ...36 Changing the Password ...36 Adjusting the Movie Rating ...36 Adjusting the TV Rating ...36 Adjusting Canadian English Rating ...37 Adjusting Canadian French Rating ...37 Troubleshooting ...38 Care and Maintenance ...39 Specification...
Operation Manual
Page 4
... the user's authority to correct the interference at his own expense. The exclamation point within an equilateral triangle is provided to call the CATV system installer's attention to Article 820-40 of the National Electrical Code that the cable ground shall be connected to...MOISTURE. Operation of this device. For disposal or recycling information, please contact your local authorities or the Electronic Industries Alliance: www.eia.org FCC STATEMENT FCC Notice LCD TV: A CLASS B digital device This equipment has been tested and found to comply with the instruction manual, ...
... the user's authority to correct the interference at his own expense. The exclamation point within an equilateral triangle is provided to call the CATV system installer's attention to Article 820-40 of the National Electrical Code that the cable ground shall be connected to...MOISTURE. Operation of this device. For disposal or recycling information, please contact your local authorities or the Electronic Industries Alliance: www.eia.org FCC STATEMENT FCC Notice LCD TV: A CLASS B digital device This equipment has been tested and found to comply with the instruction manual, ...

Operation Manual
Page 6
... the controls other equipment as power-supply cord or plug is left unattended and unused for long periods of controls not described in the product, and inserting an object can cause damage, which often requires extensive adjustment work , request the service technician to perform safety checks to ensure that the product needs servicing. 20.Safety checks---Upon completion of service or repair work by...
... the controls other equipment as power-supply cord or plug is left unattended and unused for long periods of controls not described in the product, and inserting an object can cause damage, which often requires extensive adjustment work , request the service technician to perform safety checks to ensure that the product needs servicing. 20.Safety checks---Upon completion of service or repair work by...
Operation Manual
Page 8
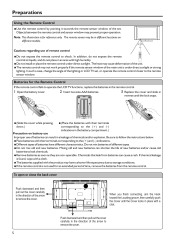
Preparations Using the Remote Control
Preparations Using the Remote Control

Operation Manual
Page 9
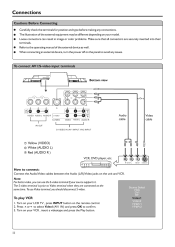
.../descrambler by the cable TV company. F-type connector 75-ohm coaxial cable (round) 300-ohm twin-lead cable (flat) A. RF switch (not supplied) Two-set . A: Using a VHF/UHF combination outdoor antenna. When connecting the 75- Since the signals of the TV set signal splitter (not supplied) Cable TV Line OUT IN Cable TV converter/ descrambler (not supplied) "A" position on the rear of these premium pay channels". "B" position on installing cable TV, consult your Dealer or Service Center for...
.../descrambler by the cable TV company. F-type connector 75-ohm coaxial cable (round) 300-ohm twin-lead cable (flat) A. RF switch (not supplied) Two-set . A: Using a VHF/UHF combination outdoor antenna. When connecting the 75- Since the signals of the TV set signal splitter (not supplied) Cable TV Line OUT IN Cable TV converter/ descrambler (not supplied) "A" position on the rear of these premium pay channels". "B" position on installing cable TV, consult your Dealer or Service Center for...

Operation Manual
Page 11
... view ANTENNA INPUT 3 D - Sub IN AUDIO DVI DVI IN AUDIO Y1 VIDEO Y2 L AUDIO R S-VIDEO VIDEO VIDEO L L AUDIO AUDIO R R AV2 IN COMPONENT IN AV1 IN Pb1 Pb 2 Pr1 Pr 2 R1 R 2 L1 L 2 D - Component inputs (Y, Pb, Pr, Audio L, R) Connect to the VGA/audio outputs on your PC. 5. Antenna input Allows you to record programs. 2. Sub D-Sub D-Sub IN D - AV outputs (Video, Audio L/mono, R) Connect to the VCR input jacks to connect cable or outdoor antenna. 4. Receive video/audio signals from Antenna input or AV inputs. 8 Identification of a DVD player or Set...
... view ANTENNA INPUT 3 D - Sub IN AUDIO DVI DVI IN AUDIO Y1 VIDEO Y2 L AUDIO R S-VIDEO VIDEO VIDEO L L AUDIO AUDIO R R AV2 IN COMPONENT IN AV1 IN Pb1 Pb 2 Pr1 Pr 2 R1 R 2 L1 L 2 D - Component inputs (Y, Pb, Pr, Audio L, R) Connect to the VGA/audio outputs on your PC. 5. Antenna input Allows you to record programs. 2. Sub D-Sub D-Sub IN D - AV outputs (Video, Audio L/mono, R) Connect to the VCR input jacks to connect cable or outdoor antenna. 4. Receive video/audio signals from Antenna input or AV inputs. 8 Identification of a DVD player or Set...
Operation Manual
Page 14
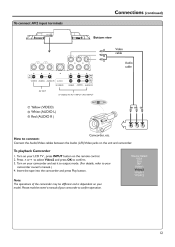
... to the operating manual of the external equipment may be different depending on the panel to connect: Connect the Audio/Video cables between the Audio (L/R)/Video jacks on your model. To use the S-video terminal if your LCD TV , press INPUT button on your source supports it. To play VCR 1. Turn on the remote control. 2. R w Y R AUDIO OUT L VIDEO OUT S-VIDEO OUT How to avoid any connections. Note: For better video, you should disconnect S-video. When connecting an external device, turn the power off on...
... to the operating manual of the external equipment may be different depending on the panel to connect: Connect the Audio/Video cables between the Audio (L/R)/Video jacks on your model. To use the S-video terminal if your LCD TV , press INPUT button on your source supports it. To play VCR 1. Turn on the remote control. 2. R w Y R AUDIO OUT L VIDEO OUT S-VIDEO OUT How to avoid any connections. Note: For better video, you should disconnect S-video. When connecting an external device, turn the power off on...
Operation Manual
Page 15
... LCD TV , press INPUT button on the unit and camcorder. Press 5or6 to select Video2 and press OK to confirm operation. Insert the tape into the camcorder and press Play button. How to your model. Please read the owner's manual of the camcorder may be different and is dependent on your camcorder and set it to output mode. (For details, refer to connect: Connect the Audio/Video cables...
... LCD TV , press INPUT button on the unit and camcorder. Press 5or6 to select Video2 and press OK to confirm operation. Insert the tape into the camcorder and press Play button. How to your model. Please read the owner's manual of the camcorder may be different and is dependent on your camcorder and set it to output mode. (For details, refer to connect: Connect the Audio/Video cables...
Operation Manual
Page 16
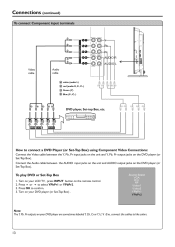
... cables to confirm. 3. Turn on your LCD TV , press INPUT button on the DVD player (or Set-Top Box). Press OK to like colors. 13 Source Select VGA DVI RF Video1 Video2 YPbPr1 YPbPr2 Note: The Y, Pb, Pr outputs on the DVD player (or Set-Top Box). Sub IN AUDIO Pr1 Pr 2 DVI R1 R 2 DVI IN AUDIO COMPONENT IN R W Y1 Y2 Pb1 Pb 2 Pr1 Pr 2 R1 R 2 L1 L 2 L1 L 2 Video cable Audio cable W white (audio L) W R red (audio R, Pr /C r ) G Green (Y) B Blue (P b /C b ) R R B G G B R R W W R R B G DVD player, Set...
... cables to confirm. 3. Turn on your LCD TV , press INPUT button on the DVD player (or Set-Top Box). Press OK to like colors. 13 Source Select VGA DVI RF Video1 Video2 YPbPr1 YPbPr2 Note: The Y, Pb, Pr outputs on the DVD player (or Set-Top Box). Sub IN AUDIO Pr1 Pr 2 DVI R1 R 2 DVI IN AUDIO COMPONENT IN R W Y1 Y2 Pb1 Pb 2 Pr1 Pr 2 R1 R 2 L1 L 2 L1 L 2 Video cable Audio cable W white (audio L) W R red (audio R, Pr /C r ) G Green (Y) B Blue (P b /C b ) R R B G G B R R W W R R B G DVD player, Set...

Operation Manual
Page 18
... the unit. Press OK to select VGA. 3. Turn on your LCD TV , press INPUT button on your computer to connect: Connect a VGA cable between the AUDIO output on the PC and AUDIO input jack on the unit. Press 5 or 6 to confirm. 4. Adjust the screen resolution and settings on the remote control. 2. Sub D-Sub D - To Watch the PC screen 1. Connections (continued) To connect D-Sub input D - Source Select VGA DVI RF Video1 Video2 YPbPr1 YPbPr2...
... the unit. Press OK to select VGA. 3. Turn on your LCD TV , press INPUT button on your computer to connect: Connect a VGA cable between the AUDIO output on the PC and AUDIO input jack on the unit. Press 5 or 6 to confirm. 4. Adjust the screen resolution and settings on the remote control. 2. Sub D-Sub D - To Watch the PC screen 1. Connections (continued) To connect D-Sub input D - Source Select VGA DVI RF Video1 Video2 YPbPr1 YPbPr2...
Operation Manual
Page 20
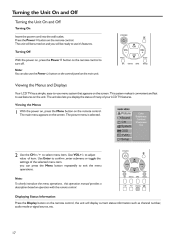
... the Display button on the main unit. Turning Off With the power on the screen. MAIN MENU Picture Sound CH System OSD TVPC Setup Color Brightness Contrast Sharpness Tint 2 Use the CH5/6 to button on the control panel on the remote control, the unit will be ready to confirm ,enter submenu or toggle the settings of item. to exit the menu operations. The unit will be turned on the screen. Viewing the...
... the Display button on the main unit. Turning Off With the power on the screen. MAIN MENU Picture Sound CH System OSD TVPC Setup Color Brightness Contrast Sharpness Tint 2 Use the CH5/6 to button on the control panel on the remote control, the unit will be ready to confirm ,enter submenu or toggle the settings of item. to exit the menu operations. The unit will be turned on the screen. Viewing the...

Operation Manual
Page 21
... connected to the unit. (i.e., an antenna or cable system) MAIN MENU 1 2 Press Menu to display the menu main page. Selecting the Signal Source Before your LCD TV can memorize the available channels, you must specify the type of the Auto Search, you can memorize and store all the available channels. Picture Sound CH System OSD TVPC Setup TV/Cable Channel No Add/Erase Auto Search 3 4 Press Enter to highlight Auto Search item. The TV/Cable menu...
... connected to the unit. (i.e., an antenna or cable system) MAIN MENU 1 2 Press Menu to display the menu main page. Selecting the Signal Source Before your LCD TV can memorize the available channels, you must specify the type of the Auto Search, you can memorize and store all the available channels. Picture Sound CH System OSD TVPC Setup TV/Cable Channel No Add/Erase Auto Search 3 4 Press Enter to highlight Auto Search item. The TV/Cable menu...

Operation Manual
Page 23
... 0-9 number buttons to input the remain two digits of the channel number, then the unit goes to change channels. To turn mute off . When you can temporarily cut off the sound using the Mute button. 1 2 Press the button and the sound cuts off , press the 20 Direct Accessing Channels Press the number buttons to go directly to switch between the current channel and the previous channel. Using the Return button Press this button to a channel...
... 0-9 number buttons to input the remain two digits of the channel number, then the unit goes to change channels. To turn mute off . When you can temporarily cut off the sound using the Mute button. 1 2 Press the button and the sound cuts off , press the 20 Direct Accessing Channels Press the number buttons to go directly to switch between the current channel and the previous channel. Using the Return button Press this button to a channel...

Operation Manual
Page 25
...: Select for a normal picture. Press Menu to display the menu main page. Adjusts color saturation. darker hair. Nature: Select for a bright picture. Setting Picture Customizing the Picture 1 2 3 4 5 Press Menu to exit. The picture menu page will be displayed automatically. Press Enter to change. Press CH5/6 to select the item you wish to access the Picture submenu. In TV/Video mode Option Function Operation MAIN MENU Picture Sound CH System OSD TVPC Setup Color Brightness Contrast Sharpness...
...: Select for a normal picture. Press Menu to display the menu main page. Adjusts color saturation. darker hair. Nature: Select for a bright picture. Setting Picture Customizing the Picture 1 2 3 4 5 Press Menu to exit. The picture menu page will be displayed automatically. Press Enter to change. Press CH5/6 to select the item you wish to access the Picture submenu. In TV/Video mode Option Function Operation MAIN MENU Picture Sound CH System OSD TVPC Setup Color Brightness Contrast Sharpness...

Operation Manual
Page 26
... 4:3 signal format. For 16:9 signal format. Press Enter to select VCR mode item. This function helps to enhance the picture quality by using the Screen button on the screen because of poor signal. Press CH5/6 repeatedly to access the submenu. Setting System Setting System In TV Mode Adjusting Screen Aspect 1 2 3 4 Press Menu to display the menu main page. TVPC 16:9 4:3 -- This mode displays a 4:3 picture at its standard 4:3 size Setup without any stretching. 16:9 -- Reducing Picture Noise 1 2 3 4 5 Press Menu to display...
... 4:3 signal format. For 16:9 signal format. Press Enter to select VCR mode item. This function helps to enhance the picture quality by using the Screen button on the screen because of poor signal. Press CH5/6 repeatedly to access the submenu. Setting System Setting System In TV Mode Adjusting Screen Aspect 1 2 3 4 Press Menu to display the menu main page. TVPC 16:9 4:3 -- This mode displays a 4:3 picture at its standard 4:3 size Setup without any stretching. 16:9 -- Reducing Picture Noise 1 2 3 4 5 Press Menu to display...

Operation Manual
Page 36
... unit display closed caption when you set this item to access the submenu. If you mute the sound. The CCD On/Off item will be viewed in your television schedule and on the tape's packaging: . You may quickly select CCD mode by using the CCD button directly. MAIN MENU Picture Sound CH System OSD TVPC Setup CCD On/Off CCD Mode CC when mute Child Lock On Turning Closed Caption On...
... unit display closed caption when you set this item to access the submenu. If you mute the sound. The CCD On/Off item will be viewed in your television schedule and on the tape's packaging: . You may quickly select CCD mode by using the CCD button directly. MAIN MENU Picture Sound CH System OSD TVPC Setup CCD On/Off CCD Mode CC when mute Child Lock On Turning Closed Caption On...
Operation Manual
Page 39
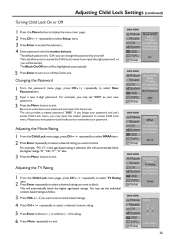
... highlighted automatically. Press VOL+/- TV-PG MAIN MENU Picture Sound CH System OSD TVPC Setup TV-PG: V S L D :View :Block 36 Please set content-based ratings. Press Menu repeatedly to exit. Press CH5/6 repeatedly to select Setup item; if you can 't access Child Lock menu, you may input the master password to exit. Press CH5/6 repeatedly to select a desired content rating. PG-13 Press the Menu button to access Child Lock menu.
... highlighted automatically. Press VOL+/- TV-PG MAIN MENU Picture Sound CH System OSD TVPC Setup TV-PG: V S L D :View :Block 36 Please set content-based ratings. Press Menu repeatedly to exit. Press CH5/6 repeatedly to select Setup item; if you can 't access Child Lock menu, you may input the master password to exit. Press CH5/6 repeatedly to select a desired content rating. PG-13 Press the Menu button to access Child Lock menu.
Operation Manual
Page 41
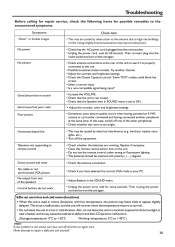
... connected to +40°C ) Note: If your problem is used in a location exposed to high rise buildings or hills. Then re-plug the power cord and turn on again once. Also, do not work. Troubleshooting Before calling for repair service, check the following items for possible remedies to remote control Check whether the batteries are working. Unplug the power cord, wait for some seconds. Good picture but poor color...
... connected to +40°C ) Note: If your problem is used in a location exposed to high rise buildings or hills. Then re-plug the power cord and turn on again once. Also, do not work. Troubleshooting Before calling for repair service, check the following items for possible remedies to remote control Check whether the batteries are working. Unplug the power cord, wait for some seconds. Good picture but poor color...

Operation Manual
Page 43
Specification Type Display Size diagonal Display Feature LCD panel Resolution Pixel Pitch Maximum Colors Brightness Contrast Viewing Angle Response Time TV Tuner & Color System Tuner TV System Channel Coverage Video Features Audio Speaker System Maximum Audio Output Stereo Sound System Power Supply Power Consumption Stand by Mode Power Consumption Unit weight (lb) TV Unit Dimension (WxHxD) (inch) Other functions Caption Security Remote Control function support for full OSD features 10Wx2 BTSC AC 100-240V, 50/ 60Hz 200W
Specification Type Display Size diagonal Display Feature LCD panel Resolution Pixel Pitch Maximum Colors Brightness Contrast Viewing Angle Response Time TV Tuner & Color System Tuner TV System Channel Coverage Video Features Audio Speaker System Maximum Audio Output Stereo Sound System Power Supply Power Consumption Stand by Mode Power Consumption Unit weight (lb) TV Unit Dimension (WxHxD) (inch) Other functions Caption Security Remote Control function support for full OSD features 10Wx2 BTSC AC 100-240V, 50/ 60Hz 200W


