
Operation Manual
Page 1
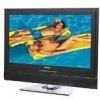
Please keep this product, please read the manual completely. Menu items that are not selectable are for future reference. LCD Color TV with ATSC Tuner Operating Manual FPE3206 Before connecting, operating or adjusting this manual for explanation purposes and may vary slightly from the actual operations. FOR ASSISTANCE CALL 1-800-619-3848 OR VISIT US AT WWW.AUDIOVOX.COM. 1287616 The illustrations and on-screen displays in this operation manual are grayed out.
Please keep this product, please read the manual completely. Menu items that are not selectable are for future reference. LCD Color TV with ATSC Tuner Operating Manual FPE3206 Before connecting, operating or adjusting this manual for explanation purposes and may vary slightly from the actual operations. FOR ASSISTANCE CALL 1-800-619-3848 OR VISIT US AT WWW.AUDIOVOX.COM. 1287616 The illustrations and on-screen displays in this operation manual are grayed out.
Operation Manual
Page 3
...the following basic safety precautions should be connected to grasp the plug when disconnecting the AC power cord. Important Safeguards Before using your TV, please read these slots and openings must never be blocked causing overheating and cause fire or damage the unit. Grounding or Polarization This... outlet only one blade wider than the other materials. = Never block the slots and openings by forcing it from the type of the TV with a three-wire grounding type AC power cord plug (Class 1 unit) This unit must be operated only from overheating, these instructions completely...
...the following basic safety precautions should be connected to grasp the plug when disconnecting the AC power cord. Important Safeguards Before using your TV, please read these slots and openings must never be blocked causing overheating and cause fire or damage the unit. Grounding or Polarization This... outlet only one blade wider than the other materials. = Never block the slots and openings by forcing it from the type of the TV with a three-wire grounding type AC power cord plug (Class 1 unit) This unit must be operated only from overheating, these instructions completely...
Operation Manual
Page 5
...Connecting a DVD Player with S-Video and Audio Connectors 16 Connecting a PC...17 Connecting a Camcorder or "PlayStation 17 Connecting a Second TV or Monitor 18 Connecting Headphones ...18 Introducing the Remote Control...19 Insert Batteries into the Remote Control 19 Using the Remote Control...19 ...Button Descriptions...20 Getting Start ...22 Running Initial Setup...22 Setting a Secret Number...23 Menu Navigation ...23 Watching TV ...24 Turning On/Off ...24 Introducing Channel Number ...24 Selecting Channels ...24 Adjusting Volume ...25 Using FREEZE button...25 Using ZOOM button...
...Connecting a DVD Player with S-Video and Audio Connectors 16 Connecting a PC...17 Connecting a Camcorder or "PlayStation 17 Connecting a Second TV or Monitor 18 Connecting Headphones ...18 Introducing the Remote Control...19 Insert Batteries into the Remote Control 19 Using the Remote Control...19 ...Button Descriptions...20 Getting Start ...22 Running Initial Setup...22 Setting a Secret Number...23 Menu Navigation ...23 Watching TV ...24 Turning On/Off ...24 Introducing Channel Number ...24 Selecting Channels ...24 Adjusting Volume ...25 Using FREEZE button...25 Using ZOOM button...
Operation Manual
Page 7
...installation location as possible. = When transporting, do not subject the unit to shocks or vibration, or excessive force. 6 Cautions: = Do not install the TV in protruding locations. = Do not install this unit in a place subject to excessive dust or mechanical vibration. = Be sure to take measures to direct illumination... or serious injury. however, keep the wrapping on the unit. It is desirable to protect it by two or more = Do not install the TV in a hot or humid place, or in a vehicle or hang from toppling over and causing injury. = To obtain the best picture, do so...
...installation location as possible. = When transporting, do not subject the unit to shocks or vibration, or excessive force. 6 Cautions: = Do not install the TV in protruding locations. = Do not install this unit in a place subject to excessive dust or mechanical vibration. = Be sure to take measures to direct illumination... or serious injury. however, keep the wrapping on the unit. It is desirable to protect it by two or more = Do not install the TV in a hot or humid place, or in a vehicle or hang from toppling over and causing injury. = To obtain the best picture, do so...
Operation Manual
Page 8
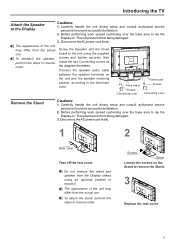
... installation. 2. Screws Stand Loosen the screws on the unit and the speaker matching polarity according to the Display Cautions: 1. This will prevent it . Introducing the TV Attach the Speaker to the terminals' color. To deattach the speaker, perform the steps in reverse order. Fixed board Screws Connecting cover Fixed board Screws...
... installation. 2. Screws Stand Loosen the screws on the unit and the speaker matching polarity according to the Display Cautions: 1. This will prevent it . Introducing the TV Attach the Speaker to the terminals' color. To deattach the speaker, perform the steps in reverse order. Fixed board Screws Connecting cover Fixed board Screws...
Operation Manual
Page 9
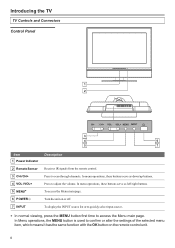
.... VOL+ MENU INPUT 3 4 6 5 7 Item 1 Power Indicator 2 Remote Sensor 3 CH-/CH+ 4 VOL-/VOL+ 5 MENU* 6 POWER 7 INPUT Description Receives IR signals from the remote control. Introducing the TV TV Controls and Connectors Control Panel 1 2 CH- Turn the unit on the remote control unit. 8 In Menu operations, the MENU button is used to access the...
.... VOL+ MENU INPUT 3 4 6 5 7 Item 1 Power Indicator 2 Remote Sensor 3 CH-/CH+ 4 VOL-/VOL+ 5 MENU* 6 POWER 7 INPUT Description Receives IR signals from the remote control. Introducing the TV TV Controls and Connectors Control Panel 1 2 CH- Turn the unit on the remote control unit. 8 In Menu operations, the MENU button is used to access the...
Operation Manual
Page 10
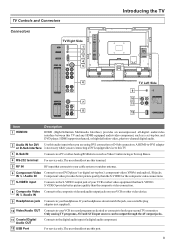
...Item 1 HDMI IN Description HDMI (High-Definition Multimedia Interface) provides an uncompressed, all-digital audio/video interface between this TV and any HDMI-equipped audio/video component, such as desired or connects to a PC or other video device. HDMI ...TV or monitor. S VIDEO provides better picture quality than the S-VIDEO or the composite video connections. 7 S-VIDEO input Connects to the composite video and audio output jacks on your headphones. VIDEO 7 AV VIDEO VIDEO L L 8 R R 2 1 HDM I INP UT D-Su b/D VI AUD IO IN PUT D-S ub IN PUT (PC/ DTV I NPU T) RS -2 32...
...Item 1 HDMI IN Description HDMI (High-Definition Multimedia Interface) provides an uncompressed, all-digital audio/video interface between this TV and any HDMI-equipped audio/video component, such as desired or connects to a PC or other video device. HDMI ...TV or monitor. S VIDEO provides better picture quality than the S-VIDEO or the composite video connections. 7 S-VIDEO input Connects to the composite video and audio output jacks on your headphones. VIDEO 7 AV VIDEO VIDEO L L 8 R R 2 1 HDM I INP UT D-Su b/D VI AUD IO IN PUT D-S ub IN PUT (PC/ DTV I NPU T) RS -2 32...
Operation Manual
Page 11
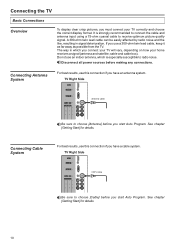
...before you start Auto Program. The way in signal deterioration. CATV cable Be sure to choose [Antenna] before making any connections. Connecting the TV Basic Connections Overview To display clear crisp pictures, you must connect your home receives a signal (antenna and satellite; Connecting Antenna System For best ... chapter [Getting Start] for details. Do not use a 300-ohm twin lead cable, keep it as far away as possible from the TV. A 300-ohm twin lead cable can be easily affected by radio noise and the like, resulting in which is strongly recommended to connect ...
...before you start Auto Program. The way in signal deterioration. CATV cable Be sure to choose [Antenna] before making any connections. Connecting the TV Basic Connections Overview To display clear crisp pictures, you must connect your home receives a signal (antenna and satellite; Connecting Antenna System For best ... chapter [Getting Start] for details. Do not use a 300-ohm twin lead cable, keep it as far away as possible from the TV. A 300-ohm twin lead cable can be easily affected by radio noise and the like, resulting in which is strongly recommended to connect ...
Operation Manual
Page 12
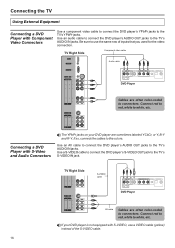
... such as premium channels or all channels (which requires you to use a coaxial cable to connect the cable box's output jack to the TV's RF input jack. TV Right Side HDMI INPUT D-Sub/DVI AUDIO INPUT Component video cable D-Sub INPUT (PC/DTV INPUT) RS-232 RF COMPONENT Y Y Pb Pb... Connections Connecting Cable Box For best results, use this connection if you have a cable system and your digital cable box to the TV's component jacks. This TV displays most format types of picture. Connect red to red, white to view digital broadcastings in 1080i, 720p, 480i and 480p. See ...
... such as premium channels or all channels (which requires you to use a coaxial cable to connect the cable box's output jack to the TV's RF input jack. TV Right Side HDMI INPUT D-Sub/DVI AUDIO INPUT Component video cable D-Sub INPUT (PC/DTV INPUT) RS-232 RF COMPONENT Y Y Pb Pb... Connections Connecting Cable Box For best results, use this connection if you have a cable system and your digital cable box to the TV's component jacks. This TV displays most format types of picture. Connect red to red, white to view digital broadcastings in 1080i, 720p, 480i and 480p. See ...
Operation Manual
Page 13
...Connect red to red, white to connectors. Use a component video cable to connect the YPbPr jacks of the digital satellite receiver. TV Right Side HDMI INPUT D-Sub/DVI AUDIO INPUT Component video cable D-Sub INPUT (PC/DTV INPUT) RS-232 RF COMPONENT Y Y...Receiver R R L L 2 1 Audio cable RF coaxial cable S- This TV displays most format types of the S-VIDEO cable. Connecting the TV Basic Connections Connecting Satellite Receiver Connect the satellite antenna cable to the TV's component jacks. Connecting Digital Satellite Receiver Connect the RF coaxial cable from the...
...Connect red to red, white to connectors. Use a component video cable to connect the YPbPr jacks of the digital satellite receiver. TV Right Side HDMI INPUT D-Sub/DVI AUDIO INPUT Component video cable D-Sub INPUT (PC/DTV INPUT) RS-232 RF COMPONENT Y Y...Receiver R R L L 2 1 Audio cable RF coaxial cable S- This TV displays most format types of the S-VIDEO cable. Connecting the TV Basic Connections Connecting Satellite Receiver Connect the satellite antenna cable to the TV's component jacks. Connecting Digital Satellite Receiver Connect the RF coaxial cable from the...
Operation Manual
Page 14
... VIDEO AV VIDEO VIDEO L L R R 2 1 The HDMI jack provides both video and audio signals, so it is not necessary to the TV's HDMI IN jack. To view external source images, select the input source from INPUT on the remote control unit or on your model. Equipment with...and type before making any connections. = Carefully check the terminals for the signal type. = The illustration of external equipment to your TV, like a DVD player, VCR, Digital TV tuner, PC, HDMI equipment, game console and camcorder. Notes and Cautions: = Disconnect all power sources before making any connections. ...
... VIDEO AV VIDEO VIDEO L L R R 2 1 The HDMI jack provides both video and audio signals, so it is not necessary to the TV's HDMI IN jack. To view external source images, select the input source from INPUT on the remote control unit or on your model. Equipment with...and type before making any connections. = Carefully check the terminals for the signal type. = The illustration of external equipment to your TV, like a DVD player, VCR, Digital TV tuner, PC, HDMI equipment, game console and camcorder. Notes and Cautions: = Disconnect all power sources before making any connections. ...
Operation Manual
Page 15
... LINE IN L AUDIO R COAXIAL AUDIO IN VCR(OUTPUT) VIDEO R COAXIAL L DIGITAL AUDIO OUT USB(UPGRADE PORT) TV Left Side The Digital Audio OUT jack is available only when a digital TV channel is for sound as an audio amplifier. You can use separate audio cables for video signals only... AUDIO INPUT D-Sub INPUT (PC/DTV INPUT) HDMI-to the device's Coaxial Digital Audio IN jack. Both are connecting equipment with DVI connector to this TV, you will also need to use a commercial HDMI-to connect a digital audio device, such as DVI connector is received. 14 VIDEO AV VIDEO VIDEO L L R...
... LINE IN L AUDIO R COAXIAL AUDIO IN VCR(OUTPUT) VIDEO R COAXIAL L DIGITAL AUDIO OUT USB(UPGRADE PORT) TV Left Side The Digital Audio OUT jack is available only when a digital TV channel is for sound as an audio amplifier. You can use separate audio cables for video signals only... AUDIO INPUT D-Sub INPUT (PC/DTV INPUT) HDMI-to the device's Coaxial Digital Audio IN jack. Both are connecting equipment with DVI connector to this TV, you will also need to use a commercial HDMI-to connect a digital audio device, such as DVI connector is received. 14 VIDEO AV VIDEO VIDEO L L R...
Operation Manual
Page 16
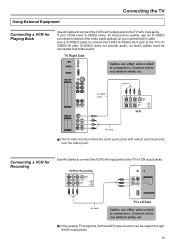
... priority over the video2 jack. Use a S-VIDEO cable to connect the VCR's S-VIDEO OUT jack to connectors. Connect red to red, white to the TV's AV input jacks. If your VCRs have S-VIDEO jacks, for Recording Use AV cables to connect the VCR's AV input jacks to provide sound. Connecting... the TV Using External Equipment Connecting a VCR for Playing Back Use AV cables to connect the VCR's AV output jacks to white, etc. S-VIDEO does not ...
... priority over the video2 jack. Use a S-VIDEO cable to connect the VCR's S-VIDEO OUT jack to connectors. Connect red to red, white to the TV's AV input jacks. If your VCRs have S-VIDEO jacks, for Recording Use AV cables to connect the VCR's AV input jacks to provide sound. Connecting... the TV Using External Equipment Connecting a VCR for Playing Back Use AV cables to connect the VCR's AV output jacks to white, etc. S-VIDEO does not ...
Operation Manual
Page 17
... are often color-coded to like colors. Use an audio cable to connect the DVD player's AUDIO OUT jacks to connectors. Be sure to the TV's YPbPr jacks. Connecting a DVD Player with S-Video and Audio Connectors The YPbPr jacks on your DVD player is not equipped with Component Video Connectors ...DVD Player AV cable Cables are sometimes labeled YCbCr, or Y, B-Y and R-Y. If so, connect the cables to connectors. Connect red to red, white to the TV's AUDIO IN jacks. Use an AV cable to connect the DVD player's AUDIO OUT jacks to white, etc. Use a S-VIDEO cable to connect the DVD...
... are often color-coded to like colors. Use an audio cable to connect the DVD player's AUDIO OUT jacks to connectors. Be sure to the TV's YPbPr jacks. Connecting a DVD Player with S-Video and Audio Connectors The YPbPr jacks on your DVD player is not equipped with Component Video Connectors ...DVD Player AV cable Cables are sometimes labeled YCbCr, or Y, B-Y and R-Y. If so, connect the cables to connectors. Connect red to red, white to the TV's AUDIO IN jacks. Use an AV cable to connect the DVD player's AUDIO OUT jacks to white, etc. Use a S-VIDEO cable to connect the DVD...
Operation Manual
Page 18
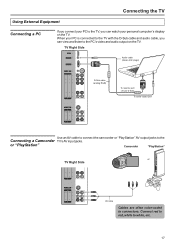
... color-coded to white, etc. 17 VIDEO AV VIDEO VIDEO L L R R 2 1 Use an AV cable to connect the camcorder or "PlayStation" AV output jacks to the TV with the D-Sub cable and audio cable, you can view and listen to the PC's video and audio output on the... TV. When your personal computer's display on the TV. TV Right Side HDMI INPUT D-Sub/DVI AUDIO INPUT D-Sub INPUT (PC/DTV INPUT) Audio cable (stereo mini plugs) RS-232 RF COMPONENT Y Y Pb...
... color-coded to white, etc. 17 VIDEO AV VIDEO VIDEO L L R R 2 1 Use an AV cable to connect the camcorder or "PlayStation" AV output jacks to the TV with the D-Sub cable and audio cable, you can view and listen to the PC's video and audio output on the... TV. When your personal computer's display on the TV. TV Right Side HDMI INPUT D-Sub/DVI AUDIO INPUT D-Sub INPUT (PC/DTV INPUT) Audio cable (stereo mini plugs) RS-232 RF COMPONENT Y Y Pb...
Operation Manual
Page 19
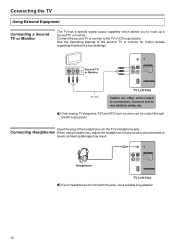
... white to avoid excessive levels, as to white, etc. Headphones VCR(OUTPUT) VIDEO R COAXIAL L DIGITAL AUDIO OUT USB(UPGRADE PORT) TV Left Side If your headphones do not match the jack, use a suitable plug adaptor. 18 Connecting Headphones When using headphones, adjust the headphone...as hearing damage may result. Connecting the TV Using External Equipment Connecting a Second TV or Monitor The TV has a special signal output capability which allows you to the TV's VCR output jacks. Connect the second TV or monitor to hook up a second TV or monitor. See the Operating Manual ...
... white to avoid excessive levels, as to white, etc. Headphones VCR(OUTPUT) VIDEO R COAXIAL L DIGITAL AUDIO OUT USB(UPGRADE PORT) TV Left Side If your headphones do not match the jack, use a suitable plug adaptor. 18 Connecting Headphones When using headphones, adjust the headphone...as hearing damage may result. Connecting the TV Using External Equipment Connecting a Second TV or Monitor The TV has a special signal output capability which allows you to the TV's VCR output jacks. Connect the second TV or monitor to hook up a second TV or monitor. See the Operating Manual ...
Operation Manual
Page 20
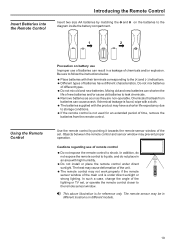
Chemicals that leak from the remote control. This above illustration is under direct sunlight. In such a case, change the angle of the lighting or TV set . The remote sensor may prevent proper operation. Mixing old and new batteries can result in a leakage of remote control = Do not expose the remote ...
Chemicals that leak from the remote control. This above illustration is under direct sunlight. In such a case, change the angle of the lighting or TV set . The remote sensor may prevent proper operation. Mixing old and new batteries can result in a leakage of remote control = Do not expose the remote ...
Operation Manual
Page 21
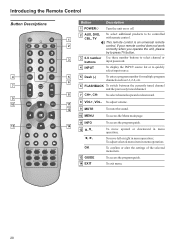
... channel and the previously tuned channel. 8 7 CH+, CH- If your remote control does not work correctly when you operate the unit, please try to press TV button. 3 3 0-9 number Use these number buttons to select channel or buttons input password. 4 INPUT To display the INPUT source list or to be controlled 1 CBL...
... channel and the previously tuned channel. 8 7 CH+, CH- If your remote control does not work correctly when you operate the unit, please try to press TV button. 3 3 0-9 number Use these number buttons to select channel or buttons input password. 4 INPUT To display the INPUT source list or to be controlled 1 CBL...
Operation Manual
Page 23
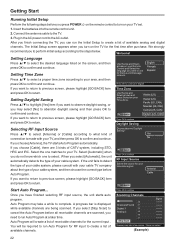
...your television signal. Getting Start Running Initial Setup Perform the following steps before you press POWER on the remote control to turn on the TV for the first time after purchase. Plug in English If you have finished selecting RF input source, the unit starts auto program. ...After you finish connecting the TV, you observe Daylight Saving? Setting Language Press ▲/▼ to create a list of available channels. English Français Español Press...
...your television signal. Getting Start Running Initial Setup Perform the following steps before you press POWER on the remote control to turn on the TV for the first time after purchase. Plug in English If you have finished selecting RF input source, the unit starts auto program. ...After you finish connecting the TV, you observe Daylight Saving? Setting Language Press ▲/▼ to create a list of available channels. English Français Español Press...

Operation Manual
Page 24
... make a note of your secret number and keep it again. Use or button. 3. Channels 3D Comb Filter Temporal NR Press to set successfully, the TV requests you to enter secret number if you are going to: = Access to the [Locks] menu. = Scan channels automatically. = Find channel manually...your operation or alter the settings for some items such as below. 1. Getting Start Setting a Secret Number For additional protection to your TV and the user's settings from being accidentally changed, we recommend you to select items in the submenu. Highlight [Locks]........... Locks Guide ...
... make a note of your secret number and keep it again. Use or button. 3. Channels 3D Comb Filter Temporal NR Press to set successfully, the TV requests you to enter secret number if you are going to: = Access to the [Locks] menu. = Scan channels automatically. = Find channel manually...your operation or alter the settings for some items such as below. 1. Getting Start Setting a Secret Number For additional protection to your TV and the user's settings from being accidentally changed, we recommend you to select items in the submenu. Highlight [Locks]........... Locks Guide ...


