
Operation Manual
Page 1
The illustrations and on-screen displays in this operation manual are grayed out. FOR ASSISTANCE CALL 1-800-619-3848 OR VISIT US AT WWW.AUDIOVOX.COM. 1287616 Please keep this product, please read the manual completely. Menu items that are not selectable are for future reference. LCD Color TV with ATSC Tuner Operating Manual FPE3206 Before connecting, operating or adjusting this manual for explanation purposes and may vary slightly from the actual operations.
The illustrations and on-screen displays in this operation manual are grayed out. FOR ASSISTANCE CALL 1-800-619-3848 OR VISIT US AT WWW.AUDIOVOX.COM. 1287616 Please keep this product, please read the manual completely. Menu items that are not selectable are for future reference. LCD Color TV with ATSC Tuner Operating Manual FPE3206 Before connecting, operating or adjusting this manual for explanation purposes and may vary slightly from the actual operations.
Operation Manual
Page 3
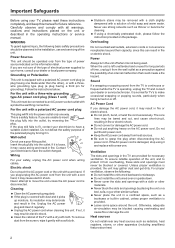
.... = Do not pinch, bend, or twist the cord excessively. Otherwise, adequate air-circulation may cause electric shock. Important Safeguards Before using your TV, please read these slots and openings must be connected to an AC power socket outlet with a protective earthing connection. Carefully observe and comply with ... unit should be observed in fire or electric shock. If you are unable to have a suitable outlet installed. To remove dust from the screen, wipe it from the type of the unit, and to protect it regularly. = Unplug the AC power cord when cleaning this manual for...
.... = Do not pinch, bend, or twist the cord excessively. Otherwise, adequate air-circulation may cause electric shock. Important Safeguards Before using your TV, please read these slots and openings must be connected to an AC power socket outlet with a protective earthing connection. Carefully observe and comply with ... unit should be observed in fire or electric shock. If you are unable to have a suitable outlet installed. To remove dust from the screen, wipe it from the type of the unit, and to protect it regularly. = Unplug the AC power cord when cleaning this manual for...

Operation Manual
Page 4
... on the apparatus. Servicing Refer all servicing to lightning and power-line surges. Use of unauthorized parts can cause damage, which may appear on the screen as to provide some protection against voltage surges and built-up static charges. Do not use attachments not recommended by the manufacturer. When the power...
... on the apparatus. Servicing Refer all servicing to lightning and power-line surges. Use of unauthorized parts can cause damage, which may appear on the screen as to provide some protection against voltage surges and built-up static charges. Do not use attachments not recommended by the manufacturer. When the power...

Operation Manual
Page 6
... MENU Options ...27 Picture Control ...27 Accessing Picture Menu ...27 Selecting Picture Options...27 Adjusting Picture Settings ...28 Adjusting Screen Settings...28 Audio Control ...29 Accessing Audio Menu...29 Selecting Audio Options...29 Setting Channels...30 Accessing Channels Menu ...30 Selecting... Guide ...32 Using the Program Guide ...32 Setting System ...33 Accessing Settings Menu...33 Setting Date & Time ...33 Setting Timer...33 Input Select ...34 Setting Caption Vision...34 Using the CCD button ...34 Setting Menu & Display...34 Editing Input Labels ...35 Setting Screen Saver ...35...
... MENU Options ...27 Picture Control ...27 Accessing Picture Menu ...27 Selecting Picture Options...27 Adjusting Picture Settings ...28 Adjusting Screen Settings...28 Audio Control ...29 Accessing Audio Menu...29 Selecting Audio Options...29 Setting Channels...30 Accessing Channels Menu ...30 Selecting... Guide ...32 Using the Program Guide ...32 Setting System ...33 Accessing Settings Menu...33 Setting Date & Time ...33 Setting Timer...33 Input Select ...34 Setting Caption Vision...34 Using the CCD button ...34 Setting Menu & Display...34 Editing Input Labels ...35 Setting Screen Saver ...35...
Operation Manual
Page 7
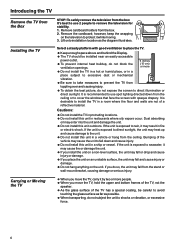
.... Bumping of a reflective material. Carrying or Moving the TV = When you move the TV, carry it while moving. 3. Remove cardboard holders from the ceiling or to cover the windows that face the screen with good ventilation to place the TV. = Keep enough space above and behind the Display. ...= The TV should be careful to prevent the TV from toppling over and causing injury. = To obtain the best picture,...
.... Bumping of a reflective material. Carrying or Moving the TV = When you move the TV, carry it while moving. 3. Remove cardboard holders from the ceiling or to cover the windows that face the screen with good ventilation to place the TV. = Keep enough space above and behind the Display. ...= The TV should be careful to prevent the TV from toppling over and causing injury. = To obtain the best picture,...
Operation Manual
Page 22
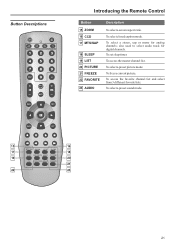
... Remote Control Button 15 ZOOM 16 CCD 17 MTS/SAP 18 SLEEP 19 LIST 20 PICTURE 21 FREEZE 22 FAVORITE 23 AUDIO Description To select a screen aspect ratio. To access the favorite channel list and select from 3 different favorite lists.
... Remote Control Button 15 ZOOM 16 CCD 17 MTS/SAP 18 SLEEP 19 LIST 20 PICTURE 21 FREEZE 22 FAVORITE 23 AUDIO Description To select a screen aspect ratio. To access the favorite channel list and select from 3 different favorite lists.
Operation Manual
Page 23
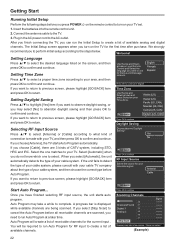
...zone according to your Time Zone. Setting Daylight Saving Press ▲/▼ to highlight [Yes] item if you want to return to previous screen, please highlight [GO BACK] item and press OK to return. GO BACK Start Auto Program... Getting Start Running Initial Setup Perform the ...] item and press OK to the steps below. When you want to return to previous screen, please highlight [GO BACK] item and press OK to continue Once you choose [Antenna], the TV starts Auto Program automatically. Antenna Cable If you select [Automatic], the unit automatically detects the...
...zone according to your Time Zone. Setting Daylight Saving Press ▲/▼ to highlight [Yes] item if you want to return to previous screen, please highlight [GO BACK] item and press OK to return. GO BACK Start Auto Program... Getting Start Running Initial Setup Perform the ...] item and press OK to the steps below. When you want to return to previous screen, please highlight [GO BACK] item and press OK to continue Once you choose [Antenna], the TV starts Auto Program automatically. Antenna Cable If you select [Automatic], the unit automatically detects the...

Operation Manual
Page 24
... Conversion OFF RESET PICTURE Press to adjust the selected items or move the on-screen cursor in [Settings] menu. Press to highlight the menu items. Picture Picture Settings Screen Settings Audio Aspect Ratio Press to display the Main menu. 2. Color Temperature Settings... Cinemotion ON 3. Press to confirm your TV and the user's settings from being accidentally changed, we recommend you to...
... Conversion OFF RESET PICTURE Press to adjust the selected items or move the on-screen cursor in [Settings] menu. Press to highlight the menu items. Picture Picture Settings Screen Settings Audio Aspect Ratio Press to display the Main menu. 2. Color Temperature Settings... Cinemotion ON 3. Press to confirm your TV and the user's settings from being accidentally changed, we recommend you to...
Operation Manual
Page 25
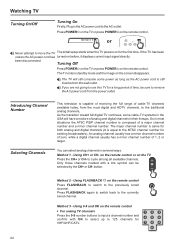
...channels, to cycle among all available channels. You can be sure to the previously tuned channel. If the TV has been unless the AC power cord has turned on the screen disappears. Only those channels marked with OK to select up to the AC outlet. Press FLASHBACK again to ...switch back to the NTSC channel number for existing broadcasters). Watching TV Turning On/Off Turning On Firstly, Plug in the...
...channels, to cycle among all available channels. You can be sure to the previously tuned channel. If the TV has been unless the AC power cord has turned on the screen disappears. Only those channels marked with OK to select up to the AC outlet. Press FLASHBACK again to ...switch back to the NTSC channel number for existing broadcasters). Watching TV Turning On/Off Turning On Firstly, Plug in the...

Operation Manual
Page 26
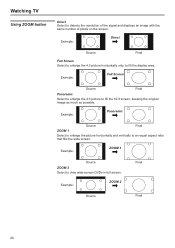
...VOL- Press it again to normal viewing in about a minute. FREEZE The TV automatically cancel FREEZE and return to cancel the mute. Press ZOOM repeatedly to increase or decrease the volume. to choose a proper screen aspect ZOOM Using ZOOM button ratio. The following mode may available for a long... period of time. 25 You may press any key to cancel FREEZE and return to 16:9) differ from different formats of the screen. Normal The zoom mode options may Select to match the source's image.( 4:3 to 4:3, 16:9 to normal viewing. LIST FAVORITE Adjusting Volume ...
...VOL- Press it again to normal viewing in about a minute. FREEZE The TV automatically cancel FREEZE and return to cancel the mute. Press ZOOM repeatedly to increase or decrease the volume. to choose a proper screen aspect ZOOM Using ZOOM button ratio. The following mode may available for a long... period of time. 25 You may press any key to cancel FREEZE and return to 16:9) differ from different formats of the screen. Normal The zoom mode options may Select to match the source's image.( 4:3 to 4:3, 16:9 to normal viewing. LIST FAVORITE Adjusting Volume ...
Operation Manual
Page 27
... to detects the resolution of the signal and displays an image with the same number of pixels on the screen. Watching TV Using ZOOM button Direct Select to view wide-screen DVDs in full screen. Example: Full Screen Source Final Panoramic Select to enlarge the 4:3 picture to an equal aspect ratio that fills the wide...
... to detects the resolution of the signal and displays an image with the same number of pixels on the screen. Watching TV Using ZOOM button Direct Select to view wide-screen DVDs in full screen. Example: Full Screen Source Final Panoramic Select to enlarge the 4:3 picture to an equal aspect ratio that fills the wide...
Operation Manual
Page 28
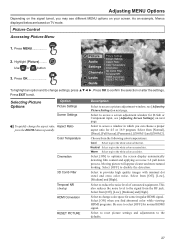
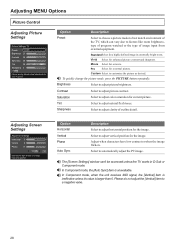
...the selection or alter the settings. Color Temperature Cinemotion 3D Comb Filter Temporal NR (Analog) HDMI Conversion RESET PICTURE Description Select to optimize the screen display automatically detecting film content and applying a reverse 3-2 pull down process. Select from [Off], [Low], [Medium] and [High]. ...for D-Sub or Component input, see [Adjusting Screen Settings] on next page. Select [ON] when you find abnormal color while viewing HDMI programs. Be sure to access a window in which you may see different MENU options on TV mode. Highlight [Picture]......... Select to select [...
...the selection or alter the settings. Color Temperature Cinemotion 3D Comb Filter Temporal NR (Analog) HDMI Conversion RESET PICTURE Description Select to optimize the screen display automatically detecting film content and applying a reverse 3-2 pull down process. Select from [Off], [Low], [Medium] and [High]. ...for D-Sub or Component input, see [Adjusting Screen Settings] on next page. Select [ON] when you find abnormal color while viewing HDMI programs. Be sure to access a window in which you may see different MENU options on TV mode. Highlight [Picture]......... Select to select [...
Operation Manual
Page 29
... to best match environment of the TV, which can 't be accessed unless the TV works in a normally bright room. Vivid Select for a highly defined image in D-Sub or Component mode. StandardSelect for enhanced picture contrast and sharpness. Adjusting Screen Settings Adjustment Settings Horizontal 0 Vertical ... brightness, type of program watched or the type of outline detail. Contrast Select to customize the picture as desired. The [Screen Settings] window can vary due to adjust horizontal position for the image. In Component mode, when the unit receives 480i signal...
... to best match environment of the TV, which can 't be accessed unless the TV works in a normally bright room. Vivid Select for a highly defined image in D-Sub or Component mode. StandardSelect for enhanced picture contrast and sharpness. Adjusting Screen Settings Adjustment Settings Horizontal 0 Vertical ... brightness, type of program watched or the type of outline detail. Contrast Select to customize the picture as desired. The [Screen Settings] window can vary due to adjust horizontal position for the image. In Component mode, when the unit receives 480i signal...
Operation Manual
Page 31
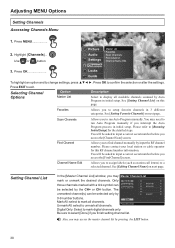
... Digital Only: Select to unmark all channels. Be sure to select [Done] if you to input a correct secret number before you access the [Find Channel] screen. See [Setting Favorite Channels] on next page. button. The unmarked channel(s) can be asked to run Auto Program manually if you may Master Channel List... input the RF channel number. Scan Channels Find Channel Channel Name Edit Allows you to input a correct secret number before you access the [Channel Scan] screen. Adjusting MENU Options Setting Channels Accessing Channels Menu 1.
... Digital Only: Select to unmark all channels. Be sure to select [Done] if you to input a correct secret number before you access the [Find Channel] screen. See [Setting Favorite Channels] on next page. button. The unmarked channel(s) can be asked to run Auto Program manually if you may Master Channel List... input the RF channel number. Scan Channels Find Channel Channel Name Edit Allows you to input a correct secret number before you access the [Channel Scan] screen. Adjusting MENU Options Setting Channels Accessing Channels Menu 1.

Operation Manual
Page 32
... to rename each list as desired by selecting [Add] item. Press to select the highlighted character. Back: select to 16 channels for one character. The screen displays current favorite list name and those favorite channels under current list so that you can easily accessing them by 2.0 Add selecting [Remove] item. Editing...
... to rename each list as desired by selecting [Add] item. Press to select the highlighted character. Back: select to 16 channels for one character. The screen displays current favorite list name and those favorite channels under current list so that you can easily accessing them by 2.0 Add selecting [Remove] item. Editing...
Operation Manual
Page 33
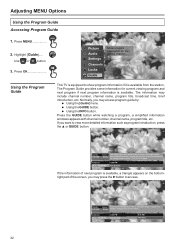
... if it is available. Antenna 24.1 KVUE-HD 8:00 PM The Scholar 9:00 PM The Ring 32 The Program Guide provides some information for the current channel This TV is available, a triangle appears on the bottomright part of a full scholarship to access. SIGNAL HD1080i ...A juonralist investigates a bizarre videotape whose images hold Stereo deadly consequences for the prize of the screen, you may access program guide by:...
... if it is available. Antenna 24.1 KVUE-HD 8:00 PM The Scholar 9:00 PM The Ring 32 The Program Guide provides some information for the current channel This TV is available, a triangle appears on the bottomright part of a full scholarship to access. SIGNAL HD1080i ...A juonralist investigates a bizarre videotape whose images hold Stereo deadly consequences for the prize of the screen, you may access program guide by:...
Operation Manual
Page 35
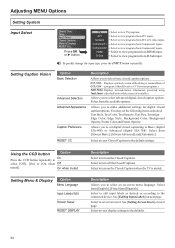
...programs from D-Sub input. Using the CCD button Option On Press the CCD button repeatedly to the default settings. See [Setting Screen Saver] on the Closed Captions. Select to the connected device. Allows you to set the following items as desired or according ...TV programs Select to turn off the Closed Captions. RESET CC Select to reset Closed Captions to select [Off], [On] or [On when Off muted]. Allows you to make additional settings for most programs.) Text1,Text2, Displays network/station information presented using Text3,Text4 either half or the whole screen...
...programs from D-Sub input. Using the CCD button Option On Press the CCD button repeatedly to the default settings. See [Setting Screen Saver] on the Closed Captions. Select to the connected device. Allows you to set the following items as desired or according ...TV programs Select to turn off the Closed Captions. RESET CC Select to reset Closed Captions to select [Off], [On] or [On when Off muted]. Allows you to make additional settings for most programs.) Text1,Text2, Displays network/station information presented using Text3,Text4 either half or the whole screen...

Operation Manual
Page 36
...button to input a desired label name. Menu Language Input Labels Edit Screen Saver TV AV1 SV/AV2 RESET DISPLAY Component1 Component2 HDMI 3. As an example, highlight [TV]. The Label editing window appears. Be sure TV AV1 SV/AV2 Component1 Component2 HDMI D-Sub D-Sub Antenna Cable DTV... reset. Setting System Editing Input Labels Adjusting MENU Options 1. Highlight [Custom Label] item. Press OK or ► button to preview the screen saver. Select to enter. Highlight [Menu & Displays] item in the [SETTINGS] menu. Date & Time Timer Input Select Closed Captions Menu ...
...button to input a desired label name. Menu Language Input Labels Edit Screen Saver TV AV1 SV/AV2 RESET DISPLAY Component1 Component2 HDMI 3. As an example, highlight [TV]. The Label editing window appears. Be sure TV AV1 SV/AV2 Component1 Component2 HDMI D-Sub D-Sub Antenna Cable DTV... reset. Setting System Editing Input Labels Adjusting MENU Options 1. Highlight [Custom Label] item. Press OK or ► button to preview the screen saver. Select to enter. Highlight [Menu & Displays] item in the [SETTINGS] menu. Date & Time Timer Input Select Closed Captions Menu ...
Operation Manual
Page 39
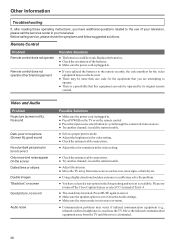
...), good sound No color/dark picture/color Is not correct Only snow and noise appear On the screen Dotted lines or stripes Double images "Black box" on the remote control. ● Press the input source select button to cycle through the connected video ... could be weak. Press MUTE again to cancel. ● Make sure the speaker option is set to On in . ● Press POWER on the TV or on screen Good picture, no text is available. Move the infrared communication equipment away from noise sources such as cars, neon signs, or hair dryers. ●...
...), good sound No color/dark picture/color Is not correct Only snow and noise appear On the screen Dotted lines or stripes Double images "Black box" on the remote control. ● Press the input source select button to cycle through the connected video ... could be weak. Press MUTE again to cancel. ● Make sure the speaker option is set to On in . ● Press POWER on the TV or on screen Good picture, no text is available. Move the infrared communication equipment away from noise sources such as cars, neon signs, or hair dryers. ●...
Operation Manual
Page 40
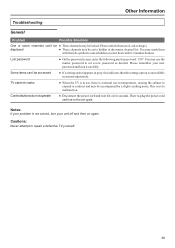
... the cabinet to hidden in the master channel list. Lost password ● On the password screen, enter the following master password: 1397. This is not solved, turn on again. TV cabinet creaks ● When the TV is in current input mode. Then re-plug the power cord and turn your unit off... and then on the unit again. Cautions: Never attempt to cancel hidden or select them with the tick symbol to repair a defective TV yourself. 39 Notes: If your new password and keep it carefully. You may be accompanied by a slight creaking noise. You may use , there ...
... the cabinet to hidden in the master channel list. Lost password ● On the password screen, enter the following master password: 1397. This is not solved, turn on again. TV cabinet creaks ● When the TV is in current input mode. Then re-plug the power cord and turn your unit off... and then on the unit again. Cautions: Never attempt to cancel hidden or select them with the tick symbol to repair a defective TV yourself. 39 Notes: If your new password and keep it carefully. You may be accompanied by a slight creaking noise. You may use , there ...


