

Operation Manual
Page 2
Table of Contents Important Information ...1 Important Safety Precautions ...2 Preparations ...5 Using the Remote Control...5 Batteries for the Remote Control...5 Power Connection...5 Antenna Connection ...6 Identification of Controls...7 Main Unit ...7 Remote Control ...9 Connections...11 Cautions Before Connecting ...11 Connect a VCR...11 Connect a ...Setting Picture...22 Customizing the Picture ...22 Using the Preset Picture Mode ...22 Setting System...23 Setting System In TV Mode ...23 Adjusting Screen Aspect ...23 Reducing Picture Noise ...23 VCR mode ...23 Loading Default Values ...23...
Table of Contents Important Information ...1 Important Safety Precautions ...2 Preparations ...5 Using the Remote Control...5 Batteries for the Remote Control...5 Power Connection...5 Antenna Connection ...6 Identification of Controls...7 Main Unit ...7 Remote Control ...9 Connections...11 Cautions Before Connecting ...11 Connect a VCR...11 Connect a ...Setting Picture...22 Customizing the Picture ...22 Using the Preset Picture Mode ...22 Setting System...23 Setting System In TV Mode ...23 Adjusting Screen Aspect ...23 Reducing Picture Noise ...23 VCR mode ...23 Loading Default Values ...23...
Operation Manual
Page 8
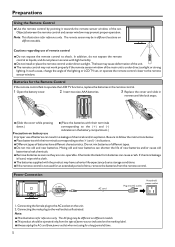
Preparations Using the Remote Control
Preparations Using the Remote Control
Operation Manual
Page 10
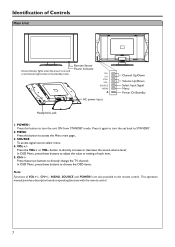
...standby mode. Identification of VOL+/-, CH+/-, MENU, SOURCE and POWER are also provided to access the Menu main page. 3. button to directly change the TV channel; MENU Press this button to turn the set back to adjust the value or setting of each item. 5. In OSD Menu, press these ...buttons to choose the OSD items. Note: Functions of Controls Main Unit A blue indicator lights when the power is on operating functions with the remote control. 7 SOURCE To access signal source select menu. 4. CH+/Press these two buttons to directly increase or decrease the sound volume level...
...standby mode. Identification of VOL+/-, CH+/-, MENU, SOURCE and POWER are also provided to access the Menu main page. 3. button to directly change the TV channel; MENU Press this button to turn the set back to adjust the value or setting of each item. 5. In OSD Menu, press these ...buttons to choose the OSD items. Note: Functions of Controls Main Unit A blue indicator lights when the power is on operating functions with the remote control. 7 SOURCE To access signal source select menu. 4. CH+/Press these two buttons to directly increase or decrease the sound volume level...
Operation Manual
Page 12
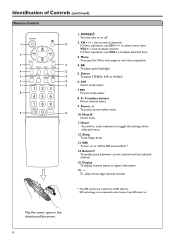
... or off 2. Display To display channel status or signal information 16. --To select three-digit channel number * The SRS symbol are trademark of Controls (continued) Remote Control 1. Identification of SRS Labs,Inc. SRS To turn on or off the SRS sound effect * 14.
... or off 2. Display To display channel status or signal information 16. --To select three-digit channel number * The SRS symbol are trademark of Controls (continued) Remote Control 1. Identification of SRS Labs,Inc. SRS To turn on or off the SRS sound effect * 14.
Operation Manual
Page 13
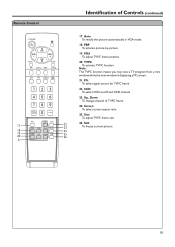
... screen aspect ratio 25. Size To adjust TVPC frame size 22 26. TVPC To activate TVPC function Note: The TVPC function means you may view a TV program from a mini window while the main window is displaying a PC screen. 21. CCD To select CCD on/off and CCD channel 23. Still 23... 10 PBP To activate picture-by-picture 19. POS To adjust TVPC frame position 20. P.S. Auto To rectify the picture automatically in VGA mode 18. Remote Control 17 18 19 20 21 Identification of TVPC frame 24. Up, Down To change channel of Controls (continued) 17.
... screen aspect ratio 25. Size To adjust TVPC frame size 22 26. TVPC To activate TVPC function Note: The TVPC function means you may view a TV program from a mini window while the main window is displaying a PC screen. 21. CCD To select CCD on/off and CCD channel 23. Still 23... 10 PBP To activate picture-by-picture 19. POS To adjust TVPC frame position 20. P.S. Auto To rectify the picture automatically in VGA mode 18. Remote Control 17 18 19 20 21 Identification of TVPC frame 24. Up, Down To change channel of Controls (continued) 17.
Operation Manual
Page 14
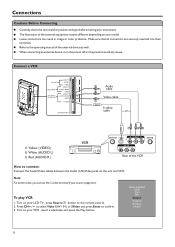
... inserted into their terminals. Turn on the remote control. 2. When connecting an external device, turn the power off on your model. Turn on the panel to the operating manual of the external device as well. Loose connectors can use the S-video terminal if your LCD TV , press Source button on your source supports...
... inserted into their terminals. Turn on the remote control. 2. When connecting an external device, turn the power off on your model. Turn on the panel to the operating manual of the external device as well. Loose connectors can use the S-video terminal if your LCD TV , press Source button on your source supports...
Operation Manual
Page 15
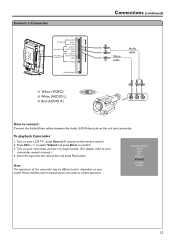
... press Enter to connect: Connect the Audio/Video cables between the Audio (L/R)/Video jacks on the unit and camcorder. Turn on the remote control. 2. Note: The operations of your LCD TV , press Source button on your camcorder and set it to output mode. (For details, refer to confirm operation. Source Select VGA DVI...
... press Enter to connect: Connect the Audio/Video cables between the Audio (L/R)/Video jacks on the unit and camcorder. Turn on the remote control. 2. Note: The operations of your LCD TV , press Source button on your camcorder and set it to output mode. (For details, refer to confirm operation. Source Select VGA DVI...

Operation Manual
Page 16
... between the Y, Pb, Pr input jacks on the unit and Y, Pb, Pr output jacks on the DVD player (or Set-Top Box). Turn on the remote control. 2. Press CH5/6 to confirm. 3. Connections (continued) Connect a DVD player (or Set-Top Box) Video cable Audio cable W R RB G AUDIO L AUDIO R COMPONENT Pr Pb Y... output jacks on the DVD player (or Set-Top Box). Press Enter to select YPbPr. 3. To play DVD or Set-Top Box 1. Turn on your LCD TV , press Source button on your DVD player are sometimes labeled Y, Cb, Cr or Y, U, V. If so, connect the cables to like colors. 13 Source Select ...
... between the Y, Pb, Pr input jacks on the unit and Y, Pb, Pr output jacks on the DVD player (or Set-Top Box). Turn on the remote control. 2. Press CH5/6 to confirm. 3. Connections (continued) Connect a DVD player (or Set-Top Box) Video cable Audio cable W R RB G AUDIO L AUDIO R COMPONENT Pr Pb Y... output jacks on the DVD player (or Set-Top Box). Press Enter to select YPbPr. 3. To play DVD or Set-Top Box 1. Turn on your LCD TV , press Source button on your DVD player are sometimes labeled Y, Cb, Cr or Y, U, V. If so, connect the cables to like colors. 13 Source Select ...
Operation Manual
Page 17
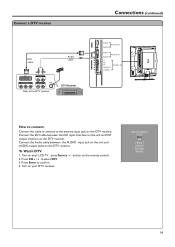
... DVI cable between the AUDIO input jack on the unit and AUDIO output jacks on the DTV receiver . Press CH5/6 to confirm. 4. Turn on your LCD TV , press Source 2. button on the DTV receiver. Press Enter to select DVI. 3. Source Select VGA DVI RF Video1 Video2 SVideo YPbPr 14 Connect a DTV receiver... DVI-D AUDIO DVI-D IN Y Pb Pr AUDIO R AUDIO L HDTV IN How to connect: Connect the cable or antenna to the antenna input jack on the remote control.
... DVI cable between the AUDIO input jack on the unit and AUDIO output jacks on the DTV receiver . Press CH5/6 to confirm. 4. Turn on your LCD TV , press Source 2. button on the DTV receiver. Press Enter to select DVI. 3. Source Select VGA DVI RF Video1 Video2 SVideo YPbPr 14 Connect a DTV receiver... DVI-D AUDIO DVI-D IN Y Pb Pr AUDIO R AUDIO L HDTV IN How to connect: Connect the cable or antenna to the antenna input jack on the remote control.

Operation Manual
Page 18
... Audio cable between the VGA jack on the PC and the VGA input jack on the unit. To Watch the PC screen 1. Turn on the remote control. 2. Connections (continued) Connect a PC Audio cable VGA cable D-Sub AUDIO D-Sub IN DVI-D AUDIO DVI-D IN Y Pb Pr AUDIO R AUDIO L HDTV IN How to... confirm. 4. Press Enter to connect: Connect a VGA cable between the AUDIO output on the PC and AUDIO input jack on the unit. Turn on your LCD TV , press Source button on your computer to select VGA. 3.
... Audio cable between the VGA jack on the PC and the VGA input jack on the unit. To Watch the PC screen 1. Turn on the remote control. 2. Connections (continued) Connect a PC Audio cable VGA cable D-Sub AUDIO D-Sub IN DVI-D AUDIO DVI-D IN Y Pb Pr AUDIO R AUDIO L HDTV IN How to... confirm. 4. Press Enter to connect: Connect a VGA cable between the AUDIO output on the PC and AUDIO input jack on the unit. Turn on your LCD TV , press Source button on your computer to select VGA. 3.
Operation Manual
Page 20
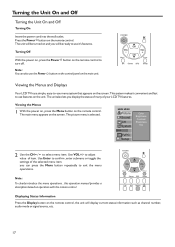
... the menu operations. The unit will be turned on the remote control, the unit will be ready to -use it convenient and fast to confirm ,enter submenu or toggle the settings of item. Viewing the Menus and Displays Your LCD TV has a simple, easy-to use menu system that appears ... signal source, etc. 17 The unit also lets you display the status of many of your LCD TV features. Note: To clearly introduce the menu operations , this operation manual provides a description based on the remote control. This system makes it 's features. MAIN MENU Picture Sound CH System OSD TVPC Setup ...
... the menu operations. The unit will be turned on the remote control, the unit will be ready to -use it convenient and fast to confirm ,enter submenu or toggle the settings of item. Viewing the Menus and Displays Your LCD TV has a simple, easy-to use menu system that appears ... signal source, etc. 17 The unit also lets you display the status of many of your LCD TV features. Note: To clearly introduce the menu operations , this operation manual provides a description based on the remote control. This system makes it 's features. MAIN MENU Picture Sound CH System OSD TVPC Setup ...
Operation Manual
Page 26
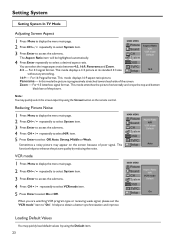
.... 3 Press Enter to access the submenu. 4 Press CH5/6 repeatedly to select N/R item. 5 Press Enter to "On". Setting System Setting System In TV Mode Adjusting Screen Aspect 1 Press Menu to display the menu main page. 2 Press CH5/6 repeatedly to select System item. 3 Press Enter to obtain a...and improve MAIN MENU Picture Sound CH System Aspect Ratio N/R VCR mode Default OSD TVPC Setup On Loading Default Values You may appear on the remote control. OSD You can select the image aspect ratio between 4:3, 16:9, Panorama and Zoom. This mode displays a 4:3 picture at its standard ...
.... 3 Press Enter to access the submenu. 4 Press CH5/6 repeatedly to select N/R item. 5 Press Enter to "On". Setting System Setting System In TV Mode Adjusting Screen Aspect 1 Press Menu to display the menu main page. 2 Press CH5/6 repeatedly to select System item. 3 Press Enter to obtain a...and improve MAIN MENU Picture Sound CH System Aspect Ratio N/R VCR mode Default OSD TVPC Setup On Loading Default Values You may appear on the remote control. OSD You can select the image aspect ratio between 4:3, 16:9, Panorama and Zoom. This mode displays a 4:3 picture at its standard ...
Operation Manual
Page 28
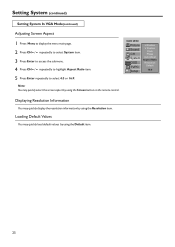
... Clock Phase Auto Adjust Aspect Ratio Resolution Default 16:9 Displaying Resolution Information You may quickly load default values by using the Screen button on the remote control. Setting System (continued) Setting System In VGA Mode(continued) Adjusting Screen Aspect 1 Press Menu to display the menu main page. 2 Press CH5/6 repeatedly to...
... Clock Phase Auto Adjust Aspect Ratio Resolution Default 16:9 Displaying Resolution Information You may quickly load default values by using the Screen button on the remote control. Setting System (continued) Setting System In VGA Mode(continued) Adjusting Screen Aspect 1 Press Menu to display the menu main page. 2 Press CH5/6 repeatedly to...

Operation Manual
Page 29
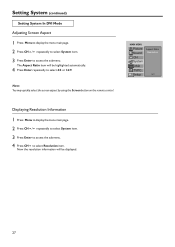
... Sound CH System Phase Aspect Ratio N/R Default OSD TVPC Setup Auto You may quickly select the screen aspect by using the Screen button on the remote control. For 720P or 1080i signal format, you can select the image aspect ratio between 4:3, 16:9, Panorama and Zoom.
... Sound CH System Phase Aspect Ratio N/R Default OSD TVPC Setup Auto You may quickly select the screen aspect by using the Screen button on the remote control. For 720P or 1080i signal format, you can select the image aspect ratio between 4:3, 16:9, Panorama and Zoom.
Operation Manual
Page 30
... the submenu. Now the resolution information will be displayed. 27 Note: You may quickly select the screen aspect by using the Screen button on the remote control. The Aspect Ratio item will be highlighted automatically. 4 Press Enter repeatedly to select 4:3 or 16:9.
... the submenu. Now the resolution information will be displayed. 27 Note: You may quickly select the screen aspect by using the Screen button on the remote control. The Aspect Ratio item will be highlighted automatically. 4 Press Enter repeatedly to select 4:3 or 16:9.
Operation Manual
Page 41
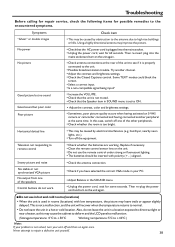
...then on the unit. ! The batteries should be inserted with low temperature, the picture may leave trails or appear slightly delayed. Never attempt to remote control ! Check that the Speaker item in your problem is set to +40°C ) Note: If your PC. ! Try another peripheral... picture Good picture but no sound Good sound but poor color Poor picture ! Horizontal dotted line ! This may cause the cabinet to deform and the LCD panel to malfunction. (Storage temperature: 0°C to +50°C Working temperature: 5°C to ON. • Adjust the contrast, color and ...
...then on the unit. ! The batteries should be inserted with low temperature, the picture may leave trails or appear slightly delayed. Never attempt to remote control ! Check that the Speaker item in your problem is set to +40°C ) Note: If your PC. ! Try another peripheral... picture Good picture but no sound Good sound but poor color Poor picture ! Horizontal dotted line ! This may cause the cabinet to deform and the LCD panel to malfunction. (Storage temperature: 0°C to +50°C Working temperature: 5°C to ON. • Adjust the contrast, color and ...
Operation Manual
Page 43
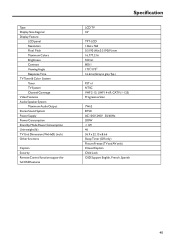
... Audio Output Stereo Sound System Power Supply Power Consumption Stand by Mode Power Consumption Unit weight (lb) TV Unit Dimension (WxHxD) (inch) Other functions Caption Security Remote Control function support for full OSD features Specification LCD TV 32" TFT-LCD 1366 x 768 0.5190 (H)x 0.5190(V) mm 16,777,216 550 nit 800:1 170O/170O 16.6ms (Gray...
... Audio Output Stereo Sound System Power Supply Power Consumption Stand by Mode Power Consumption Unit weight (lb) TV Unit Dimension (WxHxD) (inch) Other functions Caption Security Remote Control function support for full OSD features Specification LCD TV 32" TFT-LCD 1366 x 768 0.5190 (H)x 0.5190(V) mm 16,777,216 550 nit 800:1 170O/170O 16.6ms (Gray...


