

Owners Manual
Page 1
D1812PKG PORTABLE 8" LCD MONITOR AND DVD PLAYER IN A BAG
D1812PKG PORTABLE 8" LCD MONITOR AND DVD PLAYER IN A BAG

Owners Manual
Page 2
Use of this copyright protection technology must be authorized by Macrovision Corporation, and is intended for television reception, video or DVD play that operates when the vehicle is in gear or when the parking brake is not applied must be installed to the rear of the ... the vehicle is in a motor vehicle and visible to the driver if the LCD panel or video monitor is used for television reception, video or DVD play, the LCD panel or video monitor must be visible, directly or indirectly, to the operator of certain U.S. Notice: This Product incorporates copyright protection technology...
Use of this copyright protection technology must be authorized by Macrovision Corporation, and is intended for television reception, video or DVD play that operates when the vehicle is in gear or when the parking brake is not applied must be installed to the rear of the ... the vehicle is in a motor vehicle and visible to the driver if the LCD panel or video monitor is used for television reception, video or DVD play, the LCD panel or video monitor must be visible, directly or indirectly, to the operator of certain U.S. Notice: This Product incorporates copyright protection technology...

Owners Manual
Page 4
... directly from falling. Caution Do not push objects of the art electronics and is constructed to a warm location, wait for choosing the D1812PKG. Cautions and Warnings 1. Keep the unit away from a cold to provide years of any kind into the unit through openings; To ...the system (this manual for later use . The main features include a 8" Wide Screen (16:9 Aspect Ratio) Liquid Crystal Display (LCD) monitor, a DVD player and a game controller with a cloth or other material. 4 The documentation will assist you move it from strong magnets, heat sources, direct sunlight, excessive ...
... directly from falling. Caution Do not push objects of the art electronics and is constructed to a warm location, wait for choosing the D1812PKG. Cautions and Warnings 1. Keep the unit away from a cold to provide years of any kind into the unit through openings; To ...the system (this manual for later use . The main features include a 8" Wide Screen (16:9 Aspect Ratio) Liquid Crystal Display (LCD) monitor, a DVD player and a game controller with a cloth or other material. 4 The documentation will assist you move it from strong magnets, heat sources, direct sunlight, excessive ...

Owners Manual
Page 5
... cloth lightly dampened with a cleaning cloth. Do not touch the surface of electric shock and/or exposure to Laser Radiation. Regional Coding Both the DVD player and disc are coded by its case after playing. Cleaning Unit When cleaning, make sure the system is region 1. Also refer to the instructions ...fixed by wiping the disc from the center out with water for the disc to play . This unit's code is unplugged from the power source. DVD's with the discs. 7. In order to replace the battery incorrectly. It is a risk of disc. Disc Do not use liquid cleaners or aerosol...
... cloth lightly dampened with a cleaning cloth. Do not touch the surface of electric shock and/or exposure to Laser Radiation. Regional Coding Both the DVD player and disc are coded by its case after playing. Cleaning Unit When cleaning, make sure the system is region 1. Also refer to the instructions ...fixed by wiping the disc from the center out with water for the disc to play . This unit's code is unplugged from the power source. DVD's with the discs. 7. In order to replace the battery incorrectly. It is a risk of disc. Disc Do not use liquid cleaners or aerosol...

Owners Manual
Page 6
Contents 1. 1 x 8'' LCD Monitor & DVD Player 2. 1 x AC to DC adapter into the DC 9V jack on the unit, then plug the other end into the vehicle power outlet. Powering and installation 1. ...
Contents 1. 1 x 8'' LCD Monitor & DVD Player 2. 1 x AC to DC adapter into the DC 9V jack on the unit, then plug the other end into the vehicle power outlet. Powering and installation 1. ...

Owners Manual
Page 7
.... 2). Load the disc into the bag with the clear plastic covering on the mounting bag. Adjust the strap until the bag is placed into the DVD compartment and then adjust the retaining cord across the top portion of the unit. Installing the System onto the seat back in Figure 2 1. In some...
.... 2). Load the disc into the bag with the clear plastic covering on the mounting bag. Adjust the strap until the bag is placed into the DVD compartment and then adjust the retaining cord across the top portion of the unit. Installing the System onto the seat back in Figure 2 1. In some...

Owners Manual
Page 10
2. Open the disc tray by pressing the area marked "PRESS" on the "DVD player" with the label side facing up. d. e. Loading and Playing a Disc a. b. The unit will light. After connecting power to the unit, turn on the disc door. ...
2. Open the disc tray by pressing the area marked "PRESS" on the "DVD player" with the label side facing up. d. e. Loading and Playing a Disc a. b. The unit will light. After connecting power to the unit, turn on the disc door. ...

Owners Manual
Page 12
... to the last position on the screen. Note: The Last position memory function will only work when the power is on or off ) *NOTE: The DVD player will not return to confirm the setting. Choose Screen Saver on . 13 Select 'Screen Saver' using the UP/DOWN button.
... to the last position on the screen. Note: The Last position memory function will only work when the power is on or off ) *NOTE: The DVD player will not return to confirm the setting. Choose Screen Saver on . 13 Select 'Screen Saver' using the UP/DOWN button.

Owners Manual
Page 21
...automatically in 3 seconds. The heading will disappear automatically after 3 seconds if no buttons are pressed. Press MENU during playback to disc.) 1. Some DVDs only allow you play a DVD, a root menu of the disc will appear on the screen of Chapters (4), and the Playing elapsed Time for the title (5). When you ...Chapter Number, and Time Screen Display b. The contents of the title. DISPLAY (Display contents vary from disc to select disc playback options using the DVD root menu. K. Press 'DISPLAY' again to display the Remaining Time of the menu vary from disc to display the...
...automatically in 3 seconds. The heading will disappear automatically after 3 seconds if no buttons are pressed. Press MENU during playback to disc.) 1. Some DVDs only allow you play a DVD, a root menu of the disc will appear on the screen of Chapters (4), and the Playing elapsed Time for the title (5). When you ...Chapter Number, and Time Screen Display b. The contents of the title. DISPLAY (Display contents vary from disc to select disc playback options using the DVD root menu. K. Press 'DISPLAY' again to display the Remaining Time of the menu vary from disc to display the...

Owners Manual
Page 23
... disappear automatically if the 'SUBTITLE' button is displayed. If there are multiple languages press 'SUBTITLE' again to this function through the DVD root menu. 23 Subtitle Screen Display * Some DVDs only allow access to select another subtitle language. SUBTITLE During disc playback press 'SUBTITLE' to select the subtitle language you desire*, with...
... disappear automatically if the 'SUBTITLE' button is displayed. If there are multiple languages press 'SUBTITLE' again to this function through the DVD root menu. 23 Subtitle Screen Display * Some DVDs only allow access to select another subtitle language. SUBTITLE During disc playback press 'SUBTITLE' to select the subtitle language you desire*, with...

Owners Manual
Page 24
The audio display will return to normal size. 4. ZOOM Screen Display 24 Audio Language Screen Display * Some DVDs only allow access to select another audio language. ZOOM During playback press 'ZOOM' to select the audio language you desire*, with the current Audio Channel... Number (1) and the total number of Audio Channels (2) displayed. Press AUDIO again to this function through the DVD root menu. 5. AUDIO During playback press 'AUDIO' to enlarge the picture by 2x, 3x or 4X. (1) Press "zoom"one time, the picture will be ...
The audio display will return to normal size. 4. ZOOM Screen Display 24 Audio Language Screen Display * Some DVDs only allow access to select another audio language. ZOOM During playback press 'ZOOM' to select the audio language you desire*, with the current Audio Channel... Number (1) and the total number of Audio Channels (2) displayed. Press AUDIO again to this function through the DVD root menu. 5. AUDIO During playback press 'AUDIO' to enlarge the picture by 2x, 3x or 4X. (1) Press "zoom"one time, the picture will be ...
Owners Manual
Page 29
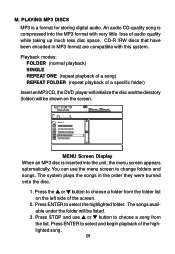
... can use or button to choose a folder from the list. Press ENTER to select and begin playback of a specific folder) Insert an MP3 CD, the DVD player will initialize the disc and the directory (folder) will be shown on the left side of audio quality while taking up much less disc space...
... can use or button to choose a folder from the list. Press ENTER to select and begin playback of a specific folder) Insert an MP3 CD, the DVD player will initialize the disc and the directory (folder) will be shown on the left side of audio quality while taking up much less disc space...

Owners Manual
Page 33
...on your TV or Monitor (white = left audio channels and the yellow RCA connector is readily available at most electronic retailers. To connect the DVD player to a monitor requires the purchase of the unit, and the other end to the VIDEO INPUT jack on your TV or Monitor. The ... white corresponding to enjoy high quality stereo audio and video on the back of an audio/video cable. The purchased cable can also connect the DVD player to a TV to right and left channel, red = right channel). 2. Cable Purchased Separately Figure 6 33 Connect one end of the audio/video adapter...
...on your TV or Monitor (white = left audio channels and the yellow RCA connector is readily available at most electronic retailers. To connect the DVD player to a monitor requires the purchase of the unit, and the other end to the VIDEO INPUT jack on your TV or Monitor. The ... white corresponding to enjoy high quality stereo audio and video on the back of an audio/video cable. The purchased cable can also connect the DVD player to a TV to right and left channel, red = right channel). 2. Cable Purchased Separately Figure 6 33 Connect one end of the audio/video adapter...

Owners Manual
Page 34
...Ni-MH batteries do not have "Memory Effect" and thus can provide power to use the battery for a portable power supply. Ideally, store the battery in order to recharge your Rechargeable Batteries 1. Please make sure you ...is fully discharged, immediately recharge (re- For longer periods of degradation. NOTE: If you plan to the player for approximately 3 hours. Each full recharge takes approximately five-hours and one week or longer), we recommend that...To charge the battery, please connect the power jack directly into the DVD player and leave the POWER switch in the off . P.
...Ni-MH batteries do not have "Memory Effect" and thus can provide power to use the battery for a portable power supply. Ideally, store the battery in order to recharge your Rechargeable Batteries 1. Please make sure you ...is fully discharged, immediately recharge (re- For longer periods of degradation. NOTE: If you plan to the player for approximately 3 hours. Each full recharge takes approximately five-hours and one week or longer), we recommend that...To charge the battery, please connect the power jack directly into the DVD player and leave the POWER switch in the off . P.

Owners Manual
Page 35
... the Battery Pack: 1. During this period , please recharge the battery at least once every two months to the player. Press the release button on the back of battery. 3. Removing the DVD Player Battery 35 Close the player cover. 3. The lock position is not to be used for long time. Figure 7. 2.Recharge efficiency will fit...
... the Battery Pack: 1. During this period , please recharge the battery at least once every two months to the player. Press the release button on the back of battery. 3. Removing the DVD Player Battery 35 Close the player cover. 3. The lock position is not to be used for long time. Figure 7. 2.Recharge efficiency will fit...

Owners Manual
Page 36
... disc's software restricts it . 36 The disc's software doesn't support the feature (e.g., angles) 3. Troubleshooting PROBLEM No sound or distorted sound SOLUTION • Make sure the DVD player is connected properly. Make sure all cables are securely inserted into the appropriate jacks.
... disc's software restricts it . 36 The disc's software doesn't support the feature (e.g., angles) 3. Troubleshooting PROBLEM No sound or distorted sound SOLUTION • Make sure the DVD player is connected properly. Make sure all cables are securely inserted into the appropriate jacks.

Owners Manual
Page 37
...; Both the unit and the disc are fresh. • Verify that the remote sensor eye is dirty. Clean it. • Condensation has formed. This DVD player only plays DVD's audio CDs and MP3s. Disc won't play • Check the type of disc you put into disc tray. This... DVD player is Region Number 1. • The disc is not obstructed. If the regional codes don't match, the disc can't be played. Allow player to dry out. 37 Troubleshooting (Cont) PROBLEM IR sensor inoperative SOLUTION • Verify that...
...; Both the unit and the disc are fresh. • Verify that the remote sensor eye is dirty. Clean it. • Condensation has formed. This DVD player only plays DVD's audio CDs and MP3s. Disc won't play • Check the type of disc you put into disc tray. This... DVD player is Region Number 1. • The disc is not obstructed. If the regional codes don't match, the disc can't be played. Allow player to dry out. 37 Troubleshooting (Cont) PROBLEM IR sensor inoperative SOLUTION • Verify that...

Owners Manual
Page 38
... the game picture will be displayed on the screen. 3) To remove the game jack from the DVD player press the tabs on both sides of the jack and pull the jack from the game console into DVD's E Port. Press the start button to select the displayed game. 2) Press START to the game select... AND USE Game Console Left and Right Direction 2. How to use 1) Press the START button to choose from the different games available. Installation 1) Turn the DVD player on the directional pad to enter the game selection mode. Use the left and right buttons on then plug the jack from the...
... the game picture will be displayed on the screen. 3) To remove the game jack from the DVD player press the tabs on both sides of the jack and pull the jack from the game console into DVD's E Port. Press the start button to select the displayed game. 2) Press START to the game select... AND USE Game Console Left and Right Direction 2. How to use 1) Press the START button to choose from the different games available. Installation 1) Turn the DVD player on the directional pad to enter the game selection mode. Use the left and right buttons on then plug the jack from the...

Owners Manual
Page 46
... format: Horizontal 720 pixel, vertical 480 pixel (NTSC) Frequency response: DVD (PCM 96 kHz/24 bits ): 20 Hz to 44 Hz DVD (PCM 48 kHz): 20 Hz to 22 kHz CD: 20 Hz to 20 kHz Video output: 1.0 Vp-p/75 Ohm, unbalanced Video S/N: Better than 35 dB ...
... format: Horizontal 720 pixel, vertical 480 pixel (NTSC) Frequency response: DVD (PCM 96 kHz/24 bits ): 20 Hz to 44 Hz DVD (PCM 48 kHz): 20 Hz to 22 kHz CD: 20 Hz to 20 kHz Video output: 1.0 Vp-p/75 Ohm, unbalanced Video S/N: Better than 35 dB ...


