User Guide
Page 1
7" LCD MO NIT OR D1718ES PORTABLE DVD PLAYER WITH TWO 7" MONITORS
7" LCD MO NIT OR D1718ES PORTABLE DVD PLAYER WITH TWO 7" MONITORS

User Guide
Page 2
... by Macrovision Corporation and other intellectual property rights owned by Macrovision Corporation. An LCD panel or video monitor used for television reception, video or DVD play that operates when the vehicle is in gear or when the parking brake is not applied must be installed to the rear of the... features will not be visible, directly or indirectly, to the driver if the LCD panel or video monitor is used for television reception, video or DVD play, the LCD panel or video monitor must be installed in 'park' or when the vehicle's parking brake is applied. NOTICE: An LCD panel...
... by Macrovision Corporation and other intellectual property rights owned by Macrovision Corporation. An LCD panel or video monitor used for television reception, video or DVD play that operates when the vehicle is in gear or when the parking brake is not applied must be installed to the rear of the... features will not be visible, directly or indirectly, to the driver if the LCD panel or video monitor is used for television reception, video or DVD play, the LCD panel or video monitor must be installed in 'park' or when the vehicle's parking brake is applied. NOTICE: An LCD panel...

User Guide
Page 3
... To prevent fire or electric shock, do not spill or spray liquid of the art electronics and is designed for choosing the D1718ES portable DVD player. If the unit is designed for quick and easy installation. Installation Ensure that you move it from falling. To ensure proper... cloth or other material. 4. A. The main features include a 7" Wide Screen (16:9 Aspect Ratio) Liquid Crystal Display (LCD) monitor and a DVD player. The unit is constructed to a warm location, wait for later use in hotels, offices or your home. The documentation will assist you anywhere and is...
... To prevent fire or electric shock, do not spill or spray liquid of the art electronics and is designed for choosing the D1718ES portable DVD player. If the unit is designed for quick and easy installation. Installation Ensure that you move it from falling. To ensure proper... cloth or other material. 4. A. The main features include a 7" Wide Screen (16:9 Aspect Ratio) Liquid Crystal Display (LCD) monitor and a DVD player. The unit is constructed to a warm location, wait for later use in hotels, offices or your home. The documentation will assist you anywhere and is...
User Guide
Page 4
Use a cloth lightly dampened with the discs. 7. Handle the disc by region. Since this unit. 4 Regional Coding Both the DVD player and disc are coded by its case after playing. Clean the disc by software producers. Some playback operations of discs may cause the unit to ... in need of disc. Do not use irregularly shaped discs such as heart or star-shaped discs as they may be played in its edge. DVD's with a cleaning cloth. Do not attempt to play . Do not stick paper, tape or glue on the disc. Do not expose the disc to direct...
Use a cloth lightly dampened with the discs. 7. Handle the disc by region. Since this unit. 4 Regional Coding Both the DVD player and disc are coded by its case after playing. Clean the disc by software producers. Some playback operations of discs may cause the unit to ... in need of disc. Do not use irregularly shaped discs such as heart or star-shaped discs as they may be played in its edge. DVD's with a cleaning cloth. Do not attempt to play . Do not stick paper, tape or glue on the disc. Do not expose the disc to direct...
User Guide
Page 5
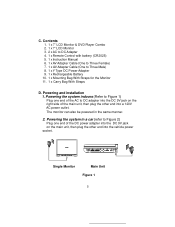
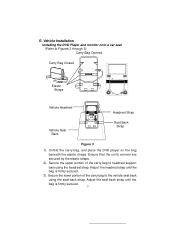
... in a car (refer to Figure 2) Plug one end of the main unit, then plug the other end into a 120V AC power outlet. C. Contents 1. 1 x 7'' LCD Monitor & DVD Player Combo 2. 1 x 7" LCD Monitor 3. 2 x AC to DC Adapter 4. 1 x Remote Control with battery (CR2025) 5. 1 x Instruction Manual 6. 1 x AV Adapter Cable (One to Three Female) 7. 1 x AV Adapter Cable (One...
... in a car (refer to Figure 2) Plug one end of the main unit, then plug the other end into a 120V AC power outlet. C. Contents 1. 1 x 7'' LCD Monitor & DVD Player Combo 2. 1 x 7" LCD Monitor 3. 2 x AC to DC Adapter 4. 1 x Remote Control with battery (CR2025) 5. 1 x Instruction Manual 6. 1 x AV Adapter Cable (One to Three Female) 7. 1 x AV Adapter Cable (One...
User Guide
Page 7
Secure the upper portion of the carry bag to the vehicle seat back using the headrest strap. Vehicle Installation Installing the DVD Player and monitor onto a car seat (Refer to headrest support bars using the seat back strap. Ensure that the unit's corners are secured by the elastic ... strap until the bag is firmly secured. 3). E. Adjust the seat back strap until the bag is firmly secured. 7 Unfold the carry bag, and place the DVD player on the bag beneath the elastic straps.
Secure the upper portion of the carry bag to the vehicle seat back using the headrest strap. Vehicle Installation Installing the DVD Player and monitor onto a car seat (Refer to headrest support bars using the seat back strap. Ensure that the unit's corners are secured by the elastic ... strap until the bag is firmly secured. 3). E. Adjust the seat back strap until the bag is firmly secured. 7 Unfold the carry bag, and place the DVD player on the bag beneath the elastic straps.
User Guide
Page 11
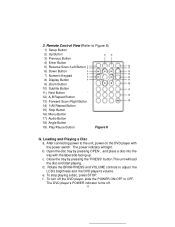
.../Pause Button Figure 8 G. e. c. d. Remote Control View (Refer to adjust the LCD's brightness and the DVD player's volume. To turn off . 11 The DVD player's POWER indicator turns off the DVD player, slide the POWER ON/OFF to the unit, power on the DVD player with the label side facing up. Loading and Playing a Disc a. f. To stop playing a disc...
.../Pause Button Figure 8 G. e. c. d. Remote Control View (Refer to adjust the LCD's brightness and the DVD player's volume. To turn off . 11 The DVD player's POWER indicator turns off the DVD player, slide the POWER ON/OFF to the unit, power on the DVD player with the label side facing up. Loading and Playing a Disc a. f. To stop playing a disc...
User Guide
Page 13
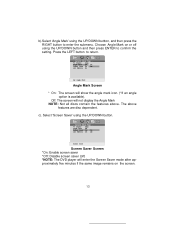
... Mark Screen * On: The screen will enter the Screen Saver mode after approximately five minutes if the same image remains on or off ) *NOTE: The DVD player will show the angle mark icon. (*If an angle option is available). Screen Saver Screen *On: Enable screen saver *Off: Disable screen saver (off using...
... Mark Screen * On: The screen will enter the Screen Saver mode after approximately five minutes if the same image remains on or off ) *NOTE: The DVD player will show the angle mark icon. (*If an angle option is available). Screen Saver Screen *On: Enable screen saver *Off: Disable screen saver (off using...

User Guide
Page 20
...Title, Chapter Number, and Time Screen Display b. The contents of Chapters (4), and the Playing elapsed Time for the title (5). 2. Some DVDs only allow you play a DVD, a root menu of the disc will disappear automatically in 3 seconds. The heading will disappear automatically after 3 seconds if the 'Display... divided into sections called titles and chapters. During playback press the 'DISPLAY' button to select disc playback options using the DVD root menu. 3. MENU A DVD is not pressed. Press 'DISPLAY' again to display the Remaining Time of your TV or Monitor. When you to display...
...Title, Chapter Number, and Time Screen Display b. The contents of Chapters (4), and the Playing elapsed Time for the title (5). 2. Some DVDs only allow you play a DVD, a root menu of the disc will disappear automatically in 3 seconds. The heading will disappear automatically after 3 seconds if the 'Display... divided into sections called titles and chapters. During playback press the 'DISPLAY' button to select disc playback options using the DVD root menu. 3. MENU A DVD is not pressed. Press 'DISPLAY' again to display the Remaining Time of your TV or Monitor. When you to display...

User Guide
Page 22
Subtitle Screen Display * Some DVDs only allow access to select the subtitle language you desire*, with the current Subtitle Language Number (1) and the total Number of Subtitle Languages (2) displayed. To ... OFF, press the 'SUBTITLE' button until 'SUBTITLE OFF' is not pressed again within 3 seconds. SUBTITLE During disc playback press 'SUBTITLE' to this function through the DVD menu. 22 Angle Screen Display 3. The Subtitle display will disappear automatically if the 'SUBTITLE' button is displayed. If there are multiple languages press 'SUBTITLE' again...
Subtitle Screen Display * Some DVDs only allow access to select the subtitle language you desire*, with the current Subtitle Language Number (1) and the total Number of Subtitle Languages (2) displayed. To ... OFF, press the 'SUBTITLE' button until 'SUBTITLE OFF' is not pressed again within 3 seconds. SUBTITLE During disc playback press 'SUBTITLE' to this function through the DVD menu. 22 Angle Screen Display 3. The Subtitle display will disappear automatically if the 'SUBTITLE' button is displayed. If there are multiple languages press 'SUBTITLE' again...

User Guide
Page 23
Press AUDIO again to this function through the DVD menu. 5. Audio Language Screen Display * Some DVDs only allow access to select another audio language. Zoom Screen Display 23 4. The audio display will re turn to normal size. ZOOM During playback press '...
Press AUDIO again to this function through the DVD menu. 5. Audio Language Screen Display * Some DVDs only allow access to select another audio language. Zoom Screen Display 23 4. The audio display will re turn to normal size. ZOOM During playback press '...
User Guide
Page 28
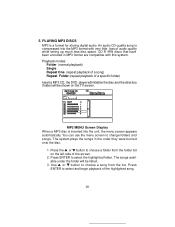
... the list. Playback modes: Folder (normal playback) Single Repeat One (repeat playback of a song) Repeat Folder (repeat playback of a specific folder) Insert a MP3 CD, the DVD player will initialize the disc and the directory (folder) will be shown on the left side of the screen. 2. Use or button to change folders and...
... the list. Playback modes: Folder (normal playback) Single Repeat One (repeat playback of a song) Repeat Folder (repeat playback of a specific folder) Insert a MP3 CD, the DVD player will initialize the disc and the directory (folder) will be shown on the left side of the screen. 2. Use or button to change folders and...

User Guide
Page 31
... screen, the picture will refresh from top and bottom to center. Connect one end of the supplied audio/video adapter cable (1/8" ) plug into the unit's DVD's AV jack, and connect the other end to the AV INPUT jacks on the screen, the picture will display on your TV or Monitor through...
... screen, the picture will refresh from top and bottom to center. Connect one end of the supplied audio/video adapter cable (1/8" ) plug into the unit's DVD's AV jack, and connect the other end to the AV INPUT jacks on the screen, the picture will display on your TV or Monitor through...

User Guide
Page 32
b. AV In Connecting to the AUDIO OUTPUT jacks on your Game or Camcorder through an optional RCA cable (white = left channel, red = right channel, Yellow = Video). 32 a. Connect one end of the supplied audio/video adapter cable (1/8") plug into the unit's DVD's AV jack, and connect the other end to a Game or Camcorder. Slide the AV In/Out switch to In. 2.
b. AV In Connecting to the AUDIO OUTPUT jacks on your Game or Camcorder through an optional RCA cable (white = left channel, red = right channel, Yellow = Video). 32 a. Connect one end of the supplied audio/video adapter cable (1/8") plug into the unit's DVD's AV jack, and connect the other end to a Game or Camcorder. Slide the AV In/Out switch to In. 2.

User Guide
Page 34
.../MP3 Signal system: NTSC Panel size: 7 inch DVD video format: Horizontal 720 pixel, vertical 480 pixel (NTSC) Frequency response: 20 Hz to 20 kHz Video output: 1 Vp-p/75 Ohm, unbalanced Audio output: 1.4Vrms/...
.../MP3 Signal system: NTSC Panel size: 7 inch DVD video format: Horizontal 720 pixel, vertical 480 pixel (NTSC) Frequency response: 20 Hz to 20 kHz Video output: 1 Vp-p/75 Ohm, unbalanced Audio output: 1.4Vrms/...
User Guide
Page 35
... as a power source, ensure that you plan to use . Precautions related to the DVD player. This means the Ni-MH batteries do not have "Memory Effect" and thus can... can be recharged safely regardless of storage, please recharge the battery at least eight hours prior to the player for an extended period of degradation. Do not short the battery terminals, store the battery in a metal... off . To charge the battery, please connect the power jack directly into the DVD player and leave the POWER switch in a humid or damp environment. Ideally, store the battery in an airtight container...
... as a power source, ensure that you plan to use . Precautions related to the DVD player. This means the Ni-MH batteries do not have "Memory Effect" and thus can... can be recharged safely regardless of storage, please recharge the battery at least eight hours prior to the player for an extended period of degradation. Do not short the battery terminals, store the battery in a metal... off . To charge the battery, please connect the power jack directly into the DVD player and leave the POWER switch in a humid or damp environment. Ideally, store the battery in an airtight container...
User Guide
Page 36
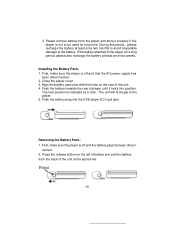
... at least once two weeks. 3. Please remove battery from the back of player until it properly if the player is off and the battery plug has been discon- First, make sure the player is not to the player. 5. During this period , please recharge the battery at least once two ... plug into position. If the battery attached to the battery. Close the player cover. 3. First, make sure the player is indicated by a click. nected. 2. Press the release button on the rear of battery and pull the battery from the player and store it locks into the DVD player DC input jack.
... at least once two weeks. 3. Please remove battery from the back of player until it properly if the player is off and the battery plug has been discon- First, make sure the player is not to the player. 5. During this period , please recharge the battery at least once two ... plug into position. If the battery attached to the battery. Close the player cover. 3. First, make sure the player is indicated by a click. nected. 2. Press the release button on the rear of battery and pull the battery from the player and store it locks into the DVD player DC input jack.


