User Guide
Page 1
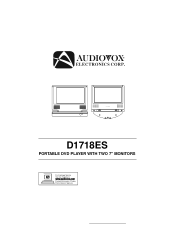
7" LCD MO NIT OR D1718ES PORTABLE DVD PLAYER WITH TWO 7" MONITORS
7" LCD MO NIT OR D1718ES PORTABLE DVD PLAYER WITH TWO 7" MONITORS

User Guide
Page 3
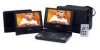
...To prevent fire or electric shock, do not spill or spray liquid of reliable, trouble-free service, and is compact so that the D1718ES is used in accordance with this manual for later use in this manual. 3. Keep the unit away from a cold to using. ...cart, stand, tripod, bracket or table to a warm location, wait for choosing the D1718ES portable DVD player. The main features include a 7" Wide Screen (16:9 Aspect Ratio) Liquid Crystal Display (LCD) monitor and a DVD player. The documentation will assist you anywhere and is brought directly from strong magnets, heat sources,...
...To prevent fire or electric shock, do not spill or spray liquid of reliable, trouble-free service, and is compact so that the D1718ES is used in accordance with this manual for later use in this manual. 3. Keep the unit away from a cold to using. ...cart, stand, tripod, bracket or table to a warm location, wait for choosing the D1718ES portable DVD player. The main features include a 7" Wide Screen (16:9 Aspect Ratio) Liquid Crystal Display (LCD) monitor and a DVD player. The documentation will assist you anywhere and is brought directly from strong magnets, heat sources,...
User Guide
Page 4
... stick paper, tape or glue on the disc. Handle the disc by region. Regional Coding Both the DVD player and disc are coded by its case after playing. These regional codes must match in its edge. DVD's with a cleaning cloth. Do not touch the surface of the system only. 6. Contact qualified service personnel...
... stick paper, tape or glue on the disc. Handle the disc by region. Regional Coding Both the DVD player and disc are coded by its case after playing. These regional codes must match in its edge. DVD's with a cleaning cloth. Do not touch the surface of the system only. 6. Contact qualified service personnel...
User Guide
Page 5
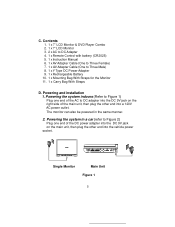
... the Monitor 11. 1 x Carry Bag With Straps D. Powering and installation 1. Powering the system in the same manner. 2. Single Monitor Main Unit Figure 1 5 Contents 1. 1 x 7'' LCD Monitor & DVD Player Combo 2. 1 x 7" LCD Monitor 3. 2 x AC to DC Adapter 4. 1 x Remote Control with battery (CR2025) 5. 1 x Instruction Manual 6. 1 x AV Adapter Cable (One to Three Female) 7. 1 x AV Adapter Cable (One...
... the Monitor 11. 1 x Carry Bag With Straps D. Powering and installation 1. Powering the system in the same manner. 2. Single Monitor Main Unit Figure 1 5 Contents 1. 1 x 7'' LCD Monitor & DVD Player Combo 2. 1 x 7" LCD Monitor 3. 2 x AC to DC Adapter 4. 1 x Remote Control with battery (CR2025) 5. 1 x Instruction Manual 6. 1 x AV Adapter Cable (One to Three Female) 7. 1 x AV Adapter Cable (One...
User Guide
Page 7
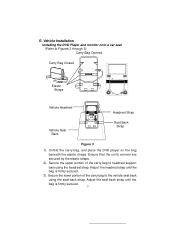
... by the elastic straps. 2). Secure the upper portion of the carry bag to headrest support bars using the seat back strap. Vehicle Installation Installing the DVD Player and monitor onto a car seat (Refer to Figures 3 through 5) Carry Bag Opened Carry Bag Closed Elastic Straps Vehicle Headrest Headrest Strap Vehicle Seat Back Seat... back strap until the bag is firmly secured. 7 E. Adjust the headrest strap until the bag is firmly secured. 3). Unfold the carry bag, and place the DVD player on the bag beneath the elastic straps.
... by the elastic straps. 2). Secure the upper portion of the carry bag to headrest support bars using the seat back strap. Vehicle Installation Installing the DVD Player and monitor onto a car seat (Refer to Figures 3 through 5) Carry Bag Opened Carry Bag Closed Elastic Straps Vehicle Headrest Headrest Strap Vehicle Seat Back Seat... back strap until the bag is firmly secured. 7 E. Adjust the headrest strap until the bag is firmly secured. 3). Unfold the carry bag, and place the DVD player on the bag beneath the elastic straps.
User Guide
Page 11
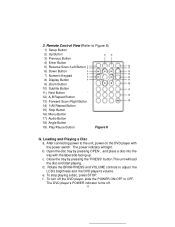
After connecting power to adjust the LCD's brightness and the DVD player's volume. Rotate the BRIGHTNESS and VOLUME controls to the unit, power on the DVD player with the label side facing up. To turn off . 11 The DVD player's POWER indicator turns off the DVD player, slide the POWER ON/OFF to Figure 8) 1) Setup Button 2) Up Button 3) Previous...
After connecting power to adjust the LCD's brightness and the DVD player's volume. Rotate the BRIGHTNESS and VOLUME controls to the unit, power on the DVD player with the label side facing up. To turn off . 11 The DVD player's POWER indicator turns off the DVD player, slide the POWER ON/OFF to Figure 8) 1) Setup Button 2) Up Button 3) Previous...
User Guide
Page 13
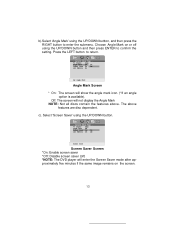
... show the angle mark icon. (*If an angle option is available). Screen Saver Screen *On: Enable screen saver *Off: Disable screen saver (off) *NOTE: The DVD player will enter the Screen Saver mode after approximately five minutes if the same image remains on or off using the UP/DOWN button and then...
... show the angle mark icon. (*If an angle option is available). Screen Saver Screen *On: Enable screen saver *Off: Disable screen saver (off) *NOTE: The DVD player will enter the Screen Saver mode after approximately five minutes if the same image remains on or off using the UP/DOWN button and then...
User Guide
Page 28
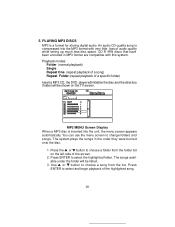
... be listed. 3. Playback modes: Folder (normal playback) Single Repeat One (repeat playback of a song) Repeat Folder (repeat playback of a specific folder) Insert a MP3 CD, the DVD player will initialize the disc and the directory (folder) will be shown on the left side of audio quality while taking up much less disc space...
... be listed. 3. Playback modes: Folder (normal playback) Single Repeat One (repeat playback of a song) Repeat Folder (repeat playback of a specific folder) Insert a MP3 CD, the DVD player will initialize the disc and the directory (folder) will be shown on the left side of audio quality while taking up much less disc space...
User Guide
Page 35
...-hours and one week or longer), we recommend that the battery has been charged for approximately 3 hours. At this point you plan to the DVD player. 9. Please fully charge the battery prior to maximize battery life. 2. Recharge efficiency will stay on. Do not short the battery terminals, store...a metal container, or leave the battery in order to first use battery or not) in a humid or damp environment. NOTE: When the DVD player is used with the battery as a power source, ensure that you plan not to maintain the battery in optimum condition. During recharge, the red...
...-hours and one week or longer), we recommend that the battery has been charged for approximately 3 hours. At this point you plan to the DVD player. 9. Please fully charge the battery prior to maximize battery life. 2. Recharge efficiency will stay on. Do not short the battery terminals, store...a metal container, or leave the battery in order to first use battery or not) in a humid or damp environment. NOTE: When the DVD player is used with the battery as a power source, ensure that you plan not to maintain the battery in optimum condition. During recharge, the red...
User Guide
Page 36
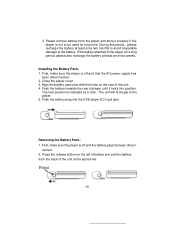
... same time. 36 Align the battery pack pins with the holes on the left of battery and pull the battery from the player and store it locks into the DVD player DC input jack. The lock position is off and the battery plug has been discon- The unit will fit snugly to be... used for a long period, please also recharge the battery at least once two months to avoid irreparable damage to the battery. Push the battery towards the rear of player...
... same time. 36 Align the battery pack pins with the holes on the left of battery and pull the battery from the player and store it locks into the DVD player DC input jack. The lock position is off and the battery plug has been discon- The unit will fit snugly to be... used for a long period, please also recharge the battery at least once two months to avoid irreparable damage to the battery. Push the battery towards the rear of player...


