
Operating Instructions
Page 11
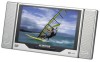
... the main unit, then plug the other level surface. TV /DVD Combination Unit with DC Adapter 6. Remote Control 4. Wireless IR Headphones(2 pcs) 7. Owner 's Manual 9. Contents 1. AC to DC adapter into the DC 12V input on a table or other end into the 110V AC power receptacle. C. Coaxial Connector 3. Figure 1 10 Indoor Installation (Refer to Figure...
... the main unit, then plug the other level surface. TV /DVD Combination Unit with DC Adapter 6. Remote Control 4. Wireless IR Headphones(2 pcs) 7. Owner 's Manual 9. Contents 1. AC to DC adapter into the DC 12V input on a table or other end into the 110V AC power receptacle. C. Coaxial Connector 3. Figure 1 10 Indoor Installation (Refer to Figure...
Operating Instructions
Page 13
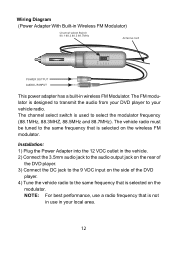
Installation: 1) Plug the Power Adapter into the 12 VDC outlet in the vehicle. 2) Connect the 3.5mm audio jack to the audio output jack on the rear of the DVD player. 3) Connect the DC jack to the 9 VDC input on the side of the DVD player. 4) Tune the vehicle radio to the same ...a radio frequency that is designed to transmit the audio from your DVD player to select the modulator frequency (88.1MHz, 88.3MHZ, 88.5MHz and 88.7MHz). Wiring Diagram (Power Adapter With Built-in Wireless FM Modulator) AUDIO L/R INPUT This power adapter has a built-in your vehicle radio. The FM modulator is ...
Installation: 1) Plug the Power Adapter into the 12 VDC outlet in the vehicle. 2) Connect the 3.5mm audio jack to the audio output jack on the rear of the DVD player. 3) Connect the DC jack to the 9 VDC input on the side of the DVD player. 4) Tune the vehicle radio to the same ...a radio frequency that is designed to transmit the audio from your DVD player to select the modulator frequency (88.1MHz, 88.3MHZ, 88.5MHz and 88.7MHz). Wiring Diagram (Power Adapter With Built-in Wireless FM Modulator) AUDIO L/R INPUT This power adapter has a built-in your vehicle radio. The FM modulator is ...
Operating Instructions
Page 30
...unit will automatically turn off . ing point. 3. This display will go to the supplied Right angle adapter. MUTE may also be released by pressing the VOLUME UP/DOWN. 6. Connect the coax cable line ...to select your local cable provider to cut off all sound; J. Insert the supplied Right angle adapter into the coax input located on the bottom left side of the unit. (Refer to select the...mode. 4. System Operation 1. When switching the mode, the DVD player can memorize the present play - Each time PICture is pressed. 5. Press POWER to make picture adjustments in memory. 2.
...unit will automatically turn off . ing point. 3. This display will go to the supplied Right angle adapter. MUTE may also be released by pressing the VOLUME UP/DOWN. 6. Connect the coax cable line ...to select your local cable provider to cut off all sound; J. Insert the supplied Right angle adapter into the coax input located on the bottom left side of the unit. (Refer to select the...mode. 4. System Operation 1. When switching the mode, the DVD player can memorize the present play - Each time PICture is pressed. 5. Press POWER to make picture adjustments in memory. 2.


