Installation Guide
Page 2
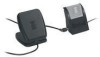
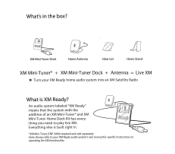
... XM Mini-Tuner* + XM Mini-Tuner Dock + Antenna = Live XM ■ Turn your XM Ready audio system's user manual for specific instructions on operating the XM functionality. Everything else is XM Ready? What's in . *XM Mini-Tuner (CNP-2000) required and sold separately Note: Always refer to play live XM. An audio system labeled "XM Ready" means that the system with the addition of an XM Mini-Tuner* and XM Mini-Tuner Home Dock...
... XM Mini-Tuner* + XM Mini-Tuner Dock + Antenna = Live XM ■ Turn your XM Ready audio system's user manual for specific instructions on operating the XM functionality. Everything else is XM Ready? What's in . *XM Mini-Tuner (CNP-2000) required and sold separately Note: Always refer to play live XM. An audio system labeled "XM Ready" means that the system with the addition of an XM Mini-Tuner* and XM Mini-Tuner Home Dock...

Installation Guide
Page 3
XM Ready Audio System Only 65 Note: Always turn off , simply connect the end of the XM Mini-Tuner Dock cable to the port on the back panel of your XM Ready audio system before removing XM Mini-Tuner from the XM Mini-Tuner Dock. With power to your XM Ready audio system turned off power to your XM Ready audio system. Setup: At Home Step 1: Insert XM Mini-Tuner into XM Mini-Tuner Dock DD 0 Step 2: Connect to your XM Ready audio system Connect your XM Mini-Tuner Dock to your XM Ready audio system labeled "XM."
XM Ready Audio System Only 65 Note: Always turn off , simply connect the end of the XM Mini-Tuner Dock cable to the port on the back panel of your XM Ready audio system before removing XM Mini-Tuner from the XM Mini-Tuner Dock. With power to your XM Ready audio system turned off power to your XM Ready audio system. Setup: At Home Step 1: Insert XM Mini-Tuner into XM Mini-Tuner Dock DD 0 Step 2: Connect to your XM Ready audio system Connect your XM Mini-Tuner Dock to your XM Ready audio system labeled "XM."
Installation Guide
Page 4
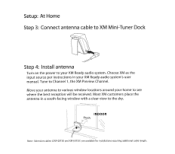
... 3: Connect antenna cable to XM Mini-Tuner Dock Step 4: Install antenna Turn on the power to your home to see where the best reception will be received. Move your antenna to various window locations around your XM Ready audio system. Most XM customers place the antenna in your XM Ready audio system's user manual. South OOR Note: Extension...
... 3: Connect antenna cable to XM Mini-Tuner Dock Step 4: Install antenna Turn on the power to your home to see where the best reception will be received. Move your antenna to various window locations around your XM Ready audio system. Most XM customers place the antenna in your XM Ready audio system's user manual. South OOR Note: Extension...
Installation Guide
Page 5
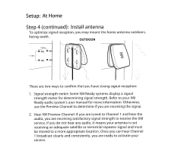
...the audio, you have strong signal reception: 1. Hear XM Preview Channel: If you are receiving satisfactory signal strength to receive the XM service. If you may mount the home antenna outdoors, facing south. Refer to your XM Ready audio system's user manual for determining signal strength. ...Setup: At Home Step 4 (continued): Install antenna To optimize signal reception,...
...the audio, you have strong signal reception: 1. Hear XM Preview Channel: If you are receiving satisfactory signal strength to receive the XM service. If you may mount the home antenna outdoors, facing south. Refer to your XM Ready audio system's user manual for determining signal strength. ...Setup: At Home Step 4 (continued): Install antenna To optimize signal reception,...
Installation Guide
Page 6
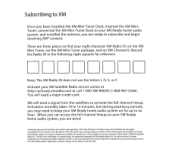
... you have installed the XM Mini-Tuner Dock, inserted the XM MiniTuner, connected the XM Mini-Tuner Dock to your eight character XM Radio ID: on the XM Mini-Tuner, on the XM Mini-Tuner package, and on location. Activate your XM Satellite Radio service online at xmradie.com. You will need to your XM Ready home audio system, you are done! Activation normally takes 10 to 15 minutes...
... you have installed the XM Mini-Tuner Dock, inserted the XM MiniTuner, connected the XM Mini-Tuner Dock to your eight character XM Radio ID: on the XM Mini-Tuner, on the XM Mini-Tuner package, and on location. Activate your XM Satellite Radio service online at xmradie.com. You will need to your XM Ready home audio system, you are done! Activation normally takes 10 to 15 minutes...
Installation Guide
Page 7
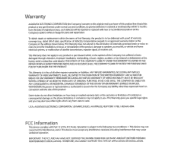
...may not cause harmful interference, and 2. IMPORTANT: THE FCC AND FAA HAVE NOT CERTIFIED THE XM MINI-TUNER FOR USE IN ANY AIRCRAFT (NEITHER PORTABLE NOR PERMANENT INSTALLATION). Operation is authorized to any part... MUST BE BROUGHT WITHIN A PERIOD OF 48 MONTHS FROM DATE OF ORIGINAL PURCHASE. USA: AUDIOVOX ELECTRONICS CORPORATION, 150 MARCUS BLVD., HAUPPAUGE, NEW YORK 11788,1-800645-4994. This Warranty is ...prepaid, to speakers, accessories, or vehicle and home electrical systems, or malfunction of this product that may not apply to the following two conditions: 1.
...may not cause harmful interference, and 2. IMPORTANT: THE FCC AND FAA HAVE NOT CERTIFIED THE XM MINI-TUNER FOR USE IN ANY AIRCRAFT (NEITHER PORTABLE NOR PERMANENT INSTALLATION). Operation is authorized to any part... MUST BE BROUGHT WITHIN A PERIOD OF 48 MONTHS FROM DATE OF ORIGINAL PURCHASE. USA: AUDIOVOX ELECTRONICS CORPORATION, 150 MARCUS BLVD., HAUPPAUGE, NEW YORK 11788,1-800645-4994. This Warranty is ...prepaid, to speakers, accessories, or vehicle and home electrical systems, or malfunction of this product that may not apply to the following two conditions: 1.
Installation Guide
Page 15
((>
((>
