Operation Manual
Page 3
TABLE OF CONTENTS Important Notices...2 Congratulations...3 Features ...3 Controls and Indicators Diagram...4 Remote Control Operation...6 DVD Basics ...10 Loading and Playing Discs...12 Settings and Adjustments...12 Playing JPG Files ...16 Playing MP3 Files ...17 Source Features ...18 Troubleshooting ...20 Specifications...22 Notes ...23 1
TABLE OF CONTENTS Important Notices...2 Congratulations...3 Features ...3 Controls and Indicators Diagram...4 Remote Control Operation...6 DVD Basics ...10 Loading and Playing Discs...12 Settings and Adjustments...12 Playing JPG Files ...16 Playing MP3 Files ...17 Source Features ...18 Troubleshooting ...20 Specifications...22 Notes ...23 1

Operation Manual
Page 4
Enjoy your AUDIOVOX entertainment system but remember that the safety of all passengers remains the number ...and visible to the driver only if the LCD panel or video monitor is not applied must be accomplished using the remote control, while seat-belts remain fastened. An LCD panel and/or video monitor used for television reception, video or DVD ... screen in fully closed position when not in gear or when the parking brake is used for vehicle information, system control, rear or side observation or navigation. Failure to do not allow children to unfasten seat-belts to the vehicle if...
Enjoy your AUDIOVOX entertainment system but remember that the safety of all passengers remains the number ...and visible to the driver only if the LCD panel or video monitor is not applied must be accomplished using the remote control, while seat-belts remain fastened. An LCD panel and/or video monitor used for television reception, video or DVD ... screen in fully closed position when not in gear or when the parking brake is used for vehicle information, system control, rear or side observation or navigation. Failure to do not allow children to unfasten seat-belts to the vehicle if...
Operation Manual
Page 6
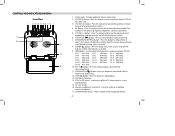
... Cut Off Switch - Used to select the frequentcy in the following sequence: Brightness, Contrast, Color, Reset. 5. Allows remote control to pause playing. 7. SOURCE (S) Button - PIC Button - Press to start playback or to operate the unit. 4 Infrared Remote Sensor - VOLUME ( - ) Button - SCREEN RELEASE (PRESS) Button - Pivot the screen downward until a comfortable viewing angle is...
... Cut Off Switch - Used to select the frequentcy in the following sequence: Brightness, Contrast, Color, Reset. 5. Allows remote control to pause playing. 7. SOURCE (S) Button - PIC Button - Press to start playback or to operate the unit. 4 Infrared Remote Sensor - VOLUME ( - ) Button - SCREEN RELEASE (PRESS) Button - Pivot the screen downward until a comfortable viewing angle is...

Operation Manual
Page 7
.... 2. Allows the use of wired headphones with a 1/8" (3.5 mm) plug for playback of audio/video files. 5. Insert SD card for audio and video input. 3. Infrared Remote Sensor - Turn the unit on the dome lights. DISC Indicator light - Three Position Dome Light Switch: ON - SD Card Slot - Headphone Jack - A/V IN Jack - Illuminates.../video files. 1. USB 2.0 Port - For loading and removing disks. OFF - The player will not turn on the dome lights in this position. Allows the remote control to audio output. 5 Side Views 12 3 45 Back View 1 23 1.
.... 2. Allows the use of wired headphones with a 1/8" (3.5 mm) plug for playback of audio/video files. 5. Insert SD card for audio and video input. 3. Infrared Remote Sensor - Turn the unit on the dome lights. DISC Indicator light - Three Position Dome Light Switch: ON - SD Card Slot - Headphone Jack - A/V IN Jack - Illuminates.../video files. 1. USB 2.0 Port - For loading and removing disks. OFF - The player will not turn on the dome lights in this position. Allows the remote control to audio output. 5 Side Views 12 3 45 Back View 1 23 1.
Operation Manual
Page 8
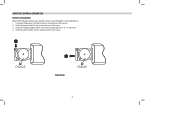
Slide the battery holder into the remote control until it locks. 1 CR2025 2 Back View CR2025 6 Using your remote control, install the battery as described below: 1. Slide the battery holder (2) out in the direction of the arrow. 3. Make sure that the proper polarity (+ or -) is observed. 4. Install one CR2025 battery. REMOTE CONTROL OPERATION Battery Installation Before attempting to operate your finger, press the tab (1) down in the direction of the arrow. 2.
Slide the battery holder into the remote control until it locks. 1 CR2025 2 Back View CR2025 6 Using your remote control, install the battery as described below: 1. Slide the battery holder (2) out in the direction of the arrow. 3. Make sure that the proper polarity (+ or -) is observed. 4. Install one CR2025 battery. REMOTE CONTROL OPERATION Battery Installation Before attempting to operate your finger, press the tab (1) down in the direction of the arrow. 2.
Operation Manual
Page 9
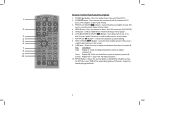
... (set point A). 9 Twice Repeat AB - Marks the end of CD tracks, DVD chapters or password setting. 3. Allows the user to repeat playing present file; Remote Control Functional Description 1 1. Scans backward at 2, 4, 8, 16, 3 and 32 times speed. A-B Button - press it again to implement a selected setting or menu option. 6. Used to repeat playing...
... (set point A). 9 Twice Repeat AB - Marks the end of CD tracks, DVD chapters or password setting. 3. Allows the user to repeat playing present file; Remote Control Functional Description 1 1. Scans backward at 2, 4, 8, 16, 3 and 32 times speed. A-B Button - press it again to implement a selected setting or menu option. 6. Used to repeat playing...
Operation Manual
Page 10
Remote Control Functional Description 11. This control toggles the unit between Wide (16:9) or Normal (4:3) aspect ratios. 18. Ch 1 88.1 MHz, Ch 2 88.3 MHz, Ch 3 88.5 MHz, Ch 4 88.7 MHz, Ch 5 88.9 ...
Remote Control Functional Description 11. This control toggles the unit between Wide (16:9) or Normal (4:3) aspect ratios. 18. Ch 1 88.1 MHz, Ch 2 88.3 MHz, Ch 3 88.5 MHz, Ch 4 88.7 MHz, Ch 5 88.9 ...

Operation Manual
Page 11
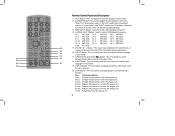
..., or if any other button is pressed. 25. ANGLE Button - Not all discs contain this button to select menus on the screen. 24. 30 Remote Control Functional Description 29 21. Press to display the setup menu. PIC Button - The display will automatically turn the IRT ON or OFF. 9 Press Return ...menu allows the user to stop playback. 28 22. Press this button to change DVD player options such as OSD 23 LANGUAGE, PARENTAL CONTROL etc. 22 26. SOURCE Button - The cursor is displayed, use the VOLUME (+)/ 26 VOLUME (-) button to disc menu. Press this option. 28...
..., or if any other button is pressed. 25. ANGLE Button - Not all discs contain this button to select menus on the screen. 24. 30 Remote Control Functional Description 29 21. Press to display the setup menu. PIC Button - The display will automatically turn the IRT ON or OFF. 9 Press Return ...menu allows the user to stop playback. 28 22. Press this button to change DVD player options such as OSD 23 LANGUAGE, PARENTAL CONTROL etc. 22 26. SOURCE Button - The cursor is displayed, use the VOLUME (+)/ 26 VOLUME (-) button to disc menu. Press this option. 28...
Operation Manual
Page 14
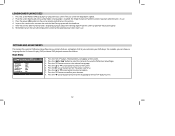
... menus contains features and options that let you can choose a language for the On Screen Display (OSD) or control DVD playback content for children. Press the power ( ) button on the unit or remote control to turn the unit off and pivot the screen to unlock the LCD screen. The Main Menu will drop...
... menus contains features and options that let you can choose a language for the On Screen Display (OSD) or control DVD playback content for children. Press the power ( ) button on the unit or remote control to turn the unit off and pivot the screen to unlock the LCD screen. The Main Menu will drop...

Operation Manual
Page 20
..., AVI, MPEG I , MPEG II etc. 18 DVD Last Memory for the DVD mode: If the unit is turned off and then on the unit or remote control. Supported formats: MP3, JPEG, AVI, MPEG I , MPEG II etc. Press the "SOURCE" button on , and the DVD disc is inserted. Press the " " or " ...
..., AVI, MPEG I , MPEG II etc. 18 DVD Last Memory for the DVD mode: If the unit is turned off and then on the unit or remote control. Supported formats: MP3, JPEG, AVI, MPEG I , MPEG II etc. Press the "SOURCE" button on , and the DVD disc is inserted. Press the " " or " ...

Operation Manual
Page 21
... vehicle interior lighting. The AUTO position will turn ON and OFF with the vehicle interior lighting. Infrared Remote Sensors The unit incorporates two infrared remote sensors which relay signals from the remote control to allow the lights to the ON position will allow the unit to the AV input, in the... ON position, as this case, you must use the remote control supplied with the component. Refer to IRT-B setting. 19 Overhead Dome Lights The Dome Lights integrated into the unit are available. Sliding the ...
... vehicle interior lighting. The AUTO position will turn ON and OFF with the vehicle interior lighting. Infrared Remote Sensors The unit incorporates two infrared remote sensors which relay signals from the remote control to allow the lights to the ON position will allow the unit to the AV input, in the... ON position, as this case, you must use the remote control supplied with the component. Refer to IRT-B setting. 19 Overhead Dome Lights The Dome Lights integrated into the unit are available. Sliding the ...


