Programming Guide
Page 1
... Output 7 Driver 2 Priority or Separate Output Receiver channels 6 or 7 will however operate for certain model Audiovox Alarms. If your owners manual. Note: The RED Button serves as the Lock/Unlock button, or Channel 2 when separate Lock Unlock buttons are programmed. In addition, the receiver also allows driver priority function. The following indicates the receiver programmable slots. 1 Lock/Unlock or Lock 2 Unlock if Programmed 3 Trunk Release & or Remote Start (Optional on the following page, you do not program a transmitter button into channel...
... Output 7 Driver 2 Priority or Separate Output Receiver channels 6 or 7 will however operate for certain model Audiovox Alarms. If your owners manual. Note: The RED Button serves as the Lock/Unlock button, or Channel 2 when separate Lock Unlock buttons are programmed. In addition, the receiver also allows driver priority function. The following indicates the receiver programmable slots. 1 Lock/Unlock or Lock 2 Unlock if Programmed 3 Trunk Release & or Remote Start (Optional on the following page, you do not program a transmitter button into channel...
Programming Guide
Page 2
... the valet/program switch three times. programming with the default button configurations for the first four channels will control both Lock & Arm/Unlock & Disarm. (Repeat this for each transmitter you wish to operate the Unlock/Disarm feature). 6. If you wish to operate the Lock/Unlock features from the siren. (Repeat this for each transmitter you wish to operate the Channel 3 output (Trunk Release) 8. TO ENTER THE PROGRAM MODE: 1. In...
... the valet/program switch three times. programming with the default button configurations for the first four channels will control both Lock & Arm/Unlock & Disarm. (Repeat this for each transmitter you wish to operate the Unlock/Disarm feature). 6. If you wish to operate the Lock/Unlock features from the siren. (Repeat this for each transmitter you wish to operate the Channel 3 output (Trunk Release) 8. TO ENTER THE PROGRAM MODE: 1. In...

Programming Guide
Page 3
... release the valet program switch one time. (Siren emits 5 short chirps indicating channel 5 has been entered) 11. Simply programming any unused button(s)) of the first transmitter you wish to control Channel 7 output, (Driver Priority 2) until a long chirp is heard from the siren. (Repeat this for each transmitter you wish to operate the Channel 7 output, Driver Priority 2) NOTE: Channels 6 and 7 can be used as a separate output to control a function other than...
... release the valet program switch one time. (Siren emits 5 short chirps indicating channel 5 has been entered) 11. Simply programming any unused button(s)) of the first transmitter you wish to control Channel 7 output, (Driver Priority 2) until a long chirp is heard from the siren. (Repeat this for each transmitter you wish to operate the Channel 7 output, Driver Priority 2) NOTE: Channels 6 and 7 can be used as a separate output to control a function other than...
Programming Guide
Page 4
... indicate no change in the unit's memory still remain operational. Transmitter battery replacement is recommended at least every 6 to 8 months, depending upon how frequently the transmitter is used. 4 128-6799C 4 of buttons, push out the stored code by pressing the unused button until a long chirp is also a low battery indicator that particular receiver channel, all other transmitter stored in programming has been made to the receiver channel. If...
... indicate no change in the unit's memory still remain operational. Transmitter battery replacement is recommended at least every 6 to 8 months, depending upon how frequently the transmitter is used. 4 128-6799C 4 of buttons, push out the stored code by pressing the unused button until a long chirp is also a low battery indicator that particular receiver channel, all other transmitter stored in programming has been made to the receiver channel. If...
Programming Guide
Page 5
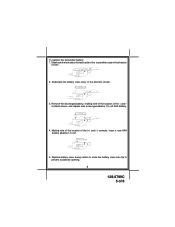
Remove the discharged battery, making note of the location of the (+) and (-) contacts, insert a new AAA battery alkaline 1.5 volt. 5. Slide back the lock tab on the back side of 8 Making note of the location of the + and contacts shown, and replace with a new type alkaline 1.5 volt AAA Battery. 4. Replace battery cover being certain to close the battery case lock clip to prevent accidental opening. 5 128-6799C 5 of the transmitter case in the direction shown. 3. Slide back the battery case cover in the direction shown. 2. To replace the transmitter battery: 1.
Remove the discharged battery, making note of the location of the (+) and (-) contacts, insert a new AAA battery alkaline 1.5 volt. 5. Slide back the lock tab on the back side of 8 Making note of the location of the + and contacts shown, and replace with a new type alkaline 1.5 volt AAA Battery. 4. Replace battery cover being certain to close the battery case lock clip to prevent accidental opening. 5 128-6799C 5 of the transmitter case in the direction shown. 3. Slide back the battery case cover in the direction shown. 2. To replace the transmitter battery: 1.

Programming Guide
Page 6
... Checks Payable To Audiovox Corporation Credit Card Number Credit Card Expiration Date 8) Mail this form and your payment to the instructions below. Simply dial 1 - 800 - 645 - 4994, and follow the instructions from the operator interface 6 128-6799C 6 of 8 ORDER FORM FOR TRANSCEIVERS 5BCR/5BCR03/5BCR05/5BCR07 5BCR/5BCR03 5BCR05/5BCR07 Attention: Transmitter Ordering Department Important: To help us expedite your order...
... Checks Payable To Audiovox Corporation Credit Card Number Credit Card Expiration Date 8) Mail this form and your payment to the instructions below. Simply dial 1 - 800 - 645 - 4994, and follow the instructions from the operator interface 6 128-6799C 6 of 8 ORDER FORM FOR TRANSCEIVERS 5BCR/5BCR03/5BCR05/5BCR07 5BCR/5BCR03 5BCR05/5BCR07 Attention: Transmitter Ordering Department Important: To help us expedite your order...
Programming Guide
Page 8
© 2007 Audiovox Electronics Corp., 150 Marcus Blvd., Hauppauge, NY 11788 128-6799C 8 128-6799C 8 of 8
© 2007 Audiovox Electronics Corp., 150 Marcus Blvd., Hauppauge, NY 11788 128-6799C 8 128-6799C 8 of 8


