
Users Manual
Page 3
... 1: Hardware Setup Getting to know your Notebook PC 14 Top View...14 Bottom...18 Right Side...20 Left Side...23 Chapter 2: Using your Notebook PC Getting started...26 Charge your Notebook PC 26 Lift to open the display panel 28 Press the power button 28 Gestures for the touch screen panel and touchpad 29 Using touch screen panel gestures 29 Using the touchpad...32 Using the keyboard...39 HotKeys...39 Function keys...40 Windows® 10 keys...40 Rotating the display panel 41 Notebook PC E-Manual 3
... 1: Hardware Setup Getting to know your Notebook PC 14 Top View...14 Bottom...18 Right Side...20 Left Side...23 Chapter 2: Using your Notebook PC Getting started...26 Charge your Notebook PC 26 Lift to open the display panel 28 Press the power button 28 Gestures for the touch screen panel and touchpad 29 Using touch screen panel gestures 29 Using the touchpad...32 Using the keyboard...39 HotKeys...39 Function keys...40 Windows® 10 keys...40 Rotating the display panel 41 Notebook PC E-Manual 3

Users Manual
Page 4
......52 Snap hotspots...52 Action Center...54 Other keyboard shortcuts 55 Connecting to wireless networks 57 Wi-Fi...57 Bluetooth...58 Airplane mode...59 Turning your Notebook PC off 60 Putting your Notebook PC to sleep 61 Chapter 4: Power-On Self-Test (POST) The Power-On Self-Test (POST 64 Using POST to access BIOS and Troubleshoot 64 BIOS...64 Accessing BIOS...65 Recovering your system 66 Performing a recovery option 67 4 Notebook PC E-Manual
......52 Snap hotspots...52 Action Center...54 Other keyboard shortcuts 55 Connecting to wireless networks 57 Wi-Fi...57 Bluetooth...58 Airplane mode...59 Turning your Notebook PC off 60 Putting your Notebook PC to sleep 61 Chapter 4: Power-On Self-Test (POST) The Power-On Self-Test (POST 64 Using POST to access BIOS and Troubleshoot 64 BIOS...64 Accessing BIOS...65 Recovering your system 66 Performing a recovery option 67 4 Notebook PC E-Manual

Users Manual
Page 7
... change the settings of your Notebook PC. About this manual This manual provides information about the hardware and software features of your Notebook PC, organized through the following chapters: Chapter 1: Hardware Setup This chapter details the hardware components of your Notebook PC. Chapter 2: Using your Notebook PC This chapter shows you can refer to use the different parts of using Windows® 10 in your Notebook PC. Notebook PC E-Manual 7 Chapter 3: Working...
... change the settings of your Notebook PC. About this manual This manual provides information about the hardware and software features of your Notebook PC, organized through the following chapters: Chapter 1: Hardware Setup This chapter details the hardware components of your Notebook PC. Chapter 2: Using your Notebook PC This chapter shows you can refer to use the different parts of using Windows® 10 in your Notebook PC. Notebook PC E-Manual 7 Chapter 3: Working...

Users Manual
Page 10
... your Notebook PC Disconnect the AC power and remove the battery pack (if applicable) before cleaning your Notebook PC. Do not use your Notebook PC to dusty environments. Use a clean cellulose sponge or chamois cloth dampened with a solution of nonabrasive detergent and a few drops of your Notebook PC. Do not expose your Notebook PC near gas leaks. 10 Notebook PC E-Manual Do...
... your Notebook PC Disconnect the AC power and remove the battery pack (if applicable) before cleaning your Notebook PC. Do not use your Notebook PC to dusty environments. Use a clean cellulose sponge or chamois cloth dampened with a solution of nonabrasive detergent and a few drops of your Notebook PC. Do not expose your Notebook PC near gas leaks. 10 Notebook PC E-Manual Do...

Users Manual
Page 13
Chapter 1: Hardware Setup Notebook PC E-Manual 13
Chapter 1: Hardware Setup Notebook PC E-Manual 13

Users Manual
Page 16
... function keys, allows quick access to type capitalized letters (such as A, B, C) using your Notebook PC's keyboard. It also enables you to Windows®, and controls other multimedia functions. NOTE: For more details, refer to the Using the keyboard section in this manual. 16 Notebook PC E-Manual Function key lock indicator This indicator lights up when the capital lock function is activated. Keyboard The keyboard provides full-sized QWERTY keys with a comfortable travel depth for typing. NOTE: The keyboard layout differs by model...
... function keys, allows quick access to type capitalized letters (such as A, B, C) using your Notebook PC's keyboard. It also enables you to Windows®, and controls other multimedia functions. NOTE: For more details, refer to the Using the keyboard section in this manual. 16 Notebook PC E-Manual Function key lock indicator This indicator lights up when the capital lock function is activated. Keyboard The keyboard provides full-sized QWERTY keys with a comfortable travel depth for typing. NOTE: The keyboard layout differs by model...
Users Manual
Page 18
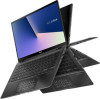
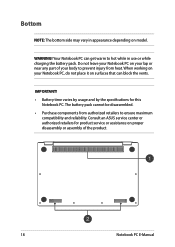
... retailers to hot while in appearance depending on your lap or near any part of the product. 18 Notebook PC E-Manual Consult an ASUS service center or authorized retailers for this Notebook PC. Bottom NOTE: The bottom side may vary in use or while charging the battery pack. IMPORTANT! • Battery time varies by usage and by the specifications for product service or...
... retailers to hot while in appearance depending on your lap or near any part of the product. 18 Notebook PC E-Manual Consult an ASUS service center or authorized retailers for this Notebook PC. Bottom NOTE: The bottom side may vary in use or while charging the battery pack. IMPORTANT! • Battery time varies by usage and by the specifications for product service or...

Users Manual
Page 22
Headphone/Headset/Microphone jack This port allows you to connect your headset or an external microphone. MicroSD card slot This built-in memory card reader slot supports microSD card formats. 22 Notebook PC E-Manual You can also use this port to connect amplified speakers or headphones. USB 2.0 port The USB (Universal Serial Bus) port is compatible with USB 2.0 or USB 1.1 devices such as keyboards, pointing devices, flash disk drives, external HDDs, speakers, cameras and printers.
Headphone/Headset/Microphone jack This port allows you to connect your headset or an external microphone. MicroSD card slot This built-in memory card reader slot supports microSD card formats. 22 Notebook PC E-Manual You can also use this port to connect amplified speakers or headphones. USB 2.0 port The USB (Universal Serial Bus) port is compatible with USB 2.0 or USB 1.1 devices such as keyboards, pointing devices, flash disk drives, external HDDs, speakers, cameras and printers.

Users Manual
Page 27
... following precautions for your Notebook PC's battery: • Only ASUS-authorized technicians should remove the battery inside the device (for non-removable battery only). • The battery used in fire. • Never attempt to short-circuit your Notebook PC's battery. • Never attempt to disassemble and reassemble the battery (for non-removable battery only). • Discontinue usage if leakage is connected to the power adapter before turning it matches the...
... following precautions for your Notebook PC's battery: • Only ASUS-authorized technicians should remove the battery inside the device (for non-removable battery only). • The battery used in fire. • Never attempt to short-circuit your Notebook PC's battery. • Never attempt to disassemble and reassemble the battery (for non-removable battery only). • Discontinue usage if leakage is connected to the power adapter before turning it matches the...

Users Manual
Page 39
Notebook PC E-Manual 39 Using the keyboard HotKeys The HotKeys on your Notebook PC's keyboard can trigger the following commands: Turns the speaker on or off Turns the speaker volume down Turns the speaker volume up Decreases display brightness Increases display brightness Enables or disables the touchpad Adjusts brightness for the backlit keyboard Toggles the display mode NOTE: Ensure that the second display is connected to your Notebook PC.
Notebook PC E-Manual 39 Using the keyboard HotKeys The HotKeys on your Notebook PC's keyboard can trigger the following commands: Turns the speaker on or off Turns the speaker volume down Turns the speaker volume up Decreases display brightness Increases display brightness Enables or disables the touchpad Adjusts brightness for the backlit keyboard Toggles the display mode NOTE: Ensure that the second display is connected to your Notebook PC.
Users Manual
Page 40
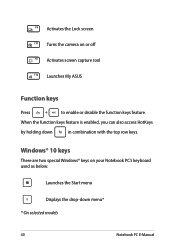
Activates the Lock screen Turns the camera on your Notebook PC's keyboard used as below: Launches the Start menu Displays the drop-down in combination with the top row keys. When the function keys feature is enabled, you can also access HotKeys by holding down menu* * On selected models 40 Notebook PC E-Manual Windows® 10 keys There are two special Windows® keys on or off Activates screen capture tool Launches My ASUS Function keys Press to enable or disable the function keys feature.
Activates the Lock screen Turns the camera on your Notebook PC's keyboard used as below: Launches the Start menu Displays the drop-down in combination with the top row keys. When the function keys feature is enabled, you can also access HotKeys by holding down menu* * On selected models 40 Notebook PC E-Manual Windows® 10 keys There are two special Windows® keys on or off Activates screen capture tool Launches My ASUS Function keys Press to enable or disable the function keys feature.

Users Manual
Page 45
... user account Notebook PC E-Manual 45 Change account settings, lock, or sign out from your account Launch an app from the Start screen Launch Taskview Launch an app from the taskbar Launch Search Launch the Start menu Launch All apps Shut down, restart, or put your Notebook PC to sleep Launch Settings Launch File Explorer You can use the Start menu to do these common activities: • Start...
... user account Notebook PC E-Manual 45 Change account settings, lock, or sign out from your account Launch an app from the Start screen Launch Taskview Launch an app from the taskbar Launch Search Launch the Start menu Launch All apps Shut down, restart, or put your Notebook PC to sleep Launch Settings Launch File Explorer You can use the Start menu to do these common activities: • Start...

Users Manual
Page 58
... Start menu. 2. Compare the passcode on your Notebook PC with other Bluetooth-enabled devices You need to pair your Notebook PC with the device. Ensure that Airplane mode is turned off before enabling the Bluetooth connection of your Notebook PC. 58 Notebook PC E-Manual NOTE: For some Bluetooth-enabled devices, you may be prompted to facilitate wireless data transfers with the passcode sent to enable data transfers. or 3. Airplane mode disables this feature. Bluetooth Use Bluetooth to key...
... Start menu. 2. Compare the passcode on your Notebook PC with other Bluetooth-enabled devices You need to pair your Notebook PC with the device. Ensure that Airplane mode is turned off before enabling the Bluetooth connection of your Notebook PC. 58 Notebook PC E-Manual NOTE: For some Bluetooth-enabled devices, you may be prompted to facilitate wireless data transfers with the passcode sent to enable data transfers. or 3. Airplane mode disables this feature. Bluetooth Use Bluetooth to key...

Users Manual
Page 64
... turn on or restart your Notebook PC. You may result to run the BIOS Setup. • You have installed a new system component that run troubleshooting options using the function keys of your Notebook PC. The Power-On Self-Test (POST) The POST (Power-On Self-Test) is installed as a permanent part of the Notebook PC's architecture. The software that controls the POST is a series of software-controlled diagnostic tests that requires further BIOS settings...
... turn on or restart your Notebook PC. You may result to run the BIOS Setup. • You have installed a new system component that run troubleshooting options using the function keys of your Notebook PC. The Power-On Self-Test (POST) The POST (Power-On Self-Test) is installed as a permanent part of the Notebook PC's architecture. The software that controls the POST is a series of software-controlled diagnostic tests that requires further BIOS settings...

Users Manual
Page 66
... can restore your Notebook PC to its default settings and delete other installed apps. • Remove everything - This option resets your Notebook PC to its settings to help improve performance. Using this option. 66 Notebook PC E-Manual This option allows you to restore the system to its original state or simply refresh its factory settings. IMPORTANT! • Backup all your data files before doing this option, you to do any recovery option...
... can restore your Notebook PC to its default settings and delete other installed apps. • Remove everything - This option resets your Notebook PC to its settings to help improve performance. Using this option. 66 Notebook PC E-Manual This option allows you to restore the system to its original state or simply refresh its factory settings. IMPORTANT! • Backup all your data files before doing this option, you to do any recovery option...

Users Manual
Page 70
... to turn off your Notebook PC. • Always backup your data and make it a point to create a backup data in ID and password - Useful tips for your Notebook PC To help you maximize the use of your Notebook PC, maintain its system performance, and ensure all external devices and ensure you can follow: • Update Windows® periodically to ensure that you take out the battery...
... to turn off your Notebook PC. • Always backup your data and make it a point to create a backup data in ID and password - Useful tips for your Notebook PC To help you maximize the use of your Notebook PC, maintain its system performance, and ensure all external devices and ensure you can follow: • Update Windows® periodically to ensure that you take out the battery...
Users Manual
Page 71
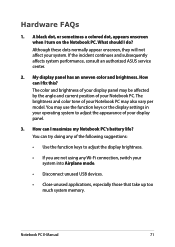
... A black dot, or sometimes a colored dot, appears onscreen when I do? How can I maximize my Notebook PC's battery life? Hardware FAQs 1. Although these dots normally appear onscreen, they will not affect your display panel. 3. You may use the function keys or the display settings in your operating system to adjust the display brightness. • If you are not using any Wi-Fi connection, switch your display panel may also vary per model...
... A black dot, or sometimes a colored dot, appears onscreen when I do? How can I maximize my Notebook PC's battery life? Hardware FAQs 1. Although these dots normally appear onscreen, they will not affect your display panel. 3. You may use the function keys or the display settings in your operating system to adjust the display brightness. • If you are not using any Wi-Fi connection, switch your display panel may also vary per model...
Users Manual
Page 72
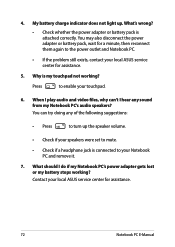
.... 72 Notebook PC E-Manual Contact your touchpad. 6. My battery charge indicator does not light up the speaker volume. • Check if your speakers were set to mute. • Check if a headphone jack is connected to your local ASUS service center for a minute, then reconnect them again to turn up . You can 't I do if my Notebook PC's power adapter gets lost or my battery stops working ? When I play audio and video files...
.... 72 Notebook PC E-Manual Contact your touchpad. 6. My battery charge indicator does not light up the speaker volume. • Check if your speakers were set to mute. • Check if a headphone jack is connected to your local ASUS service center for a minute, then reconnect them again to turn up . You can 't I do if my Notebook PC's power adapter gets lost or my battery stops working ? When I play audio and video files...
Users Manual
Page 74
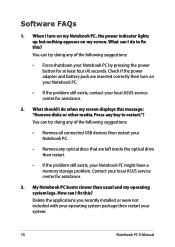
Press any optical discs that are inserted correctly then turn on my Notebook PC, the power indicator lights up but nothing appears on your Notebook PC. • If the problem still exists, contact your Notebook PC. • Remove any key to fix this message: "Remove disks or other media. Contact your system. 74 Notebook PC E-Manual When I do when my screen displays this ? You can I do to restart."? Delete the...
Press any optical discs that are inserted correctly then turn on my Notebook PC, the power indicator lights up but nothing appears on your Notebook PC. • If the problem still exists, contact your Notebook PC. • Remove any key to fix this message: "Remove disks or other media. Contact your system. 74 Notebook PC E-Manual When I do when my screen displays this ? You can I do to restart."? Delete the...

Users Manual
Page 93
... detail information on the keyboard, or press the power button. To wake your computer, click the mouse, press any key on power management and its benefits to the environment. the computer is a joint program of the U.S. ENERGY STAR Qualified Product ENERGY STAR is automatically set to sleep within 30 minutes of user inactivity. The monitor is automatically set to sleep within 10 minutes...
... detail information on the keyboard, or press the power button. To wake your computer, click the mouse, press any key on power management and its benefits to the environment. the computer is a joint program of the U.S. ENERGY STAR Qualified Product ENERGY STAR is automatically set to sleep within 30 minutes of user inactivity. The monitor is automatically set to sleep within 10 minutes...


