User Guide
Page 1
Motherboard Z9PA-D8 Series
Motherboard Z9PA-D8 Series
User Guide
Page 3
Contents Notices...vii Safety information viii About this guide x Z9PA-D8 series specifications summary xii Chapter 1: Product introduction 1.1 Welcome 1-3 1.2 Package contents 1-3 1.3 Serial number label 1-4 1.4 Special features 1-4 1.4.1 Product highlights 1-4 1.4.2 Innovative ASUS features 1-6 Chapter 2: Hardware information 2.1 Before you proceed 2-3 2.2 Motherboard overview 2-4 2.2.1 Placement direction 2-4 2.2.2 Screw holes 2-4 2.2.3 Motherboard layout 2-5 2.2.4 Layout contents 2-7 2.3 Central Processing Unit (CPU 2-8 2.3.1 Installing the CPU 2-8 2.4 System memory...
Contents Notices...vii Safety information viii About this guide x Z9PA-D8 series specifications summary xii Chapter 1: Product introduction 1.1 Welcome 1-3 1.2 Package contents 1-3 1.3 Serial number label 1-4 1.4 Special features 1-4 1.4.1 Product highlights 1-4 1.4.2 Innovative ASUS features 1-6 Chapter 2: Hardware information 2.1 Before you proceed 2-3 2.2 Motherboard overview 2-4 2.2.1 Placement direction 2-4 2.2.2 Screw holes 2-4 2.2.3 Motherboard layout 2-5 2.2.4 Layout contents 2-7 2.3 Central Processing Unit (CPU 2-8 2.3.1 Installing the CPU 2-8 2.4 System memory...
User Guide
Page 8
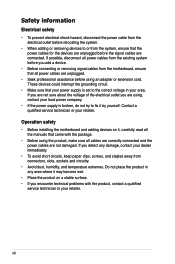
... clips, screws, and staples away from connectors, slots, sockets and circuitry. • Avoid dust, humidity, and temperature extremes. Operation safety • Before installing the motherboard and adding devices on a stable surface. • If you add a device. • Before connecting or removing signal cables from the... motherboard, ensure that all cables are correctly connected and the power cables are not damaged. If you are not sure about the voltage of the ...
... clips, screws, and staples away from connectors, slots, sockets and circuitry. • Avoid dust, humidity, and temperature extremes. Operation safety • Before installing the motherboard and adding devices on a stable surface. • If you add a device. • Before connecting or removing signal cables from the... motherboard, ensure that all cables are correctly connected and the power cables are not damaged. If you are not sure about the voltage of the ...
User Guide
Page 9
...electronic products. This product has been designed to a major failure. For the latest product warranty details please visit http://support.asus.com. DO NOT throw the motherboard in municipal waste. This symbol of the crossed out wheeled bin indicates that the product (electrical and electronic equipment) should not... loss or damage. Our goods come with the Australian Consumer Law. If you require assistance please call ASUS Customer Service 1300 2787 88 or visit us at http://support.asus.com ix You are also entitled to have the goods repaired or replaced if the goods fail to ...
...electronic products. This product has been designed to a major failure. For the latest product warranty details please visit http://support.asus.com. DO NOT throw the motherboard in municipal waste. This symbol of the crossed out wheeled bin indicates that the product (electrical and electronic equipment) should not... loss or damage. Our goods come with the Australian Consumer Law. If you require assistance please call ASUS Customer Service 1300 2787 88 or visit us at http://support.asus.com ix You are also entitled to have the goods repaired or replaced if the goods fail to ...

User Guide
Page 10
...perform when installing system components. It includes description of the switches, jumpers, and connectors on ASUS hardware and software products. ASUS websites The ASUS website provides updated information on the motherboard. • Chapter 3: Powering up This chapter describes the power up , creating, and ...BIOS setup This chapter tells how to change system settings through the BIOS Setup menus. Detailed descriptions of the motherboard and the new technologies it supports. • Chapter 2: Hardware information This chapter lists the hardware setup procedures that may refer...
...perform when installing system components. It includes description of the switches, jumpers, and connectors on ASUS hardware and software products. ASUS websites The ASUS website provides updated information on the motherboard. • Chapter 3: Powering up This chapter describes the power up , creating, and ...BIOS setup This chapter tells how to change system settings through the BIOS Setup menus. Detailed descriptions of the motherboard and the new technologies it supports. • Chapter 2: Hardware information This chapter lists the hardware setup procedures that may refer...

User Guide
Page 15
This chapter describes the motherboard introPdruoc1dtuiocnt features and the new technologies it supports.
This chapter describes the motherboard introPdruoc1dtuiocnt features and the new technologies it supports.
User Guide
Page 17
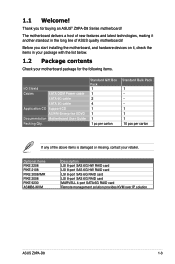
...RAID card LSI 8-port SAS 6G RAID card MARVELL 4-port SATA 6G RAID card Remote management solution provides KVM over IP solution ASUS Z9PA-D8 1-3 The motherboard delivers a host of new features and latest technologies, making it , check the items in the long line of the above ...items is damaged or missing, contact your motherboard package for buying an ASUS® Z9PA-D8 Series motherboard! Thank you start installing the motherboard, and hardware devices on it another standout in your package with the list below. 1.2 Package contents...
...RAID card LSI 8-port SAS 6G RAID card MARVELL 4-port SATA 6G RAID card Remote management solution provides KVM over IP solution ASUS Z9PA-D8 1-3 The motherboard delivers a host of new features and latest technologies, making it , check the items in the long line of the above ...items is damaged or missing, contact your motherboard package for buying an ASUS® Z9PA-D8 Series motherboard! Thank you start installing the motherboard, and hardware devices on it another standout in your package with the list below. 1.2 Package contents...
User Guide
Page 18
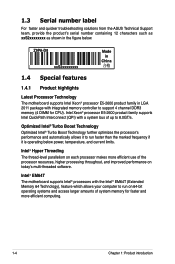
...level parallelism on each processor makes more efficient computing. 1-4 Chapter 1: Product introduction Z9PA-D8 xxS2xxxxxxxx Made in China 合格 1.4 Special features 1.4.1 Product highlights Latest Processor Technology The motherboard supports Intel Xeon® processor E5-2600 product family in the figure below ... to run on today's multi-threaded software. 1.3 Serial number label For faster and quicker troubleshooting solutions from the ASUS Technical Support team, provide the product's serial number containing 12 characters such as xxS2xxxxxxxx as shown in LGA 2011 ...
...level parallelism on each processor makes more efficient computing. 1-4 Chapter 1: Product introduction Z9PA-D8 xxS2xxxxxxxx Made in China 合格 1.4 Special features 1.4.1 Product highlights Latest Processor Technology The motherboard supports Intel Xeon® processor E5-2600 product family in the figure below ... to run on today's multi-threaded software. 1.3 Serial number label For faster and quicker troubleshooting solutions from the ASUS Technical Support team, provide the product's serial number containing 12 characters such as xxS2xxxxxxxx as shown in LGA 2011 ...
User Guide
Page 19
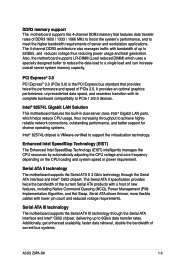
... through the Serial ATA interface and Intel® C602 chipset, delivering up to 6Gb/s data transfer rates. Also, the motherboard supports LR-DIMM (Load reduced DIMM) which helps reduce CPU usage, thus increasing throughput to achieve highlyreliable network connections, outstanding... technology The motherboard supports the Serial ATA III technology through the Serial ATA interface and Intel® C602 chipset. Additionally, get enhanced scalability, faster data retrieval, double the bandwidth of current bus systems. ASUS Z9PA-D8 1-5 DDR3 memory support The motherboard supports the...
... through the Serial ATA interface and Intel® C602 chipset, delivering up to 6Gb/s data transfer rates. Also, the motherboard supports LR-DIMM (Load reduced DIMM) which helps reduce CPU usage, thus increasing throughput to achieve highlyreliable network connections, outstanding... technology The motherboard supports the Serial ATA III technology through the Serial ATA interface and Intel® C602 chipset. Additionally, get enhanced scalability, faster data retrieval, double the bandwidth of current bus systems. ASUS Z9PA-D8 1-5 DDR3 memory support The motherboard supports the...
User Guide
Page 20
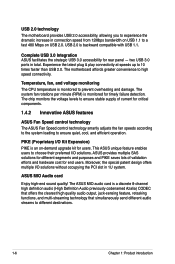
... solutions. two USB 3.0 ports in 1U system. Complete USB 3.0 Integration ASUS facilitates the strategic USB 3.0 accessibility for critical components. 1.4.2 Innovative ASUS features ASUS Fan Speed control technology The ASUS Fan Speed control technology smartly adjusts the fan speeds according to the system loading... the voltage levels to ensure stable supply of validation efforts and hardware cost for end users. USB 2.0 technology The motherboard provides USB 2.0 accessibility, allowing you to experience the dramatic increase in connection speed from 12Mbps bandwidth on USB 1.1 ...
... solutions. two USB 3.0 ports in 1U system. Complete USB 3.0 Integration ASUS facilitates the strategic USB 3.0 accessibility for critical components. 1.4.2 Innovative ASUS features ASUS Fan Speed control technology The ASUS Fan Speed control technology smartly adjusts the fan speeds according to the system loading... the voltage levels to ensure stable supply of validation efforts and hardware cost for end users. USB 2.0 technology The motherboard provides USB 2.0 accessibility, allowing you to experience the dramatic increase in connection speed from 12Mbps bandwidth on USB 1.1 ...
User Guide
Page 21
Chapter 2: 2 Hardware information It includes description of the jumpers and connectors on the motherboard. This chapter lists the hardware setup procedures that you have to perform when installing system components.
Chapter 2: 2 Hardware information It includes description of the jumpers and connectors on the motherboard. This chapter lists the hardware setup procedures that you have to perform when installing system components.
User Guide
Page 22
Chapter summary 2 2.1 Before you proceed 2-3 2.2 Motherboard overview 2-4 2.3 Central Processing Unit (CPU 2-8 2.4 System memory 2-13 2.5 Expansion slots 2-16 2.6 Onboard LEDs 2-21 2.7 Jumpers 2-26 2.8 Connectors 2-30 ASUS Z9PA-D8
Chapter summary 2 2.1 Before you proceed 2-3 2.2 Motherboard overview 2-4 2.3 Central Processing Unit (CPU 2-8 2.4 System memory 2-13 2.5 Expansion slots 2-16 2.6 Onboard LEDs 2-21 2.7 Jumpers 2-26 2.8 Connectors 2-30 ASUS Z9PA-D8
User Guide
Page 23
.... • Use a grounded wrist strap or touch a safely grounded object or a metal object, such as the power supply case, before removing or installing any motherboard component. ASUS Z9PA-D8 2-3 The green LED lights up to indicate that the system AC power cable is a reminder that you should shut down the system and unplug the...
.... • Use a grounded wrist strap or touch a safely grounded object or a metal object, such as the power supply case, before removing or installing any motherboard component. ASUS Z9PA-D8 2-3 The green LED lights up to indicate that the system AC power cable is a reminder that you should shut down the system and unplug the...
User Guide
Page 24
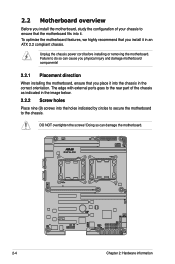
...indicated by circles to secure the motherboard to ensure that the motherboard fits into the chassis in an ATX 2.2 compliant chassis. Doing so can cause you physical injury and damage motherboard components! 2.2.1 Placement direction When installing the motherboard, ensure that you place it... in the correct orientation. To optimize the motherboard features, we highly recommend that you install it into it....
...indicated by circles to secure the motherboard to ensure that the motherboard fits into the chassis in an ATX 2.2 compliant chassis. Doing so can cause you physical injury and damage motherboard components! 2.2.1 Placement direction When installing the motherboard, ensure that you place it... in the correct orientation. To optimize the motherboard features, we highly recommend that you install it into it....
User Guide
Page 25
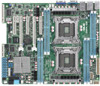
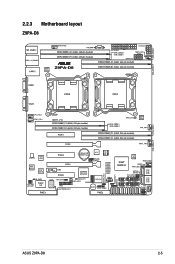
2.2.3 Motherboard layout Z9PA-D8 ASUS Z9PA-D8 2-5
2.2.3 Motherboard layout Z9PA-D8 ASUS Z9PA-D8 2-5
User Guide
Page 28
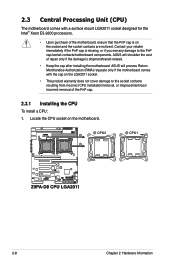
Locate the CPU socket on the socket and the socket contacts are not bent. ASUS will process Return Merchandise Authorization (RMA) requests only if the motherboard comes with a surface mount LGA2011 socket designed for the Intel® Xeon E5-2600 processors. • Upon purchase of repair only ... cap on the LGA2011 socket. • The product warranty does not cover damage to the PnP cap/socket contacts/motherboard components. ASUS will shoulder the cost of the motherboard, ensure that the PnP cap is missing, or if you see any damage to the socket contacts resulting from incorrect...
Locate the CPU socket on the socket and the socket contacts are not bent. ASUS will process Return Merchandise Authorization (RMA) requests only if the motherboard comes with a surface mount LGA2011 socket designed for the Intel® Xeon E5-2600 processors. • Upon purchase of repair only ... cap on the LGA2011 socket. • The product warranty does not cover damage to the PnP cap/socket contacts/motherboard components. ASUS will shoulder the cost of the motherboard, ensure that the PnP cap is missing, or if you see any damage to the socket contacts resulting from incorrect...
User Guide
Page 32
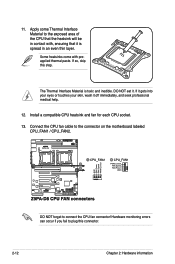
Some heatsinks come with , ensuring that the heatsink will be in an even thin layer. DO NOT forget to the connector on the motherboard labeled CPU_FAN1 / CPU_FAN2. Apply some Thermal Interface Material to plug this step. Connect the CPU fan cable to connect the CPU fan connector! DO NOT ...
Some heatsinks come with , ensuring that the heatsink will be in an even thin layer. DO NOT forget to the connector on the motherboard labeled CPU_FAN1 / CPU_FAN2. Apply some Thermal Interface Material to plug this step. Connect the CPU fan cable to connect the CPU fan connector! DO NOT ...
User Guide
Page 33
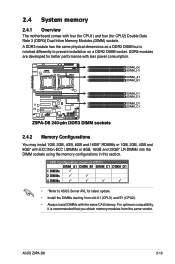
... same vendor. DDR3 modules are developed for CPU2) Double Data Rate 3 (DDR3) Dual Inline Memory Modules (DIMM) sockets. 2.4 System memory 2.4.1 Overview The motherboard comes with the same CAS latency. ASUS Z9PA-D8 2-13 A DDR3 module has the same physical dimensions as a DDR2 DIMM but is recommended that you obtain memory modules from slot A1...
... same vendor. DDR3 modules are developed for CPU2) Double Data Rate 3 (DDR3) Dual Inline Memory Modules (DIMM) sockets. 2.4 System memory 2.4.1 Overview The motherboard comes with the same CAS latency. ASUS Z9PA-D8 2-13 A DDR3 module has the same physical dimensions as a DDR2 DIMM but is recommended that you obtain memory modules from slot A1...
User Guide
Page 35
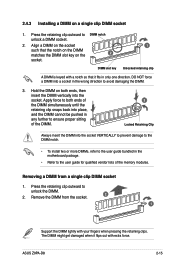
... A DIMM is keyed with extra force. ASUS Z9PA-D8 2-15 Remove the DIMM from a single clip DIMM socket 1. DO NOT force a DIMM into the socket VERTICALLY to prevent damage to the DIMM notch. • To install two or more DIMMs, refer to the user guide bundled in the motherboard package. • Refer to ensure...
... A DIMM is keyed with extra force. ASUS Z9PA-D8 2-15 Remove the DIMM from a single clip DIMM socket 1. DO NOT force a DIMM into the socket VERTICALLY to prevent damage to the DIMM notch. • To install two or more DIMMs, refer to the user guide bundled in the motherboard package. • Refer to ensure...

User Guide
Page 36
... expansion card, read the documentation that the cards do so may cause you physical injury and damage motherboard components. 2.5.1 Installing an expansion card To install an expansion card: 1. Remove the system unit cover (if your motherboard is completely seated on the next page. 3. See Chapter 4 for the expansion card. Assign an IRQ...
... expansion card, read the documentation that the cards do so may cause you physical injury and damage motherboard components. 2.5.1 Installing an expansion card To install an expansion card: 1. Remove the system unit cover (if your motherboard is completely seated on the next page. 3. See Chapter 4 for the expansion card. Assign an IRQ...

