
User Manual
Page 6
...Setting the Boot array in the BIOS Setup Utility 5-32 Chapter 6: Driver installation 6.1 RAID driver installation 6-1 6.1.1 Creating a RAID driver disk 6-1 6.1.2 Installing the RAID controller driver 6-4 6.2 Intel® chipset device installation 6-11 6.3 LAN driver installation 6-13 6.4 VGA driver installation 6-16 6.5 Management applications and utilities installation 6-18 6.5.1 Running the support DVD 6-18 6.5.2 Drivers menu 6-18 6.5.3 Utilities menu 6-19 6.5.4 Make disk menu 6-19 6.5.5 Contact information 6-19 Appendix: Reference information A.1 Z8NR-D12 model block diagram...
...Setting the Boot array in the BIOS Setup Utility 5-32 Chapter 6: Driver installation 6.1 RAID driver installation 6-1 6.1.1 Creating a RAID driver disk 6-1 6.1.2 Installing the RAID controller driver 6-4 6.2 Intel® chipset device installation 6-11 6.3 LAN driver installation 6-13 6.4 VGA driver installation 6-16 6.5 Management applications and utilities installation 6-18 6.5.1 Running the support DVD 6-18 6.5.2 Drivers menu 6-18 6.5.3 Utilities menu 6-19 6.5.4 Make disk menu 6-19 6.5.5 Contact information 6-19 Appendix: Reference information A.1 Z8NR-D12 model block diagram...

User Manual
Page 9
... installing and configuring the motherboard. Detailed descriptions of the BIOS parameters are not part of the standard package. Where to find more information Refer to when configuring the motherboard. ASUS websites The ASUS website provides updated information on the motherboard. • Chapter 3: Powering up This chapter describes the power up , creating, and configuring RAID sets using the available utilities. • Chapter 6: Driver installation This chapter provides instructions for installing the necessary drivers for setting...
... installing and configuring the motherboard. Detailed descriptions of the BIOS parameters are not part of the standard package. Where to find more information Refer to when configuring the motherboard. ASUS websites The ASUS website provides updated information on the motherboard. • Chapter 3: Powering up This chapter describes the power up , creating, and configuring RAID sets using the available utilities. • Chapter 6: Driver installation This chapter provides instructions for installing the necessary drivers for setting...
User Manual
Page 15
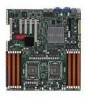
... 8 channel audio card provides clearest high quality sounds If any of ASUS quality motherboards! ASUS Z8NR-D12 1-1 1.1 Welcome! Before you for the following items. Cables SATA signal cable FDD cable Accessories IO shield Application CD Support CD Documentation User Guide Packing Qty. Standard Gift Box Pack Standard Bulk Pack Z8NR-D12 Z8NR-D12 6 -- 1 -- 1 1 1 1 1 1 1 pcs per carton 10 pcs per carton Optional items PIKE 1064E PIKE 1068E PIKE 1078 PIKE 6480 ASMB4-iKVM ASUS...
... 8 channel audio card provides clearest high quality sounds If any of ASUS quality motherboards! ASUS Z8NR-D12 1-1 1.1 Welcome! Before you for the following items. Cables SATA signal cable FDD cable Accessories IO shield Application CD Support CD Documentation User Guide Packing Qty. Standard Gift Box Pack Standard Bulk Pack Z8NR-D12 Z8NR-D12 6 -- 1 -- 1 1 1 1 1 1 1 pcs per carton 10 pcs per carton Optional items PIKE 1064E PIKE 1068E PIKE 1078 PIKE 6480 ASMB4-iKVM ASUS...

User Manual
Page 34
... the slot. 5. Remove the bracket opposite the slot that they support. Align the card connector with the slot and press firmly until the card is already installed in a chassis). 3. Refer to install expansion cards. Replace the system cover. 2.5.2 Configuring an expansion card After installing the expansion card, configure the it and make the necessary hardware settings for later use . Turn on BIOS setup. 2. Install the software drivers for information on the system and change the necessary BIOS settings, if...
... the slot. 5. Remove the bracket opposite the slot that they support. Align the card connector with the slot and press firmly until the card is already installed in a chassis). 3. Refer to install expansion cards. Replace the system cover. 2.5.2 Configuring an expansion card After installing the expansion card, configure the it and make the necessary hardware settings for later use . Turn on BIOS setup. 2. Install the software drivers for information on the system and change the necessary BIOS settings, if...

User Manual
Page 45
... after configuring a RAID set using the SAS connectors. 4. Each connector supports one device. • These connectors function only when you install a PIKE RAID card. • Connect the SAS hard disk drives to SAS connectors 1-4 (red) when installing a 4-port PIKE RAID card. • Ensure to a hard disk drive active LED connector on the SCSI or RAID card. SAS connectors (7-pin SAS1-4 [red]; 7-pin SAS5-8 [blue]) This motherboard comes with eight (8) Serial Attached SCSI (SAS) connectors, the next-generation storage technology that supports both Series SCSI and Serial ATA (SATA...
... after configuring a RAID set using the SAS connectors. 4. Each connector supports one device. • These connectors function only when you install a PIKE RAID card. • Connect the SAS hard disk drives to SAS connectors 1-4 (red) when installing a 4-port PIKE RAID card. • Ensure to a hard disk drive active LED connector on the SCSI or RAID card. SAS connectors (7-pin SAS1-4 [red]; 7-pin SAS5-8 [blue]) This motherboard comes with eight (8) Serial Attached SCSI (SAS) connectors, the next-generation storage technology that supports both Series SCSI and Serial ATA (SATA...
User Manual
Page 59
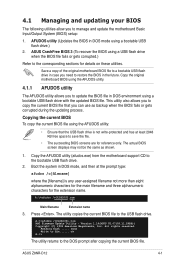
... at the prompt type: afudos /o[filename] where the [filename] is any user-assigned filename not more than eight alphanumeric characters for the main filename and three alphanumeric characters for reference only. ASUS Z8NR-D12 4-1 This utility also allows you to file...... Copying the current BIOS To copy the current BIOS file using a bootable USB flash drive.) 2. Boot the system in DOS mode using the AFUDOS utility: • Ensure that...
... at the prompt type: afudos /o[filename] where the [filename] is any user-assigned filename not more than eight alphanumeric characters for the main filename and three alphanumeric characters for reference only. ASUS Z8NR-D12 4-1 This utility also allows you to file...... Copying the current BIOS To copy the current BIOS file using a bootable USB flash drive.) 2. Boot the system in DOS mode using the AFUDOS utility: • Ensure that...

User Manual
Page 61
... reset the system while recovering the BIOS! Doing so would cause system boot failure! 4.1.2 ASUS CrashFree BIOS 3 utility The ASUS CrashFree BIOS 3 is an auto recovery tool that contains the updated BIOS file. Restart the system after the utility completes the updating process. The recovered BIOS may not be the latest BIOS version for the BIOS file. ASUS Z8NR-D12 4-3 When found, the utility reads the BIOS file and starts flashing the corrupted BIOS file. 4. Insert the USB flash disk that contains the BIOS file to download...
... reset the system while recovering the BIOS! Doing so would cause system boot failure! 4.1.2 ASUS CrashFree BIOS 3 utility The ASUS CrashFree BIOS 3 is an auto recovery tool that contains the updated BIOS file. Restart the system after the utility completes the updating process. The recovered BIOS may not be the latest BIOS version for the BIOS file. ASUS Z8NR-D12 4-3 When found, the utility reads the BIOS file and starts flashing the corrupted BIOS file. 4. Insert the USB flash disk that contains the BIOS file to download...

User Manual
Page 64
... user-configurable. Refer to 4.2.7 Pop-up window. 4.2.7 Pop-up window Select a menu item then press to display a list of the selected item. 4-6 Chapter 4: BIOS setup Advanced BIOS SETUP UTILITY CPU Bridge Chipset Configuration USB Functions USB Port Configure USB 2.0 Controller HDA Controller SMBUS Controller [1D2isUaSbBlePdorts] [82X4USUBSBPoProtrsts] [E4naUbSlBedP]orts [E6naUbSlBedP]orts [E8naUbSlBedP]orts 10 USB Ports SLP_S4# Min. To change the value of a menu screen when there are items that menu. 4.2.4 Menu items The highlighted item on the menu bar displays the specific...
... user-configurable. Refer to 4.2.7 Pop-up window. 4.2.7 Pop-up window Select a menu item then press to display a list of the selected item. 4-6 Chapter 4: BIOS setup Advanced BIOS SETUP UTILITY CPU Bridge Chipset Configuration USB Functions USB Port Configure USB 2.0 Controller HDA Controller SMBUS Controller [1D2isUaSbBlePdorts] [82X4USUBSBPoProtrsts] [E4naUbSlBedP]orts [E6naUbSlBedP]orts [E8naUbSlBedP]orts 10 USB Ports SLP_S4# Min. To change the value of a menu screen when there are items that menu. 4.2.4 Menu items The highlighted item on the menu bar displays the specific...

User Manual
Page 66
... Change Option F1 General Help F10 Save and Exit ESC Exit v02.61 (C)Copyright 1985-2008, American Megatrends, Inc. Configuration options: [Not Installed] [Auto] [CD/DVD] [ARMD] LBA/Large Mode [Auto] Enables or disables the LBA mode. Configuration options: [Disabled] [Auto] 4-8 Chapter 4: BIOS setup Select a device item, then press to [Auto] enables the LBA mode if the device supports this mode, and if the device was not previously formatted with LBA mode disabled. Main BIOS SETUP UTILITY SATA 1 Device :Hard Disk Vendor :ST3160812AS Size :160.0GB LBA Mode :Supported Block...
... Change Option F1 General Help F10 Save and Exit ESC Exit v02.61 (C)Copyright 1985-2008, American Megatrends, Inc. Configuration options: [Not Installed] [Auto] [CD/DVD] [ARMD] LBA/Large Mode [Auto] Enables or disables the LBA mode. Configuration options: [Disabled] [Auto] 4-8 Chapter 4: BIOS setup Select a device item, then press to [Auto] enables the LBA mode if the device supports this mode, and if the device was not previously formatted with LBA mode disabled. Main BIOS SETUP UTILITY SATA 1 Device :Hard Disk Vendor :ST3160812AS Size :160.0GB LBA Mode :Supported Block...

User Manual
Page 71
Main Advanced Server BIOS SETUP UTILITY Boot Exit CPU Configuration Chipset Configuration Legacy Device Configuration USB Configuration PCIPnP Configuration Power On Configuration Event Log Configuration Hardware Monitor ACPI Configuration PCI Express Configuration Configure CPU. ←→ Select Screen ↑↓ Select Item Enter Go to malfunction. Some items may differ. Take caution when changing the settings of the Advanced menu items. Incorrect field values can cause the system to Sub Screen F1 General Help F10 Save and Exit ESC Exit v02.61 (C)Copyright 1985...
Main Advanced Server BIOS SETUP UTILITY Boot Exit CPU Configuration Chipset Configuration Legacy Device Configuration USB Configuration PCIPnP Configuration Power On Configuration Event Log Configuration Hardware Monitor ACPI Configuration PCI Express Configuration Configure CPU. ←→ Select Screen ↑↓ Select Item Enter Go to malfunction. Some items may differ. Take caution when changing the settings of the Advanced menu items. Incorrect field values can cause the system to Sub Screen F1 General Help F10 Save and Exit ESC Exit v02.61 (C)Copyright 1985...

User Manual
Page 75
... [Disabled] Configuration options: [Disabled] [Enabled] NUMA AWare [Auto] Configuration options: [Disabled] [Auto] ASUS Z8NR-D12 4-17 Configuration options: [Auto] [4.800GT] [5.866GT] [6.400GT] CSI Isochronous [Disabled] Configuration options: [Disabled] [Enabled] CSI L0s [Disabled] Configuration options: [Disabled] [Enabled] CSI L1 [Disabled] Configuration options: [Disabled] [Enabled] Memory Frequency [Auto] You may allow the system to enable or disable the memory ECC function. CSI Links Speed [Full-Speed] Allows you to set Memory channel mode. Configuration options: [Auto...
... [Disabled] Configuration options: [Disabled] [Enabled] NUMA AWare [Auto] Configuration options: [Disabled] [Auto] ASUS Z8NR-D12 4-17 Configuration options: [Auto] [4.800GT] [5.866GT] [6.400GT] CSI Isochronous [Disabled] Configuration options: [Disabled] [Enabled] CSI L0s [Disabled] Configuration options: [Disabled] [Enabled] CSI L1 [Disabled] Configuration options: [Disabled] [Enabled] Memory Frequency [Auto] You may allow the system to enable or disable the memory ECC function. CSI Links Speed [Full-Speed] Allows you to set Memory channel mode. Configuration options: [Auto...

User Manual
Page 76
.... Configuration options: [Disabled] [Enabled] South Bridge Chipset Configuration Advanced BIOS SETUP UTILITY CPU Bridge Chipset Configuration USB Functions USB Port Configure USB 2.0 Controller HDA Controller [7 USB Ports] [6+6 USB Ports] [Enabled] [Enabled] SLP_S4# Min. Page Policy [Closed] Configuration options: [Closed] [Open] Adaptive Page [Disabled] Configuration options: [Disabled] [Enabled] Data Scramble [Enabled] Configuration options: [Disabled] [Enabled] Split Below 4GB [Disabled] Configuration options: [Disabled] [Auto] Channel Interleaving [6:1] Configuration...
.... Configuration options: [Disabled] [Enabled] South Bridge Chipset Configuration Advanced BIOS SETUP UTILITY CPU Bridge Chipset Configuration USB Functions USB Port Configure USB 2.0 Controller HDA Controller [7 USB Ports] [6+6 USB Ports] [Enabled] [Enabled] SLP_S4# Min. Page Policy [Closed] Configuration options: [Closed] [Open] Adaptive Page [Disabled] Configuration options: [Disabled] [Enabled] Data Scramble [Enabled] Configuration options: [Disabled] [Enabled] Split Below 4GB [Disabled] Configuration options: [Disabled] [Auto] Channel Interleaving [6:1] Configuration...

User Manual
Page 78
...Serial Port2 Address [2F8/IRQ3] Allows you to [Enabled]. USB 2.0 Controller Mode [HiSpeed] Allows you to set USB Function to enable or disable the onboard floppy controller. Legacy USB Support [Enabled] Allows you to enable or disable support for legacy USB. If no USB devices are connected. Configuration options: [Disabled] [2F8/IRQ3] [3E8/IRQ4] [2E8/IRQ3] 4.4.4 USB Configuration Advanced BIOS SETUP UTILITY USB Configuration Module Version - 2.24.3-13.4 USB Devices Enabled : None Legacy USB Support USB 2.0 Controller Mode BIOS EHCI Hand-Off Hotplug USB FDD Support...
...Serial Port2 Address [2F8/IRQ3] Allows you to [Enabled]. USB 2.0 Controller Mode [HiSpeed] Allows you to set USB Function to enable or disable the onboard floppy controller. Legacy USB Support [Enabled] Allows you to enable or disable support for legacy USB. If no USB devices are connected. Configuration options: [Disabled] [2F8/IRQ3] [3E8/IRQ4] [2E8/IRQ3] 4.4.4 USB Configuration Advanced BIOS SETUP UTILITY USB Configuration Module Version - 2.24.3-13.4 USB Devices Enabled : None Legacy USB Support USB 2.0 Controller Mode BIOS EHCI Hand-Off Hotplug USB FDD Support...

User Manual
Page 85
... is set to [Enabled]. Serial port number [COM2] Selects the serial port for console redirection. ASUS Z8NR-D12 4-27 Server BIOS SETUP UTILITY Configure Remote Access type and parameters Remote Access [Enabled] Select Remote Access type. Main Advanced Server BIOS SETUP UTILITY Boot Exit Remote Access Configuration Configure Remote Access. ←→ Select Screen ↑↓ Select Item Enter Go to display the configuration options. Select an item then press to Sub Screen F1 General Help F10 Save and Exit ESC Exit v02.61 (C)Copyright...
... is set to [Enabled]. Serial port number [COM2] Selects the serial port for console redirection. ASUS Z8NR-D12 4-27 Server BIOS SETUP UTILITY Configure Remote Access type and parameters Remote Access [Enabled] Select Remote Access type. Main Advanced Server BIOS SETUP UTILITY Boot Exit Remote Access Configuration Configure Remote Access. ←→ Select Screen ↑↓ Select Item Enter Go to display the configuration options. Select an item then press to Sub Screen F1 General Help F10 Save and Exit ESC Exit v02.61 (C)Copyright...

User Manual
Page 90
... RAM. 4-32 Chapter 4: BIOS setup To clear the supervisor password, select the Change Supervisor Password then press . From the password box, type a password composed of the screen shows the default Not Installed. The message "Password Uninstalled" appears. again to display the configuration options. If you forget your BIOS password, you successfully set your password. The message "Password Installed" appears after you can clear it by erasing the CMOS Real Time Clock (RTC) RAM. Change Supervisor Password Change User Password ←→ Select Screen...
... RAM. 4-32 Chapter 4: BIOS setup To clear the supervisor password, select the Change Supervisor Password then press . From the password box, type a password composed of the screen shows the default Not Installed. The message "Password Uninstalled" appears. again to display the configuration options. If you forget your BIOS password, you successfully set your password. The message "Password Installed" appears after you can clear it by erasing the CMOS Real Time Clock (RTC) RAM. Change Supervisor Password Change User Password ←→ Select Screen...

User Manual
Page 91
... to the Setup utility. Change User Password Select this item shows Installed. After you have set a supervisor password, the other security settings. After you set a password, this item to set or change the user password. Select the Change User Password item and press . 2. The message "Password Installed" appears after you to select the access restriction to the Setup items. Configuration options: [No Access] [View Only] [Limited] [Full Access] No Access prevents user access to disable password. To change password. Configuration options: [Setup] [Always] ASUS Z8NR-D12 4-33
... to the Setup utility. Change User Password Select this item shows Installed. After you have set a supervisor password, the other security settings. After you set a password, this item to set or change the user password. Select the Change User Password item and press . 2. The message "Password Installed" appears after you to select the access restriction to the Setup items. Configuration options: [No Access] [View Only] [Limited] [Full Access] No Access prevents user access to disable password. To change password. Configuration options: [Setup] [Always] ASUS Z8NR-D12 4-33

User Manual
Page 129
... drive as the first boot priority to boot from the connected SATA ODD. Create Driver Diskette Menu ICH10R INTEL RAID Driver ICH10R LSI RAID Driver Write DMI FreeDOS command prompt 5. ICH10R INTEL RAID Driver ICH10R INTEL RAID Driver Windows 32 bit Windows 64 bit Back Exit ASUS Z8NR-D12 6-1 The Makedisk menu appears. Place the motherboard support DVD in a RAID set. 6.1 RAID driver installation After creating the RAID sets for your changes, and then exit the BIOS Setup. 4. A floppy disk with the LSI Software RAID configuration utility, the boot priority of RAID driver disk...
... drive as the first boot priority to boot from the connected SATA ODD. Create Driver Diskette Menu ICH10R INTEL RAID Driver ICH10R LSI RAID Driver Write DMI FreeDOS command prompt 5. ICH10R INTEL RAID Driver ICH10R INTEL RAID Driver Windows 32 bit Windows 64 bit Back Exit ASUS Z8NR-D12 6-1 The Makedisk menu appears. Place the motherboard support DVD in a RAID set. 6.1 RAID driver installation After creating the RAID sets for your changes, and then exit the BIOS Setup. 4. A floppy disk with the LSI Software RAID configuration utility, the boot priority of RAID driver disk...

User Manual
Page 132
6.1.2 Installing the RAID controller driver Windows® Server OS During Windows® Server OS installation To install the RAID controller driver when installing Windows® Server OS: 1. Boot the computer using the Windows® Server installation DVD. Windows Setup Press F6 if you have chosen to manually specify an adapter. When prompted, press to install a third party SCSI or RAID driver... 2. Windows Setup Setup could not determine the type of the screen. 3. S=Specify Additional Device ENTER=Continue F3=Exit 6-4 Chapter 6: Driver installation appears at...
6.1.2 Installing the RAID controller driver Windows® Server OS During Windows® Server OS installation To install the RAID controller driver when installing Windows® Server OS: 1. Boot the computer using the Windows® Server installation DVD. Windows Setup Press F6 if you have chosen to manually specify an adapter. When prompted, press to install a third party SCSI or RAID driver... 2. Windows Setup Setup could not determine the type of the screen. 3. S=Specify Additional Device ENTER=Continue F3=Exit 6-4 Chapter 6: Driver installation appears at...

User Manual
Page 133
... the Update Driver button. 7. Select the option Install the software automatically (Recommended), and then click Next. 10. ASUS Z8NR-D12 6-5 The Windows® Setup loads the RAID controller drivers from the menu. 4. Restart the computer, and then log in the system. 5. The Upgrade Device Driver Wizard window appears. Windows Setup Please insert the disk labeled Manufacturer-supplied hardware support disk into Drive A: * Press ENTER when ready. When prompted, press to display the list of devices installed in with the OS installation. Insert the RAID driver disk...
... the Update Driver button. 7. Select the option Install the software automatically (Recommended), and then click Next. 10. ASUS Z8NR-D12 6-5 The Windows® Setup loads the RAID controller drivers from the menu. 4. Restart the computer, and then log in the system. 5. The Upgrade Device Driver Wizard window appears. Windows Setup Please insert the disk labeled Manufacturer-supplied hardware support disk into Drive A: * Press ENTER when ready. When prompted, press to display the list of devices installed in with the OS installation. Insert the RAID driver disk...

User Manual
Page 146
... ASUS website (www.asus.com) for updates. 6.5.1 Running the support DVD Place the support DVD to activate the devices. Install the necessary drivers to the optical drive. The DVD automatically displays the Drivers menu if Autorun is NOT enabled in your computer, browse the contents of the support DVD are subject to locate the file ASSETUP.EXE from the BIN folder. The screen display and driver options vary under different operating system versions. 6-18 Chapter 6: Driver installation...
... ASUS website (www.asus.com) for updates. 6.5.1 Running the support DVD Place the support DVD to activate the devices. Install the necessary drivers to the optical drive. The DVD automatically displays the Drivers menu if Autorun is NOT enabled in your computer, browse the contents of the support DVD are subject to locate the file ASSETUP.EXE from the BIN folder. The screen display and driver options vary under different operating system versions. 6-18 Chapter 6: Driver installation...


