

User Manual
Page 8
... the CPU installed. Support software RAID 0, 1, 10 & 5) Intel® VROC (for Windows only; Z13PE-D16 Specifications Summary Processor Support Core Logic Total Slots Voltage Capacity Memory Memory Type Expansion Slots Memory Size Total PCI/PCI-X/ PCI-E/PIKE Slots Slot Location 1 Slot Location 2 Slot Location 3 Slot Location 4 Slot Location 5 Slot Location 6 Storage SATA Controller Networking LAN Graphic VGA I/O Ports 2 x Socket (LGA 4677) 4th Gen Intel® Xeon® Scalable Processors Family (up to 350W) UPI 16 GT/s Intel® C741 Chipset 16 1.1V Maximum up to ASUS server...
... the CPU installed. Support software RAID 0, 1, 10 & 5) Intel® VROC (for Windows only; Z13PE-D16 Specifications Summary Processor Support Core Logic Total Slots Voltage Capacity Memory Memory Type Expansion Slots Memory Size Total PCI/PCI-X/ PCI-E/PIKE Slots Slot Location 1 Slot Location 2 Slot Location 3 Slot Location 4 Slot Location 5 Slot Location 6 Storage SATA Controller Networking LAN Graphic VGA I/O Ports 2 x Socket (LGA 4677) 4th Gen Intel® Xeon® Scalable Processors Family (up to 350W) UPI 16 GT/s Intel® C741 Chipset 16 1.1V Maximum up to ASUS server...

User Manual
Page 15
... holes indicated by circles to secure the motherboard to the rear part of the chassis ASUS Z13PE-D16 2-3 The edge with external ports goes to the chassis. 2.2 Motherboard overview Before you place it into the chassis in the correct orientation. DO NOT overtighten the screws! To optimize the motherboard features, we highly recommend that the motherboard fits into it in an EATX compliant...
... holes indicated by circles to secure the motherboard to the rear part of the chassis ASUS Z13PE-D16 2-3 The edge with external ports goes to the chassis. 2.2 Motherboard overview Before you place it into the chassis in the correct orientation. DO NOT overtighten the screws! To optimize the motherboard features, we highly recommend that the motherboard fits into it in an EATX compliant...
User Manual
Page 24
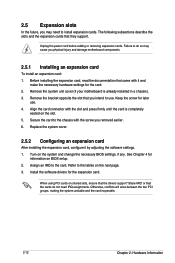
... on BIOS setup. 2. See Chapter 4 for later use . Remove the bracket opposite the slot that the cards do not need to the tables on shared slots, ensure that the drivers support "Share IRQ" or that you intend to use . 4. Assign an IRQ to the chassis with it by adjusting the software settings. 1. Failure to do so may need IRQ assignments. Refer to install expansion cards. Before installing...
... on BIOS setup. 2. See Chapter 4 for later use . Remove the bracket opposite the slot that the cards do not need to the tables on shared slots, ensure that the drivers support "Share IRQ" or that you intend to use . 4. Assign an IRQ to the chassis with it by adjusting the software settings. 1. Failure to do so may need IRQ assignments. Refer to install expansion cards. Before installing...

User Manual
Page 29
... such as system passwords. To erase the RTC RAM: 1. Plug the power cord and turn ON the computer. 4. After the CMOS clearance, reinstall the battery. Clear RTC RAM (3-pin CLRTC1) This jumper allows you to pins 1-2. 3. ASUS Z13PE-D16 2-17 Except when clearing the RTC RAM, never remove the cap on the model, but the locations for reference only. 2.6 Jumpers The motherboard illustration is for these jumpers/LEDs/connectors remain the same. 1. The motherboard layout and appearance...
... such as system passwords. To erase the RTC RAM: 1. Plug the power cord and turn ON the computer. 4. After the CMOS clearance, reinstall the battery. Clear RTC RAM (3-pin CLRTC1) This jumper allows you to pins 1-2. 3. ASUS Z13PE-D16 2-17 Except when clearing the RTC RAM, never remove the cap on the model, but the locations for reference only. 2.6 Jumpers The motherboard illustration is for these jumpers/LEDs/connectors remain the same. 1. The motherboard layout and appearance...

User Manual
Page 30
Smart Ride Through (SmaRT) setting (3-pin SMART_PSU1) This jumper allows you to disable it. This feature is enabled by default. Set to pins 1-2 to enable or disable the Smart Ride Through (SmaRT) function. When enabled, SmaRT allows uninterrupted operation of the system during an AC loss event. 3. Set to pins 2-3 to enable or disable the onboard X710 LAN1 or LAN2 port. LAN Controller settings (3-pin LAN_SW1-2) These jumpers allow you to activate the Gigabit LAN feature. 2-18 Chapter 2: Hardware Information 2.
Smart Ride Through (SmaRT) setting (3-pin SMART_PSU1) This jumper allows you to disable it. This feature is enabled by default. Set to pins 1-2 to enable or disable the Smart Ride Through (SmaRT) function. When enabled, SmaRT allows uninterrupted operation of the system during an AC loss event. 3. Set to pins 2-3 to enable or disable the onboard X710 LAN1 or LAN2 port. LAN Controller settings (3-pin LAN_SW1-2) These jumpers allow you to activate the Gigabit LAN feature. 2-18 Chapter 2: Hardware Information 2.

User Manual
Page 33
RM_DEBUG1 default is 1-2 (disable) and 2-3 is enable. ASUS Z13PE-D16 2-21 Set to pins 1-2 to enable or disable BMC remote debug feature. RM Debug setting (3-pin RM_DEBUG1) This jumper allows you to enable or disable the onboard VGA controller. 8. VGA Controller setting (3-pin VGA_SW1) This jumper allows you to activate the VGA feature. 9.
RM_DEBUG1 default is 1-2 (disable) and 2-3 is enable. ASUS Z13PE-D16 2-21 Set to pins 1-2 to enable or disable BMC remote debug feature. RM Debug setting (3-pin RM_DEBUG1) This jumper allows you to enable or disable the onboard VGA controller. 8. VGA Controller setting (3-pin VGA_SW1) This jumper allows you to activate the VGA feature. 9.
User Manual
Page 59
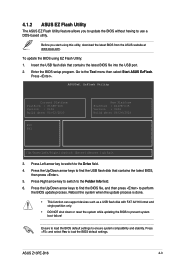
... keys to use a DOS‑based utility. 4.1.2 ASUS EZ Flash Utility The ASUS EZ Flash Utility feature allows you start using EZ Flash Utility: 1. Before you to update the BIOS without having to find the BIOS file, and then press to the Drive field. 4. Insert the USB flash disk that contains the latest BIOS, then press . 5. Enter the BIOS setup program. Press . Ensure to load the BIOS default settings to the Tool menu then select Start ASUS EzFlash. Go to ensure system compatibility...
... keys to use a DOS‑based utility. 4.1.2 ASUS EZ Flash Utility The ASUS EZ Flash Utility feature allows you start using EZ Flash Utility: 1. Before you to update the BIOS without having to find the BIOS file, and then press to the Drive field. 4. Insert the USB flash disk that contains the latest BIOS, then press . 5. Enter the BIOS setup program. Press . Ensure to load the BIOS default settings to the Tool menu then select Start ASUS EzFlash. Go to ensure system compatibility...

User Manual
Page 64
... maximum supported frequency of 25°C or below for different scenarios. Engine Boost [Disabled] Enable this option will reset some BIOS settings that you to keep the processor operating at an ambient temperature of the CPU installed and may vary between different CPUs. Optimized Performance Setting [Default] Allows you have changed back to change performance related settings for optimized performance. Select this option, then select a benchmark type from the >> list...
... maximum supported frequency of 25°C or below for different scenarios. Engine Boost [Disabled] Enable this option will reset some BIOS settings that you to keep the processor operating at an ambient temperature of the CPU installed and may vary between different CPUs. Optimized Performance Setting [Default] Allows you have changed back to change performance related settings for optimized performance. Select this option, then select a benchmark type from the >> list...

User Manual
Page 67
... Configuration Security Device Support [Enable] Allows you to enable or disable the BIOS ACPI Auto Configuration. will not be available. Configuration options: [Disable] [Enable] 4.5.2 ACPI Settings Enable ACPI Auto Configuration [Disabled] Allows you to enable or disable Redfish. Configuration options: [Disabled] [Enabled] ASUS Z13PE-D16 4-11 TCG EFI protocol and INT1A interface will not show Security Device. Configuration options: [Disabled] [Enabled] 4.5.3 Redfish Host Interface Settings Redfish [Enabled] Allows you to enable or disable the BIOS support for security device...
... Configuration Security Device Support [Enable] Allows you to enable or disable the BIOS ACPI Auto Configuration. will not be available. Configuration options: [Disable] [Enable] 4.5.2 ACPI Settings Enable ACPI Auto Configuration [Disabled] Allows you to enable or disable Redfish. Configuration options: [Disabled] [Enabled] ASUS Z13PE-D16 4-11 TCG EFI protocol and INT1A interface will not show Security Device. Configuration options: [Disabled] [Enabled] 4.5.3 Redfish Host Interface Settings Redfish [Enabled] Allows you to enable or disable the BIOS support for security device...

User Manual
Page 69
...] Data Bits [8] Configuration options: [7] [8] ASUS Z13PE-D16 4-13 Configuration options: [Disabled] [Enabled] The following item appears only when Console Redirection for COM1 or COM2(SOL) is using) will exchange data. Long or noisy lines may require lower speeds. Bits per second [115200] Selects serial port transmission speed. Console Redirection Settings These items become configurable only when you to set the terminal type. [VT100] ASCII char set. [VT100Plus] Extends VT100 to support color, function keys...
...] Data Bits [8] Configuration options: [7] [8] ASUS Z13PE-D16 4-13 Configuration options: [Disabled] [Enabled] The following item appears only when Console Redirection for COM1 or COM2(SOL) is using) will exchange data. Long or noisy lines may require lower speeds. Bits per second [115200] Selects serial port transmission speed. Console Redirection Settings These items become configurable only when you to set the terminal type. [VT100] ASCII char set. [VT100Plus] Extends VT100 to support color, function keys...

User Manual
Page 70
... Terminal data. This is 1 stop bit. Configuration options: [1] [2] Flow Control [None] Flow control can prevent data loss from buffer overflow. Configuration options: [Disabled] [Enabled] Recorder Mode [Disabled] With this mode enabled only text will be sent to re-start bit indicates the beginning.) The standard setting is to enable the VT -UTF8 Combination Key Support for Out-of a serial data packet. (A start the flow. Configuration options: [Disabled] [Enabled] 4-14 Chapter 4: BIOS Setup Once the buffers are full...
... Terminal data. This is 1 stop bit. Configuration options: [1] [2] Flow Control [None] Flow control can prevent data loss from buffer overflow. Configuration options: [Disabled] [Enabled] Recorder Mode [Disabled] With this mode enabled only text will be sent to re-start bit indicates the beginning.) The standard setting is to enable the VT -UTF8 Combination Key Support for Out-of a serial data packet. (A start the flow. Configuration options: [Disabled] [Enabled] 4-14 Chapter 4: BIOS Setup Once the buffers are full...

User Manual
Page 72
... Use This Device is set CSM (Compatibility Support Module) to enable or disable Single Root IO Virtualization Support if the system has SRIOV capable PCIe devices. DMA;] [IO=2F8h; Configuration options: [Disabled] [Enabled] Re-Size BAR Support [Disabled] If system has Resizable BAR capable PCIe Devices, this setup page after SMM locked. New settings will be decoded in above 4G address space. It only works if the system supports 64-bit PCI decoding. Above 4G Decoding [Enabled...
... Use This Device is set CSM (Compatibility Support Module) to enable or disable Single Root IO Virtualization Support if the system has SRIOV capable PCIe devices. DMA;] [IO=2F8h; Configuration options: [Disabled] [Enabled] Re-Size BAR Support [Disabled] If system has Resizable BAR capable PCIe Devices, this setup page after SMM locked. New settings will be decoded in above 4G address space. It only works if the system supports 64-bit PCI decoding. Above 4G Decoding [Enabled...

User Manual
Page 74
... the NVMe configuration list depends on the connected devices. The following items appear only when Network Stack is set to complete. If no devices are connected, No NVMe Device Found will take couple of media will not be checked. Configuration options: [Short] [Extended] 4-18 Chapter 4: BIOS Setup Configuration options: [Disabled] [Enabled] IPv4 HTTP Support [Disabled] Enables or disables the IPv4 HTTP Boot Support. If disabled, IPv6 HTTP boot support will be available. Configuration options: [Disabled] [Enabled] IPv6 HTTP Support [Disabled] Enables or disables the IPv6...
... the NVMe configuration list depends on the connected devices. The following items appear only when Network Stack is set to complete. If no devices are connected, No NVMe Device Found will take couple of media will not be checked. Configuration options: [Short] [Extended] 4-18 Chapter 4: BIOS Setup Configuration options: [Disabled] [Enabled] IPv4 HTTP Support [Disabled] Enables or disables the IPv4 HTTP Boot Support. If disabled, IPv6 HTTP boot support will be available. Configuration options: [Disabled] [Enabled] IPv6 HTTP Support [Disabled] Enables or disables the IPv6...

User Manual
Page 75
... State], the system goes into off or on -LAN function of the onboard LAN controller or other installed PCI-E LAN cards. Configuration options: [Power On] [Power Off] [Last State] Power On By PCI-E [Disabled] Allows you to both enroll the required certificate files and also to enable or disable the wake-on state, whatever the system state was before the AC power loss. This allows you to delete the certicates...
... State], the system goes into off or on -LAN function of the onboard LAN controller or other installed PCI-E LAN cards. Configuration options: [Power On] [Power Off] [Last State] Power On By PCI-E [Disabled] Allows you to both enroll the required certificate files and also to enable or disable the wake-on state, whatever the system state was before the AC power loss. This allows you to delete the certicates...

User Manual
Page 78
... This option allows you to enable or bypass IEH mode. Configuration options: [Disabled] [Enabled in S5] IEH Mode [Enabled] This option allows you to enable to disable DeepSx power policies. 4.6.1 PCH-IO Configuration SATA And RST Configuration This option allows you to select the active video type. Configuration options: [Bypass Mode] [Enabled] 4.6.2 Miscellaneous Configuration Active Video [Auto] Allows you to configure SATA Controller 1/2/3 Device Options Settings. Configuration options: [Auto] [Onboard Device] [PCIE Device] 4-22 Chapter 4: BIOS Setup Controller 1/2/3 SATA And...
... This option allows you to enable or bypass IEH mode. Configuration options: [Disabled] [Enabled in S5] IEH Mode [Enabled] This option allows you to enable to disable DeepSx power policies. 4.6.1 PCH-IO Configuration SATA And RST Configuration This option allows you to select the active video type. Configuration options: [Bypass Mode] [Enabled] 4.6.2 Miscellaneous Configuration Active Video [Auto] Allows you to configure SATA Controller 1/2/3 Device Options Settings. Configuration options: [Auto] [Onboard Device] [PCIE Device] 4-22 Chapter 4: BIOS Setup Controller 1/2/3 SATA And...

User Manual
Page 80
Configuration options: [Disable] [Enable] 4-24 Chapter 4: BIOS Setup Whea Settings Whea Support [Enable] Allows you to enable or disable System Errors setup options. 4.6.4 Runtime Error Logging System Errors [Enable] Allows you to enable or disable Whea support. Configuration options: [Disable] [Enable] The following items are only available when System Errors is set to [Enable].
Configuration options: [Disable] [Enable] 4-24 Chapter 4: BIOS Setup Whea Settings Whea Support [Enable] Allows you to enable or disable System Errors setup options. 4.6.4 Runtime Error Logging System Errors [Enable] Allows you to enable or disable Whea support. Configuration options: [Disable] [Enable] The following items are only available when System Errors is set to [Enable].

User Manual
Page 92
... installed in ACPI. Configuration options: [Enable] [Disable] The following items appear only when Intel VT for Directed I /O (VT-d) configuration menu. Configuration options: [Disable] [Enable] 4.7.6 Advanced Power Management Configuration CPU P State Control P State Control Configuration Sub Menus, including Turbo, XE, etc. To disable VT-d, X2APIC must also be disabled. Not compatible with Directive Device Assignment (DDA). AVX License Pre-Grant Override [Disable] Allows you to enable or disable Intel Virtualization Technology for Directed I /O device assignment to enable or disable...
... installed in ACPI. Configuration options: [Enable] [Disable] The following items appear only when Intel VT for Directed I /O (VT-d) configuration menu. Configuration options: [Disable] [Enable] 4.7.6 Advanced Power Management Configuration CPU P State Control P State Control Configuration Sub Menus, including Turbo, XE, etc. To disable VT-d, X2APIC must also be disabled. Not compatible with Directive Device Assignment (DDA). AVX License Pre-Grant Override [Disable] Allows you to enable or disable Intel Virtualization Technology for Directed I /O device assignment to enable or disable...

User Manual
Page 106
... to set to [Static]. Unspecified option will not modify any BMC network parameters during BIOS phase. Configuration options: [Unspecified] [Static] [DynamicBmcDhcp] The following items are available only when Configuration Address source is 128). IPV6 Router1 Prefix Value Lan1/2 Allows you to enable or disable IPV6 support. Configure IPv6 support DM_LAN / Shared LAN IPV6 support [Enabled] Allows you to change the IPV6 router prefix value. 4-50 Chapter 4: BIOS Setup
... to set to [Static]. Unspecified option will not modify any BMC network parameters during BIOS phase. Configuration options: [Unspecified] [Static] [DynamicBmcDhcp] The following items are available only when Configuration Address source is 128). IPV6 Router1 Prefix Value Lan1/2 Allows you to enable or disable IPV6 support. Configure IPv6 support DM_LAN / Shared LAN IPV6 support [Enabled] Allows you to change the IPV6 router prefix value. 4-50 Chapter 4: BIOS Setup

User Manual
Page 112
... that of three identical hard disk drives for this setup. 5.1.2 Installing hard disk drives The motherboard supports Serial ATA for this chapter may differ slightly from one drive fails, the disk array management software directs all the benefits of the data in the system user guide. 2. To install the SATA hard disks for Windows OS and Linux). 5.1 Setting up RAID The motherboard supports Intel® Rapid Storage Technology, with RAID 0, RAID 1, RAID 10, and RAID 5 support (for RAID configuration: 1. The BIOS options in parallel, interleaved stacks...
... that of three identical hard disk drives for this setup. 5.1.2 Installing hard disk drives The motherboard supports Serial ATA for this chapter may differ slightly from one drive fails, the disk array management software directs all the benefits of the data in the system user guide. 2. To install the SATA hard disks for Windows OS and Linux). 5.1 Setting up RAID The motherboard supports Intel® Rapid Storage Technology, with RAID 0, RAID 1, RAID 10, and RAID 5 support (for RAID configuration: 1. The BIOS options in parallel, interleaved stacks...

User Manual
Page 121
... DC Description SCSI Reset SCSI Detect SCSI Enable Setup Verifying Password Start of Setup Reserved for ASL (see ASL Status Codes section below) Setup Input Wait Reserved for ASL (see ASL Status Codes section below) Ready To Boot event Legacy Boot event Exit Boot Services event Runtime Set Virtual Address MAP Begin Runtime Set Virtual Address MAP End Legacy Option ROM Initialization System Reset USB hot plug PCI bus hot plug Clean-up of NVRAM Configuration Reset (reset of the...
... DC Description SCSI Reset SCSI Detect SCSI Enable Setup Verifying Password Start of Setup Reserved for ASL (see ASL Status Codes section below) Setup Input Wait Reserved for ASL (see ASL Status Codes section below) Ready To Boot event Legacy Boot event Exit Boot Services event Runtime Set Virtual Address MAP Begin Runtime Set Virtual Address MAP End Legacy Option ROM Initialization System Reset USB hot plug PCI bus hot plug Clean-up of NVRAM Configuration Reset (reset of the...


