
User Guide
Page 3
Contents Safety information...v About this guide...vi X99-PRO/USB 3.1 specifications summary viii Package contents...xiv Installation tools and components xv Chapter 1: Product Introduction 1.1 Special features 1-1... 2-6 2.1.5 ATX Power connection 2-7 2.1.6 SATA device connection 2-8 2.1.7 Front I/O Connector 2-9 2.1.8 Expansion Card installation 2-10 2.1.9 Wi-Fi antenna installation 2-12 2.2 BIOS update utility 2-13 2.3 Motherboard rear and audio connections 2-14 2.3.1 Rear I/O connection 2-14 2.3.2 Audio I/O connections 2-16 2.4 Starting up for the first time 2-18...
Contents Safety information...v About this guide...vi X99-PRO/USB 3.1 specifications summary viii Package contents...xiv Installation tools and components xv Chapter 1: Product Introduction 1.1 Special features 1-1... 2-6 2.1.5 ATX Power connection 2-7 2.1.6 SATA device connection 2-8 2.1.7 Front I/O Connector 2-9 2.1.8 Expansion Card installation 2-10 2.1.9 Wi-Fi antenna installation 2-12 2.2 BIOS update utility 2-13 2.3 Motherboard rear and audio connections 2-14 2.3.1 Rear I/O connection 2-14 2.3.2 Audio I/O connections 2-16 2.4 Starting up for the first time 2-18...

User Guide
Page 4
... Configuration 3-38 3.6.5 USB Configuration 3-39 3.6.6 Platform Misc Configuration 3-41 3.6.7 Onboard Devices Configuration 3-42 3.6.8 APM Configuration 3-44 3.6.9 Network Stack Configuration 3-45 3.7 Monitor menu 3-46 3.8 Boot menu 3-51 3.9 Tool menu 3-57 3.9.1 ASUS EZ Flash 2 Utility 3-57 3.9.2 ASUS O.C. Profile 3-58 3.9.3 ASUS DRAM SPD Information 3-59 3.10 Exit menu 3-60 3.11 Updating BIOS 3-61 3.11.1 EZ Update 3-61 3.11.2 ASUS EZ Flash...
... Configuration 3-38 3.6.5 USB Configuration 3-39 3.6.6 Platform Misc Configuration 3-41 3.6.7 Onboard Devices Configuration 3-42 3.6.8 APM Configuration 3-44 3.6.9 Network Stack Configuration 3-45 3.7 Monitor menu 3-46 3.8 Boot menu 3-51 3.9 Tool menu 3-57 3.9.1 ASUS EZ Flash 2 Utility 3-57 3.9.2 ASUS O.C. Profile 3-58 3.9.3 ASUS DRAM SPD Information 3-59 3.10 Exit menu 3-60 3.11 Updating BIOS 3-61 3.11.1 EZ Update 3-61 3.11.2 ASUS EZ Flash...

User Guide
Page 6
Chapter 1: Product introduction This chapter describes the features of the standard package. ASUS website The ASUS website (www.asus.com) provides updated information on the motherboard. 2. These documents are also provided. How this guide This user guide contains the ... contains the following sources for additional information and for product and software updates. 1. It includes description of the switches, jumpers, and connectors on ASUS hardware and software products. 2. Detailed descriptions of the BIOS parameters are not part of the motherboard and the new technology it ...
Chapter 1: Product introduction This chapter describes the features of the standard package. ASUS website The ASUS website (www.asus.com) provides updated information on the motherboard. 2. These documents are also provided. How this guide This user guide contains the ... contains the following sources for additional information and for product and software updates. 1. It includes description of the switches, jumpers, and connectors on ASUS hardware and software products. 2. Detailed descriptions of the BIOS parameters are not part of the motherboard and the new technology it ...

User Guide
Page 13
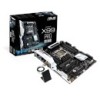
X99-PRO/USB 3.1 specifications summary Internal I/O Connectors BIOS Features Manageability Support DVD Operating system Form Factors 1 x 4-pin CPU Fan connector for both 3-pin (DC mode) and 4-pin (PWM mode) CPU coolers ...2.7, WfM 2.0, SM BIOS 2.7, ACPI 5.0, Multi-language BIOS, ASUS EZ Flash 2, CrashFree BIOS 3, F11 EZ Tuning Wizard, F6 Qfan Control, F3 My Favorites, Quick Note, Last Modified Log, F12 PrintScreen function, F3 Shortcut function, and ASUS DRAM SPD (Serial Presence Detect) memory information WfM 2.0, DMI 2.7, WOL by PME, PXE Drivers ASUS Utilities EZ Update Anti-virus software...
X99-PRO/USB 3.1 specifications summary Internal I/O Connectors BIOS Features Manageability Support DVD Operating system Form Factors 1 x 4-pin CPU Fan connector for both 3-pin (DC mode) and 4-pin (PWM mode) CPU coolers ...2.7, WfM 2.0, SM BIOS 2.7, ACPI 5.0, Multi-language BIOS, ASUS EZ Flash 2, CrashFree BIOS 3, F11 EZ Tuning Wizard, F6 Qfan Control, F3 My Favorites, Quick Note, Last Modified Log, F12 PrintScreen function, F3 Shortcut function, and ASUS DRAM SPD (Serial Presence Detect) memory information WfM 2.0, DMI 2.7, WOL by PME, PXE Drivers ASUS Utilities EZ Update Anti-virus software...
User Guide
Page 36
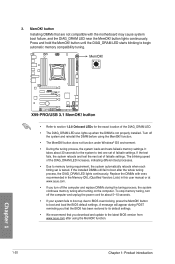
...ones recommended in the Memory QVL (Qualified Vendors Lists) in this user manual or at www.asus.com. • If you download and update to boot up when the DIMM is tested. button to BIOS overclocking, press the MemOK! Turn off the computer and unplug the power cord for the exact...system and reinstall the DIMM before using the MemOK! It takes about 5-10 seconds. • If your system fails to the latest BIOS version from www.asus.com after the whole tuning process, the DIAG_DRAM LED lights continuously. Replace the DIMMs with the motherboard may cause system boot failure, and...
...ones recommended in the Memory QVL (Qualified Vendors Lists) in this user manual or at www.asus.com. • If you download and update to boot up when the DIMM is tested. button to BIOS overclocking, press the MemOK! Turn off the computer and unplug the power cord for the exact...system and reinstall the DIMM before using the MemOK! It takes about 5-10 seconds. • If your system fails to the latest BIOS version from www.asus.com after the whole tuning process, the DIAG_DRAM LED lights continuously. Replace the DIMMs with the motherboard may cause system boot failure, and...

User Guide
Page 71
... out, indicating that supports USB BIOS Flashback. 3. ASUS X99-PRO/USB 3.1 2-13 Place the bundled support DVD to complete the installation. 2. Insert the USB storage device to the USB Flashback port. • We recommend you to automatically download the latest BIOS version. 4. press the BIOS Flashback button for the location of the USB port that the BIOS updating process is damaged during the...
... out, indicating that supports USB BIOS Flashback. 3. ASUS X99-PRO/USB 3.1 2-13 Place the bundled support DVD to complete the installation. 2. Insert the USB storage device to the USB Flashback port. • We recommend you to automatically download the latest BIOS version. 4. press the BIOS Flashback button for the location of the USB port that the BIOS updating process is damaged during the...

User Guide
Page 73
... on the operating system's setting. • USB 3.0 devices can disable the LAN controllers in BIOS. Some legacy USB devices must update their respective owners. ** LAN ports LED indications... Activity Link LED Speed LED Status Description Status Description Off No link Off 10 Mbps connection Orange Linked Orange 100 Mbps connection Orange (Blinking) Data activity Green 1 Gbps connection Orange (Blinking Ready to blink even when disabled. Chapter 2 ASUS X99-PRO/USB...
... on the operating system's setting. • USB 3.0 devices can disable the LAN controllers in BIOS. Some legacy USB devices must update their respective owners. ** LAN ports LED indications... Activity Link LED Speed LED Status Description Status Description Off No link Off 10 Mbps connection Orange Linked Orange 100 Mbps connection Orange (Blinking) Data activity Green 1 Gbps connection Orange (Blinking Ready to blink even when disabled. Chapter 2 ASUS X99-PRO/USB...

User Guide
Page 79
... mouse input. We strongly recommend that you to ensure optimal performance. ASUS X99-PRO/USB 3.1 3-1 DO NOT change the BIOS settings only with the same smoothness as storage device configuration, overclocking settings, advanced power management, and boot device configuration that requires further BIOS settings or update. BIOS (Basic Input and Output System) stores system hardware settings such as...
... mouse input. We strongly recommend that you to ensure optimal performance. ASUS X99-PRO/USB 3.1 3-1 DO NOT change the BIOS settings only with the same smoothness as storage device configuration, overclocking settings, advanced power management, and boot device configuration that requires further BIOS settings or update. BIOS (Basic Input and Output System) stores system hardware settings such as...

User Guide
Page 80
... reset button on the system chassis. • Press the power button to update the BIOS or configure its routines. Chapter 3 3-2 Chapter 3: BIOS setup If you in this option only if you want to use the mouse to control the BIOS setup program. • If the system becomes unstable after changing any... in using the first two options. BIOS menu screen The BIOS Setup program can change modes from the Exit menu or from the Exit/Advanced Mode screen. See section 3.10 Exit menu for information on your screen. • Ensure that a USB mouse is connected to your motherboard if...
... reset button on the system chassis. • Press the power button to update the BIOS or configure its routines. Chapter 3 3-2 Chapter 3: BIOS setup If you in this option only if you want to use the mouse to control the BIOS setup program. • If the system becomes unstable after changing any... in using the first two options. BIOS menu screen The BIOS Setup program can change modes from the Exit menu or from the Exit/Advanced Mode screen. See section 3.10 Exit menu for information on your screen. • Ensure that a USB mouse is connected to your motherboard if...

User Guide
Page 111
...to [Enabled], this item allows the legacy OS to boot even without support for logical processor threads. Configuration options: [Disabled] [Enabled] ASUS X99-PRO/USB 3.1 3-33 The thermal monitor includes TM1 (Thermal monitor 1), TM2 (Thermal monitor 2), and EMTTM (Enhanced Multi-threaded Thermal Monitoring). Configuration ...when combined with extended CPUID functions. 3.6.1 CPU Configuration The items in this menu show the CPU-related information that the BIOS automatically detects. The items in this menu may vary based on the CPU installed. Chapter 3 Hyper-Threading [ALL]...
...to [Enabled], this item allows the legacy OS to boot even without support for logical processor threads. Configuration options: [Disabled] [Enabled] ASUS X99-PRO/USB 3.1 3-33 The thermal monitor includes TM1 (Thermal monitor 1), TM2 (Thermal monitor 2), and EMTTM (Enhanced Multi-threaded Thermal Monitoring). Configuration ...when combined with extended CPUID functions. 3.6.1 CPU Configuration The items in this menu show the CPU-related information that the BIOS automatically detects. The items in this menu may vary based on the CPU installed. Chapter 3 Hyper-Threading [ALL]...

User Guide
Page 136
... item allows you to key in the BIOS Flash. 3.9.2 ASUS O.C. Load/Save Profile from your USB drive, load and save the current BIOS settings to your BIOS settings, press , and then select Yes. • DO NOT shut down or reset the system while updating the BIOS to prevent the system boot failure! •... load or save profile from /to USB Drive This item allows you to save profile to the BIOS Flash, and create a profile. Key in a profile number from the same memory/ CPU configuration and BIOS version. Profile This item allows you update the BIOS file only coming from one to store...
... item allows you to key in the BIOS Flash. 3.9.2 ASUS O.C. Load/Save Profile from your USB drive, load and save the current BIOS settings to your BIOS settings, press , and then select Yes. • DO NOT shut down or reset the system while updating the BIOS to prevent the system boot failure! •... load or save profile from /to USB Drive This item allows you to save profile to the BIOS Flash, and create a profile. Key in a profile number from the same memory/ CPU configuration and BIOS version. Profile This item allows you update the BIOS file only coming from one to store...
User Guide
Page 139
... (Internet Service Provider). • This utility is available in this chapter to enable it. To update the BIOS using the current version of the BIOS setup program. Chapter 3 ASUS X99-PRO/USB 3.1 3-61 Enter the Advanced Mode of BIOS, DO NOT manually update the BIOS. Carefully follow the instructions in the support DVD that comes with the support DVD. 3.11...
... (Internet Service Provider). • This utility is available in this chapter to enable it. To update the BIOS using the current version of the BIOS setup program. Chapter 3 ASUS X99-PRO/USB 3.1 3-61 Enter the Advanced Mode of BIOS, DO NOT manually update the BIOS. Carefully follow the instructions in the support DVD that comes with the support DVD. 3.11...

User Guide
Page 140
...the Up/Down arrow keys to perform the BIOS update process. Ensure to load the BIOS default settings to the Folder Info field. 6. Press the Up/Down arrow keys to find the BIOS file, and then press to find the USB flash disk that contains the latest BIOS, and then press . 5. Press to... switch to ensure system compatibility and stability. Reboot the system when the update process is done. • This function can support...
...the Up/Down arrow keys to perform the BIOS update process. Ensure to load the BIOS default settings to the Folder Info field. 6. Press the Up/Down arrow keys to find the BIOS file, and then press to find the USB flash disk that contains the latest BIOS, and then press . 5. Press to... switch to ensure system compatibility and stability. Reboot the system when the update process is done. • This function can support...
User Guide
Page 141
... the ASUS official website. Before updating BIOS • Prepare the motherboard support DVD and a USB flash drive. • Download the latest BIOS file and BIOS Updater from http://support.asus.com and save it fails or gets corrupted during the updating process. Chapter 3 ASUS X99-PRO/USB 3.1 3-63 If you want to use the newer BIOS file, download the file at http://support.asus.com...
... the ASUS official website. Before updating BIOS • Prepare the motherboard support DVD and a USB flash drive. • Download the latest BIOS file and BIOS Updater from http://support.asus.com and save it fails or gets corrupted during the updating process. Chapter 3 ASUS X99-PRO/USB 3.1 3-63 If you want to use the newer BIOS file, download the file at http://support.asus.com...
User Guide
Page 142
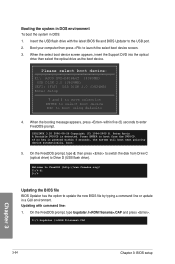
... the boot device. ISOLINUX 3.20 2006-08-26 Copyright (C) 1994-2005 H. Please select boot device: E1: ASUS DVD-E818A6T (4069MB) USB DISK 2.0 (3824MB) UEFI: (FAT) USB DISK 2.0 (3824MB) Enter Setup and to move selection ENTER to select boot device ESC...to the USB port. 2. On the FreeDOS prompt, type bupdater /i.CAP and press . If no key is detected. D:/> bupdater /i.CAP Chapter 3 3-64 Chapter 3: BIOS setup boot: 5. Booting the system in DOS environment To boot the system in a GUI environment. C:/> d: D:/> Updating the BIOS file BIOS Updater has the ...
... the boot device. ISOLINUX 3.20 2006-08-26 Copyright (C) 1994-2005 H. Please select boot device: E1: ASUS DVD-E818A6T (4069MB) USB DISK 2.0 (3824MB) UEFI: (FAT) USB DISK 2.0 (3824MB) Enter Setup and to move selection ENTER to select boot device ESC...to the USB port. 2. On the FreeDOS prompt, type bupdater /i.CAP and press . If no key is detected. D:/> bupdater /i.CAP Chapter 3 3-64 Chapter 3: BIOS setup boot: 5. Booting the system in DOS environment To boot the system in a GUI environment. C:/> d: D:/> Updating the BIOS file BIOS Updater has the ...

User Guide
Page 143
... Note [Enter] Select or Load [Up/Down/Home/End] Move [Tab] Switch [Esc] Exit [V] Drive Info 3. Chapter 3 ASUS X99-PRO/USB 3.1 3-65 When BIOS update is not supported due to check the correct filename in GUI environment: 1. On the BIOS Updater screen, press to switch from Drives panel to Files panel then press or keys to confirm the...
... Note [Enter] Select or Load [Up/Down/Home/End] Move [Tab] Switch [Esc] Exit [V] Drive Info 3. Chapter 3 ASUS X99-PRO/USB 3.1 3-65 When BIOS update is not supported due to check the correct filename in GUI environment: 1. On the BIOS Updater screen, press to switch from Drives panel to Files panel then press or keys to confirm the...

User Guide
Page 144
5. When the BIOS update is done, select OK or press to ensure system compatibility and stability. Ensure to load the BIOS default settings to restart your User Guide for details. Select Load Optimized Defaults item under the Exit BIOS menu. System will enter EZ Flash 2 Updater and continue the BIOS update process. 6. DO NOT shut down or reset the system while updating the BIOS to launch secure BIOS update. Chapter 3 3-66 Chapter 3: BIOS setup Press again to prevent system boot failure. See chapter BIOS setup, section Exit menu of your computer.
5. When the BIOS update is done, select OK or press to ensure system compatibility and stability. Ensure to load the BIOS default settings to restart your User Guide for details. Select Load Optimized Defaults item under the Exit BIOS menu. System will enter EZ Flash 2 Updater and continue the BIOS update process. 6. DO NOT shut down or reset the system while updating the BIOS to launch secure BIOS update. Chapter 3 3-66 Chapter 3: BIOS setup Press again to prevent system boot failure. See chapter BIOS setup, section Exit menu of your computer.


