
X79-DELUXE User's Manual
Page 1
X79-DELUXE Motherboard
X79-DELUXE Motherboard

X79-DELUXE User's Manual
Page 3
... information...vi About this guide...vii X79-DELUXE specifications summary ix Package contents...xiii Installation tools and components xiv Chapter 1: Product Introduction 1.1 Special features 1-1 1.1.1 Product highlights 1-1 1.1.2 Dual Intelligent Processors 4 with 4-Way Optimization 1-2 1.1.3 ASUS Exclusive Features 1-3 1.1.4 ASUS Quiet Thermal Solution 1-4 1.1.5 ASUS EZ DIY 1-4 1.1.6 Other special features 1-5 1.2 Motherboard overview 1-6 1.2.1 Before you proceed 1-6 1.2.2 Motherboard layout 1-7 1.2.3 Central Processing Unit (CPU 1-9 1.2.4 System...
... information...vi About this guide...vii X79-DELUXE specifications summary ix Package contents...xiii Installation tools and components xiv Chapter 1: Product Introduction 1.1 Special features 1-1 1.1.1 Product highlights 1-1 1.1.2 Dual Intelligent Processors 4 with 4-Way Optimization 1-2 1.1.3 ASUS Exclusive Features 1-3 1.1.4 ASUS Quiet Thermal Solution 1-4 1.1.5 ASUS EZ DIY 1-4 1.1.6 Other special features 1-5 1.2 Motherboard overview 1-6 1.2.1 Before you proceed 1-6 1.2.2 Motherboard layout 1-7 1.2.3 Central Processing Unit (CPU 1-9 1.2.4 System...

X79-DELUXE User's Manual
Page 9
... x PCI Express 3.0 x16 slots (dual at x4 mode) 2 x PCI Express 2.0 x1 slots Multi-GPU support Storage LAN * This motherboard is subject to www.asus.com for Intel® CPU support list. Dual interconnect between the integrated LAN controller and physical layer (PHY) - Realtek® 8111GR Gigabit...Intel® 82579V Gigabit LAN - triple at x16/x8/x8 mode) 1 x PCI Express 3.0 x1 slot (PCIe x16 at x16/x16; X79-DELUXE specifications summary CPU LGA2011 socket for the 2nd Generation Intel® Core™ i7 processor family Supports Intel® Turbo Boost Technology 2.0* Chipset Memory...
... x PCI Express 3.0 x16 slots (dual at x4 mode) 2 x PCI Express 2.0 x1 slots Multi-GPU support Storage LAN * This motherboard is subject to www.asus.com for Intel® CPU support list. Dual interconnect between the integrated LAN controller and physical layer (PHY) - Realtek® 8111GR Gigabit...Intel® 82579V Gigabit LAN - triple at x16/x8/x8 mode) 1 x PCI Express 3.0 x1 slot (PCIe x16 at x16/x16; X79-DELUXE specifications summary CPU LGA2011 socket for the 2nd Generation Intel® Core™ i7 processor family Supports Intel® Turbo Boost Technology 2.0* Chipset Memory...
X79-DELUXE User's Manual
Page 13
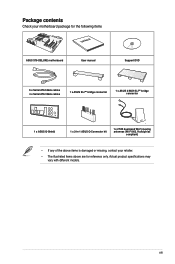
... for the following items User Manual ASUS X79-DELUXE motherboard User manual Support DVD 6 x Serial ATA 6Gb/s cables 4 x Serial ATA 3Gb/s cables 1 x ASUS SLI™ bridge connector 1 x ASUS 3-WAY SLI™ bridge connector 1 x ASUS Q-Shield 1 x 2-in-1 ASUS Q-Connector kit 1 x 2T2R dual-band Wi-Fi moving antennas (Wi-Fi 802.11a/b/g/n/ac compliant) • If any of the above...
... for the following items User Manual ASUS X79-DELUXE motherboard User manual Support DVD 6 x Serial ATA 6Gb/s cables 4 x Serial ATA 3Gb/s cables 1 x ASUS SLI™ bridge connector 1 x ASUS 3-WAY SLI™ bridge connector 1 x ASUS Q-Shield 1 x 2-in-1 ASUS Q-Connector kit 1 x 2T2R dual-band Wi-Fi moving antennas (Wi-Fi 802.11a/b/g/n/ac compliant) • If any of the above...
X79-DELUXE User's Manual
Page 15
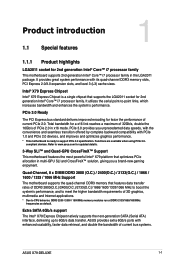
...PCIe 3.0 Ready The PCI Express bus standard delivers improved encoding for twice the performance of current bus systems. Chapter 1 ASUS X79-DELUXE 1-1 Functions are available when using PCIe 3.0compliant devices. It provides great system performance with enhanced scalability, faster data retrieval...Product introduction 1.1 Special features 1 1.1.1 Product highlights LGA2011 socket for 2nd generation Intel® Core™ i7 processor family This motherboard supports 2nd generation Intel® Core™ i7 processor family in x16 mode. It utilizes the serial point-to 6Gb/s data...
...PCIe 3.0 Ready The PCI Express bus standard delivers improved encoding for twice the performance of current bus systems. Chapter 1 ASUS X79-DELUXE 1-1 Functions are available when using PCIe 3.0compliant devices. It provides great system performance with enhanced scalability, faster data retrieval...Product introduction 1.1 Special features 1 1.1.1 Product highlights LGA2011 socket for 2nd generation Intel® Core™ i7 processor family This motherboard supports 2nd generation Intel® Core™ i7 processor family in x16 mode. It utilizes the serial point-to 6Gb/s data...

X79-DELUXE User's Manual
Page 19
ASUS Q-connector ASUS Q-Connector is capable of performing mult-channel ... II DTS UltraPC II delivers a superior surround sound experience through your DIY experience. Chapter 1 ASUS X79-DELUXE 1-5 ASUS Q-Design ASUS Q-Design enhances your system's speakers and headphones while monitoring and balancing the loudness level difference between...Products (ErP) ready, and ErP requires products to meet certain energy efficiency requirement in line with ASUS vision of creating environment-friendly and energy-efficient products through augmenting low and high frequencies of incredible...
ASUS Q-connector ASUS Q-Connector is capable of performing mult-channel ... II DTS UltraPC II delivers a superior surround sound experience through your DIY experience. Chapter 1 ASUS X79-DELUXE 1-5 ASUS Q-Design ASUS Q-Design enhances your system's speakers and headphones while monitoring and balancing the loudness level difference between...Products (ErP) ready, and ErP requires products to meet certain energy efficiency requirement in line with ASUS vision of creating environment-friendly and energy-efficient products through augmenting low and high frequencies of incredible...

X79-DELUXE User's Manual
Page 21
1.2.2 Motherboard layout Chapter 1 Refer to 1.2.8 Internal connectors and 2.3.1 Rear I/O connection for more information about rear panel connectors and internal connectors. ASUS X79-DELUXE 1-7
1.2.2 Motherboard layout Chapter 1 Refer to 1.2.8 Internal connectors and 2.3.1 Rear I/O connection for more information about rear panel connectors and internal connectors. ASUS X79-DELUXE 1-7

X79-DELUXE User's Manual
Page 23
... cap. Contact your retailer immediately if the PnP cap is shipment/ transit-related. • Keep the cap after installing the motherboard. ASUS will shoulder the cost of repair only if the damage is missing, or if you see any damage to the socket contacts resulting... motherboard comes with a surface mount LGA2011 socket designed for the 2nd Generation Intel® Core™ i7 processor family. • Ensure that the PnP cap is on the LGA2011 socket. • The product warranty does not cover damage to the PnP cap/socket contacts/motherboard components. Chapter 1 ASUS X79-DELUXE ...
... cap. Contact your retailer immediately if the PnP cap is shipment/ transit-related. • Keep the cap after installing the motherboard. ASUS will shoulder the cost of repair only if the damage is missing, or if you see any damage to the socket contacts resulting... motherboard comes with a surface mount LGA2011 socket designed for the 2nd Generation Intel® Core™ i7 processor family. • Ensure that the PnP cap is on the LGA2011 socket. • The product warranty does not cover damage to the PnP cap/socket contacts/motherboard components. Chapter 1 ASUS X79-DELUXE ...
X79-DELUXE User's Manual
Page 25
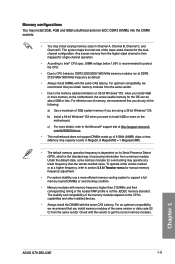
...a memory module. com/kb/929605/en-us. • This motherboard does not support DIMMs made up of 512Mb (64MB) chips or less (Memory chip capacity counts in Channel A, Channel B, Channel C, and Channel D. Chapter 1 ASUS X79-DELUXE 1-11 The system maps the total size of accessing information from ...® CPU spec, DIMM voltage below 1.65V is recommended to protect the CPU. • Due to install 4GB or more memory on the motherboard. For effective use a more details, refer to section 3.5 Ai Tweaker menu for overclocking may install varying memory sizes in Megabit, 8 Megabit/Mb...
...a memory module. com/kb/929605/en-us. • This motherboard does not support DIMMs made up of 512Mb (64MB) chips or less (Memory chip capacity counts in Channel A, Channel B, Channel C, and Channel D. Chapter 1 ASUS X79-DELUXE 1-11 The system maps the total size of accessing information from ...® CPU spec, DIMM voltage below 1.65V is recommended to protect the CPU. • Due to install 4GB or more memory on the motherboard. For effective use a more details, refer to section 3.5 Ai Tweaker menu for overclocking may install varying memory sizes in Megabit, 8 Megabit/Mb...

X79-DELUXE User's Manual
Page 26
X79-DELUXE Motherboard Qualified Vendors List (QVL) DDR3 2400 MHz capacity Vendors A-DATA Apacer Apacer CORSAIR CORSAIR CORSAIR CORSAIR CORSAIR CORSAIR G.SKILL G.SKILL G.SKILL G.SKILL GEIL GEIL GEIL ...
X79-DELUXE Motherboard Qualified Vendors List (QVL) DDR3 2400 MHz capacity Vendors A-DATA Apacer Apacer CORSAIR CORSAIR CORSAIR CORSAIR CORSAIR CORSAIR G.SKILL G.SKILL G.SKILL G.SKILL GEIL GEIL GEIL ...

X79-DELUXE User's Manual
Page 37
...- - shared - - - - shared - - - - - Intel® LAN - - Marvell 9230 SATA Controller shared - - - - - shared - PCIe x1_2 shared - - - - - - - Wi-Fi/Bluetooth 4.0 - - - Chapter 1 ASUS X79-DELUXE 1-23 shared - VGA configuration Single VGA/PCIe card Dual VGA/PCIe card Triple VGA/PCIe card PCIe Express 3.0 operating mode PCIe x16_1 PCIe x16_2 PCIe...; Connect a chassis fan to the motherboard connector labeled CHA_FAN1-4 when using multiple graphics cards for this motherboard A B C D E F G H PCIe x16_1 shared - - - - - - -...
...- - shared - - - - shared - - - - - Intel® LAN - - Marvell 9230 SATA Controller shared - - - - - shared - PCIe x1_2 shared - - - - - - - Wi-Fi/Bluetooth 4.0 - - - Chapter 1 ASUS X79-DELUXE 1-23 shared - VGA configuration Single VGA/PCIe card Dual VGA/PCIe card Triple VGA/PCIe card PCIe Express 3.0 operating mode PCIe x16_1 PCIe x16_2 PCIe...; Connect a chassis fan to the motherboard connector labeled CHA_FAN1-4 when using multiple graphics cards for this motherboard A B C D E F G H PCIe x16_1 shared - - - - - - -...
X79-DELUXE User's Manual
Page 39
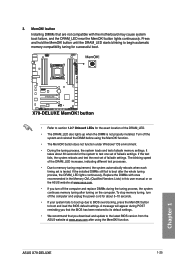
...manual or on the ASUS website at www.asus.com. • If you download and update to the latest BIOS version from the ASUS website at www.asus.com after the whole tuning process, the DRAM_LED lights continuously. ASUS X79-DELUXE 1-25 Chapter 1 ...function. • The MemOK! A message will appear during the tuning process, the system continues memory tuning after turning on the computer. It takes about 30 seconds for about 5-10 seconds. • If your system fails to boot after using the MemOK! Replace the DIMMs with the motherboard...
...manual or on the ASUS website at www.asus.com. • If you download and update to the latest BIOS version from the ASUS website at www.asus.com after the whole tuning process, the DRAM_LED lights continuously. ASUS X79-DELUXE 1-25 Chapter 1 ...function. • The MemOK! A message will appear during the tuning process, the system continues memory tuning after turning on the computer. It takes about 30 seconds for about 5-10 seconds. • If your system fails to boot after using the MemOK! Replace the DIMMs with the motherboard...

X79-DELUXE User's Manual
Page 55
... of these connectors, then install the module to DRAFT v4Mb/s (Mbps) connection speed. The USB 2.0 module is purchased separately. Doing so will damage the motherboard! Chapter 1 ASUS X79-DELUXE 1-41 DO NOT connect a 1394 cable to the USB connector onboard if your chassis supports front panel USB ports. You can connect the front panel...
... of these connectors, then install the module to DRAFT v4Mb/s (Mbps) connection speed. The USB 2.0 module is purchased separately. Doing so will damage the motherboard! Chapter 1 ASUS X79-DELUXE 1-41 DO NOT connect a 1394 cable to the USB connector onboard if your chassis supports front panel USB ports. You can connect the front panel...
X79-DELUXE User's Manual
Page 57
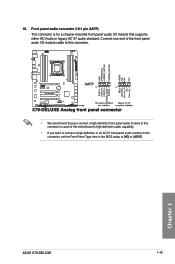
...one end of the front panel audio I /O module that you connect a high-definition front panel audio module to this connector to avail of the motherboard's high-definition audio capability. • If you want to connect a high-definition or an AC'97 front panel audio module to this connector, ...Panel Type item in the BIOS setup to this connector. • We recommend that supports either HD Audio or legacy AC`97 audio standard. Chapter 1 ASUS X79-DELUXE 1-43 Front panel audio connector (10-1 pin AAFP) This connector is for a chassis-mounted front panel audio I /O module cable to [HD] or ...
...one end of the front panel audio I /O module that you connect a high-definition front panel audio module to this connector to avail of the motherboard's high-definition audio capability. • If you want to connect a high-definition or an AC'97 front panel audio module to this connector, ...Panel Type item in the BIOS setup to this connector. • We recommend that supports either HD Audio or legacy AC`97 audio standard. Chapter 1 ASUS X79-DELUXE 1-43 Front panel audio connector (10-1 pin AAFP) This connector is for a chassis-mounted front panel audio I /O module cable to [HD] or ...

X79-DELUXE User's Manual
Page 61
Install the ASUS Q-Shield to the chassis' rear I /O panel. 2. The motherboard layout may vary with models, but the installation steps are for all models. 1. Chapter 2 ASUS X79-DELUXE 2-1 Place the motherboard into the chassis, ensuring that its rear I/O ports are aligned to the chassis rear I /O panel. Chapter 2: Basic installation Basic installation 2.1 Building your PC system 2 2.1.1 Motherboard installation The diagrams in this section are the same for reference only.
Install the ASUS Q-Shield to the chassis' rear I /O panel. 2. The motherboard layout may vary with models, but the installation steps are for all models. 1. Chapter 2 ASUS X79-DELUXE 2-1 Place the motherboard into the chassis, ensuring that its rear I/O ports are aligned to the chassis rear I /O panel. Chapter 2: Basic installation Basic installation 2.1 Building your PC system 2 2.1.1 Motherboard installation The diagrams in this section are the same for reference only.

X79-DELUXE User's Manual
Page 73
USB 2.0 ports 1-4 2. Optical S/PDIF Out port 11. Realtek® LAN (RJ-45) port** 4. Wi-Fi 802.11 a/b/g/n/ac Bluetooth V4.0* 5. 2.3 Motherboard rear and audio connections 2.3.1 Rear I /O ports*** *, ** and ***: Refer to the tables on the next page for Bluetooth/Wi-Fi module LEDs, LAN port LEDs, and audio port definitions. Intel® LAN (RJ-45) port** 3. USB BIOS Flashback button 7. USB 3.0 ports 5-6 10. ASUS X79-DELUXE 2-13 Chapter 2 Power external SATA 6Gb/s ports 1-2 8. Audio I /O connection Rear panel connectors 1. USB 3.0 ports 3-4 9. USB 3.0 ports 1-2 6.
USB 2.0 ports 1-4 2. Optical S/PDIF Out port 11. Realtek® LAN (RJ-45) port** 4. Wi-Fi 802.11 a/b/g/n/ac Bluetooth V4.0* 5. 2.3 Motherboard rear and audio connections 2.3.1 Rear I /O ports*** *, ** and ***: Refer to the tables on the next page for Bluetooth/Wi-Fi module LEDs, LAN port LEDs, and audio port definitions. Intel® LAN (RJ-45) port** 3. USB BIOS Flashback button 7. USB 3.0 ports 5-6 10. ASUS X79-DELUXE 2-13 Chapter 2 Power external SATA 6Gb/s ports 1-2 8. Audio I /O connection Rear panel connectors 1. USB 3.0 ports 3-4 9. USB 3.0 ports 1-2 6.
X79-DELUXE User's Manual
Page 79
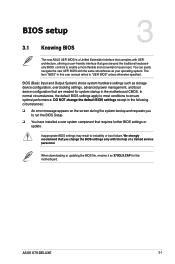
... BIOS settings apply to most conditions to instability or boot failure. Chapter 3 ASUS X79-DELUXE 3-1 When downloading or updating the BIOS file, rename it as X79DLX.CAP for system startup in the motherboard CMOS. BIOS (Basic Input and Output System) stores system hardware settings such as...the screen during the system bootup and requests you change the default BIOS settings except in this motherboard. Chapter 3: BIOS setup BIOS setup 3.1 Knowing BIOS 3 The new ASUS UEFI BIOS is a Unified Extensible Interface that complies with UEFI architecture, offering a user-friendly ...
... BIOS settings apply to most conditions to instability or boot failure. Chapter 3 ASUS X79-DELUXE 3-1 When downloading or updating the BIOS file, rename it as X79DLX.CAP for system startup in the motherboard CMOS. BIOS (Basic Input and Output System) stores system hardware settings such as...the screen during the system bootup and requests you change the default BIOS settings except in this motherboard. Chapter 3: BIOS setup BIOS setup 3.1 Knowing BIOS 3 The new ASUS UEFI BIOS is a Unified Extensible Interface that complies with UEFI architecture, offering a user-friendly ...

X79-DELUXE User's Manual
Page 81
Refer to the system. ASUS X79-DELUXE 3-3 To access the Advanced Mode, click Exit/Advanced Mode, then select Advanced Mode or press hot key for entering the BIOS setup program can be changed. Displays the CPU/motherboard temperature, CPU/5V/3.3V/12V voltage output, CPU/chassis/power fan speed Selects the display language of the...
Refer to the system. ASUS X79-DELUXE 3-3 To access the Advanced Mode, click Exit/Advanced Mode, then select Advanced Mode or press hot key for entering the BIOS setup program can be changed. Displays the CPU/motherboard temperature, CPU/5V/3.3V/12V voltage output, CPU/chassis/power fan speed Selects the display language of the...
X79-DELUXE User's Manual
Page 87
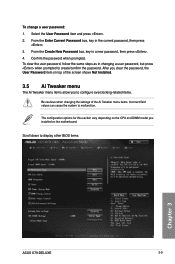
.... Be cautious when changing the settings of the Ai Tweaker menu items. Incorrect field values can cause the system to display other BIOS items. Chapter 3 ASUS X79-DELUXE 3-9 To clear the user password, follow the same steps as in the current password, then press . 3. Select the User Password item and press . ...screen shows Not Installed. 3.5 Ai Tweaker menu The Ai Tweaker menu items allow you clear the password, the User Password item on the motherboard. From the Create New Password box, key in a new password, then press . 4. To change a user password: 1. Scroll down to malfunction...
.... Be cautious when changing the settings of the Ai Tweaker menu items. Incorrect field values can cause the system to display other BIOS items. Chapter 3 ASUS X79-DELUXE 3-9 To clear the user password, follow the same steps as in the current password, then press . 3. Select the User Password item and press . ...screen shows Not Installed. 3.5 Ai Tweaker menu The Ai Tweaker menu items allow you clear the password, the User Password item on the motherboard. From the Create New Password box, key in a new password, then press . 4. To change a user password: 1. Scroll down to malfunction...

X79-DELUXE User's Manual
Page 97
... VCore Voltage to [Manual Mode]. The following item appears only when you to provide power for the DRAMs located on the right side of your motherboard. The values range from 0.800V to [Manual Mode] or [Offset Mode]. CPU VCORE Manual Voltage [Auto] Allows you set the CPU VCore Voltage to 1.700V... or keys to 1.990V with a 0.005V interval. The values range from 0.800V to provide power for the DRAMs located on the left side of your motherboard. DRAM Voltage (CHC, CHD) [Auto] Allows you set the CPU Core Voltage. The values range from 1.200V to adjust the value. Chapter...
... VCore Voltage to [Manual Mode]. The following item appears only when you to provide power for the DRAMs located on the right side of your motherboard. The values range from 0.800V to [Manual Mode] or [Offset Mode]. CPU VCORE Manual Voltage [Auto] Allows you set the CPU VCore Voltage to 1.700V... or keys to 1.990V with a 0.005V interval. The values range from 0.800V to provide power for the DRAMs located on the left side of your motherboard. DRAM Voltage (CHC, CHD) [Auto] Allows you set the CPU Core Voltage. The values range from 1.200V to adjust the value. Chapter...


