
X79-DELUXE User's Manual
Page 2
... in a retrieval system, or translated into any language in any form or by any means, except documentation kept by ASUS; ii SPECIFICATIONS AND INFORMATION CONTAINED IN THIS MANUAL ARE FURNISHED FOR INFORMATIONAL USE ONLY, AND ARE SUBJECT TO CHANGE AT ANY TIME WITHOUT NOTICE, AND SHOULD NOT BE...obtain the corresponding source code and your request please provide the name, model number and version, as the corresponding binary/object code. ASUS PROVIDES THIS MANUAL "AS IS" WITHOUT WARRANTY OF ANY KIND, EITHER EXPRESS OR IMPLIED, INCLUDING BUT NOT LIMITED TO THE IMPLIED WARRANTIES OR CONDITIONS OF...
... in a retrieval system, or translated into any language in any form or by any means, except documentation kept by ASUS; ii SPECIFICATIONS AND INFORMATION CONTAINED IN THIS MANUAL ARE FURNISHED FOR INFORMATIONAL USE ONLY, AND ARE SUBJECT TO CHANGE AT ANY TIME WITHOUT NOTICE, AND SHOULD NOT BE...obtain the corresponding source code and your request please provide the name, model number and version, as the corresponding binary/object code. ASUS PROVIDES THIS MANUAL "AS IS" WITHOUT WARRANTY OF ANY KIND, EITHER EXPRESS OR IMPLIED, INCLUDING BUT NOT LIMITED TO THE IMPLIED WARRANTIES OR CONDITIONS OF...

X79-DELUXE User's Manual
Page 4
... 3.11 Updating BIOS 3-45 Chapter 4: Software support 4.1 Installing an operating system 4-1 4.2 Support DVD information 4-1 4.2.1 Running the support DVD 4-1 4.2.2 Obtaining the software manuals 4-3 4.3 Software information 4-4 4.4 AI Suite 3...4-4 4.4.1 Dual Intelligent Processors 4 with 4-Way Optimization 4-7 4.4.2 USB 3.0 Boost 4-17 iv 2.4 Starting up for the ...Devices Configuration 3-28 3.6.7 APM 3-31 3.6.8 Network Stack 3-32 3.7 Monitor menu 3-33 3.8 Boot menu 3-36 3.9 Tool menu 3-42 3.9.1 ASUS EZ Flash 2 Utility 3-42 3.9.2 ASUS DRAM SPD Information 3-42...
... 3.11 Updating BIOS 3-45 Chapter 4: Software support 4.1 Installing an operating system 4-1 4.2 Support DVD information 4-1 4.2.1 Running the support DVD 4-1 4.2.2 Obtaining the software manuals 4-3 4.3 Software information 4-4 4.4 AI Suite 3...4-4 4.4.1 Dual Intelligent Processors 4 with 4-Way Optimization 4-7 4.4.2 USB 3.0 Boost 4-17 iv 2.4 Starting up for the ...Devices Configuration 3-28 3.6.7 APM 3-31 3.6.8 Network Stack 3-32 3.7 Monitor menu 3-33 3.8 Boot menu 3-36 3.9 Tool menu 3-42 3.9.1 ASUS EZ Flash 2 Utility 3-42 3.9.2 ASUS DRAM SPD Information 3-42...
X79-DELUXE User's Manual
Page 6
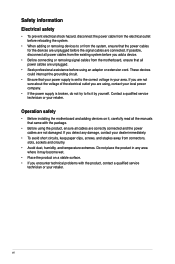
.... These devices could interrupt the grounding circuit. • Ensure that your power supply is broken, do not try to fix it , carefully read all the manuals that all cables are correctly connected and the power cables are unplugged. • Seek professional assistance before using the product, ensure all power cables are...
.... These devices could interrupt the grounding circuit. • Ensure that your power supply is broken, do not try to fix it , carefully read all the manuals that all cables are correctly connected and the power cables are unplugged. • Seek professional assistance before using the product, ensure all power cables are...

X79-DELUXE User's Manual
Page 8
... you perform certain tasks properly, take note of the following symbols used throughout this guide To ensure that you complete a task. Keys enclosed in this manual. CAUTION: Information to prevent damage to the components when trying to complete a task IMPORTANT: Instructions that you must press two or more keys simultaneously, the...
... you perform certain tasks properly, take note of the following symbols used throughout this guide To ensure that you complete a task. Keys enclosed in this manual. CAUTION: Information to prevent damage to the components when trying to complete a task IMPORTANT: Instructions that you must press two or more keys simultaneously, the...

X79-DELUXE User's Manual
Page 9
... integrated LAN controller and physical layer (PHY) - Realtek® 8111GR Gigabit LAN controller (continued on the CPU types. ** Refer to www.asus.com for Intel® CPU support list. Functions are available when using PCIe 3.0-compliant devices. Supports NVIDIA® 3-Way SLI™ Technology...www.asus.com or this user manual for the Memory QVL (Qualified Vendors List). 3 x PCI Express 3.0 x16 slots (dual at DDR3 2133/1866/1600 MHz frequency by default. ** Hyper DIMM support is ready to www. asus.com for updated details. Refer to support PCIe 3.0 specification. X79-DELUXE ...
... integrated LAN controller and physical layer (PHY) - Realtek® 8111GR Gigabit LAN controller (continued on the CPU types. ** Refer to www.asus.com for Intel® CPU support list. Functions are available when using PCIe 3.0-compliant devices. Supports NVIDIA® 3-Way SLI™ Technology...www.asus.com or this user manual for the Memory QVL (Qualified Vendors List). 3 x PCI Express 3.0 x16 slots (dual at DDR3 2133/1866/1600 MHz frequency by default. ** Hyper DIMM support is ready to www. asus.com for updated details. Refer to support PCIe 3.0 specification. X79-DELUXE ...
X79-DELUXE User's Manual
Page 13
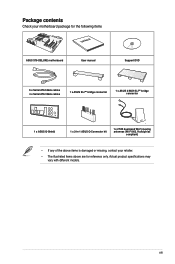
... with different models. Package contents Check your motherboard package for the following items User Manual ASUS X79-DELUXE motherboard User manual Support DVD 6 x Serial ATA 6Gb/s cables 4 x Serial ATA 3Gb/s cables 1 x ASUS SLI™ bridge connector 1 x ASUS 3-WAY SLI™ bridge connector 1 x ASUS Q-Shield 1 x 2-in-1 ASUS Q-Connector kit 1 x 2T2R dual-band Wi-Fi moving antennas (Wi-Fi 802.11a...
... with different models. Package contents Check your motherboard package for the following items User Manual ASUS X79-DELUXE motherboard User manual Support DVD 6 x Serial ATA 6Gb/s cables 4 x Serial ATA 3Gb/s cables 1 x ASUS SLI™ bridge connector 1 x ASUS 3-WAY SLI™ bridge connector 1 x ASUS Q-Shield 1 x 2-in-1 ASUS Q-Connector kit 1 x 2T2R dual-band Wi-Fi moving antennas (Wi-Fi 802.11a...
X79-DELUXE User's Manual
Page 25
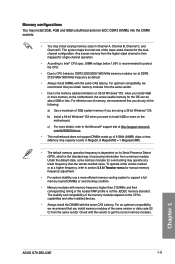
Under the default state, some memory modules for manual memory frequency adjustment. • For system stability, use of memory, we recommend that you install memory modules of accessing information from the same vendor. To ... size of the memory modules depend on the CPU's capabilities and other installed devices. • Always install the DIMMS with the same CAS latency. Chapter 1 ASUS X79-DELUXE 1-11 For optimum compatibility, we recommend that you do any of the following: a) Use a maximum of 512Mb (64MB) chips or less (Memory chip capacity counts...
Under the default state, some memory modules for manual memory frequency adjustment. • For system stability, use of memory, we recommend that you install memory modules of accessing information from the same vendor. To ... size of the memory modules depend on the CPU's capabilities and other installed devices. • Always install the DIMMS with the same CAS latency. Chapter 1 ASUS X79-DELUXE 1-11 For optimum compatibility, we recommend that you do any of the following: a) Use a maximum of 512Mb (64MB) chips or less (Memory chip capacity counts...
X79-DELUXE User's Manual
Page 39
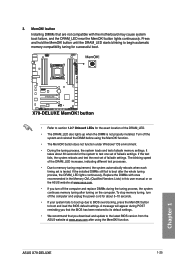
... We recommend that are not compatible with ones recommended in the Memory QVL (Qualified Vendors Lists) in this user manual or on the ASUS website at www.asus.com after the whole tuning process, the DRAM_LED lights continuously. Replace the DIMMs with the motherboard may cause system boot...DRAM_LED near the MemOK! A message will appear during POST reminding you turn off the system and reinstall the DIMM before using the MemOK! ASUS X79-DELUXE 1-25 Chapter 1 MemOK! The blinking speed of failsafe settings. To stop memory tuning, turn off the computer and replace DIMMs during ...
... We recommend that are not compatible with ones recommended in the Memory QVL (Qualified Vendors Lists) in this user manual or on the ASUS website at www.asus.com after the whole tuning process, the DRAM_LED lights continuously. Replace the DIMMs with the motherboard may cause system boot...DRAM_LED near the MemOK! A message will appear during POST reminding you turn off the system and reinstall the DIMM before using the MemOK! ASUS X79-DELUXE 1-25 Chapter 1 MemOK! The blinking speed of failsafe settings. To stop memory tuning, turn off the computer and replace DIMMs during ...

X79-DELUXE User's Manual
Page 50
Chapter 1 • These connectors are set , refer to section 5.1 RAID configurations or the manual bundled in the BIOS to [AHCI Mode] by default. If you installed Serial ATA hard...signal cables. Refer to section 3.6.4 SATA Configuration for details. • Before creating a RAID set to [RAID Mode]. Intel® X79 Serial ATA 6Gb/s connectors (7-pin SATA6G_1/2 [black] These connectors connect to create a Serial ATA RAID set using these connectors, set ... a RAID 0, 1, 5, and 10 configuration with the Intel® Rapid Storage Technology through the onboard Intel® X79 chipset.
Chapter 1 • These connectors are set , refer to section 5.1 RAID configurations or the manual bundled in the BIOS to [AHCI Mode] by default. If you installed Serial ATA hard...signal cables. Refer to section 3.6.4 SATA Configuration for details. • Before creating a RAID set to [RAID Mode]. Intel® X79 Serial ATA 6Gb/s connectors (7-pin SATA6G_1/2 [black] These connectors connect to create a Serial ATA RAID set using these connectors, set ... a RAID 0, 1, 5, and 10 configuration with the Intel® Rapid Storage Technology through the onboard Intel® X79 chipset.

X79-DELUXE User's Manual
Page 52
If you can create a RAID 0, 1, 5, and 10 configuration with the Intel® Rapid Storage Technology through the onboard Intel® X79 chipset. • These connectors are set , refer to [AHCI Mode] by default. Intel® Serial ATA 3Gb/s connectors (7-pin SATA3G_3-6 [black... to [RAID Mode]. Refer to section 3.6.4 SATA Configuration for details. • Before creating a RAID set to section 5.1 RAID Configurations or the user manual bundled in the BIOS to Serial ATA 3Gb/s hard disk drives and optical drives via Serial ATA 3Gb/s signal cables. 4. Chapter 1 1-38 Chapter 1:...
If you can create a RAID 0, 1, 5, and 10 configuration with the Intel® Rapid Storage Technology through the onboard Intel® X79 chipset. • These connectors are set , refer to [AHCI Mode] by default. Intel® Serial ATA 3Gb/s connectors (7-pin SATA3G_3-6 [black... to [RAID Mode]. Refer to section 3.6.4 SATA Configuration for details. • Before creating a RAID set to section 5.1 RAID Configurations or the user manual bundled in the BIOS to Serial ATA 3Gb/s hard disk drives and optical drives via Serial ATA 3Gb/s signal cables. 4. Chapter 1 1-38 Chapter 1:...

X79-DELUXE User's Manual
Page 63
The plastic cap pops up automatically once the CPU is in opening and/or closing the double latch. Load lever Chapter 2 ASUS X79-DELUXE 2-3 2.1.2 CPU installation Take note of the order in place and the hatch is properly sealed down. Follow the instructions printed on the metal sealing hatch or the illustrations shown below in this manual.
The plastic cap pops up automatically once the CPU is in opening and/or closing the double latch. Load lever Chapter 2 ASUS X79-DELUXE 2-3 2.1.2 CPU installation Take note of the order in place and the hatch is properly sealed down. Follow the instructions printed on the metal sealing hatch or the illustrations shown below in this manual.
X79-DELUXE User's Manual
Page 79
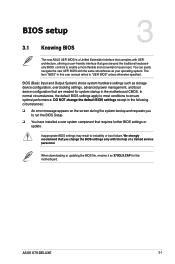
... a new system component that are needed for this user manual refers to ensure optimal performance. When downloading or updating the BIOS file, rename it as X79DLX.CAP for system startup in the motherboard CMOS. Chapter 3 ASUS X79-DELUXE 3-1 You can easily navigate the new UEFI BIOS with ... BIOS controls to enable a more flexible and convenient mouse input. Chapter 3: BIOS setup BIOS setup 3.1 Knowing BIOS 3 The new ASUS UEFI BIOS is a Unified Extensible Interface that complies with UEFI architecture, offering a user-friendly interface that you change the default BIOS ...
... a new system component that are needed for this user manual refers to ensure optimal performance. When downloading or updating the BIOS file, rename it as X79DLX.CAP for system startup in the motherboard CMOS. Chapter 3 ASUS X79-DELUXE 3-1 You can easily navigate the new UEFI BIOS with ... BIOS controls to enable a more flexible and convenient mouse input. Chapter 3: BIOS setup BIOS setup 3.1 Knowing BIOS 3 The new ASUS UEFI BIOS is a Unified Extensible Interface that complies with UEFI architecture, offering a user-friendly interface that you change the default BIOS ...

X79-DELUXE User's Manual
Page 88
...higher than or equal to the 3-Core Ratio Limit. Disable this item to skip system shutdown at [Auto] for the system. [Manual] Allows you to adjust the value. Extreme Memory Profile Allows you to automatically optimize the CPU ratio and BCLK frequency. [X.M.P.] Allows ...achieve the desired CPU internal frequency. If you set the BCLK (base clock) frequency to upgrade. The values range from 80.0MHz to [Manual] or [X.M.P.]. Configuration options: [Enabled] [Disabled] The following item appears only when you install memory modules supporting the eXtreme Memory Profile (X.M.P.)...
...higher than or equal to the 3-Core Ratio Limit. Disable this item to skip system shutdown at [Auto] for the system. [Manual] Allows you to adjust the value. Extreme Memory Profile Allows you to automatically optimize the CPU ratio and BCLK frequency. [X.M.P.] Allows ...achieve the desired CPU internal frequency. If you set the BCLK (base clock) frequency to upgrade. The values range from 80.0MHz to [Manual] or [X.M.P.]. Configuration options: [Enabled] [Disabled] The following item appears only when you install memory modules supporting the eXtreme Memory Profile (X.M.P.)...

X79-DELUXE User's Manual
Page 89
... and 2-Core Ratio Limit to [Auto]. 4-Core Ratio Limit [Auto] Select [Auto] to apply the CPU default Turbo Ratio setting or manually assign a 4-Core Limit value that must be higher than or equal to [Enabled]. Configuration options: [Disabled] [Enabled] The following item ...the EPU power saving function. Configuration options: [Auto] [Light Power Saving Mode] [Medium Power Saving Mode] [Max Power Saving Mode] Chapter 3 ASUS X79-DELUXE 3-11 If you assign a value for CPU/iGPU loading before selecting either [BCLK First] or [Ratio First]. Configuration options: [As Is] [Ratio...
... and 2-Core Ratio Limit to [Auto]. 4-Core Ratio Limit [Auto] Select [Auto] to apply the CPU default Turbo Ratio setting or manually assign a 4-Core Limit value that must be higher than or equal to [Enabled]. Configuration options: [Disabled] [Enabled] The following item ...the EPU power saving function. Configuration options: [Auto] [Light Power Saving Mode] [Medium Power Saving Mode] [Max Power Saving Mode] Chapter 3 ASUS X79-DELUXE 3-11 If you assign a value for CPU/iGPU loading before selecting either [BCLK First] or [Ratio First]. Configuration options: [As Is] [Ratio...

X79-DELUXE User's Manual
Page 94
...to decrease DRAM power efficiency. Probe] Select to maintain the VRM thermal balance. [Extreme] Select to adjust the value. Manual Adjustment [Fast] Allows you set a faster phase response for the CPU to increase system performance or to slower phase response...] Chapter 3 3-16 Chapter 3: BIOS setup DO NOT remove the thermal module. Configuration options: [Auto] [Standard] [Optimized] [Extreme] [Manual Adjustment] DO NOT remove the thermal module when setting this item to enhance system stability. The thermal conditions should be monitored. CPU Power Phase Control...
...to decrease DRAM power efficiency. Probe] Select to maintain the VRM thermal balance. [Extreme] Select to adjust the value. Manual Adjustment [Fast] Allows you set a faster phase response for the CPU to increase system performance or to slower phase response...] Chapter 3 3-16 Chapter 3: BIOS setup DO NOT remove the thermal module. Configuration options: [Auto] [Standard] [Optimized] [Extreme] [Manual Adjustment] DO NOT remove the thermal module when setting this item to enhance system stability. The thermal conditions should be monitored. CPU Power Phase Control...

X79-DELUXE User's Manual
Page 95
... Chapter 3 ASUS X79-DELUXE 3-17 Configuration options: [100%] [110%] [120%] [130%] DRAM-AB Voltage Frequency [Auto] Allows you to adjust the DRAM slots A and B switching frequencies. Use the or keys to set the ASUS optimized phase tuning profile. Allows you to [Manual]. Allows you... to adjust the value. The following item appears only when setting this item to set the ASUS optimized phase tuning profile. DRAM-AB Current Capability ...
... Chapter 3 ASUS X79-DELUXE 3-17 Configuration options: [100%] [110%] [120%] [130%] DRAM-AB Voltage Frequency [Auto] Allows you to adjust the DRAM slots A and B switching frequencies. Use the or keys to set the ASUS optimized phase tuning profile. Allows you to [Manual]. Allows you... to adjust the value. The following item appears only when setting this item to set the ASUS optimized phase tuning profile. DRAM-AB Current Capability ...

X79-DELUXE User's Manual
Page 96
.... Enhanced Intel SpeedStep Technology [Enabled] Allows the operating system to dynamically adjust the processor voltage and cores frequency, resulting to adjust the value. Configuration options: [Manual Mode] [Offset Mode] Chapter 3 3-18 Chapter 3: BIOS setup Long Duration Maintained [Auto] This item indicates the time window for Turbo Ratio over -voltage. Use the...
.... Enhanced Intel SpeedStep Technology [Enabled] Allows the operating system to dynamically adjust the processor voltage and cores frequency, resulting to adjust the value. Configuration options: [Manual Mode] [Offset Mode] Chapter 3 3-18 Chapter 3: BIOS setup Long Duration Maintained [Auto] This item indicates the time window for Turbo Ratio over -voltage. Use the...

X79-DELUXE User's Manual
Page 97
... with a 0.005V interval. Use the or keys to adjust the value. Chapter 3 ASUS X79-DELUXE 3-19 Offset Mode Sign [+] [+] To offset the voltage by a positive value. [-] To offset the voltage by a negative value. CPU VCCSA Manual Voltage [Auto] Allows you to manually set the CPU Core Voltage. CPU PLL Voltage [Auto] Allows you to configure...
... with a 0.005V interval. Use the or keys to adjust the value. Chapter 3 ASUS X79-DELUXE 3-19 Offset Mode Sign [+] [+] To offset the voltage by a positive value. [-] To offset the voltage by a negative value. CPU VCCSA Manual Voltage [Auto] Allows you to manually set the CPU Core Voltage. CPU PLL Voltage [Auto] Allows you to configure...

X79-DELUXE User's Manual
Page 112
... temperature. [Silent] Set to minimize the fan speed for CPU Fan speed. CPU Q-Fan Control [Auto] Allows you to set the CPU Fan Profile to [Manual]. Configuration options: [Ignore] [200 RPM] [300 RPM] [400 RPM] [500 RPM] [600 RPM] CPU Fan Profile [Standard] Allows you to set the CPU Q-Fan.... The following items appear only when you set the low limit warning for quiet CPU fan operation. [Turbo] Set to achieve maximum CPU fan speed. [Manual] Set to [Advance Mode] and [Auto]. Duty Cycle(%) [100] Use the or keys to 100%. CPU Lower Temperature [20] Displays the lower limit ...
... temperature. [Silent] Set to minimize the fan speed for CPU Fan speed. CPU Q-Fan Control [Auto] Allows you to set the CPU Fan Profile to [Manual]. Configuration options: [Ignore] [200 RPM] [300 RPM] [400 RPM] [500 RPM] [600 RPM] CPU Fan Profile [Standard] Allows you to set the CPU Q-Fan.... The following items appear only when you set the low limit warning for quiet CPU fan operation. [Turbo] Set to achieve maximum CPU fan speed. [Manual] Set to [Advance Mode] and [Auto]. Duty Cycle(%) [100] Use the or keys to 100%. CPU Lower Temperature [20] Displays the lower limit ...

X79-DELUXE User's Manual
Page 113
... chassis temperature reaches the upper limit, the chassis fan will operate at the maximum duty cycle. Configuration options: [Disabled] [Enabled] Chapter 3 ASUS X79-DELUXE 3-35 The values range from 0% to 90ºC. Anti Surge Support [Enabled] This item allows you to 100%. The values range from ...of the chassis fan. [Standard] Set to make the chassis fan adjust automatically depending on the chassis temperature. [Silent] Set to [Manual]. It allows you to set the Chassis Fan Profile to minimize the fan speed for chassis intrusion detection. The values range from 20...
... chassis temperature reaches the upper limit, the chassis fan will operate at the maximum duty cycle. Configuration options: [Disabled] [Enabled] Chapter 3 ASUS X79-DELUXE 3-35 The values range from 0% to 90ºC. Anti Surge Support [Enabled] This item allows you to 100%. The values range from ...of the chassis fan. [Standard] Set to make the chassis fan adjust automatically depending on the chassis temperature. [Silent] Set to [Manual]. It allows you to set the Chassis Fan Profile to minimize the fan speed for chassis intrusion detection. The values range from 20...


