User Manual
Page 2
.... Where the applicable license entitles you to duly provide complete source code as stated in this manual may or may obtain it from https://www.asus.com/support/ or (2) for free by ASUS; ASUSTeK is valid to this information. E16279 Revised Edition V7 February 2020 Copyright© 2020...Dept. 15 Li Te Rd., Beitou, Taipei 112 Taiwan In your contact details so that is defaced or missing. All Rights Reserved. ASUS PROVIDES THIS MANUAL "AS IS" WITHOUT WARRANTY OF ANY KIND, EITHER EXPRESS OR IMPLIED, INCLUDING BUT NOT LIMITED TO THE IMPLIED WARRANTIES OR CONDITIONS OF ...
.... Where the applicable license entitles you to duly provide complete source code as stated in this manual may or may obtain it from https://www.asus.com/support/ or (2) for free by ASUS; ASUSTeK is valid to this information. E16279 Revised Edition V7 February 2020 Copyright© 2020...Dept. 15 Li Te Rd., Beitou, Taipei 112 Taiwan In your contact details so that is defaced or missing. All Rights Reserved. ASUS PROVIDES THIS MANUAL "AS IS" WITHOUT WARRANTY OF ANY KIND, EITHER EXPRESS OR IMPLIED, INCLUDING BUT NOT LIMITED TO THE IMPLIED WARRANTIES OR CONDITIONS OF ...

User Manual
Page 7
... all cables are correctly connected and the power cables are not damaged. Do not place the product in your retailer. If possible, disconnect all the manuals that came with the product, contact a qualified service technician or your dealer immediately. • To avoid short circuits, keep paper clips, screws, and staples away...
... all cables are correctly connected and the power cables are not damaged. Do not place the product in your retailer. If possible, disconnect all the manuals that came with the product, contact a qualified service technician or your dealer immediately. • To avoid short circuits, keep paper clips, screws, and staples away...
User Manual
Page 9
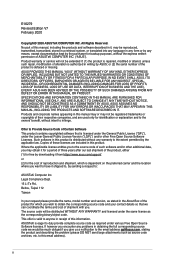
... yourself when trying to emphasize a word or a phrase. Example: means that you perform certain tasks properly, take note of the following symbols used throughout this manual. Conventions used in the less-than and greater-than sign means that you must press the enclosed key.
... yourself when trying to emphasize a word or a phrase. Example: means that you perform certain tasks properly, take note of the following symbols used throughout this manual. Conventions used in the less-than and greater-than sign means that you must press the enclosed key.
User Manual
Page 13
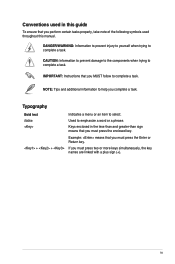
...Dual Front Panel USB 3.1 Gen 1 Support ASUS Q-Design - ASUS Q-Code (80 port) - ASUS CrashFree BIOS 3 - xiii ASUS Q-Shield - ASUS Q-DIMM ASUS EZ DIY - ASUS MyLogo 2 - Multi-language BIOS TPM header UEFI BIOS - ASUS Q-Slot - WS C621E SAGE specifications summary Model Name ASUS Special Features BIOS Features Manageability Operating System Form Factor WS C621E SAGE WS C621E SAGE (BMC) CPU Power - Most advanced options...® 10 64-bit EEB Form Factor, 12"x 13" • Specifications are subject to change without notice. • Visit the ASUS website for the software manual.
...Dual Front Panel USB 3.1 Gen 1 Support ASUS Q-Design - ASUS Q-Code (80 port) - ASUS CrashFree BIOS 3 - xiii ASUS Q-Shield - ASUS Q-DIMM ASUS EZ DIY - ASUS MyLogo 2 - Multi-language BIOS TPM header UEFI BIOS - ASUS Q-Slot - WS C621E SAGE specifications summary Model Name ASUS Special Features BIOS Features Manageability Operating System Form Factor WS C621E SAGE WS C621E SAGE (BMC) CPU Power - Most advanced options...® 10 64-bit EEB Form Factor, 12"x 13" • Specifications are subject to change without notice. • Visit the ASUS website for the software manual.
User Manual
Page 14
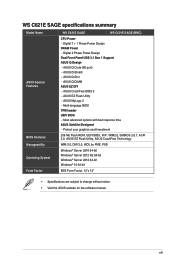
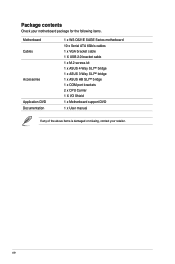
Package contents Check your motherboard package for the following items. Motherboard Cables Accessories Application DVD Documentation 1 x WS C621E SAGE Series motherboard 10 x Serial ATA 6Gb/s cables 1 x VGA bracket cable 1 X USB 2.0 bracket cable 1 x M.2 screws kit 1 x ASUS 4-Way SLI™ bridge 1 x ASUS 3-Way SLI™ bridge 1 x ASUS HB SLI™ bridge 1 x COM port brackets 2 x CPU Carrier 1 X I/O Shield 1 x Motherboard support DVD 1 x User manual If any of the above items is damaged or missing, contact your retailer. xiv
Package contents Check your motherboard package for the following items. Motherboard Cables Accessories Application DVD Documentation 1 x WS C621E SAGE Series motherboard 10 x Serial ATA 6Gb/s cables 1 x VGA bracket cable 1 X USB 2.0 bracket cable 1 x M.2 screws kit 1 x ASUS 4-Way SLI™ bridge 1 x ASUS 3-Way SLI™ bridge 1 x ASUS HB SLI™ bridge 1 x COM port brackets 2 x CPU Carrier 1 X I/O Shield 1 x Motherboard support DVD 1 x User manual If any of the above items is damaged or missing, contact your retailer. xiv
User Manual
Page 72
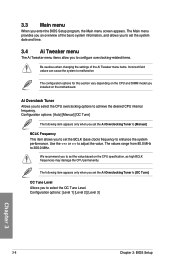
... provides you an overview of the Ai Tweaker menu items. Incorrect field values can cause the system to enhance the system performance. Configuration options: [Auto] [Manual] [OC Tune] The following item appears only when you to select the CPU overclocking options to [OC Tune]. We recommend you set the Ai Overclocking... Tweaker menu items allow you to configure overclocking-related items. Be cautious when changing the settings of the basic system information, and allows you to [Manual]. The values range from 80.0 MHz to adjust the value.
... provides you an overview of the Ai Tweaker menu items. Incorrect field values can cause the system to enhance the system performance. Configuration options: [Auto] [Manual] [OC Tune] The following item appears only when you to select the CPU overclocking options to [OC Tune]. We recommend you set the Ai Overclocking... Tweaker menu items allow you to configure overclocking-related items. Be cautious when changing the settings of the basic system information, and allows you to [Manual]. The values range from 80.0 MHz to adjust the value.
User Manual
Page 74
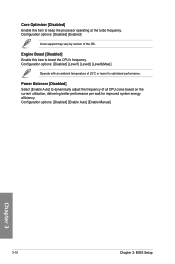
... the frequency of all CPU cores based on the current utilization, delivering better performance per watt for optimized performance. Configuration options: [Disabled] [Enable Auto] [Enable Manual] Chapter 3 3-10 Chapter 3: BIOS Setup
... the frequency of all CPU cores based on the current utilization, delivering better performance per watt for optimized performance. Configuration options: [Disabled] [Enable Auto] [Enable Manual] Chapter 3 3-10 Chapter 3: BIOS Setup

User Manual
Page 87
... the menus and select the menu options. The RAID BIOS setup screens shown in this manual for reference only and may not exactly match the items on the system. 2. Turn on your screen. Delete RAID Volume 3. Chapter 4 ASUS WS C621E SAGE 4-3 Before you proceed, ensure that are for more information. To launch the Intel®...
... the menus and select the menu options. The RAID BIOS setup screens shown in this manual for reference only and may not exactly match the items on the system. 2. Turn on your screen. Delete RAID Volume 3. Chapter 4 ASUS WS C621E SAGE 4-3 Before you proceed, ensure that are for more information. To launch the Intel®...
User Manual
Page 95
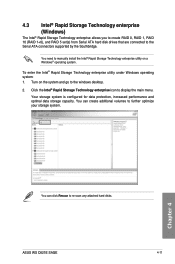
... Windows operating system: 1. Your storage system is configured for data protection, increased performance and optimal data storage capacity. Chapter 4 You can create additional volumes to manually install the Intel® Rapid Storage Technology enterprise utility on the system and go to re-scan any attached hard disks. Click the Intel®... you to create RAID 0, RAID 1, RAID 10 (RAID 1+0), and RAID 5 set(s) from Serial ATA hard disk drives that are connected to display the main menu. ASUS WS C621E SAGE 4-11
... Windows operating system: 1. Your storage system is configured for data protection, increased performance and optimal data storage capacity. Chapter 4 You can create additional volumes to manually install the Intel® Rapid Storage Technology enterprise utility on the system and go to re-scan any attached hard disks. Click the Intel®... you to create RAID 0, RAID 1, RAID 10 (RAID 1+0), and RAID 5 set(s) from Serial ATA hard disk drives that are connected to display the main menu. ASUS WS C621E SAGE 4-11
User Manual
Page 108
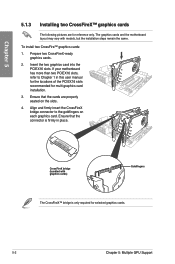
...™ graphics cards: 1. The graphics cards and the motherboard layout may vary with graphics cards) Goldfingers The CrossFireX™ bridge is firmly in this user manual for the locations of the PCIEX16 slots recommended for multi-graphics card installation. 3. Ensure that the cards are for selected graphics cards. 5-2 Chapter 5: Multiple GPU...
...™ graphics cards: 1. The graphics cards and the motherboard layout may vary with graphics cards) Goldfingers The CrossFireX™ bridge is firmly in this user manual for the locations of the PCIEX16 slots recommended for multi-graphics card installation. 3. Ensure that the cards are for selected graphics cards. 5-2 Chapter 5: Multiple GPU...

User Manual
Page 109
...the goldfingers on the slots. 4. Insert the three graphics card into the PCIEX16 slots. Ensure that the cards are firmly in this user manual for the locations of the PCIEX16 slots recommended for multi-graphics card installation. 3. Connect three independent auxiliary power sources from the power supply... are properly seated on each graphics card. Align and firmly insert the two CrossFireX™ bridge connectors to the graphics card. ASUS WS C621E SAGE 5-3 Connect a VGA or a DVI cable to Chapter 1 in place. 5. Prepare three CrossFireX™-ready graphics cards. 2.
...the goldfingers on the slots. 4. Insert the three graphics card into the PCIEX16 slots. Ensure that the cards are firmly in this user manual for the locations of the PCIEX16 slots recommended for multi-graphics card installation. 3. Connect three independent auxiliary power sources from the power supply... are properly seated on each graphics card. Align and firmly insert the two CrossFireX™ bridge connectors to the graphics card. ASUS WS C621E SAGE 5-3 Connect a VGA or a DVI cable to Chapter 1 in place. 5. Prepare three CrossFireX™-ready graphics cards. 2.

User Manual
Page 110
... are properly seated on each graphics card. Insert the four graphics cards into the PCIEX16 slots. Ensure that the cards are firmly in this user manual for the locations of the PCIEX16 slots recommended for multi-graphics card installation. 3. Connect a VGA or a DVI cable to the four graphics cards separately. 6. Refer...
... are properly seated on each graphics card. Insert the four graphics cards into the PCIEX16 slots. Ensure that the cards are firmly in this user manual for the locations of the PCIEX16 slots recommended for multi-graphics card installation. 3. Connect a VGA or a DVI cable to the four graphics cards separately. 6. Refer...
User Manual
Page 113
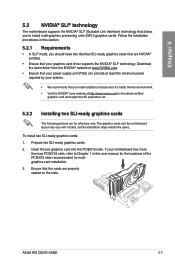
...technology. Follow the installation procedures in this section. 5.2.1 Requirements • In SLI® mode, you to Chapter 1 in this user manual for the locations of the PCIEX16 slots recommended for multigraphics card installation. 3. To install two SLI-ready graphics cards: 1. Insert the ... and supported 3D application list. 5.2.2 Installing two SLI-ready graphics cards The following pictures are properly seated on the slots. ASUS WS C621E SAGE 5-7 The graphics cards and the motherboard layout may vary with models, but the installation steps remain the same. Download the ...
...technology. Follow the installation procedures in this section. 5.2.1 Requirements • In SLI® mode, you to Chapter 1 in this user manual for the locations of the PCIEX16 slots recommended for multigraphics card installation. 3. To install two SLI-ready graphics cards: 1. Insert the ... and supported 3D application list. 5.2.2 Installing two SLI-ready graphics cards The following pictures are properly seated on the slots. ASUS WS C621E SAGE 5-7 The graphics cards and the motherboard layout may vary with models, but the installation steps remain the same. Download the ...

User Manual
Page 114
Chapter 5 4. Ensure that the connector is firmly in this user manual for locations of the PCIEX16 slots recommended for multi-graphics card installation. 3. Connect a VGA or a DVI cable to the two graphics cards separately. 6. Insert the ...
Chapter 5 4. Ensure that the connector is firmly in this user manual for locations of the PCIEX16 slots recommended for multi-graphics card installation. 3. Connect a VGA or a DVI cable to the two graphics cards separately. 6. Insert the ...
User Manual
Page 115
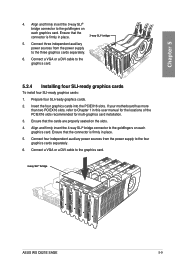
... to Chapter 1 in this user manual for the locations of the PCIEX16 slots recommended for multi-graphics card installation. 3. Chapter 5 4. Insert the four graphics cards into the PCIEX16 slots. If your motherboard has more than two PCIEX16 slots, refer to the graphics card. 4-way SLI® bridge ASUS WS C621E SAGE 5-9 Prepare four SLI-ready...
... to Chapter 1 in this user manual for the locations of the PCIEX16 slots recommended for multi-graphics card installation. 3. Chapter 5 4. Insert the four graphics cards into the PCIEX16 slots. If your motherboard has more than two PCIEX16 slots, refer to the graphics card. 4-way SLI® bridge ASUS WS C621E SAGE 5-9 Prepare four SLI-ready...


