
VN247 Series User Guide for English Edition
Page 15
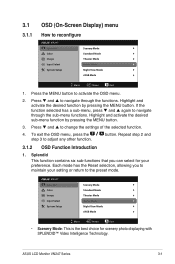
... 3.1.2 OSD Function Introduction 1. If the function selected has a sub-menu, press and again to reconfigure VN247 Splendid Color Image Input Select System Setup Scenery Mode Standard Mode Theater Mode Game Mode Night View Mode sRGB Mode Move Menu Exit 1. button.... Splendid This function contains six sub-functions that you to maintain your preference. ASUS LCD Monitor VN247 Series 3-1 Highlight and activate ...
... 3.1.2 OSD Function Introduction 1. If the function selected has a sub-menu, press and again to reconfigure VN247 Splendid Color Image Input Select System Setup Scenery Mode Standard Mode Theater Mode Game Mode Night View Mode sRGB Mode Move Menu Exit 1. button.... Splendid This function contains six sub-functions that you to maintain your preference. ASUS LCD Monitor VN247 Series 3-1 Highlight and activate ...
VN247 Series User Guide for English Edition
Page 16
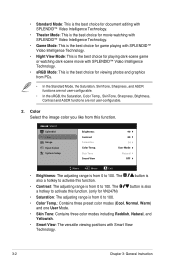
...50 User Mode Natural OFF Move Menu Exit • Brightness: The adjusting range is from 0 to 100. VN247 Splendid Color Image Input Select System Setup Brightness Contrast Saturation Color Temp. • Standard Mode: This is the best choice for document editing with SPLENDID™ Video Intelligence ...8482; Video Intelligence Technology. • sRGB Mode: This is the best choice for VN247N) button is also • Saturation: The adjusting range is from 0 to 100. • Color Temp.: Contains three preset color modes (Cool, Normal, Warm) and one User Mode. • Skin Tone: ...
...50 User Mode Natural OFF Move Menu Exit • Brightness: The adjusting range is from 0 to 100. VN247 Splendid Color Image Input Select System Setup Brightness Contrast Saturation Color Temp. • Standard Mode: This is the best choice for document editing with SPLENDID™ Video Intelligence ...8482; Video Intelligence Technology. • sRGB Mode: This is the best choice for VN247N) button is also • Saturation: The adjusting range is from 0 to 100. • Color Temp.: Contains three preset color modes (Cool, Normal, Warm) and one User Mode. • Skin Tone: ...
VN247 Series User Guide for English Edition
Page 17
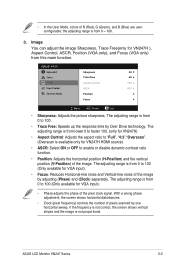
...the image by adjusting (Phase) and (Clock) separately. The adjusting range is from this main function. ASUS LCD Monitor VN247 Series 3-3 VN247 Splendid Sharpness 40 Color Trace Free 60 Image Aspect Control Full Input Select ASCR OFF System Setup Position Focus Move Menu Exit ...phase adjustment, the screen shows horizontal disturbances. • Clock (pixel frequency) controls the number of the image. • In the User Mode, colors of the pixel clock signal. the adjusting range is available only for VGA input). • Phase adjusts the phase of R (Red), G ...
...the image by adjusting (Phase) and (Clock) separately. The adjusting range is from this main function. ASUS LCD Monitor VN247 Series 3-3 VN247 Splendid Sharpness 40 Color Trace Free 60 Image Aspect Control Full Input Select ASCR OFF System Setup Position Focus Move Menu Exit ...phase adjustment, the screen shows horizontal disturbances. • Clock (pixel frequency) controls the number of the image. • In the User Mode, colors of the pixel clock signal. the adjusting range is available only for VGA input). • Phase adjusts the phase of R (Red), G ...
VN247 Series User Guide for English Edition
Page 18
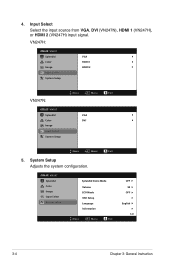
VN247 Splendid Color Image Input Select System Setup Splendid Demo Mode Volume ECO Mode OSD Setup Language Information Move Menu Exit OFF 50 OFF English 1/2 3-4 Chapter 3: General Instruction 4. VN247H: VN247 Splendid Color Image Input Select System Setup VGA HDMI 1 HDMI 2 VN247N: VN247 Splendid Color Image Input Select System Setup Move Menu Exit VGA DVI Move Menu Exit 5. System Setup Adjusts the system configuration. Input Select Select the input source from VGA, DVI (VN247N), HDMI 1 (VN247H), or HDMI 2 (VN247H) input signal.
VN247 Splendid Color Image Input Select System Setup Splendid Demo Mode Volume ECO Mode OSD Setup Language Information Move Menu Exit OFF 50 OFF English 1/2 3-4 Chapter 3: General Instruction 4. VN247H: VN247 Splendid Color Image Input Select System Setup VGA HDMI 1 HDMI 2 VN247N: VN247 Splendid Color Image Input Select System Setup Move Menu Exit VGA DVI Move Menu Exit 5. System Setup Adjusts the system configuration. Input Select Select the input source from VGA, DVI (VN247N), HDMI 1 (VN247H), or HDMI 2 (VN247H) input signal.
VN247 Series User Guide for English Edition
Page 19
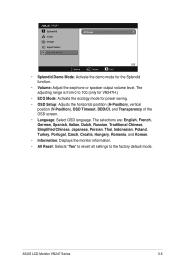
The adjusting range is from 0 to the factory default mode. VN247 Splendid Color Image Input Select System Setup All Reset 2/2 Move Menu Exit • Splendid Demo Mode: Activate the demo mode for power saving. • OSD Setup:... Adjusts the horizontal postition (H-Position), vertical position (V-Position), OSD Timeout, DDD/CI, and Transparency of the OSD screen. • Language: Select OSD language. ASUS LCD Monitor VN247...
The adjusting range is from 0 to the factory default mode. VN247 Splendid Color Image Input Select System Setup All Reset 2/2 Move Menu Exit • Splendid Demo Mode: Activate the demo mode for power saving. • OSD Setup:... Adjusts the horizontal postition (H-Position), vertical position (V-Position), OSD Timeout, DDD/CI, and Transparency of the OSD screen. • Language: Select OSD language. ASUS LCD Monitor VN247...
VN247 Series User Guide for English Edition
Page 21
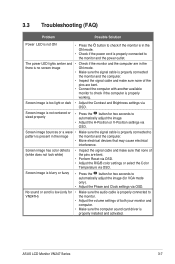
... too light or dark • Adjust the Contrast and Brightness settings via OSD. No sound or sond is properly installed and activated. ASUS LCD Monitor VN247 Series 3-7 Screen image is blurry or fuzzy • Press the button for two seconds to automatically adjust the image (for •... Adjust the volume settings of the pins are bent. • Perform Reset via OSD. • Adjust the R/G/B color settings or select the Color Temperature via OSD. Screen image has color defects (white does not look white) • Inspect the signal cable and make sure none of both your monitor and...
... too light or dark • Adjust the Contrast and Brightness settings via OSD. No sound or sond is properly installed and activated. ASUS LCD Monitor VN247 Series 3-7 Screen image is blurry or fuzzy • Press the button for two seconds to automatically adjust the image (for •... Adjust the volume settings of the pins are bent. • Perform Reset via OSD. • Adjust the R/G/B color settings or select the Color Temperature via OSD. Screen image has color defects (white does not look white) • Inspect the signal cable and make sure none of both your monitor and...