User Manual
Page 2
...AND ARE SUBJECT TO CHANGE AT ANY TIME WITHOUT NOTICE, AND SHOULD NOT BE CONSTRUED AS A COMMITMENT BY ASUS. Assembling .the.monitor Base 2-2 Chapter.3:. Troubleshooting.(FAQ 3-7 3.4. Product warranty or service will not be extended if: (1) the ...in any form or by any means, except documentation kept by ASUS; Package.contents 1-1 1.3. General.Instruction.. 3.1. Supported.operating.modes 3-8 3.5 HDMI Supported Primary Timings 3-9 Copyright © 2009 ASUSTeK COMPUTER INC. Table of the LCD monitor 1-7 Chapter.2:. Product.introduction. 1.1. Welcome 1-1 1.2. Connect Cables ...
...AND ARE SUBJECT TO CHANGE AT ANY TIME WITHOUT NOTICE, AND SHOULD NOT BE CONSTRUED AS A COMMITMENT BY ASUS. Assembling .the.monitor Base 2-2 Chapter.3:. Troubleshooting.(FAQ 3-7 3.4. Product warranty or service will not be extended if: (1) the ...in any form or by any means, except documentation kept by ASUS; Package.contents 1-1 1.3. General.Instruction.. 3.1. Supported.operating.modes 3-8 3.5 HDMI Supported Primary Timings 3-9 Copyright © 2009 ASUSTeK COMPUTER INC. Table of the LCD monitor 1-7 Chapter.2:. Product.introduction. 1.1. Welcome 1-1 1.2. Connect Cables ...
User Manual
Page 4
... it may result in fire or electric shock. • Avoid dust, humidity, and temperature extremes. Safety information • Before setting up the monitor, carefully read all cables are correctly connected and the power cables are not sure of the type of power supply to your home, consult your... local power standard. • Do not overload power strips and extention cords. This will not be operated only from damage due to open the monitor cabinet. Never place this product near or over a radiator or heat source unless proper ventilation is broken, do not try to power surges. &#...
... it may result in fire or electric shock. • Avoid dust, humidity, and temperature extremes. Safety information • Before setting up the monitor, carefully read all cables are correctly connected and the power cables are not sure of the type of power supply to your home, consult your... local power standard. • Do not overload power strips and extention cords. This will not be operated only from damage due to open the monitor cabinet. Never place this product near or over a radiator or heat source unless proper ventilation is broken, do not try to power surges. &#...
User Manual
Page 5
The.following.symptoms.are.normal.with the LCD. NOTE: Tips and additional information to complete a task. When lifting or carrying the monitor, grasp the edges of the monitor. Do not lift the display by yourself! Turn your dealer or service center to fix it is displayed for hours, ... afterimage of the previous screen may remain after switching the image. Never spray cleaner directly on the desktop pattern you lift or reposition your monitor, it . Do not repair the screen by the stand or the cord. • Cleaning. Conventions.used.in.this.guide WARNING: Information...
The.following.symptoms.are.normal.with the LCD. NOTE: Tips and additional information to complete a task. When lifting or carrying the monitor, grasp the edges of the monitor. Do not lift the display by yourself! Turn your dealer or service center to fix it is displayed for hours, ... afterimage of the previous screen may remain after switching the image. Never spray cleaner directly on the desktop pattern you lift or reposition your monitor, it . Do not repair the screen by the stand or the cord. • Cleaning. Conventions.used.in.this.guide WARNING: Information...
User Manual
Page 7
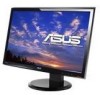
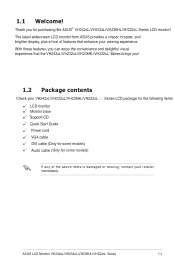
With these features, you can enjoy the convenience and delightful visual experience that enhance your viewing experience. The latest widescreen LCD monitor from ASUS provides a crisper, broader, and brighter display, plus a host of features that the VH242xL/VH232xL/VH236HL/VH222xL Series brings you for the following items: If any ...
With these features, you can enjoy the convenience and delightful visual experience that enhance your viewing experience. The latest widescreen LCD monitor from ASUS provides a crisper, broader, and brighter display, plus a host of features that the VH242xL/VH232xL/VH236HL/VH222xL Series brings you for the following items: If any ...

User Manual
Page 8
1.3 Adjusting the monitor • For optimal viewing, we recommend that you look at the full face of the monitor, then adjust the monitor to the angle that is most comfortable for you. • Hold the base to prevent the monitor from falling when you change its angle. • You can tilt the monitor's from -5º to 15º, swivel from left-to-right for 150º, and lift the monitor's height for about 100mm. -5º~15º 100mm 150º 150º 0º 1-2 Chapter 1: Product introduction
1.3 Adjusting the monitor • For optimal viewing, we recommend that you look at the full face of the monitor, then adjust the monitor to the angle that is most comfortable for you. • Hold the base to prevent the monitor from falling when you change its angle. • You can tilt the monitor's from -5º to 15º, swivel from left-to-right for 150º, and lift the monitor's height for about 100mm. -5º~15º 100mm 150º 150º 0º 1-2 Chapter 1: Product introduction
User Manual
Page 9
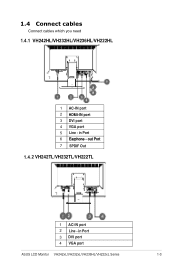
1.4 Connect cables Connect cables which you need 1.4.1 VH242HL/VH232HL/VH236HL/VH222HL 1 AC-IN.port 2 HDMI-IN.port 3 DVI.port 4 VGA.port 5 Line - in Port 3 DVI.port 4 VGA.port ASUS LCD Monitor VH242xL/VH232xL/VH236HL/VH222xL Series 1-3 out Port 7 SPDIF Out 1.4.2 VH242TL/VH232TL/VH222TL 1 AC-IN.port 2 Line - in Port 6 Earphone -
1.4 Connect cables Connect cables which you need 1.4.1 VH242HL/VH232HL/VH236HL/VH222HL 1 AC-IN.port 2 HDMI-IN.port 3 DVI.port 4 VGA.port 5 Line - in Port 3 DVI.port 4 VGA.port ASUS LCD Monitor VH242xL/VH232xL/VH236HL/VH222xL Series 1-3 out Port 7 SPDIF Out 1.4.2 VH242TL/VH232TL/VH222TL 1 AC-IN.port 2 Line - in Port 6 Earphone -
User Manual
Page 10
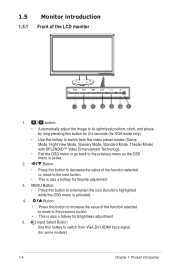
...of the function selected or move to its optimized position, clock, and phase by long pressing this button to decrease the value of .the.LCD.monitor 1. Input Select Button Use this hotkey to switch from VGA,DVI,HDMI input signal. (for VGA mode only). • Use this ...button to enter/select the icon (function) highlighted while the OSD menu is active. 2. 1.5 Monitor introduction 1.5.1. Front.of the function selected or move to the previous menu as the OSD menu is activated. 4. Button: • Press this hotkey ...
...of the function selected or move to its optimized position, clock, and phase by long pressing this button to decrease the value of .the.LCD.monitor 1. Input Select Button Use this hotkey to switch from VGA,DVI,HDMI input signal. (for VGA mode only). • Use this ...button to enter/select the icon (function) highlighted while the OSD menu is active. 2. 1.5 Monitor introduction 1.5.1. Front.of the function selected or move to the previous menu as the OSD menu is activated. 4. Button: • Press this hotkey ...
User Manual
Page 11
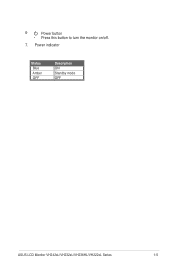
Power button • Press this button to turn the monitor on/off. 7. Power indicator Status Blue Amber OFF Description ON Standby mode OFF ASUS LCD Monitor VH242xL/VH232xL/VH236HL/VH222xL Series 1-5 6.
Power button • Press this button to turn the monitor on/off. 7. Power indicator Status Blue Amber OFF Description ON Standby mode OFF ASUS LCD Monitor VH242xL/VH232xL/VH236HL/VH222xL Series 1-5 6.
User Manual
Page 12
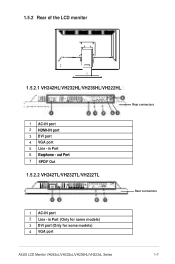
in Port 6 Earphone - 1.5.2. out Port 7 SPDIF Out 1.5.2.2 VH242TL/VH232TL/VH222TL Rear connectors 1 AC-IN.port 2 Line - Rear.of.the.LCD.monitor. 1.5.2.1 VH242HL/VH232HL/VH236HL/VH222HL Rear.connectors 1 AC-IN.port 2 HDMI-IN.port 3 DVI.port 4 VGA.port 5 Line - in Port (Only for some models) 3 DVI.port (Only for some models) 4 VGA.port ASUS LCD Monitor VH242xL/VH232xL/VH236HL/VH222xL Series 1-7
in Port 6 Earphone - 1.5.2. out Port 7 SPDIF Out 1.5.2.2 VH242TL/VH232TL/VH222TL Rear connectors 1 AC-IN.port 2 Line - Rear.of.the.LCD.monitor. 1.5.2.1 VH242HL/VH232HL/VH236HL/VH222HL Rear.connectors 1 AC-IN.port 2 HDMI-IN.port 3 DVI.port 4 VGA.port 5 Line - in Port (Only for some models) 3 DVI.port (Only for some models) 4 VGA.port ASUS LCD Monitor VH242xL/VH232xL/VH236HL/VH222xL Series 1-7
User Manual
Page 13
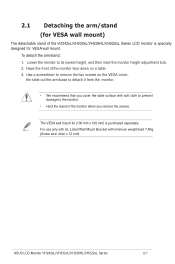
... you cover the table surface with minimum weight/load 7.4Kg (Screw size: 4mm x 12 mm) ASUS LCD Monitor VH242xL/VH232xL/VH236HL/VH222xL Series 2-1 The VESA wall mount kit (100 mm x 100 mm) is specially designed for VESA wall mount. 2.1 Detaching the arm/stand (...for VESA wall mount) The detachable stand of the VH242xL/VH232xL/VH236HL/VH222xL Series LCD monitor is purchased separately. Lower the monitor to detach it from the monitor. • We recommend that you remove the screws.
... you cover the table surface with minimum weight/load 7.4Kg (Screw size: 4mm x 12 mm) ASUS LCD Monitor VH242xL/VH232xL/VH236HL/VH222xL Series 2-1 The VESA wall mount kit (100 mm x 100 mm) is specially designed for VESA wall mount. 2.1 Detaching the arm/stand (...for VESA wall mount) The detachable stand of the VH242xL/VH232xL/VH236HL/VH222xL Series LCD monitor is purchased separately. Lower the monitor to detach it from the monitor. • We recommend that you remove the screws.

User Manual
Page 14
2.2 Assembling the monitor base To assemble the monitor base 1. Remove the monitor height adjustment lock. 1 2 3 The monitor height adjustment lock should NEVER be removed BEFORE you place the monitor VERTICALLY on a flat table. 2. Use the screw, lock the base to the arm according to the below drawing. 3. Have the monitor base place on a flat surface. 2-2 Chapter 2: Setup
2.2 Assembling the monitor base To assemble the monitor base 1. Remove the monitor height adjustment lock. 1 2 3 The monitor height adjustment lock should NEVER be removed BEFORE you place the monitor VERTICALLY on a flat table. 2. Use the screw, lock the base to the arm according to the below drawing. 3. Have the monitor base place on a flat surface. 2-2 Chapter 2: Setup
User Manual
Page 15
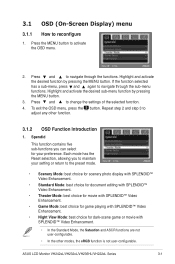
... function selected has a sub-menu, press and again to navigate through the functions. Spendid This function contains five sub-functions you to maintain your preference. ASUS LCD Monitor VH242xL/VH232xL/VH236HL/VH222xL Series 3-1 Highlight and activate the desired function by pressing the MENU button. 3. Press and to adjust any other modes, the sRGB...
... function selected has a sub-menu, press and again to navigate through the functions. Spendid This function contains five sub-functions you to maintain your preference. ASUS LCD Monitor VH242xL/VH232xL/VH236HL/VH222xL Series 3-1 Highlight and activate the desired function by pressing the MENU button. 3. Press and to adjust any other modes, the sRGB...
User Manual
Page 17
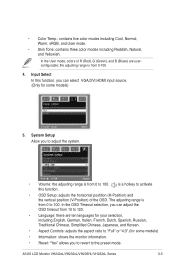
is from 0-100. 4. ASUS LCD Monitor VH242xL/VH232xL/VH236HL/VH222xL Series 3-3 System Setup Allow you to adjust the system. • Volume: the adjusting range is a hotkey to 100. The adjusting range ... to revert to 100. In the OSD Timeout selection, you can select VGA,DVI,HDMI input source. (Only for some models) • Information: shows the monitor information. • Reset: "Yes" allows you can adjust the OSD timeout from 0 to the preset mode. the adjusting range is from 10 to 120. •...
is from 0-100. 4. ASUS LCD Monitor VH242xL/VH232xL/VH236HL/VH222xL Series 3-3 System Setup Allow you to adjust the system. • Volume: the adjusting range is a hotkey to 100. The adjusting range ... to revert to 100. In the OSD Timeout selection, you can select VGA,DVI,HDMI input source. (Only for some models) • Information: shows the monitor information. • Reset: "Yes" allows you can adjust the OSD timeout from 0 to the preset mode. the adjusting range is from 10 to 120. •...
User Manual
Page 19
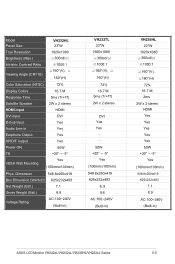
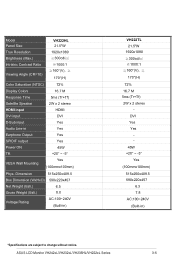
... DVI input 2W x 2 stereo HDMI DVI D-Sub input Yes Audio Line-in ) ASUS LCD Monitor VH242xL/VH232xL/VH236HL/VH222xL Series 3-5 Dimension 548.8x250x419 Box Dimension (WxHxD) 625x232x483 Net Weight (Esti.) 7.1 Gross Weight (Esti.) Voltage Rating 8.9 AC:100~240V (Built-in) VH232TL 23"W 1920x1080 ≧300cd/㎡ ≧1000:1 ≧160°(V), ≧ 160°...
... DVI input 2W x 2 stereo HDMI DVI D-Sub input Yes Audio Line-in ) ASUS LCD Monitor VH242xL/VH232xL/VH236HL/VH222xL Series 3-5 Dimension 548.8x250x419 Box Dimension (WxHxD) 625x232x483 Net Weight (Esti.) 7.1 Gross Weight (Esti.) Voltage Rating 8.9 AC:100~240V (Built-in) VH232TL 23"W 1920x1080 ≧300cd/㎡ ≧1000:1 ≧160°(V), ≧ 160°...
User Manual
Page 20
... 6.3 7.8 AC:100~240V (Built-in Yes Earphone Output Yes SPIDIF output Yes Power ON Tilt VESA Wall Mounting 45W +20° ~ -5° Yes (100mmx100mm) Phys. ASUS LCD Monitor VH242xL/VH232xL/VH236HL/VH222xL Series 3-6
... 6.3 7.8 AC:100~240V (Built-in Yes Earphone Output Yes SPIDIF output Yes Power ON Tilt VESA Wall Mounting 45W +20° ~ -5° Yes (100mmx100mm) Phys. ASUS LCD Monitor VH242xL/VH232xL/VH236HL/VH222xL Series 3-6
User Manual
Page 21
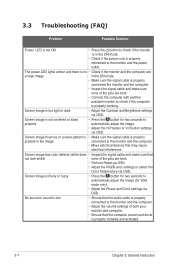
... does • Inspect the signal cable and make sure none of the pins are bent. • Connect the computer with another available monitor to the monitor and the computer • Adjust the volume settings of the pins are screen image in the ON mode. • Make sure the signal...sound card driver is properly installed and activated. 3-7 Chapter 3: General Instruction The power LED lights amber and there is no • Check if the monitor and the computer are bent. • Perform Reset via OSD. • Adjust the R/G/B color settings or select the Color Temperature via OSD. ...
... does • Inspect the signal cable and make sure none of the pins are bent. • Connect the computer with another available monitor to the monitor and the computer • Adjust the volume settings of the pins are screen image in the ON mode. • Make sure the signal...sound card driver is properly installed and activated. 3-7 Chapter 3: General Instruction The power LED lights amber and there is no • Check if the monitor and the computer are bent. • Perform Reset via OSD. • Adjust the R/G/B color settings or select the Color Temperature via OSD. ...


