
TUF X299 MARK 2 Users ManualEnglish
Page 4
Chapter 3: BIOS Setup 3.1 Knowing BIOS 3-1 3.2 BIOS setup program 3-2 3.2.1 EZ Mode 3-3 3.2.2 Advanced Mode 3-4 3.2.3 QFan Control 3-7 3.2.4 EZ Tuning Wizard 3-9 3.3 My Favorites 3-12 3.4 Main menu 3-14 3.5 Ai Tweaker... 3-20 3.8 Boot menu 3-20 3.9 Tool menu 3-22 3.9.1 ASUS EZ Flash 3 Utility 3-22 3.9.2 Secure Erase 3-23 3.9.3 ASUS Overclocking Profile 3-24 3.9.4 ASUS SPD Information 3-24 3.9.5 Graphics Card Information 3-24 3.10 Exit menu 3-25 3.11 Updating BIOS 3-26 3.11.1 EZ Update 3-26 3.11.2 ASUS EZ Flash 3 3-27 3.11.3 ASUS CrashFree BIOS 3 3-29 iv
Chapter 3: BIOS Setup 3.1 Knowing BIOS 3-1 3.2 BIOS setup program 3-2 3.2.1 EZ Mode 3-3 3.2.2 Advanced Mode 3-4 3.2.3 QFan Control 3-7 3.2.4 EZ Tuning Wizard 3-9 3.3 My Favorites 3-12 3.4 Main menu 3-14 3.5 Ai Tweaker... 3-20 3.8 Boot menu 3-20 3.9 Tool menu 3-22 3.9.1 ASUS EZ Flash 3 Utility 3-22 3.9.2 Secure Erase 3-23 3.9.3 ASUS Overclocking Profile 3-24 3.9.4 ASUS SPD Information 3-24 3.9.5 Graphics Card Information 3-24 3.10 Exit menu 3-25 3.11 Updating BIOS 3-26 3.11.1 EZ Update 3-26 3.11.2 ASUS EZ Flash 3 3-27 3.11.3 ASUS CrashFree BIOS 3 3-29 iv

TUF X299 MARK 2 Users ManualEnglish
Page 5
Chapter 4: RAID Support 4.1 RAID configurations 4-1 4.1.1 RAID definitions 4-1 4.1.2 Installing storage devices 4-2 4.1.3 Intel® Rapid Storage Technology in UEFI BIOS 4-2 4.1.4 Intel® Virtual Raid on CPU in UEFI BIOS 4-6 4.1.4 Intel® Rapid Storage Technology Option ROM utility 4-12 4.2 Creating a RAID driver disk 4-16 4.2.1 Creating a RAID driver disk in Windows 4-16 Appendix Notices ...A-1 ASUS contact information A-5 v
Chapter 4: RAID Support 4.1 RAID configurations 4-1 4.1.1 RAID definitions 4-1 4.1.2 Installing storage devices 4-2 4.1.3 Intel® Rapid Storage Technology in UEFI BIOS 4-2 4.1.4 Intel® Virtual Raid on CPU in UEFI BIOS 4-6 4.1.4 Intel® Rapid Storage Technology Option ROM utility 4-12 4.2 Creating a RAID driver disk 4-16 4.2.1 Creating a RAID driver disk in Windows 4-16 Appendix Notices ...A-1 ASUS contact information A-5 v

TUF X299 MARK 2 Users ManualEnglish
Page 7
...documentation Your product package may have to change system settings through the BIOS Setup menus. Chapter 3: BIOS Setup This chapter tells how to perform when installing system components. 3. ASUS website The ASUS website (www.asus.com) provides updated information on the motherboard. 2. It includes description ... optional documentation, such as warranty flyers, that you need when installing and configuring the motherboard. Detailed descriptions of the BIOS parameters are not part of the standard package. How this guide This user guide contains the information you have been ...
...documentation Your product package may have to change system settings through the BIOS Setup menus. Chapter 3: BIOS Setup This chapter tells how to perform when installing system components. 3. ASUS website The ASUS website (www.asus.com) provides updated information on the motherboard. 2. It includes description ... optional documentation, such as warranty flyers, that you need when installing and configuring the motherboard. Detailed descriptions of the BIOS parameters are not part of the standard package. How this guide This user guide contains the information you have been ...
TUF X299 MARK 2 Users ManualEnglish
Page 11
...: AURA Lighting Control and AURA Lighting Effects synchronization with lower pings and less lags - Profile - ASUS CrashFree BIOS 3 - Intel® VROC Ready - 3D Printing Friendly design - ASUS O.C. ASUS Q-Shield - ASUS Q-LED (CPU, DRAM, VGA, Boot Device LED) - TUF X299 MARK 2 specifications summary LAN ASUS Features USB Gigabit Intel LAN connection- 802.3az Energy Efficient Ethernet (EEE) appliance Intel®...
...: AURA Lighting Control and AURA Lighting Effects synchronization with lower pings and less lags - Profile - ASUS CrashFree BIOS 3 - Intel® VROC Ready - 3D Printing Friendly design - ASUS O.C. ASUS Q-Shield - ASUS Q-LED (CPU, DRAM, VGA, Boot Device LED) - TUF X299 MARK 2 specifications summary LAN ASUS Features USB Gigabit Intel LAN connection- 802.3az Energy Efficient Ethernet (EEE) appliance Intel®...

TUF X299 MARK 2 Users ManualEnglish
Page 13
TUF X299 MARK 2 specifications summary BIOS Features Manageability Support DVD contents Operating system support Form factor 128 Mb Flash ROM, UEFI AMI BIOS, PnP, DMI3.0, WfM2.0, SM BIOS 3.0, ACPI 6.0, Multi-language BIOS, ASUS EZ Flash 3, CrashFree BIOS 3, F11 EZ Tuning Wizard, F6 Qfan Control, F3 My Favorites, Last Modified log, F12 PrintScreen and ASUS DRAM SPD (Serial Presence Detect) memory information...
TUF X299 MARK 2 specifications summary BIOS Features Manageability Support DVD contents Operating system support Form factor 128 Mb Flash ROM, UEFI AMI BIOS, PnP, DMI3.0, WfM2.0, SM BIOS 3.0, ACPI 6.0, Multi-language BIOS, ASUS EZ Flash 3, CrashFree BIOS 3, F11 EZ Tuning Wizard, F6 Qfan Control, F3 My Favorites, Last Modified log, F12 PrintScreen and ASUS DRAM SPD (Serial Presence Detect) memory information...
TUF X299 MARK 2 Users ManualEnglish
Page 25
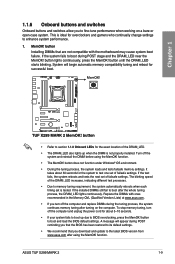
... requirement, the system automatically reboots when each timing set of the DRAM_LED. • The DRAM_LED also lights up due to BIOS overclocking, press the MemOK! Replace the DIMMs with the motherboard may cause system boot failure. If the test fails, the system.... button to boot during the tuning process, the system continues memory tuning after the whole tuning process, the DRAM_LED lights continuously. ASUS TUF X299 MARK 2 1-9 MemOK! Chapter 1 1.1.6 Onboard buttons and switches Onboard buttons and switches allow you to fine-tune performance when working on...
... requirement, the system automatically reboots when each timing set of the DRAM_LED. • The DRAM_LED also lights up due to BIOS overclocking, press the MemOK! Replace the DIMMs with the motherboard may cause system boot failure. If the test fails, the system.... button to boot during the tuning process, the system continues memory tuning after the whole tuning process, the DRAM_LED lights continuously. ASUS TUF X299 MARK 2 1-9 MemOK! Chapter 1 1.1.6 Onboard buttons and switches Onboard buttons and switches allow you to fine-tune performance when working on...

TUF X299 MARK 2 Users ManualEnglish
Page 26
...Time Clock (RTC) RAM in CMOS, which include system setup information such as system passwords. Shut down the key during the boot process and enter BIOS setup to enable C.P.R. Clear RTC RAM jumper (2-pin CLRTC) This jumper allows you to overclocking, use the C.P.R. (CPU Parameter Recall) feature. Hold... down and reboot the system so the BIOS can clear the CMOS memory of date, time, and system setup parameters by erasing the CMOS RTC RAM data. Except when clearing the RTC ...
...Time Clock (RTC) RAM in CMOS, which include system setup information such as system passwords. Shut down the key during the boot process and enter BIOS setup to enable C.P.R. Clear RTC RAM jumper (2-pin CLRTC) This jumper allows you to overclocking, use the C.P.R. (CPU Parameter Recall) feature. Hold... down and reboot the system so the BIOS can clear the CMOS memory of date, time, and system setup parameters by erasing the CMOS RTC RAM data. Except when clearing the RTC ...

TUF X299 MARK 2 Users ManualEnglish
Page 29
...ASUS TUF X299 MARK 2 1-13 If you installed Serial ATA hard disk drives, you intend to create a Serial ATA RAID set using these connectors, set to Serial ATA 6 Gb/s hard disk drives via Serial ATA 6 Gb/s signal cables. SATA 6G_34; These connectors are set the SATA Mode item in the BIOS... to [Intel RST Premium With Intel Optane System Acceleration (RAID)]. If you can create a RAID 0, 1, 5, and 10 configuration with the Intel® Rapid Storage Technology through the onboard Intel® X299 chipset. Chapter 1 1.1.9 Internal connectors 1....
...ASUS TUF X299 MARK 2 1-13 If you installed Serial ATA hard disk drives, you intend to create a Serial ATA RAID set using these connectors, set to Serial ATA 6 Gb/s hard disk drives via Serial ATA 6 Gb/s signal cables. SATA 6G_34; These connectors are set the SATA Mode item in the BIOS... to [Intel RST Premium With Intel Optane System Acceleration (RAID)]. If you can create a RAID 0, 1, 5, and 10 configuration with the Intel® Rapid Storage Technology through the onboard Intel® X299 chipset. Chapter 1 1.1.9 Internal connectors 1....

TUF X299 MARK 2 Users ManualEnglish
Page 51
...'s LEDs may continue to wake up then steady) from S5 mode ACT/LINK SPEED LED LED LAN port You can disable the LAN controllers in BIOS. * LAN ports LED indications Activity Link LED Speed LED Status Description Status Description Off No link Off 10 Mbps connection Orange Linked Orange 100 Mbps... Speaker Out Mic In Center/Sub woofer Rear Speaker Out Side Speaker Out Front Speaker Out Mic In Center/Sub woofer Rear Speaker Out Chapter 2 ASUS TUF X299 MARK 2 2-13
...'s LEDs may continue to wake up then steady) from S5 mode ACT/LINK SPEED LED LED LAN port You can disable the LAN controllers in BIOS. * LAN ports LED indications Activity Link LED Speed LED Status Description Status Description Off No link Off 10 Mbps connection Orange Linked Orange 100 Mbps... Speaker Out Mic In Center/Sub woofer Rear Speaker Out Side Speaker Out Front Speaker Out Mic In Center/Sub woofer Rear Speaker Out Chapter 2 ASUS TUF X299 MARK 2 2-13

TUF X299 MARK 2 Users ManualEnglish
Page 54
.... If your retailer for the first time 1. If you press the ATX power button. After making all switches are running, the BIOS beeps (refer to enter the BIOS Setup. Connect the power cord to green after the system LED turns on the devices in Chapter 3. 2.4 Turning off mode, depending... on the screen. System power 6. BIOS Beep One short beep One continuous beep followed by two short beeps then a pause (repeated) One continuous beep followed by three short beeps One continuous...
.... If your retailer for the first time 1. If you press the ATX power button. After making all switches are running, the BIOS beeps (refer to enter the BIOS Setup. Connect the power cord to green after the system LED turns on the devices in Chapter 3. 2.4 Turning off mode, depending... on the screen. System power 6. BIOS Beep One short beep One continuous beep followed by two short beeps then a pause (repeated) One continuous beep followed by three short beeps One continuous...

TUF X299 MARK 2 Users ManualEnglish
Page 55
... a user-friendly interface that goes beyond the traditional keyboardonly BIOS controls to enable a more flexible and convenient mouse input. BIOS (Basic Input and Output System) stores system hardware settings such as your operating system. Inappropriate BIOS settings may vary due to different BIOS release versions. Chapter 3 ASUS TUF X299 MARK 2 3-1 We strongly recommend that you to run the...
... a user-friendly interface that goes beyond the traditional keyboardonly BIOS controls to enable a more flexible and convenient mouse input. BIOS (Basic Input and Output System) stores system hardware settings such as your operating system. Inappropriate BIOS settings may vary due to different BIOS release versions. Chapter 3 ASUS TUF X299 MARK 2 3-1 We strongly recommend that you to run the...

TUF X299 MARK 2 Users ManualEnglish
Page 56
... to guide you want to use the mouse to control the BIOS setup program. • If the system becomes unstable after changing any BIOS setting, try to clear the CMOS and reset the motherboard to the default value. Please visit ASUS website for information on your screen. • Ensure that a... USB mouse is connected to your motherboard if you in Boot menu or by pressing the hotkey. You can be used under the Exit menu or press hotkey . Entering BIOS at startup To enter BIOS Setup at startup...
... to guide you want to use the mouse to control the BIOS setup program. • If the system becomes unstable after changing any BIOS setting, try to clear the CMOS and reset the motherboard to the default value. Please visit ASUS website for information on your screen. • Ensure that a... USB mouse is connected to your motherboard if you in Boot menu or by pressing the hotkey. You can be used under the Exit menu or press hotkey . Entering BIOS at startup To enter BIOS Setup at startup...

TUF X299 MARK 2 Users ManualEnglish
Page 57
... language Creates storage RAID and of the BIOS setup program configures system overclocking Chapter 3 Enables or disables the SATA RAID mode for details. Click < or > to the Setup Mode item in section Boot menu for Intel Rapid Storage Technology Displays the CPU Fan's speed. ASUS TUF X299 MARK 2 3-3 Click the button to manually tune the...
... language Creates storage RAID and of the BIOS setup program configures system overclocking Chapter 3 Enables or disables the SATA RAID mode for details. Click < or > to the Setup Mode item in section Boot menu for Intel Rapid Storage Technology Displays the CPU Fan's speed. ASUS TUF X299 MARK 2 3-3 Click the button to manually tune the...

TUF X299 MARK 2 Users ManualEnglish
Page 58
... sections for experienced end-users to EZ Mode Search on the FAQ Displays the CPU temperature, CPU, and memory voltage output 3-4 Chapter 3: BIOS Setup Configuration fields Pop-up Menu Menu bar Language Scroll bar MyFavorite(F3) Qfan Control(F6) EZ Tuning Wizard(F11) Hot Keys Chapter 3... Menu items General help Last modified settings Go back to configure the BIOS settings. The figure below shows an example of the Advanced Mode. 3.2.2 Advanced Mode The Advanced Mode provides advanced options for the detailed configurations....
... sections for experienced end-users to EZ Mode Search on the FAQ Displays the CPU temperature, CPU, and memory voltage output 3-4 Chapter 3: BIOS Setup Configuration fields Pop-up Menu Menu bar Language Scroll bar MyFavorite(F3) Qfan Control(F6) EZ Tuning Wizard(F11) Hot Keys Chapter 3... Menu items General help Last modified settings Go back to configure the BIOS settings. The figure below shows an example of the Advanced Mode. 3.2.2 Advanced Mode The Advanced Mode provides advanced options for the detailed configurations....

TUF X299 MARK 2 Users ManualEnglish
Page 59
...items. Submenu items A greater than sign (>) before each item on any menu screen means that you to section 3.2.3 QFan Control for your BIOS. My Favorites (F3) This button above the menu bar displays the current settings of your fans. Q-Fan Control (F6) This button ...BIOS settings and save it to your desired settings. Refer to section 3.2.4 EZ Tuning Wizard for that you to change the motherboard's SATA mode from AHCI to select the language that the item has a submenu. Use this button to RAID mode. It also allows you can select for more information. Chapter 3 ASUS TUF X299 MARK...
...items. Submenu items A greater than sign (>) before each item on any menu screen means that you to section 3.2.3 QFan Control for your BIOS. My Favorites (F3) This button above the menu bar displays the current settings of your fans. Q-Fan Control (F6) This button ...BIOS settings and save it to your desired settings. Refer to section 3.2.4 EZ Tuning Wizard for that you to change the motherboard's SATA mode from AHCI to select the language that the item has a submenu. Use this button to RAID mode. It also allows you can select for more information. Chapter 3 ASUS TUF X299 MARK...

TUF X299 MARK 2 Users ManualEnglish
Page 60
.... To change the settings. Use key to capture the BIOS screen and save it and press to display a list of the field opposite the item. Chapter 3 3-6 Chapter 3: BIOS Setup A configurable field is a brief description of the ASUS support website. You can change the value of options. ...Use the navigation keys to select items in BIOS Setup. Search on FAQ Move your mouse over this button to ...
.... To change the settings. Use key to capture the BIOS screen and save it and press to display a list of the field opposite the item. Chapter 3 3-6 Chapter 3: BIOS Setup A configurable field is a brief description of the ASUS support website. You can change the value of options. ...Use the navigation keys to select items in BIOS Setup. Search on FAQ Move your mouse over this button to ...

TUF X299 MARK 2 Users ManualEnglish
Page 62
Click Apply to view its current status. 2. Chapter 3 Speed points Select to manually configure your fans To configure your fans' operating speed. Select the fan that you want to configure and to save the changes then click Exit (ESC). 3-8 Chapter 3: BIOS Setup Configuring fans manually Select Manual from the list of profiles to manually configure your fans: 1. Click and drag the speed points to adjust the fans' operating speed. 3.
Click Apply to view its current status. 2. Chapter 3 Speed points Select to manually configure your fans To configure your fans' operating speed. Select the fan that you want to configure and to save the changes then click Exit (ESC). 3-8 Chapter 3: BIOS Setup Configuring fans manually Select Manual from the list of profiles to manually configure your fans: 1. Click and drag the speed points to adjust the fans' operating speed. 3.

TUF X299 MARK 2 Users ManualEnglish
Page 63
Press on your system using this feature. from the BIOS screen to their best settings. Chapter 3 ASUS TUF X299 MARK 2 3-9 Click OC then click Next. 3. OC setup RAID setup OC Tuning To start OC Tuning: 1. 3.2.4 EZ Tuning Wizard EZ Tuning Wizard allows you to easily overclock your CPU and DRAM, computer usage, and CPU fan to open 2. Select a PC scenario Daily Computing or Gaming/Media Editing, then click Next. You can also set RAID in your keyboard or click EZ Tuning Wizard screen.
Press on your system using this feature. from the BIOS screen to their best settings. Chapter 3 ASUS TUF X299 MARK 2 3-9 Click OC then click Next. 3. OC setup RAID setup OC Tuning To start OC Tuning: 1. 3.2.4 EZ Tuning Wizard EZ Tuning Wizard allows you to easily overclock your CPU and DRAM, computer usage, and CPU fan to open 2. Select a PC scenario Daily Computing or Gaming/Media Editing, then click Next. You can also set RAID in your keyboard or click EZ Tuning Wizard screen.

TUF X299 MARK 2 Users ManualEnglish
Page 64
... or SATA, then click Next. Select the port that your HDDs have no existing RAID volumes. • Ensure to start the OC Tuning. from the BIOS screen to open • Ensure that you want to set to enable RAID. After selecting the Main Cooling System, click Next then click Yes to...
... or SATA, then click Next. Select the port that your HDDs have no existing RAID volumes. • Ensure to start the OC Tuning. from the BIOS screen to open • Ensure that you want to set to enable RAID. After selecting the Main Cooling System, click Next then click Yes to...

TUF X299 MARK 2 Users ManualEnglish
Page 66
3.3 My Favorites My Favorites is your favorite BIOS items. My Favorites comes with several performance, power saving, and fast boot related items by adding or removing items. Chapter 3 3-12 Chapter 3: BIOS Setup You can easily save and access your personal space where you can personalize this screen by default.
3.3 My Favorites My Favorites is your favorite BIOS items. My Favorites comes with several performance, power saving, and fast boot related items by adding or removing items. Chapter 3 3-12 Chapter 3: BIOS Setup You can easily save and access your personal space where you can personalize this screen by default.


