
TUEG-VM User Manual
Page 1
® TUEG-VM Intel® 815EG Chipset microATX Motherboard USER'S MANUAL
® TUEG-VM Intel® 815EG Chipset microATX Motherboard USER'S MANUAL
TUEG-VM User Manual
Page 4
... 4.2 BIOS Setup Program 49 4.2.1 BIOS Menu Bar 50 4.2.2 Legend Bar 50 4 ASUS TUEG-VM User's Manual CONTENTS 1. INTRODUCTION 7 1.1 How This Manual Is Organized 7 1.2 Item Checklist 7 2. FEATURES 8 2.1 The ASUS TUEG-VM 8 2.2 TUEG-VM Motherboard Components 12 3. HARDWARE SETUP 14 3.1 TUEG-VM Motherboard Layout 14 3.2 Layout Contents 15 3.3 Hardware Setup Procedure 17 3.4 Motherboard Settings 17 3.5 System Memory (DIMM 24 3.5.1 General DIMM Notes 24 3.5.2 Memory Installation...
... 4.2 BIOS Setup Program 49 4.2.1 BIOS Menu Bar 50 4.2.2 Legend Bar 50 4 ASUS TUEG-VM User's Manual CONTENTS 1. INTRODUCTION 7 1.1 How This Manual Is Organized 7 1.2 Item Checklist 7 2. FEATURES 8 2.1 The ASUS TUEG-VM 8 2.2 TUEG-VM Motherboard Components 12 3. HARDWARE SETUP 14 3.1 TUEG-VM Motherboard Layout 14 3.2 Layout Contents 15 3.3 Hardware Setup Procedure 17 3.4 Motherboard Settings 17 3.5 System Memory (DIMM 24 3.5.1 General DIMM Notes 24 3.5.2 Memory Installation...
TUEG-VM User Manual
Page 5
APPENDIX 97 7.1 Glossary 97 INDEX 101 ASUS TUEG-VM User's Manual 5 SOFTWARE SETUP 79 5.1 Operating Systems 79 5.1.1 Windows 98 First Time Installation 79 5.2 TUEG-VM Motherboard Support CD 79 5.2.1 Installation Menus 79 5.2.2 Applications 80 6. CONTENTS 4.3 Main Menu 52 4.3.1 Primary & Secondary ...71 4.5.2 Hardware Monitor 73 4.6 Boot Menu 74 4.7 Exit Menu 76 5. SOFTWARE REFERENCE 83 6.1 ASUS PC Probe 83 6.1.1 Starting ASUS PC Probe 83 6.1.2 Using ASUS PC Probe 84 6.1.3 ASUS PC Probe Task Bar Icon 87 6.2 Winbond Smart Manager 89 6.3 CyberLink PowerPlayer SE 93 6.4 ...
APPENDIX 97 7.1 Glossary 97 INDEX 101 ASUS TUEG-VM User's Manual 5 SOFTWARE SETUP 79 5.1 Operating Systems 79 5.1.1 Windows 98 First Time Installation 79 5.2 TUEG-VM Motherboard Support CD 79 5.2.1 Installation Menus 79 5.2.2 Applications 80 6. CONTENTS 4.3 Main Menu 52 4.3.1 Primary & Secondary ...71 4.5.2 Hardware Monitor 73 4.6 Boot Menu 74 4.7 Exit Menu 76 5. SOFTWARE REFERENCE 83 6.1 ASUS PC Probe 83 6.1.1 Starting ASUS PC Probe 83 6.1.2 Using ASUS PC Probe 84 6.1.3 ASUS PC Probe Task Bar Icon 87 6.2 Winbond Smart Manager 89 6.3 CyberLink PowerPlayer SE 93 6.4 ...
TUEG-VM User Manual
Page 7
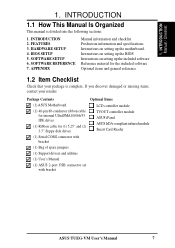
SOFTWARE SETUP 6. APPENDIX Manual information and checklist Production information and specifications Instructions on setting up the motherboard. INTRODUCTION 2. BIOS SETUP 5. If you discover damaged or missing items, contact your package is divided into ...Support drivers and utilities (1) User's Manual (1) ASUS 2-port USB connector set with bracket Optional Items LCD controller module TVOUT controller module ASUS iPanel ASUS IrDA-compliant infrared module Smart Card Reader ASUS TUEG-VM User's Manual 7 Package Contents (1) ASUS Motherboard (1) 40-pin 80-conductor ribbon cable for ...
SOFTWARE SETUP 6. APPENDIX Manual information and checklist Production information and specifications Instructions on setting up the motherboard. INTRODUCTION 2. BIOS SETUP 5. If you discover damaged or missing items, contact your package is divided into ...Support drivers and utilities (1) User's Manual (1) ASUS 2-port USB connector set with bracket Optional Items LCD controller module TVOUT controller module ASUS iPanel ASUS IrDA-compliant infrared module Smart Card Reader ASUS TUEG-VM User's Manual 7 Package Contents (1) ASUS Motherboard (1) 40-pin 80-conductor ribbon cable for ...
TUEG-VM User Manual
Page 8
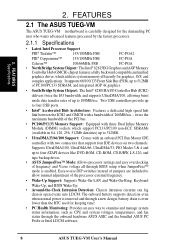
... UltraDMA/66, UltraDMA/33, PIO Modes 3 & 4 and up to allow manual adjustment of 266MB/sec - FEATURES 2.1 The ASUS TUEG-VM The ASUS TUEG-VM motherboard is enabled. Easy-to-use DIP switches instead of jumpers are included to 100MB/sec. The onboard battery supports detection even when... and complex applications. twice the maximum bandwidth of frequency and Vcore voltage all through the onboard hardware ASUS ASIC and the bundled ASUS PC Probe or Intel LDCM software. 8 ASUS TUEG-VM User's Manual Two USB controllers provide up to four USB ports. • Intel® Accelerated...
... UltraDMA/66, UltraDMA/33, PIO Modes 3 & 4 and up to allow manual adjustment of 266MB/sec - FEATURES 2.1 The ASUS TUEG-VM The ASUS TUEG-VM motherboard is enabled. Easy-to-use DIP switches instead of jumpers are included to 100MB/sec. The onboard battery supports detection even when... and complex applications. twice the maximum bandwidth of frequency and Vcore voltage all through the onboard hardware ASUS ASIC and the bundled ASUS PC Probe or Intel LDCM software. 8 ASUS TUEG-VM User's Manual Two USB controllers provide up to four USB ports. • Intel® Accelerated...

TUEG-VM User Manual
Page 9
...use interface which provides more control and protection over the motherboard. ASUS TUEG-VM User's Manual 9 This acts as a reminder to the user to turn OFF the power before plugging and unplugging devices so as not to damage the motherboard, peripherals, and/or components. • Onboard Audio...-chip sample rate converter, and a professional wavetable. • Easy Connectivity and System Information Access: Supports an optional ASUS iPanel, an easy-to the motherboard. All PCI slots can support either an optional LCD module for LCD output or a TV-out module for wireless ...
...use interface which provides more control and protection over the motherboard. ASUS TUEG-VM User's Manual 9 This acts as a reminder to the user to turn OFF the power before plugging and unplugging devices so as not to damage the motherboard, peripherals, and/or components. • Onboard Audio...-chip sample rate converter, and a professional wavetable. • Easy Connectivity and System Information Access: Supports an optional ASUS iPanel, an easy-to the motherboard. All PCI slots can support either an optional LCD module for LCD output or a TV-out module for wireless ...

TUEG-VM User Manual
Page 10
...features implemented in the OS, PCs can handle rates up , and OnNow initiatives to be ready around the clock, yet satisfy all ASUS smart series motherboards. This motherboard with two connectors that you do not have to wait for a long time for Management, remote wake-up to 66.6MB/s. ...IDE devices, such as an alternative to leaving the computer ON and QuickStart™ so that support four IDE devices in MHz increments. 10 ASUS TUEG-VM User's Manual ACPI provides more Energy Saving Features for UltraDMA/100 increases the data transfer rate to 1066MB/s max. • ACPI Ready: ...
...features implemented in the OS, PCs can handle rates up , and OnNow initiatives to be ready around the clock, yet satisfy all ASUS smart series motherboards. This motherboard with two connectors that you do not have to wait for a long time for Management, remote wake-up to 66.6MB/s. ...IDE devices, such as an alternative to leaving the computer ON and QuickStart™ so that support four IDE devices in MHz increments. 10 ASUS TUEG-VM User's Manual ACPI provides more Energy Saving Features for UltraDMA/100 increases the data transfer rate to 1066MB/s max. • ACPI Ready: ...

TUEG-VM User Manual
Page 11
... can be turned on remotely through BIOS setup to allow the computer to be defined as information providers. Regardless of ASUS smart series motherboards are based on hand, you can be powered ON using your keyboard or mouse click. 2. All the fans are... been received from anywhere in 3.8 Connectors for Windows95/98/NT . ASUS TUEG-VM User's Manual 11 A simple glimpse provides useful information. FEATURES Intelligence 2. The onboard hardware ASUS ASIC in conjunction with either the bundled ASUS PC Probe or Intel LDCM, will warn you before the system resources...
... can be turned on remotely through BIOS setup to allow the computer to be defined as information providers. Regardless of ASUS smart series motherboards are based on hand, you can be powered ON using your keyboard or mouse click. 2. All the fans are... been received from anywhere in 3.8 Connectors for Windows95/98/NT . ASUS TUEG-VM User's Manual 11 A simple glimpse provides useful information. FEATURES Intelligence 2. The onboard hardware ASUS ASIC in conjunction with either the bundled ASUS PC Probe or Intel LDCM, will warn you before the system resources...
TUEG-VM User Manual
Page 12
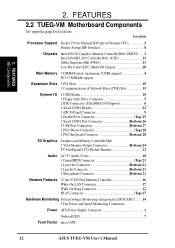
FEATURES MB Components 2. Location Processor Support Socket 370 for locations. FEATURES 2.2 TUEG-VM Motherboard Components See opposite page for Pentium III/Celeron/Tualatin CPUs 2 Feature Setting DIP Switches 8 Chipsets Intel 82815G Graphics Memory Controller Hub... Riser (CNR) Slot 15 System I/O 1 USB Header 10 1 Floppy Disk Drive Connector 5 2 IDE Connectors (UltraDMA/100 Support 6 1 Serial COM2 Header 22 1 ASUS iPanel Connector 9 1 Parallel Port Connector Top) 25 1 Serial COM1 Port Connector Bottom) 26 2 USB Port Connectors Bottom) 27 1 PS/2 Mouse Connector Top) 28 ...
FEATURES MB Components 2. Location Processor Support Socket 370 for locations. FEATURES 2.2 TUEG-VM Motherboard Components See opposite page for Pentium III/Celeron/Tualatin CPUs 2 Feature Setting DIP Switches 8 Chipsets Intel 82815G Graphics Memory Controller Hub... Riser (CNR) Slot 15 System I/O 1 USB Header 10 1 Floppy Disk Drive Connector 5 2 IDE Connectors (UltraDMA/100 Support 6 1 Serial COM2 Header 22 1 ASUS iPanel Connector 9 1 Parallel Port Connector Top) 25 1 Serial COM1 Port Connector Bottom) 26 2 USB Port Connectors Bottom) 27 1 PS/2 Mouse Connector Top) 28 ...
TUEG-VM User Manual
Page 14
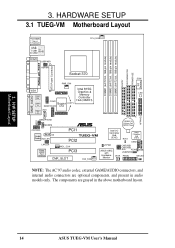
HARDWARE SETUP 3.1 TUEG-VM Motherboard Layout PS/2KBMS T: ... Lithium Cell CMOS Power AAPANEL PCI1 CD Audio Codec AUD_EN TUEG-VM PCI2 LAN_EN WOL_CON 3Com 3C920 Fast Ethernet PCI3 CNR_SLOT CHA_FAN Intel I/O Controller Hub (ICH2)...ASUS ASIC with Hardware Monitor CNRUSB1 CNRUSB2 JEN ACHA USBPWR2 SMB WOR PANEL IDELED NOTE: The AC'97 audio codec, external GAME/AUDIO connectors, and internal audio connectors are grayed in audio models only. H/W SETUP Motherboard Layout 3. The components are optional components, and present in the above motherboard layout. 14 ASUS TUEG-VM...
HARDWARE SETUP 3.1 TUEG-VM Motherboard Layout PS/2KBMS T: ... Lithium Cell CMOS Power AAPANEL PCI1 CD Audio Codec AUD_EN TUEG-VM PCI2 LAN_EN WOL_CON 3Com 3C920 Fast Ethernet PCI3 CNR_SLOT CHA_FAN Intel I/O Controller Hub (ICH2)...ASUS ASIC with Hardware Monitor CNRUSB1 CNRUSB2 JEN ACHA USBPWR2 SMB WOR PANEL IDELED NOTE: The AC'97 audio codec, external GAME/AUDIO connectors, and internal audio connectors are grayed in audio models only. H/W SETUP Motherboard Layout 3. The components are optional components, and present in the above motherboard layout. 14 ASUS TUEG-VM...
TUEG-VM User Manual
Page 15
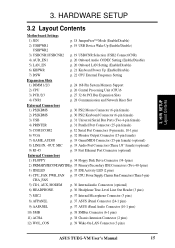
HARDWARE SETUP 3.2 Layout Contents Motherboard Settings 1) JEN p. 18 JumperFree™ Mode (Enable/Disable) 2) USBPWR1 USBPWR2 p. 19 USB Device Wake Up (Enable/Disable) 3) USBCNR1/USBCNR2 p. 19 USB/CNR... pins) 7) MIC2 p. 37 Internal Microphone Connector (3 pins) 8) AFPANEL p. 37 ASUS iPanel Connector (24-1 pins) 9) AAPANEL p. 37 ASUS iPanel Audio Connector (10-1 pins) 10) SMB p. 38 SMBus Connector (6-1 pins) 11) ACHA p. 38 Chassis Intrusion Connector (2 pins) 12) WOL_CON p. 39 Wake-On-LAN Connector (3 pins) ASUS TUEG-VM User's Manual 15 H/W SETUP Layout Contents 3. 3.
HARDWARE SETUP 3.2 Layout Contents Motherboard Settings 1) JEN p. 18 JumperFree™ Mode (Enable/Disable) 2) USBPWR1 USBPWR2 p. 19 USB Device Wake Up (Enable/Disable) 3) USBCNR1/USBCNR2 p. 19 USB/CNR... pins) 7) MIC2 p. 37 Internal Microphone Connector (3 pins) 8) AFPANEL p. 37 ASUS iPanel Connector (24-1 pins) 9) AAPANEL p. 37 ASUS iPanel Audio Connector (10-1 pins) 10) SMB p. 38 SMBus Connector (6-1 pins) 11) ACHA p. 38 Chassis Intrusion Connector (2 pins) 12) WOL_CON p. 39 Wake-On-LAN Connector (3 pins) ASUS TUEG-VM User's Manual 15 H/W SETUP Layout Contents 3. 3.
TUEG-VM User Manual
Page 17
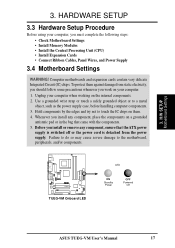
... handling computer components. 3. To protect them . 4. Use a grounded wrist strap or touch a safely grounded object or to the motherboard, peripherals, and/or components. ® TUEG-VM TUEG-VM Onboard LED LED ON Standby Power OFF Powered Off ASUS TUEG-VM User's Manual 17 HARDWARE SETUP 3.3 Hardware Setup Procedure Before using your computer when working on them against damage...
... handling computer components. 3. To protect them . 4. Use a grounded wrist strap or touch a safely grounded object or to the motherboard, peripherals, and/or components. ® TUEG-VM TUEG-VM Onboard LED LED ON Standby Power OFF Powered Off ASUS TUEG-VM User's Manual 17 HARDWARE SETUP 3.3 Hardware Setup Procedure Before using your computer when working on them against damage...
TUEG-VM User Manual
Page 18
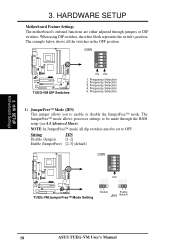
... 3. DSW ON 12345 ® TUEG-VM TUEG-VM DIP Switches ON OFF 1. Frequency Selection. 1) JumperFree™ Mode (JEN) This jumper allows you to OFF. 3. HARDWARE SETUP Motherboard Feature Settings The motherboard's onboard functions are either adjusted through the BIOS setup (see 4.4 Advanced Menu). The example below shows ...or disable the JumperFree™ mode. Setting JEN Disable (Jumper) [1-2] Enable (JumperFree) [2-3] (default) DSW ON 12345 ® TUEG-VM TUEG-VM JumperFree™ Mode Setting OFF 12 23 Disable Enable JEN (default) 18 ASUS TUEG-VM User's Manual
... 3. DSW ON 12345 ® TUEG-VM TUEG-VM DIP Switches ON OFF 1. Frequency Selection. 1) JumperFree™ Mode (JEN) This jumper allows you to OFF. 3. HARDWARE SETUP Motherboard Feature Settings The motherboard's onboard functions are either adjusted through the BIOS setup (see 4.4 Advanced Menu). The example below shows ...or disable the JumperFree™ mode. Setting JEN Disable (Jumper) [1-2] Enable (JumperFree) [2-3] (default) DSW ON 12345 ® TUEG-VM TUEG-VM JumperFree™ Mode Setting OFF 12 23 Disable Enable JEN (default) 18 ASUS TUEG-VM User's Manual
TUEG-VM User Manual
Page 19
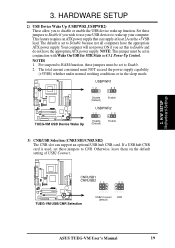
...2. Your computer will not power ON if you to wake up function. Otherwise, leave them on the +5VSB lead. H/W SETUP Motherboard Settings 3. The default is used, set to RAM function, these jumpers must NOT exceed the power supply capability (+5VSB) whether under... all computers have the appropriate ATX power supply. NOTES 1. CNRUSB1 CNRUSB2 12 ® TUEG-VM TUEG-VM USB/CNR Selection USB2 Connect (default) 23 CNR ASUS TUEG-VM User's Manual 19 USBPWR1 12 23 ® TUEG-VM TUEG-VM USB Device Wake Up Disable (Default) Enable USBPWR2 12 23 Disable (Default) Enable ...
...2. Your computer will not power ON if you to wake up function. Otherwise, leave them on the +5VSB lead. H/W SETUP Motherboard Settings 3. The default is used, set to RAM function, these jumpers must NOT exceed the power supply capability (+5VSB) whether under... all computers have the appropriate ATX power supply. NOTES 1. CNRUSB1 CNRUSB2 12 ® TUEG-VM TUEG-VM USB/CNR Selection USB2 Connect (default) 23 CNR ASUS TUEG-VM User's Manual 19 USBPWR1 12 23 ® TUEG-VM TUEG-VM USB Device Wake Up Disable (Default) Enable USBPWR2 12 23 Disable (Default) Enable ...

TUEG-VM User Manual
Page 20
Setting Enable Disable AUD_EN1 [1-2] (default) [2-3] ® TUEG-VM TUEG-VM Audio Codec Setting AUD_EN1 12 23 Enable Disable (Default) 5) Onboard LAN Setting (LAN_EN) The onboard LAN may be enabled or disabled... be enabled/disabled with this section). H/W SETUP Motherboard Settings 3. HARDWARE SETUP 4) Onboard Audio CODEC Setting (AUD_EN1) (available on any of these jumpers. Setting LAN_EN Enable Disable [1-2] (default) [2-3] ® TUEG-VM TUEG-VM On Board Lan Setting LAN_EN 12 Enable (default) 23 Disable 20 ASUS TUEG-VM User's Manual If using a PCI audio card ...
Setting Enable Disable AUD_EN1 [1-2] (default) [2-3] ® TUEG-VM TUEG-VM Audio Codec Setting AUD_EN1 12 23 Enable Disable (Default) 5) Onboard LAN Setting (LAN_EN) The onboard LAN may be enabled or disabled... be enabled/disabled with this section). H/W SETUP Motherboard Settings 3. HARDWARE SETUP 4) Onboard Audio CODEC Setting (AUD_EN1) (available on any of these jumpers. Setting LAN_EN Enable Disable [1-2] (default) [2-3] ® TUEG-VM TUEG-VM On Board Lan Setting LAN_EN 12 Enable (default) 23 Disable 20 ASUS TUEG-VM User's Manual If using a PCI audio card ...
TUEG-VM User Manual
Page 21
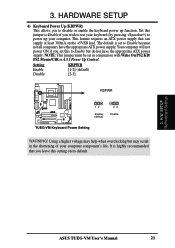
Setting Enable KBPWR [1-2] (default) Disable [2-3] KBPWR ® TUEG-VM 12 Enable (default) 23 Disable TUEG-VM Keyboard Power Setting WARNING! H/W SETUP Motherboard Settings ASUS TUEG-VM User's Manual 21 Your computer will not power ON if you set this to Enable because not all computers have the appropriate ATX power supply. ...
Setting Enable KBPWR [1-2] (default) Disable [2-3] KBPWR ® TUEG-VM 12 Enable (default) 23 Disable TUEG-VM Keyboard Power Setting WARNING! H/W SETUP Motherboard Settings ASUS TUEG-VM User's Manual 21 Your computer will not power ON if you set this to Enable because not all computers have the appropriate ATX power supply. ...
TUEG-VM User Manual
Page 22
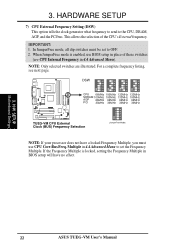
... 66MHz 100MHz 133MHz 133MHz SDRAM 100MHz 100MHz 133MHz 100MHz AGP 66MHz 66MHz 66MHz 66MHz PCI 33MHz 33MHz 33MHz 33MHz ON 12345 TUEG-VM CPU External Clock (BUS) Frequency Selection (JumperFree Mode) NOTE: If your processor does not have no effect. 3. In JumperFree ...will have a locked Frequency Multiple, you must be set the Frequency Multiple. Multiple in place of the CPU's External frequency. H/W SETUP Motherboard Settings 22 ASUS TUEG-VM User's Manual This allows the selection of these switches (see next page. If the Frequency Multiple is enabled, use CPU Core:Bus ...
... 66MHz 100MHz 133MHz 133MHz SDRAM 100MHz 100MHz 133MHz 100MHz AGP 66MHz 66MHz 66MHz 66MHz PCI 33MHz 33MHz 33MHz 33MHz ON 12345 TUEG-VM CPU External Clock (BUS) Frequency Selection (JumperFree Mode) NOTE: If your processor does not have no effect. 3. In JumperFree ...will have a locked Frequency Multiple, you must be set the Frequency Multiple. Multiple in place of the CPU's External frequency. H/W SETUP Motherboard Settings 22 ASUS TUEG-VM User's Manual This allows the selection of these switches (see next page. If the Frequency Multiple is enabled, use CPU Core:Bus ...

TUEG-VM User Manual
Page 23
...] [O N ] [O FF] [O N ] [O FF] [O N ] [O FF] [O N ] [O FF] [O N ] [O FF] [O N ] [O FF] [O N ] [O FF] [O N ] [O FF] For updated processor settings, visit ASUS's web site (see ASUS CONTACT INFORMATION) ASUS TUEG-VM User's Manual 23 HARDWARE SETUP External Frequency Table The following table is for use by experienced motherboard installers only. H/W SETUP Motherboard Settings 3. Overclocking can result in system instability or even shortening the life of...
...] [O N ] [O FF] [O N ] [O FF] [O N ] [O FF] [O N ] [O FF] [O N ] [O FF] [O N ] [O FF] [O N ] [O FF] [O N ] [O FF] For updated processor settings, visit ASUS's web site (see ASUS CONTACT INFORMATION) ASUS TUEG-VM User's Manual 23 HARDWARE SETUP External Frequency Table The following table is for use by experienced motherboard installers only. H/W SETUP Motherboard Settings 3. Overclocking can result in system instability or even shortening the life of...
TUEG-VM User Manual
Page 24
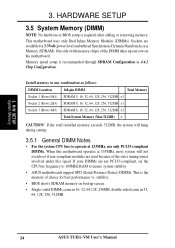
...PC133-compliant, set the CPU bus frequency to 100MHz RAM to ensure system stability. • ASUS motherboards support SPD (Serial Presence Detect) DIMMs. This is the memory of the strict timing issues involved...) unbuffered Synchronous Dynamic Random Access Memory (SDRAM). stability. • BIOS shows SDRAM memory on the motherboard. HARDWARE SETUP 3.5 System Memory (DIMM) NOTE: No hardware or BIOS setup is recommended through SDRAM Configuration... come in 32, 64, 128, 256, 512MB. 24 ASUS TUEG-VM User's Manual Install memory in 4.4.1 Chip Configuration. 3. H/W SETUP System Memory 3.
...PC133-compliant, set the CPU bus frequency to 100MHz RAM to ensure system stability. • ASUS motherboards support SPD (Serial Presence Detect) DIMMs. This is the memory of the strict timing issues involved...) unbuffered Synchronous Dynamic Random Access Memory (SDRAM). stability. • BIOS shows SDRAM memory on the motherboard. HARDWARE SETUP 3.5 System Memory (DIMM) NOTE: No hardware or BIOS setup is recommended through SDRAM Configuration... come in 32, 64, 128, 256, 512MB. 24 ASUS TUEG-VM User's Manual Install memory in 4.4.1 Chip Configuration. 3. H/W SETUP System Memory 3.

TUEG-VM User Manual
Page 79
S/W SETUP OSA/ppSliucpatpioortnsCD ASUS TUEG-VM User's Manual 79 If the menu does not appear, double-click or run ...98/2000/ Millenium, but for Windows 95, you start Windows for the first time after the installation of the motherboard, Windows 98 detects the onboard audio and video chips and may attempt to change at any time without notice. 5.2.1...updates when using new hardware to restart, select No and then follow the normal setup procedures on the screen. 5.2 TUEG-VM Motherboard Support CD To begin using the support CD, insert it into the CD-ROM drive. 5. When prompted to ensure...
S/W SETUP OSA/ppSliucpatpioortnsCD ASUS TUEG-VM User's Manual 79 If the menu does not appear, double-click or run ...98/2000/ Millenium, but for Windows 95, you start Windows for the first time after the installation of the motherboard, Windows 98 detects the onboard audio and video chips and may attempt to change at any time without notice. 5.2.1...updates when using new hardware to restart, select No and then follow the normal setup procedures on the screen. 5.2 TUEG-VM Motherboard Support CD To begin using the support CD, insert it into the CD-ROM drive. 5. When prompted to ensure...


