
T2-R User Manual
Page 4
... up 44 3.3.1 Running the support CD 45 3.3.2 Drivers menu 45 3.3.3 Utilities 46 3.3.4 ASUS contact information 47 3.3.5 Other information 47 3.4 Software information 48 3.4.1 Multi-channel audio feature 48 3.4.2 ASUS Radio Player 51 3.4.3 ASUS Instant Music 53 3.5 Audio DJ 55 3.5.1 Playing... station 55 3.5.3 Presetting a station 56 3.5.4 Adjusting the volume 56 3.6 ASUS Wireless LAN adapter 57 3.6.1 LED indicators 58 3.6.2 Antenna installation 58 3.6.3 Installing the WLAN Card utilities and driver ......... 59 3.6.4 Other support CD options 59 3.6.5 The Control Center utility ...
... up 44 3.3.1 Running the support CD 45 3.3.2 Drivers menu 45 3.3.3 Utilities 46 3.3.4 ASUS contact information 47 3.3.5 Other information 47 3.4 Software information 48 3.4.1 Multi-channel audio feature 48 3.4.2 ASUS Radio Player 51 3.4.3 ASUS Instant Music 53 3.5 Audio DJ 55 3.5.1 Playing... station 55 3.5.3 Presetting a station 56 3.5.4 Adjusting the volume 56 3.6 ASUS Wireless LAN adapter 57 3.6.1 LED indicators 58 3.6.2 Antenna installation 58 3.6.3 Installing the WLAN Card utilities and driver ......... 59 3.6.4 Other support CD options 59 3.6.5 The Control Center utility ...
T2-R User Manual
Page 8
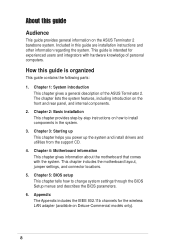
...Motherboard information This chapter gives information about the motherboard that comes with hardware knowledge of the ASUS Terminator 2. Chapter 3: Starting up This chapter helps you power up the system and install drivers and utilities from the support CD. 4. Safeguards About this guide is intended for the... wireless LAN adapter (available on Deluxe-Commercial models only). 8 Appendix The Appendix includes the IEEE 802...
...Motherboard information This chapter gives information about the motherboard that comes with hardware knowledge of the ASUS Terminator 2. Chapter 3: Starting up This chapter helps you power up the system and install drivers and utilities from the support CD. 4. Safeguards About this guide is intended for the... wireless LAN adapter (available on Deluxe-Commercial models only). 8 Appendix The Appendix includes the IEEE 802...
T2-R User Manual
Page 22
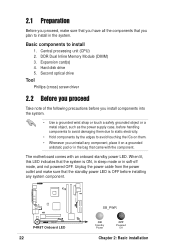
... mode or in soft-off mode, and not powered OFF. DDR Dual Inline Memory Module (DIMM) 3. Expansion card(s) 4. Second optical drive Tool Phillips (cross) screw driver 2.2 Before you proceed Take note of the following precautions before you install components into the system. • Use a grounded wrist strap or touch a safely grounded...
... mode or in soft-off mode, and not powered OFF. DDR Dual Inline Memory Module (DIMM) 3. Expansion card(s) 4. Second optical drive Tool Phillips (cross) screw driver 2.2 Before you proceed Take note of the following precautions before you install components into the system. • Use a grounded wrist strap or touch a safely grounded...
T2-R User Manual
Page 23
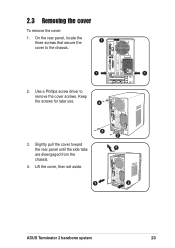
Slightly pull the cover toward the rear panel until the side tabs are disengaged from the chassis. 4. Keep the screws for later use. 2 3. Lift the cover, then set aside. 2 2 4 3 3 ASUS Terminator 2 barebone system 23 2.3 Removing the cover To remove the cover: 1. On the rear panel, locate the three screws that secure the 1 cover to remove the cover screws. Use a Phillips screw driver to the chassis. 1 1 2.
Slightly pull the cover toward the rear panel until the side tabs are disengaged from the chassis. 4. Keep the screws for later use. 2 3. Lift the cover, then set aside. 2 2 4 3 3 ASUS Terminator 2 barebone system 23 2.3 Removing the cover To remove the cover: 1. On the rear panel, locate the three screws that secure the 1 cover to remove the cover screws. Use a Phillips screw driver to the chassis. 1 1 2.

T2-R User Manual
Page 32
...-- -- -- -- shared -- See Chapter 5 for the expansion card. When using a PCI card on the system and change the necessary BIOS settings, if any. Install the software drivers for information on the next page. 3. used B used 10* 5 IRQ Holder for PCI Steering 11* 6 IRQ Holder for PCI Steering 12* 7 PS/2 Compatible Mouse Port...installing the expansion card, configure it by adjusting the software settings. 1. IRQ assignments for ISA or PCI devices. Turn on shared slots, ensure that the drivers support "Share IRQ" or that the cards do not need IRQ assignments.
...-- -- -- -- shared -- See Chapter 5 for the expansion card. When using a PCI card on the system and change the necessary BIOS settings, if any. Install the software drivers for information on the next page. 3. used B used 10* 5 IRQ Holder for PCI Steering 11* 6 IRQ Holder for PCI Steering 12* 7 PS/2 Compatible Mouse Port...installing the expansion card, configure it by adjusting the software settings. 1. IRQ assignments for ISA or PCI devices. Turn on shared slots, ensure that the drivers support "Share IRQ" or that the cards do not need IRQ assignments.
T2-R User Manual
Page 35
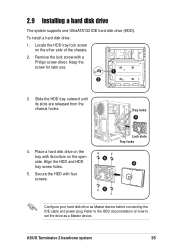
Align the HDD and HDD tray screw holes. 5. ASUS Terminator 2 barebone system 35 Remove the lock screw with its slots are released from the chassis hooks. Place a hard disk drive on the open side. Locate ... system supports one UltraATA133 IDE hard disk drive (HDD). Tray locks 3 4. Slide the HDD tray outward until its bottom on the tray with a Philips screw driver.
Align the HDD and HDD tray screw holes. 5. ASUS Terminator 2 barebone system 35 Remove the lock screw with its slots are released from the chassis hooks. Place a hard disk drive on the open side. Locate ... system supports one UltraATA133 IDE hard disk drive (HDD). Tray locks 3 4. Slide the HDD tray outward until its bottom on the tray with a Philips screw driver.
T2-R User Manual
Page 43
MODE ASUS Terminator 2 barebone system Starting up Chapter 3 This chapter helps you power up the system and install drivers and utilities from the support CD.
MODE ASUS Terminator 2 barebone system Starting up Chapter 3 This chapter helps you power up the system and install drivers and utilities from the support CD.

T2-R User Manual
Page 45
... computer, browse the contents of the support CD to run the CD. 3.3.2 Drivers menu The drivers menu shows the available device drivers if the system detects installed devices. AD1888 Driver and Application This item installs the AD1888 audio driver and SoundMax® application. ASUS Terminator 2 barebone system 45 Double-click the ASSETUP.EXE to locate the file...
... computer, browse the contents of the support CD to run the CD. 3.3.2 Drivers menu The drivers menu shows the available device drivers if the system detects installed devices. AD1888 Driver and Application This item installs the AD1888 audio driver and SoundMax® application. ASUS Terminator 2 barebone system 45 Double-click the ASSETUP.EXE to locate the file...

T2-R User Manual
Page 46
... (PDF). This utility requires an Internet connection either through a network or an Internet Service Provider (ISP). See page 51 for details. ASUS PC Probe This utility continuously monitors vital system information such as fan rotations, CPU temperature, and system voltages, and alerts you on any ...detected problems. This utility helps you to tune in to update the motherboard BIOS and drivers. The Acrobat® Acrobat Reader® software is for detailed information. View the PC-cillin online help for viewing files saved in a...
... (PDF). This utility requires an Internet connection either through a network or an Internet Service Provider (ISP). See page 51 for details. ASUS PC Probe This utility continuously monitors vital system information such as fan rotations, CPU temperature, and system voltages, and alerts you on any ...detected problems. This utility helps you to tune in to update the motherboard BIOS and drivers. The Acrobat® Acrobat Reader® software is for detailed information. View the PC-cillin online help for viewing files saved in a...

T2-R User Manual
Page 48
Setting to multi-channel audio After installing the audio driver, follow these instructions to adjust the audio settings and avail of options. 4. From the taskbar, double-click on the SoundMAX Digital Integrated Audio icon ...AC '97 audio CODEC provides 6-channel audio capability. Select the option Surround Sound Speakers (5.1 Surround). 5. The default setting is Stereo Speakers (2-channel). Install the AD1888 Driver and Application from the support CD to display the SoundMAX Control Panel. 2. To set to display a list of the onboard 6-channel audio feature. 1. 3.4 Software information...
Setting to multi-channel audio After installing the audio driver, follow these instructions to adjust the audio settings and avail of options. 4. From the taskbar, double-click on the SoundMAX Digital Integrated Audio icon ...AC '97 audio CODEC provides 6-channel audio capability. Select the option Surround Sound Speakers (5.1 Surround). 5. The default setting is Stereo Speakers (2-channel). Install the AD1888 Driver and Application from the support CD to display the SoundMAX Control Panel. 2. To set to display a list of the onboard 6-channel audio feature. 1. 3.4 Software information...
T2-R User Manual
Page 58
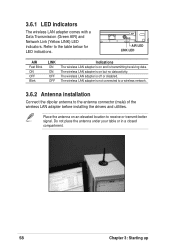
... a Data Transmission (Green AIR) and Network Link (Yellow LINK) LED indicators. Refer to the antenna connector (male) of the wireless LAN adapter before installing the drivers and utilities.
... a Data Transmission (Green AIR) and Network Link (Yellow LINK) LED indicators. Refer to the antenna connector (male) of the wireless LAN adapter before installing the drivers and utilities.

T2-R User Manual
Page 59
... Screen Savers. Click this option to begin installation. 3.6.4 Other support CD options Uninstall ASUS WLAN Card Utilities/ Driver. You may access the user guide by clicking the Read/Install User Documentation from your system. An installation window appears. 3. ASUS Terminator 2 barebone system 59 Explore this option to view the user handbook, installation, and quick...
... Screen Savers. Click this option to begin installation. 3.6.4 Other support CD options Uninstall ASUS WLAN Card Utilities/ Driver. You may access the user guide by clicking the Read/Install User Documentation from your system. An installation window appears. 3. ASUS Terminator 2 barebone system 59 Explore this option to view the user handbook, installation, and quick...
T2-R User Manual
Page 67
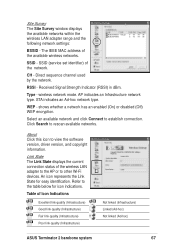
... Received Signal Strength Indicator (RSSI) in dBm. STA indicates an Ad-hoc network type. Click Search to view the software version, driver version, and copyright information. Refer to the table below for easy identification. RSSI - SSID (service set identifier) of Icon Indications ...(Infrastructure) Fair link quality (Infrastructure) Poor link quality (Infrastructure) Not linked (Infrastructure) Linked (Ad-hoc) Not linked (Ad-hoc) ASUS Terminator 2 barebone system 67 Table of the network. The IEEE MAC address of the wireless LAN adapter to the AP or to establish connection....
... Received Signal Strength Indicator (RSSI) in dBm. STA indicates an Ad-hoc network type. Click Search to view the software version, driver version, and copyright information. Refer to the table below for easy identification. RSSI - SSID (service set identifier) of Icon Indications ...(Infrastructure) Fair link quality (Infrastructure) Poor link quality (Infrastructure) Not linked (Infrastructure) Linked (Ad-hoc) Not linked (Ad-hoc) ASUS Terminator 2 barebone system 67 Table of the network. The IEEE MAC address of the wireless LAN adapter to the AP or to establish connection....

T2-R User Manual
Page 89
...method, then click Next. The Drivers menu appears. 2. The ASUS Update utility is available in the optical drive. The ASUS Update initial screen appears. 2. Place the support CD in the support CD that comes with the motherboard package. ASUS Update requires an Internet connection either...(ISP). Launch the utility from the Windows desktop by clicking Start > Programs > ASUS > ASUSUpdate > ASUSUpdate. To install ASUS Update: 1. ASUS Terminator 2 barebone system 89 Click the Utilities tab, then click Install ASUS Update VX.XX.XX. See page 46 for the Utilities screen menu. 3. Select ...
...method, then click Next. The Drivers menu appears. 2. The ASUS Update utility is available in the optical drive. The ASUS Update initial screen appears. 2. Place the support CD in the support CD that comes with the motherboard package. ASUS Update requires an Internet connection either...(ISP). Launch the utility from the Windows desktop by clicking Start > Programs > ASUS > ASUSUpdate > ASUSUpdate. To install ASUS Update: 1. ASUS Terminator 2 barebone system 89 Click the Utilities tab, then click Install ASUS Update VX.XX.XX. See page 46 for the Utilities screen menu. 3. Select ...


