
User Manual
Page 8
... different from digital apparatus set out in a residential installation. If this equipment. Operation is no guarantee that may cause undesired operation. This equipment has been tested and found to comply with the limits for compliance could void the user's authority to radio communications. viii Canadian Department of Communications Statement This digital...
... different from digital apparatus set out in a residential installation. If this equipment. Operation is no guarantee that may cause undesired operation. This equipment has been tested and found to comply with the limits for compliance could void the user's authority to radio communications. viii Canadian Department of Communications Statement This digital...
User Manual
Page 75
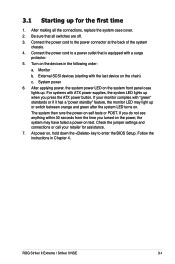
... for the first time 1. Follow the instructions in the following order: a. After applying power, the system power LED on . Turn on test. If you do not see anything within 30 seconds from the time you press the ATX power button. Check the jumper settings and connections ... the key to the power connector at the back of the system chassis. 4. Connect the power cord to enter the BIOS Setup. ROG Striker II Extreme / Striker II NSE 3-1 Connect the power cord to a power outlet that all the connections, replace the system case cover. 2. 3.1 Starting up when you ...
... for the first time 1. Follow the instructions in the following order: a. After applying power, the system power LED on . Turn on test. If you do not see anything within 30 seconds from the time you press the ATX power button. Check the jumper settings and connections ... the key to the power connector at the back of the system chassis. 4. Connect the power cord to enter the BIOS Setup. ROG Striker II Extreme / Striker II NSE 3-1 Connect the power cord to a power outlet that all the connections, replace the system case cover. 2. 3.1 Starting up when you ...
User Manual
Page 82
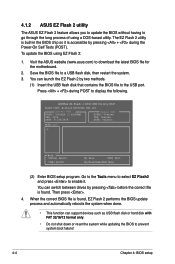
... is found . Save the BIOS file to download the latest BIOS file for the motherboard. 2. When the correct BIOS file is accessible by two methods. (1) Insert the USB... it . ASUSTek EZ Flash 2 BIOS ROM Utility B327 FLASH TYPE: Winbond W39V080A 8Mb LPC Current ROM BOARD: STRIKER II EXTREME VER: 0106 DATE: 01/18/2008 Update ROM BOARD: Unknown VER: Unknown DATE: Unknown PATH: A:\ ... 3. Press + during the Power-On Self Tests (POST). Then press . 4. To update the BIOS using a DOS‑based utility. 4.1.2 ASUS EZ Flash 2 utility The ASUS EZ Flash 2 feature allows you to update ...
... is found . Save the BIOS file to download the latest BIOS file for the motherboard. 2. When the correct BIOS file is accessible by two methods. (1) Insert the USB... it . ASUSTek EZ Flash 2 BIOS ROM Utility B327 FLASH TYPE: Winbond W39V080A 8Mb LPC Current ROM BOARD: STRIKER II EXTREME VER: 0106 DATE: 01/18/2008 Update ROM BOARD: Unknown VER: Unknown DATE: Unknown PATH: A:\ ... 3. Press + during the Power-On Self Tests (POST). Then press . 4. To update the BIOS using a DOS‑based utility. 4.1.2 ASUS EZ Flash 2 utility The ASUS EZ Flash 2 feature allows you to update ...
User Manual
Page 87
... (www.asus.com) to download the latest BIOS file for most conditions to use the Setup program, you can change the power management settings. When you start up the computer, the system provides you with its test routines. Press during the Power-On Self-Test (POST) to...you can also restart by pressing the reset button on your BIOS." ROG Striker II Extreme / Striker II NSE 4-9 otherwise, POST continues with the opportunity to use as possible. If you are not prompted to run this motherboard. If the system becomes unstable after POST, restart the system by pressing ...
... (www.asus.com) to download the latest BIOS file for most conditions to use the Setup program, you can change the power management settings. When you start up the computer, the system provides you with its test routines. Press during the Power-On Self-Test (POST) to...you can also restart by pressing the reset button on your BIOS." ROG Striker II Extreme / Striker II NSE 4-9 otherwise, POST continues with the opportunity to use as possible. If you are not prompted to run this motherboard. If the system becomes unstable after POST, restart the system by pressing ...

User Manual
Page 103
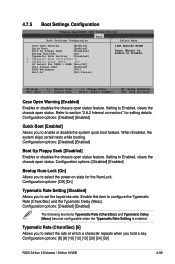
... LAN1(1-2) LAN1(3-6) LAN1(4-5) LAN1(7-8) Status Open Open Open Open Length N/A N/A N/A N/A Item Specific Help Enable or Disable LAN cable check during the Power-On Self‑Test (POST). Phoenix-AwardBIOS CMOS Setup Utility Extreme Tweaker �M�a��i��n� Advanced Power AI NET2 PCIPnP Onboard Device Configuration USB Configuration...: Save and Exit POST Check LAN/LAN2 Cable [Disabled] Enables or disables checking of the LAN/LAN2 cable during POST. Configuration options: [Disabled] [Enabled] ROG Striker II Extreme / Striker II NSE 4-25
... LAN1(1-2) LAN1(3-6) LAN1(4-5) LAN1(7-8) Status Open Open Open Open Length N/A N/A N/A N/A Item Specific Help Enable or Disable LAN cable check during the Power-On Self‑Test (POST). Phoenix-AwardBIOS CMOS Setup Utility Extreme Tweaker �M�a��i��n� Advanced Power AI NET2 PCIPnP Onboard Device Configuration USB Configuration...: Save and Exit POST Check LAN/LAN2 Cable [Disabled] Enables or disables checking of the LAN/LAN2 cable during POST. Configuration options: [Disabled] [Enabled] ROG Striker II Extreme / Striker II NSE 4-25
User Manual
Page 117
... to Enabled, clears the chassis open status. Setting to set the keystroke rate. When Enabled, the system skips certain tests while booting. Configuration options: [6] [8] [10] [12] [15] [20] [24] [30] ROG Striker II Extreme / Striker II NSE 4-39 Configuration options: [Disabled] [Enabled] The following two items Typematic Rate (Chars/Sec) and Typematic Delay (Msec) become configurable...
... to Enabled, clears the chassis open status. Setting to set the keystroke rate. When Enabled, the system skips certain tests while booting. Configuration options: [6] [8] [10] [12] [15] [20] [24] [30] ROG Striker II Extreme / Striker II NSE 4-39 Configuration options: [Disabled] [Enabled] The following two items Typematic Rate (Chars/Sec) and Typematic Delay (Msec) become configurable...

User Manual
Page 135
...item Full Screen Logo is automatically installed when you wish to [Enabled] if you install the ASUS Update utility from the drop down menu, then click Next. 5. ROG Striker II Extreme / Striker II NSE 5-9 When prompted, locate the new BIOS file, then click Next. See section "5.2.3 Utilities ... the ASUS website. 5.3 Software information Most of your original BIOS file, or obtain the latest BIOS version from the drop down menu, then click Next. 3. See section 4.1.3 Updating the BIOS. • Make sure that appears on screen during the Power‑On Self-Tests (POST...
...item Full Screen Logo is automatically installed when you wish to [Enabled] if you install the ASUS Update utility from the drop down menu, then click Next. 5. ROG Striker II Extreme / Striker II NSE 5-9 When prompted, locate the new BIOS file, then click Next. See section "5.2.3 Utilities ... the ASUS website. 5.3 Software information Most of your original BIOS file, or obtain the latest BIOS version from the drop down menu, then click Next. 3. See section 4.1.3 Updating the BIOS. • Make sure that appears on screen during the Power‑On Self-Tests (POST...

User Manual
Page 137
...diagnostics. Click Virtual Cable Tester from the Windows® desktop by clicking Start > All Programs > Marvell > Virtual Cable Tester. 2. ROG Striker II Extreme / Striker II NSE 5-11 The VCT feature reduces networking and support costs through a highly manageable and controlled network system. This utility can be incorporated in the ... 1. Launch the VCT utility from the menu to 64 ns at one meter accuracy. Click the Run button to perform a cable test. • The VCT only runs on systems with Windows® XP or Windows® Vista™ operating systems. • The VCT utility...
...diagnostics. Click Virtual Cable Tester from the Windows® desktop by clicking Start > All Programs > Marvell > Virtual Cable Tester. 2. ROG Striker II Extreme / Striker II NSE 5-11 The VCT feature reduces networking and support costs through a highly manageable and controlled network system. This utility can be incorporated in the ... 1. Launch the VCT utility from the menu to 64 ns at one meter accuracy. Click the Run button to perform a cable test. • The VCT only runs on systems with Windows® XP or Windows® Vista™ operating systems. • The VCT utility...

User Manual
Page 140
..., Dynamics, Brilliance, and Deep Bass of each preset. Move the sliders to the factory defaults. Click Save to save the changes to perform speaker test. Press the Test Speakers button to the current preset. Port settings Click this port settings tab to change the settings of the Speakers and SPDIF Interface or...
..., Dynamics, Brilliance, and Deep Bass of each preset. Move the sliders to the factory defaults. Click Save to save the changes to perform speaker test. Press the Test Speakers button to the current preset. Port settings Click this port settings tab to change the settings of the Speakers and SPDIF Interface or...

User Manual
Page 141
...Port settings Click the tab to configure and customize all the DSP presets frequencies. More Settings Click for Microphone or Line In. Record testing Click the tab to select an enhanced microphone input features, including No Filtering, Speakerphone, Voice Recording, and Directional Beam. Recording Settings ...To change the recording settings, click the Recording button on the control panel. Equalizer Allows you to perform test recording and play the test sample through the speakers or the SPDIF interface. ROG Striker II Extreme / Striker II NSE 5-15
...Port settings Click the tab to configure and customize all the DSP presets frequencies. More Settings Click for Microphone or Line In. Record testing Click the tab to select an enhanced microphone input features, including No Filtering, Speakerphone, Voice Recording, and Directional Beam. Recording Settings ...To change the recording settings, click the Recording button on the control panel. Equalizer Allows you to perform test recording and play the test sample through the speakers or the SPDIF interface. ROG Striker II Extreme / Striker II NSE 5-15

User Manual
Page 144
Click the Test button to adjust the volume as you speak. 5-18 Chapter 5: Software support Adjust speaker volume This screen helps you adjust microphone volume. You will be asked to read pre-written text to allow the AudioWizard to hear the changes you have installed. Adjust microphone volume This screen helps you adjust speaker volume. Jack configuration This screen helps you configure your computer's audio ports, depending on the audio devices you have made.
Click the Test button to adjust the volume as you speak. 5-18 Chapter 5: Software support Adjust speaker volume This screen helps you adjust microphone volume. You will be asked to read pre-written text to allow the AudioWizard to hear the changes you have installed. Adjust microphone volume This screen helps you adjust speaker volume. Jack configuration This screen helps you configure your computer's audio ports, depending on the audio devices you have made.
User Manual
Page 162
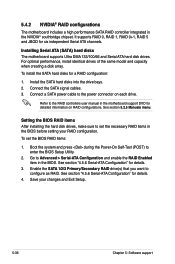
...See section "4.5.6 Serial-ATA Configuration" for details. 3. Save your RAID configuration. Boot the system and press during the Power-On Self-Test (POST) to configure as RAID. Enable the SATA 1/2/3 Primary/Secondary RAID drive(s) that you want to enter the BIOS Setup Utility...NVIDIA® southbridge chipset. See section 5.2.5 Manuals menu. 5.4.2 NVIDIA® RAID configurations The motherboard includes a high performance SATA RAID controller integrated in the motherboard support DVD for detailed information on each drive. To install the SATA hard disks for six ...
...See section "4.5.6 Serial-ATA Configuration" for details. 3. Save your RAID configuration. Boot the system and press during the Power-On Self-Test (POST) to configure as RAID. Enable the SATA 1/2/3 Primary/Secondary RAID drive(s) that you want to enter the BIOS Setup Utility...NVIDIA® southbridge chipset. See section 5.2.5 Manuals menu. 5.4.2 NVIDIA® RAID configurations The motherboard includes a high performance SATA RAID controller integrated in the motherboard support DVD for detailed information on each drive. To install the SATA hard disks for six ...

User Manual
Page 194
... information on screen display, including BIOS logo, CPU type, CPU speed . Initialize Hardware Monitor. 1. Clear CMOS error flag 1. Test F000h segment shadow to CMOS setup. Program CPU internal MTRR (Pentium class CPU) for override. Reset keyboard. Early chipset initialization: ...FSEG DET FLASH TESTCMOS PRG CHIP INIT CLK CHECKCPU INTRINIT INITINT9 CPUSPEED VGA BIOS TESTVRAM RESET KB Description CPU Initiation Test CMOS R/W functionality. Initialize 8042 self-test 1. Disable PS/2 mouse interface (optional). 2. Detect CPU information including brand, type and CPU level (586...
... information on screen display, including BIOS logo, CPU type, CPU speed . Initialize Hardware Monitor. 1. Clear CMOS error flag 1. Test F000h segment shadow to CMOS setup. Program CPU internal MTRR (Pentium class CPU) for override. Reset keyboard. Early chipset initialization: ...FSEG DET FLASH TESTCMOS PRG CHIP INIT CLK CHECKCPU INTRINIT INITINT9 CPUSPEED VGA BIOS TESTVRAM RESET KB Description CPU Initiation Test CMOS R/W functionality. Initialize 8042 self-test 1. Disable PS/2 mouse interface (optional). 2. Detect CPU information including brand, type and CPU level (586...

User Manual
Page 195
...CMOS error Mouse error HDD smart function error Hard monitor error AI NET error Case open Clear EPA or customization logo. 1. ROG Striker II Extreme / Striker II NSE A-5 Initialize the APIC for channel 2. On MP platform, adjust the cacheable range to smaller one in 40:hardware. Initialize floppy... controller 2. Calculate total memory by EPA logo (not for channel 1. Recover the text fond used by testing the last double word of M1 CPU...
...CMOS error Mouse error HDD smart function error Hard monitor error AI NET error Case open Clear EPA or customization logo. 1. ROG Striker II Extreme / Striker II NSE A-5 Initialize the APIC for channel 2. On MP platform, adjust the cacheable range to smaller one in 40:hardware. Initialize floppy... controller 2. Calculate total memory by EPA logo (not for channel 1. Recover the text fond used by testing the last double word of M1 CPU...


