User Manual
Page 6
... Definition Audio utility)... 5-12 5.3.4 ASUS PC Probe II 5-21 5.3.5 ASUS AI Suite 5-27 5.3.6 ASUS EPU Utility-AI Gear 3 5-29 5.3.7 ASUS AI Nap 5-31 5.3.8 ASUS Q-Fan Plus 5-32 5.3.9 ASUS AI Booster 5-33 5.3.10 CPU Level Up 5-34 5.4 RAID configurations 5-35 5.4.1 RAID definitions 5-35 5.4.2 NVIDIA® RAID configurations 5-36 5.4.4 JMicron® RAID Configuration 5-43 5.5 Creating a RAID driver disk 5-51 5.5.1 Creating a RAID driver disk without entering the OS.... 5-51 5.5.2 Creating a RAID/SATA driver disk in Windows 5-51 Chapter 6: NVIDIA® SLI™ technology support...
... Definition Audio utility)... 5-12 5.3.4 ASUS PC Probe II 5-21 5.3.5 ASUS AI Suite 5-27 5.3.6 ASUS EPU Utility-AI Gear 3 5-29 5.3.7 ASUS AI Nap 5-31 5.3.8 ASUS Q-Fan Plus 5-32 5.3.9 ASUS AI Booster 5-33 5.3.10 CPU Level Up 5-34 5.4 RAID configurations 5-35 5.4.1 RAID definitions 5-35 5.4.2 NVIDIA® RAID configurations 5-36 5.4.4 JMicron® RAID Configuration 5-43 5.5 Creating a RAID driver disk 5-51 5.5.1 Creating a RAID driver disk without entering the OS.... 5-51 5.5.2 Creating a RAID/SATA driver disk in Windows 5-51 Chapter 6: NVIDIA® SLI™ technology support...
User Manual
Page 12
...;�s�lo��t.�) 2 x PCI 2.2 slots Supports NVIDIA® 3-way SLI graphics cards (triple at back I �E��x�tr�e�m��e��) - 4 x 240-pin DIMM sockets support unbuffered non-ECC DDR3 1600(O.C.)/1333/1066/800MHz memory modules (Striker II NSE) - ADI 1988B 8-channel High Definition Audio CODEC - Noise Filter Coaxial / Optical S/PDIF Out ports at x16 �m�o�d�...
...;�s�lo��t.�) 2 x PCI 2.2 slots Supports NVIDIA® 3-way SLI graphics cards (triple at back I �E��x�tr�e�m��e��) - 4 x 240-pin DIMM sockets support unbuffered non-ECC DDR3 1600(O.C.)/1333/1066/800MHz memory modules (Striker II NSE) - ADI 1988B 8-channel High Definition Audio CODEC - Noise Filter Coaxial / Optical S/PDIF Out ports at x16 �m�o�d�...

User Manual
Page 60
....0 connectors Never connect a 1394 cable to the USB connector onboard. 2-34 Chapter 2: Hardware information STRIKER II EXTREME/ STRIKER II NSE Floppy disk drive connector 4. USB 910) These connectors are for the provided floppy disk drive (FDD) signal cable. These USB connectors comply with a covered Pin 5. Doing so will damage the motherboard! Floppy disk drive connector (34-1 pin FLOPPY) This connector is removed to prevent incorrect cable connection when using a FDD cable with USB 2.0 specification that supports up to a slot opening at the back of the system chassis.
....0 connectors Never connect a 1394 cable to the USB connector onboard. 2-34 Chapter 2: Hardware information STRIKER II EXTREME/ STRIKER II NSE Floppy disk drive connector 4. USB 910) These connectors are for the provided floppy disk drive (FDD) signal cable. These USB connectors comply with a covered Pin 5. Doing so will damage the motherboard! Floppy disk drive connector (34-1 pin FLOPPY) This connector is removed to prevent incorrect cable connection when using a FDD cable with USB 2.0 specification that supports up to a slot opening at the back of the system chassis.
User Manual
Page 61
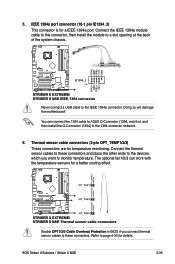
... GND STRIKER II EXTREME IE1394_2 PIN 1 TPA2+ GND TPB2+ +12V STRIKER II EXTREME/ STRIKER II NSE IEEE 1394 connector Never connect a USB cable to the 1394 connector onboard. 6. You can work with the temperature sensors for temperature monitoring. Temperature Ground OPT_TEMP1 Temperature Ground STRIKER II EXTREME OPT_TEMP2 Temperature Ground OPT_TEMP3 STRIKER II EXTREME/ STRIKER II NSE Thermal sensor cable connectors Enable OPT1/2/3 Cable Overheat Protection in BIOS if you want to these connectors and place the other ends to the devices which you connect thermal sensor cables...
... GND STRIKER II EXTREME IE1394_2 PIN 1 TPA2+ GND TPB2+ +12V STRIKER II EXTREME/ STRIKER II NSE IEEE 1394 connector Never connect a USB cable to the 1394 connector onboard. 6. You can work with the temperature sensors for temperature monitoring. Temperature Ground OPT_TEMP1 Temperature Ground STRIKER II EXTREME OPT_TEMP2 Temperature Ground OPT_TEMP3 STRIKER II EXTREME/ STRIKER II NSE Thermal sensor cable connectors Enable OPT1/2/3 Cable Overheat Protection in BIOS if you want to these connectors and place the other ends to the devices which you connect thermal sensor cables...
User Manual
Page 79
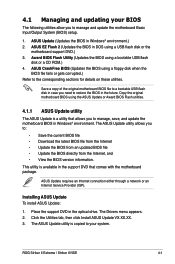
... optical drive. The ASUS Update utility allows you need to manage and update the motherboard Basic Input/Output System (BIOS) setup. 1. The Drivers menu appears. 2. ROG Striker II Extreme / Striker II NSE 4-1 ASUS EZ Flash 2 (Updates the BIOS in Windows® environment.) 2. ASUS Update requires an Internet connection either through a network or an Internet Service Provider (ISP). Place the support DVD in the support DVD that allows you to restore the BIOS in Windows® environment. Installing ASUS Update To install ASUS Update: 1. This utility is a utility that...
... optical drive. The ASUS Update utility allows you need to manage and update the motherboard Basic Input/Output System (BIOS) setup. 1. The Drivers menu appears. 2. ROG Striker II Extreme / Striker II NSE 4-1 ASUS EZ Flash 2 (Updates the BIOS in Windows® environment.) 2. ASUS Update requires an Internet connection either through a network or an Internet Service Provider (ISP). Place the support DVD in the support DVD that allows you to restore the BIOS in Windows® environment. Installing ASUS Update To install ASUS Update: 1. This utility is a utility that...
User Manual
Page 87
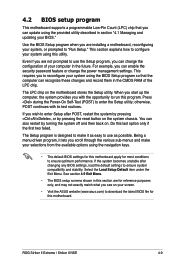
... BIOS file for most conditions to run this utility. The Setup program is designed to make your selections from the available options using the provided utility described in section "4.1 Managing and updating your BIOS." ROG Striker II Extreme / Striker II NSE 4-9 Even if you can change the power management settings. Use the BIOS Setup program when you can update using the navigation keys. • The default BIOS settings for this motherboard apply for this motherboard. See section 4.9 Exit Menu...
... BIOS file for most conditions to run this utility. The Setup program is designed to make your selections from the available options using the provided utility described in section "4.1 Managing and updating your BIOS." ROG Striker II Extreme / Striker II NSE 4-9 Even if you can change the power management settings. Use the BIOS Setup program when you can update using the navigation keys. • The default BIOS settings for this motherboard apply for this motherboard. See section 4.9 Exit Menu...

User Manual
Page 97
...[Auto] [Disabled] SATA Spread Spectrum [Disabled] Configuration options: [Disabled] [Enabled] LDT Spread Spectrum [Auto] Configuration options: [Auto] [Disabled] ROG Striker II Extreme / Striker II NSE 4-19 Configuration options: [Enabled] [Disabled] Virtualization Technology [Enabled] The Virtualization Technology allows a hardware platform to run multiple operating systems simultaneously, enabling one system to boot even without support for CPUs with extended CPUID functions. CPU Internal Thermal Control [Auto] Configuration options: [Auto] [Disabled] Limit CPUID MaxVal [Disabled] Setting...
...[Auto] [Disabled] SATA Spread Spectrum [Disabled] Configuration options: [Disabled] [Enabled] LDT Spread Spectrum [Auto] Configuration options: [Auto] [Disabled] ROG Striker II Extreme / Striker II NSE 4-19 Configuration options: [Enabled] [Disabled] Virtualization Technology [Enabled] The Virtualization Technology allows a hardware platform to run multiple operating systems simultaneously, enabling one system to boot even without support for CPUs with extended CPUID functions. CPU Internal Thermal Control [Auto] Configuration options: [Auto] [Disabled] Limit CPUID MaxVal [Disabled] Setting...

User Manual
Page 105
Front Panel Support Type [HD Audio] Allows you to set it to change the USB-related features. Configuration options: [Disabled] [IDE] [RAID] [AHCI] OnBoard LAN Boot ROM [Disabled] Allows you to legacy AC`97 or high-definition audio depending on legacy operating systems (OS). Configuration options: [Disabled] [Enabled] JMicron RAID controller [IDE] Allows you to other modes. Phoenix-AwardBIOS CMOS Setup Utility Advanced USB Configuration Select Menu USB Controller [Enabled] USB Legacy support [Enabled] USB2.0 Controller [Enabled] Item Specific Help Enable or disable USB ...
Front Panel Support Type [HD Audio] Allows you to set it to change the USB-related features. Configuration options: [Disabled] [IDE] [RAID] [AHCI] OnBoard LAN Boot ROM [Disabled] Allows you to legacy AC`97 or high-definition audio depending on legacy operating systems (OS). Configuration options: [Disabled] [Enabled] JMicron RAID controller [IDE] Allows you to other modes. Phoenix-AwardBIOS CMOS Setup Utility Advanced USB Configuration Select Menu USB Controller [Enabled] USB Legacy support [Enabled] USB2.0 Controller [Enabled] Item Specific Help Enable or disable USB ...

User Manual
Page 107
.../Secondary RAID [Disabled] Enables or disables the RAID function of Gamers on . Configuration options: [Current Time] [User String] ROG Striker II Extreme / Striker II NSE 4-29 Configuration options: [Disabled] [Enabled] LCD Poster Mode [Current Time] Allows you to [Enabled], the box labeled as Republic of the SATA drives. Configuration options: [Disabled] [Enabled] LCD Poster Backlight [Disabled] Allows you to [Enabled], the succeeding items become user-configurable. RAID Enabled [Disabled] Enables or disables the onboard RAID controller. When set to enable or disable...
.../Secondary RAID [Disabled] Enables or disables the RAID function of Gamers on . Configuration options: [Current Time] [User String] ROG Striker II Extreme / Striker II NSE 4-29 Configuration options: [Disabled] [Enabled] LCD Poster Mode [Current Time] Allows you to [Enabled], the box labeled as Republic of the SATA drives. Configuration options: [Disabled] [Enabled] LCD Poster Backlight [Disabled] Allows you to [Enabled], the succeeding items become user-configurable. RAID Enabled [Disabled] Enables or disables the onboard RAID controller. When set to enable or disable...

User Manual
Page 115
... the screen depends on the number of devices installed in the system. Configuration options: [Removable] [Hard Disk] [CDROM] [Disabled] ROG Striker II Extreme / Striker II NSE 4-37 Phoenix-AwardBIOS CMOS Setup Utility Extreme Tweaker �M�a�i�n A�d��v��a��n��c���e��d P��o��w�e�r� Boot Device Priority Removable Drives Hard Disk Drives CDROM Drives Boot Settings Configuration Security Boot Tools Exit Select Menu...
... the screen depends on the number of devices installed in the system. Configuration options: [Removable] [Hard Disk] [CDROM] [Disabled] ROG Striker II Extreme / Striker II NSE 4-37 Phoenix-AwardBIOS CMOS Setup Utility Extreme Tweaker �M�a�i�n A�d��v��a��n��c���e��d P��o��w�e�r� Boot Device Priority Removable Drives Hard Disk Drives CDROM Drives Boot Settings Configuration Security Boot Tools Exit Select Menu...

User Manual
Page 127
... Striker II Extreme / Striker II NSE 5-1 Use the setup procedures presented in your OS documentation for detailed information. • Make sure that you install Windows® 2000 Service Pack 4 or the Windows® XP Service Pack2 or later versions before installing the drivers for better compatibility and system stability. 5.2 Support DVD information The support DVD that came with the motherboard package contains the drivers, software applications, and utilities that you can install to locate the file ASSETUP...
... Striker II Extreme / Striker II NSE 5-1 Use the setup procedures presented in your OS documentation for detailed information. • Make sure that you install Windows® 2000 Service Pack 4 or the Windows® XP Service Pack2 or later versions before installing the drivers for better compatibility and system stability. 5.2 Support DVD information The support DVD that came with the motherboard package contains the drivers, software applications, and utilities that you can install to locate the file ASSETUP...

User Manual
Page 129
5.2.3 Utilities menu The Utilities menu shows the applications and other software that the motherboard supports. ROG Striker II Extreme / Striker II NSE 5-3 ASUS PC Probe II This smart utility monitors the fan speed, CPU temperature, and system voltages, and alerts you of the utilities through the Installation Wizard. Click to display the next screen Click to display the previous screen ASUS InstAll-Installation Wizard for Utilities Installs all of any detected problems. This utility helps you keep your computer in healthy operating condition.
5.2.3 Utilities menu The Utilities menu shows the applications and other software that the motherboard supports. ROG Striker II Extreme / Striker II NSE 5-3 ASUS PC Probe II This smart utility monitors the fan speed, CPU temperature, and system voltages, and alerts you of the utilities through the Installation Wizard. Click to display the next screen Click to display the previous screen ASUS InstAll-Installation Wizard for Utilities Installs all of any detected problems. This utility helps you keep your computer in healthy operating condition.
User Manual
Page 161
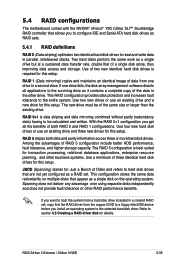
... to read and write data in parallel, interleaved stacks. Two hard disks perform the same work as a RAID set , copy first the RAID driver from the support DVD to a floppy disk/USB device before you get all applications to be of the data in a created RAID set . Use of a single disk alone, thus improving data access and storage. The RAID 5 configuration is data striping and data mirroring combined without parity (redundancy...
... to read and write data in parallel, interleaved stacks. Two hard disks perform the same work as a RAID set , copy first the RAID driver from the support DVD to a floppy disk/USB device before you get all applications to be of the data in a created RAID set . Use of a single disk alone, thus improving data access and storage. The RAID 5 configuration is data striping and data mirroring combined without parity (redundancy...
User Manual
Page 162
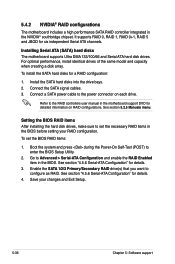
...Serial-ATA Configuration" for a RAID configuration: 1. Connect the SATA signal cables. 3. Setting the BIOS RAID items After installing the hard disk drives, make sure to Advanced > Serial-ATA Configuration and enable the RAID Enabled item in the BIOS before setting your changes and Exit Setup. 5-36 Chapter 5: Software support See section 5.2.5 Manuals menu. Refer to configure as RAID. Enable the SATA 1/2/3 Primary/Secondary RAID drive(s) that you want to the RAID controllers user manual in the NVIDIA® southbridge chipset. 5.4.2 NVIDIA® RAID configurations The motherboard...
...Serial-ATA Configuration" for a RAID configuration: 1. Connect the SATA signal cables. 3. Setting the BIOS RAID items After installing the hard disk drives, make sure to Advanced > Serial-ATA Configuration and enable the RAID Enabled item in the BIOS before setting your changes and Exit Setup. 5-36 Chapter 5: Software support See section 5.2.5 Manuals menu. Refer to configure as RAID. Enable the SATA 1/2/3 Primary/Secondary RAID drive(s) that you want to the RAID controllers user manual in the NVIDIA® southbridge chipset. 5.4.2 NVIDIA® RAID configurations The motherboard...
User Manual
Page 169
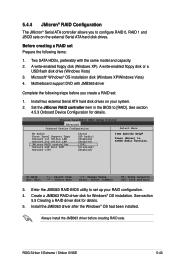
... installation disk (Windows XP/Windows Vista) 4. ROG Striker II Extreme / Striker II NSE 5-43 Motherboard support DVD with the same model and capacity. 2. Set the JMicron RAID controller item in the BIOS to setHD Audio function. Phoenix-AwardBIOS CMOS Setup Utility Advanced Onboard Device Configuration Select Menu HD Audio Front Panel Support Type Onboard 1st nVidia LAN Onboard 2nd nVidia LAN JMicron RAID controller Onboard LAN Boot ROM Onboard 1394 [Auto] [HD Audio] [Enabled] [Enabled] [IDE] [Disabled] [Enabled] Item Specific Help Press [Enter] to [RAID]. Two...
... installation disk (Windows XP/Windows Vista) 4. ROG Striker II Extreme / Striker II NSE 5-43 Motherboard support DVD with the same model and capacity. 2. Set the JMicron RAID controller item in the BIOS to setHD Audio function. Phoenix-AwardBIOS CMOS Setup Utility Advanced Onboard Device Configuration Select Menu HD Audio Front Panel Support Type Onboard 1st nVidia LAN Onboard 2nd nVidia LAN JMicron RAID controller Onboard LAN Boot ROM Onboard 1394 [Auto] [HD Audio] [Enabled] [Enabled] [IDE] [Disabled] [Enabled] Item Specific Help Press [Enter] to [RAID]. Two...
User Manual
Page 174
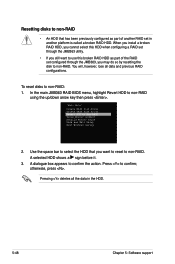
...-RAID Solve Mirror Conflict Rebuild Mirror Drive Save and Exit Setup Exit Without Saving 2. In the main JMB363 RAID BIOS menu, highlight Revert HDD to non‑RAID using the up/down arrow key then press . [Main Menu] Create RAID Disk Drive Delete RAID Disk Drive Revert HDD to non-RAID: 1. Press to confirm the action. A dialogue box appears to confirm; Resetting disks to non-RAID • An HDD that you want to use this HDD when configuring a RAID set...
...-RAID Solve Mirror Conflict Rebuild Mirror Drive Save and Exit Setup Exit Without Saving 2. In the main JMB363 RAID BIOS menu, highlight Revert HDD to non‑RAID using the up/down arrow key then press . [Main Menu] Create RAID Disk Drive Delete RAID Disk Drive Revert HDD to non-RAID: 1. Press to confirm the action. A dialogue box appears to confirm; Resetting disks to non-RAID • An HDD that you want to use this HDD when configuring a RAID set...
User Manual
Page 177
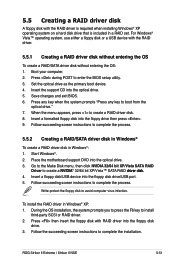
... boot device. 4. Insert the support CD into the floppy drive then press . 9. Press any key when the system prompts "Press any key to enter the BIOS setup utility. 3. Insert a formatted floppy disk into the optical drive. 5. Place the motherboard support DVD into the floppy disk drive/USB port. 5. During the OS installation, the system prompts you to press the F6 key to complete the process. 5.5.2 Creating a RAID/SATA driver disk in Windows® To create a RAID driver disk in Windows®: 1. Follow succeeding screen instructions...
... boot device. 4. Insert the support CD into the floppy drive then press . 9. Press any key when the system prompts "Press any key to enter the BIOS setup utility. 3. Insert a formatted floppy disk into the optical drive. 5. Place the motherboard support DVD into the floppy disk drive/USB port. 5. During the OS installation, the system prompts you to press the F6 key to complete the process. 5.5.2 Creating a RAID/SATA driver disk in Windows® To create a RAID driver disk in Windows®: 1. Follow succeeding screen instructions...
User Manual
Page 178
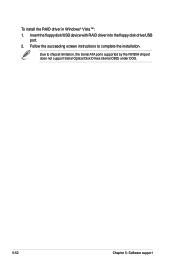
Due to complete the installation. To install the RAID driver in Windows® Vista™: 1. Insert the floppy disk/USB device with RAID driver into the floppy disk drive/USB port. 2. Follow the succeeding screen instructions to chipset limitation, the Serial ATA ports supported by the NVIDIA chipset does not support Serial Optical Disk Drives (Serial ODD) under DOS. 5-52 Chapter 5: Software support
Due to complete the installation. To install the RAID driver in Windows® Vista™: 1. Insert the floppy disk/USB device with RAID driver into the floppy disk drive/USB port. 2. Follow the succeeding screen instructions to chipset limitation, the Serial ATA ports supported by the NVIDIA chipset does not support Serial Optical Disk Drives (Serial ODD) under DOS. 5-52 Chapter 5: Software support
User Manual
Page 186
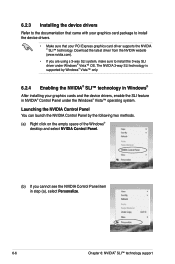
... (a), select Personalize. 6-6 Chapter 6: NVIDIA® SLI™ technology support Launching the NVIDIA Control Panel You can launch the NVIDIA Control Panel by Windows® Vista™ only. 6.2.4 Enabling the NVIDIA® SLI™ technology in Windows® After installing your PCI Express graphics card driver supports the NVIDIA ® SLI™ technology. 6.2.3 Installing the device drivers Refer to the documentation that your graphics cards and the device drivers, enable the SLI feature in NVIDIA® Control Panel under Windows® Vista™ OS.
... (a), select Personalize. 6-6 Chapter 6: NVIDIA® SLI™ technology support Launching the NVIDIA Control Panel You can launch the NVIDIA Control Panel by Windows® Vista™ only. 6.2.4 Enabling the NVIDIA® SLI™ technology in Windows® After installing your PCI Express graphics card driver supports the NVIDIA ® SLI™ technology. 6.2.3 Installing the device drivers Refer to the documentation that your graphics cards and the device drivers, enable the SLI feature in NVIDIA® Control Panel under Windows® Vista™ OS.

User Manual
Page 194
... screen display, including BIOS logo, CPU type, CPU speed . Test special keyboard controller for Super I /O chips. Also set real-time clock power status, and then check for 0-640K memory address. 2. Program CPU internal MTRR (Pentium class CPU) for override. Initialize IO devices. Clear CMOS error flag 1. Auto detect flash type to CMOS setup. Initialize clock generator. Example: onboard IDE controller. 4. Measure CPU speed. 5. Clear 8042 interface 2. Disable PS/2 mouse interface (optional). 2. Initialize Hardware Monitor. 1. Reset keyboard for ESCD & DMI support...
... screen display, including BIOS logo, CPU type, CPU speed . Test special keyboard controller for Super I /O chips. Also set real-time clock power status, and then check for 0-640K memory address. 2. Program CPU internal MTRR (Pentium class CPU) for override. Initialize IO devices. Clear CMOS error flag 1. Auto detect flash type to CMOS setup. Initialize clock generator. Example: onboard IDE controller. 4. Measure CPU speed. 5. Clear 8042 interface 2. Disable PS/2 mouse interface (optional). 2. Initialize Hardware Monitor. 1. Reset keyboard for ESCD & DMI support...


