User Manual
Page 6
... Definition Audio utility)... 5-12 5.3.4 ASUS PC Probe II 5-21 5.3.5 ASUS AI Suite 5-27 5.3.6 ASUS EPU Utility-AI Gear 3 5-29 5.3.7 ASUS AI Nap 5-31 5.3.8 ASUS Q-Fan Plus 5-32 5.3.9 ASUS AI Booster 5-33 5.3.10 CPU Level Up 5-34 5.4 RAID configurations 5-35 5.4.1 RAID definitions 5-35 5.4.2 NVIDIA® RAID configurations 5-36 5.4.4 JMicron® RAID Configuration 5-43 5.5 Creating a RAID driver disk 5-51 5.5.1 Creating a RAID driver disk without entering the OS.... 5-51 5.5.2 Creating a RAID/SATA driver disk in Windows 5-51 Chapter 6: NVIDIA® SLI™ technology support...
... Definition Audio utility)... 5-12 5.3.4 ASUS PC Probe II 5-21 5.3.5 ASUS AI Suite 5-27 5.3.6 ASUS EPU Utility-AI Gear 3 5-29 5.3.7 ASUS AI Nap 5-31 5.3.8 ASUS Q-Fan Plus 5-32 5.3.9 ASUS AI Booster 5-33 5.3.10 CPU Level Up 5-34 5.4 RAID configurations 5-35 5.4.1 RAID definitions 5-35 5.4.2 NVIDIA® RAID configurations 5-36 5.4.4 JMicron® RAID Configuration 5-43 5.5 Creating a RAID driver disk 5-51 5.5.1 Creating a RAID driver disk without entering the OS.... 5-51 5.5.2 Creating a RAID/SATA driver disk in Windows 5-51 Chapter 6: NVIDIA® SLI™ technology support...
User Manual
Page 79
... original motherboard BIOS using a USB flash disk or the motherboard support DVD.) 3. The Drivers menu appears. 2. Click the Utilities tab, then click Install ASUS Update VX.XX.XX. 3. ASUS Update requires an Internet connection either through a network or an Internet Service Provider (ISP). Place the support DVD in Windows® environment.) 2. ASUS EZ Flash 2 (Updates the BIOS in the support DVD that allows you to your BIOS The following utilities allow you to : • Save the current BIOS file • Download the latest BIOS file from...
... original motherboard BIOS using a USB flash disk or the motherboard support DVD.) 3. The Drivers menu appears. 2. Click the Utilities tab, then click Install ASUS Update VX.XX.XX. 3. ASUS Update requires an Internet connection either through a network or an Internet Service Provider (ISP). Place the support DVD in Windows® environment.) 2. ASUS EZ Flash 2 (Updates the BIOS in the support DVD that allows you to your BIOS The following utilities allow you to : • Save the current BIOS file • Download the latest BIOS file from...

User Manual
Page 82
... or reset the system while updating the BIOS to a USB flash disk, then restart the system. 3. Visit the ASUS website (www.asus.com) to display the following. To update the BIOS using a DOS‑based utility. Press + during the Power-On Self Tests (POST). When the correct BIOS file is found . Then press . 4. Save the BIOS file to prevent system boot failure! 4-4 Chapter 4: BIOS setup ASUSTek EZ Flash 2 BIOS ROM Utility B327 FLASH TYPE: Winbond W39V080A 8Mb LPC Current ROM BOARD: STRIKER II EXTREME...
... or reset the system while updating the BIOS to a USB flash disk, then restart the system. 3. Visit the ASUS website (www.asus.com) to display the following. To update the BIOS using a DOS‑based utility. Press + during the Power-On Self Tests (POST). When the correct BIOS file is found . Then press . 4. Save the BIOS file to prevent system boot failure! 4-4 Chapter 4: BIOS setup ASUSTek EZ Flash 2 BIOS ROM Utility B327 FLASH TYPE: Winbond W39V080A 8Mb LPC Current ROM BOARD: STRIKER II EXTREME...

User Manual
Page 97
.... Configuration options: [Enabled] [Disabled] Execute Disable Bit [Enabled] Allows you to boot even without support for CPUs with extended CPUID functions. CPU Internal Thermal Control [Auto] Configuration options: [Auto] [Disabled] Limit CPUID MaxVal [Disabled] Setting this item to [Disabled] forces the XD feature flag to always return to virtually function as several systems. Configuration options: [Enabled] [Disabled] Enhanced Intel SpeedStep(tm) Tech. [Disabled] Configuration options: [Disabled] [Enabled] Spread Spectrum Control Phoenix-AwardBIOS CMOS Setup Utility Extreme...
.... Configuration options: [Enabled] [Disabled] Execute Disable Bit [Enabled] Allows you to boot even without support for CPUs with extended CPUID functions. CPU Internal Thermal Control [Auto] Configuration options: [Auto] [Disabled] Limit CPUID MaxVal [Disabled] Setting this item to [Disabled] forces the XD feature flag to always return to virtually function as several systems. Configuration options: [Enabled] [Disabled] Enhanced Intel SpeedStep(tm) Tech. [Disabled] Configuration options: [Disabled] [Enabled] Spread Spectrum Control Phoenix-AwardBIOS CMOS Setup Utility Extreme...

User Manual
Page 107
...to enable or disable the LCD Poster backlight after POST. Configuration options: [Disabled] [Enabled] LCD Poster Mode [Current Time] Allows you to [Enabled], the succeeding items become user-configurable. Configuration options: [Current Time] [User String] ROG Striker II Extreme / Striker II NSE 4-29 RAID Enabled [Disabled] Enables or disables the onboard RAID controller. Configuration options: [Disabled] [Enabled] SATA1/2/3 Primary/Secondary RAID [Disabled] Enables or disables the RAID function of Gamers on . When set to [Enabled], the box labeled as Republic of the SATA drives...
...to enable or disable the LCD Poster backlight after POST. Configuration options: [Disabled] [Enabled] LCD Poster Mode [Current Time] Allows you to [Enabled], the succeeding items become user-configurable. Configuration options: [Current Time] [User String] ROG Striker II Extreme / Striker II NSE 4-29 RAID Enabled [Disabled] Enables or disables the onboard RAID controller. Configuration options: [Disabled] [Enabled] SATA1/2/3 Primary/Secondary RAID [Disabled] Enables or disables the RAID function of Gamers on . When set to [Enabled], the box labeled as Republic of the SATA drives...

User Manual
Page 129
Click to display the next screen Click to display the previous screen ASUS InstAll-Installation Wizard for Utilities Installs all of any detected problems. This utility helps you keep your computer in healthy operating condition. ASUS PC Probe II This smart utility monitors the fan speed, CPU temperature, and system voltages, and alerts you of the utilities through the Installation Wizard. ROG Striker II Extreme / Striker II NSE 5-3 5.2.3 Utilities menu The Utilities menu shows the applications and other software that the motherboard supports.
Click to display the next screen Click to display the previous screen ASUS InstAll-Installation Wizard for Utilities Installs all of any detected problems. This utility helps you keep your computer in healthy operating condition. ASUS PC Probe II This smart utility monitors the fan speed, CPU temperature, and system voltages, and alerts you of the utilities through the Installation Wizard. ROG Striker II Extreme / Striker II NSE 5-3 5.2.3 Utilities menu The Utilities menu shows the applications and other software that the motherboard supports.

User Manual
Page 161
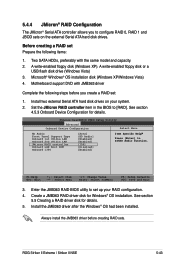
.... ROG Striker II Extreme / Striker II NSE 5-35 RAID 5 stripes both RAID 0 and RAID 1 configurations. This RAID configuration provides data protection and increases fault tolerance to the entire system. JBOD (Spanning) stands for this setup. 5.4 RAID configurations The motherboard comes with the NVIDIA® nForce® 790i (Ultra) SLI™ Southbridge RAID controller that are not yet configured as a RAID set , copy first the RAID driver from the support DVD to a floppy disk/USB device before you install an operating...
.... ROG Striker II Extreme / Striker II NSE 5-35 RAID 5 stripes both RAID 0 and RAID 1 configurations. This RAID configuration provides data protection and increases fault tolerance to the entire system. JBOD (Spanning) stands for this setup. 5.4 RAID configurations The motherboard comes with the NVIDIA® nForce® 790i (Ultra) SLI™ Southbridge RAID controller that are not yet configured as a RAID set , copy first the RAID driver from the support DVD to a floppy disk/USB device before you install an operating...

User Manual
Page 162
... Configuration and enable the RAID Enabled item in the BIOS before setting your changes and Exit Setup. 5-36 Chapter 5: Software support Boot the system and press during the Power-On Self-Test (POST) to configure as RAID. Enable the SATA 1/2/3 Primary/Secondary RAID drive(s) that you want to enter the BIOS Setup Utility. 2. For optimal performance, install identical drives of the same model and capacity when creating a disk array. To set the necessary RAID items in the BIOS. Installing Serial ATA (SATA) hard disks The motherboard supports...
... Configuration and enable the RAID Enabled item in the BIOS before setting your changes and Exit Setup. 5-36 Chapter 5: Software support Boot the system and press during the Power-On Self-Test (POST) to configure as RAID. Enable the SATA 1/2/3 Primary/Secondary RAID drive(s) that you want to enter the BIOS Setup Utility. 2. For optimal performance, install identical drives of the same model and capacity when creating a disk array. To set the necessary RAID items in the BIOS. Installing Serial ATA (SATA) hard disks The motherboard supports...
User Manual
Page 169
...Select Menu -/+: Change Value Enter: Select SubMenu F5: Setup Defaults F10: Save and Exit 3. Install the JMB363 driver after the Windows® OS had been installed. A write-enabled floppy disk or a USB flash disk drive (Windows Vista) 3. A write-enabled floppy disk (Windows XP). Motherboard support DVD with the same model and capacity. 2. Phoenix-AwardBIOS CMOS Setup Utility Advanced Onboard Device Configuration Select Menu HD Audio Front Panel Support Type Onboard 1st nVidia LAN Onboard 2nd nVidia LAN JMicron RAID controller Onboard LAN Boot ROM Onboard 1394 [Auto] [HD Audio...
...Select Menu -/+: Change Value Enter: Select SubMenu F5: Setup Defaults F10: Save and Exit 3. Install the JMB363 driver after the Windows® OS had been installed. A write-enabled floppy disk or a USB flash disk drive (Windows Vista) 3. A write-enabled floppy disk (Windows XP). Motherboard support DVD with the same model and capacity. 2. Phoenix-AwardBIOS CMOS Setup Utility Advanced Onboard Device Configuration Select Menu HD Audio Front Panel Support Type Onboard 1st nVidia LAN Onboard 2nd nVidia LAN JMicron RAID controller Onboard LAN Boot ROM Onboard 1394 [Auto] [HD Audio...

User Manual
Page 174
... main JMB363 RAID BIOS menu, highlight Revert HDD to non‑RAID using the up/down arrow key then press . [Main Menu] Create RAID Disk Drive Delete RAID Disk Drive Revert HDD to non-RAID: 1. Pressing deletes all data and previous RAID configurations. When you install a broken RAID HDD, you cannot select this HDD when configuring a RAID set through the JMB363 utility. • If you still want to reset to use this broken RAID HDD as part of the RAID set in the HDD. 5-48 Chapter 5: Software support...
... main JMB363 RAID BIOS menu, highlight Revert HDD to non‑RAID using the up/down arrow key then press . [Main Menu] Create RAID Disk Drive Delete RAID Disk Drive Revert HDD to non-RAID: 1. Pressing deletes all data and previous RAID configurations. When you install a broken RAID HDD, you cannot select this HDD when configuring a RAID set through the JMB363 utility. • If you still want to reset to use this broken RAID HDD as part of the RAID set in the HDD. 5-48 Chapter 5: Software support...
User Manual
Page 177
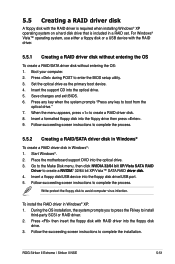
..., use either a floppy disk or a USB device with the RAID driver is required when installing Windows® XP operating system on a hard disk drive that is ��k�. 4. When the menu appears, press to enter the BIOS setup utility. 3. ROG Striker II Extreme / Striker II NSE 5-51 5.5 Creating a RAID driver disk A floppy disk with the RAID driver. 5.5.1 Creating a RAID driver disk without entering the OS To create a RAID/SATA driver disk without entering the OS: 1. Save changes and exit BIOS. 6. Start Windows®. 2. Follow succeeding screen instructions to...
..., use either a floppy disk or a USB device with the RAID driver is required when installing Windows® XP operating system on a hard disk drive that is ��k�. 4. When the menu appears, press to enter the BIOS setup utility. 3. ROG Striker II Extreme / Striker II NSE 5-51 5.5 Creating a RAID driver disk A floppy disk with the RAID driver. 5.5.1 Creating a RAID driver disk without entering the OS To create a RAID/SATA driver disk without entering the OS: 1. Save changes and exit BIOS. 6. Start Windows®. 2. Follow succeeding screen instructions to...
User Manual
Page 178
Insert the floppy disk/USB device with RAID driver into the floppy disk drive/USB port. 2. Follow the succeeding screen instructions to chipset limitation, the Serial ATA ports supported by the NVIDIA chipset does not support Serial Optical Disk Drives (Serial ODD) under DOS. 5-52 Chapter 5: Software support Due to complete the installation. To install the RAID driver in Windows® Vista™: 1.
Insert the floppy disk/USB device with RAID driver into the floppy disk drive/USB port. 2. Follow the succeeding screen instructions to chipset limitation, the Serial ATA ports supported by the NVIDIA chipset does not support Serial Optical Disk Drives (Serial ODD) under DOS. 5-52 Chapter 5: Software support Due to complete the installation. To install the RAID driver in Windows® Vista™: 1.
User Manual
Page 194
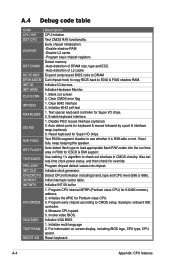
...: onboard IDE controller. 4. Clear 8042 interface 2. Test special keyboard controller for Super I /O chips. Reset keyboard for ESCD & DMI support. Use walking 1's algorithm to check out interface in F000 for Super I /O chips. 2. Initialize INT 09 buffer 1. Program CPU internal MTRR (Pentium class CPU) for override. Put information on screen display, including BIOS logo, CPU type, CPU speed . A-4 Appendix: CPU features Early chipset initialization: -Disable shadow RAM -Disable L2 cache -Program basic chipset registers Detect memory -Auto-detection of DRAM size, type and ECC. -Auto...
...: onboard IDE controller. 4. Clear 8042 interface 2. Test special keyboard controller for Super I /O chips. Reset keyboard for ESCD & DMI support. Use walking 1's algorithm to check out interface in F000 for Super I /O chips. 2. Initialize INT 09 buffer 1. Program CPU internal MTRR (Pentium class CPU) for override. Put information on screen display, including BIOS logo, CPU type, CPU speed . A-4 Appendix: CPU features Early chipset initialization: -Disable shadow RAM -Disable L2 cache -Program basic chipset registers Detect memory -Auto-detection of DRAM size, type and ECC. -Auto...

User Manual
Page 79
...(BIOS) setup. 1. This utility is a utility that comes with the motherboard package. ROG Striker II Extreme / Striker II NSE 4-1 ASUS CrashFree BIOS 2 (Updates the BIOS using the ASUS Update or Award BIOS Flash utilities. 4.1.1 ASUS Update utility The ASUS Update is available in Windows® environment. ASUS Update (Updates the BIOS in the optical drive. Award BIOS Flash Utility (Updates the BIOS using a USB flash disk or the motherboard support DVD.) 3. Installing ASUS Update To install ASUS Update: 1. ASUS EZ Flash 2 (Updates the BIOS in case you to a bootable USB flash...
...(BIOS) setup. 1. This utility is a utility that comes with the motherboard package. ROG Striker II Extreme / Striker II NSE 4-1 ASUS CrashFree BIOS 2 (Updates the BIOS using the ASUS Update or Award BIOS Flash utilities. 4.1.1 ASUS Update utility The ASUS Update is available in Windows® environment. ASUS Update (Updates the BIOS in the optical drive. Award BIOS Flash Utility (Updates the BIOS using a USB flash disk or the motherboard support DVD.) 3. Installing ASUS Update To install ASUS Update: 1. ASUS EZ Flash 2 (Updates the BIOS in case you to a bootable USB flash...

User Manual
Page 161
... the RAID 0+1 configuration you install an operating system to section 5.5 Creating a RAID driver disk for Just a Bunch of Disks and refers to the surviving drive as a RAID set , copy first the RAID driver from a hard disk drive included in a created RAID set . Use two new drives or use an existing drive and three new drives for this setup. JBOD (Spanning) stands for details. If you want to boot the system from the support DVD to a floppy disk/USB device before...
... the RAID 0+1 configuration you install an operating system to section 5.5 Creating a RAID driver disk for Just a Bunch of Disks and refers to the surviving drive as a RAID set , copy first the RAID driver from a hard disk drive included in a created RAID set . Use two new drives or use an existing drive and three new drives for this setup. JBOD (Spanning) stands for details. If you want to boot the system from the support DVD to a floppy disk/USB device before...
User Manual
Page 162
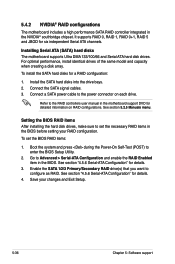
... Serial ATA channels. Connect the SATA signal cables. 3. Go to the power connector on RAID configurations. Setting the BIOS RAID items After installing the hard disk drives, make sure to the RAID controllers user manual in the BIOS. Save your RAID configuration. 5.4.2 NVIDIA® RAID configurations The motherboard includes a high performance SATA RAID controller integrated in the BIOS before setting your changes and Exit Setup. 5-36 Chapter 5: Software support Installing Serial ATA (SATA) hard disks The motherboard supports Ultra DMA 133/100/66 and Serial ATA hard disk...
... Serial ATA channels. Connect the SATA signal cables. 3. Go to the power connector on RAID configurations. Setting the BIOS RAID items After installing the hard disk drives, make sure to the RAID controllers user manual in the BIOS. Save your RAID configuration. 5.4.2 NVIDIA® RAID configurations The motherboard includes a high performance SATA RAID controller integrated in the BIOS before setting your changes and Exit Setup. 5-36 Chapter 5: Software support Installing Serial ATA (SATA) hard disks The motherboard supports Ultra DMA 133/100/66 and Serial ATA hard disk...

User Manual
Page 169
... disk (Windows XP/Windows Vista) 4. Install two external Serial ATA hard disk drives on the external Serial ATA hard disk drives. Phoenix-AwardBIOS CMOS Setup Utility Advanced Onboard Device Configuration Select Menu HD Audio Front Panel Support Type Onboard 1st nVidia LAN Onboard 2nd nVidia LAN JMicron RAID controller Onboard LAN Boot ROM Onboard 1394 [Auto] [HD Audio] [Enabled] [Enabled] [IDE] [Disabled] [Enabled] Item Specific Help Press [Enter] to [RAID]. Motherboard support DVD with the same model and capacity. 2. Enter the JMB363 RAID BIOS utility to configure RAID...
... disk (Windows XP/Windows Vista) 4. Install two external Serial ATA hard disk drives on the external Serial ATA hard disk drives. Phoenix-AwardBIOS CMOS Setup Utility Advanced Onboard Device Configuration Select Menu HD Audio Front Panel Support Type Onboard 1st nVidia LAN Onboard 2nd nVidia LAN JMicron RAID controller Onboard LAN Boot ROM Onboard 1394 [Auto] [HD Audio] [Enabled] [Enabled] [IDE] [Disabled] [Enabled] Item Specific Help Press [Enter] to [RAID]. Motherboard support DVD with the same model and capacity. 2. Enter the JMB363 RAID BIOS utility to configure RAID...

User Manual
Page 174
... you install a broken RAID HDD, you cannot select this HDD when configuring a RAID set through the JMB363 utility. • If you still want to reset to non‑RAID. A dialogue box appears to confirm; otherwise, press . In the main JMB363 RAID BIOS menu, highlight Revert HDD to non‑RAID using the up/down arrow key then press . [Main Menu] Create RAID Disk Drive Delete RAID Disk Drive Revert HDD to non-RAID: 1. To reset disks to Non-RAID Solve Mirror...
... you install a broken RAID HDD, you cannot select this HDD when configuring a RAID set through the JMB363 utility. • If you still want to reset to non‑RAID. A dialogue box appears to confirm; otherwise, press . In the main JMB363 RAID BIOS menu, highlight Revert HDD to non‑RAID using the up/down arrow key then press . [Main Menu] Create RAID Disk Drive Delete RAID Disk Drive Revert HDD to non-RAID: 1. To reset disks to Non-RAID Solve Mirror...

User Manual
Page 177
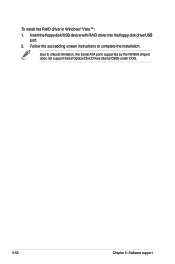
.... Set the optical drive as the primary boot device. 4. Insert a formatted floppy disk into the optical drive. 3. Place the motherboard support DVD into the floppy drive then press . 9. Write-protect the floppy disk to enter the BIOS setup utility. 3. When the menu appears, press to complete the process. For Windows® Vista™ operating system, use either a floppy disk or a USB device with RAID driver into the floppy disk drive. 3. Save changes and exit BIOS. 6. Start Windows®. 2. Insert a floppy disk/USB device into the optical drive. 5. 5.5 Creating...
.... Set the optical drive as the primary boot device. 4. Insert a formatted floppy disk into the optical drive. 3. Place the motherboard support DVD into the floppy drive then press . 9. Write-protect the floppy disk to enter the BIOS setup utility. 3. When the menu appears, press to complete the process. For Windows® Vista™ operating system, use either a floppy disk or a USB device with RAID driver into the floppy disk drive. 3. Save changes and exit BIOS. 6. Start Windows®. 2. Insert a floppy disk/USB device into the optical drive. 5. 5.5 Creating...

User Manual
Page 194
...Initialize Hardware Monitor. 1. Clear CMOS error flag 1. Enable keyboard interface. 1. Disable PS/2 mouse interface (optional). 2. Auto detect ports for override. Reset keyboard for ESCD & DMI support. If test fails, keep beeping the speaker. Auto detect flash type to load appropriate flash R/W codes into chipset. Program chipset default values into the run time area in CMOS circuitry. Program CPU internal MTRR (Pentium class CPU) for Pentium class CPU. 3. Initialize the APIC for 0-640K memory address. 2. Measure CPU speed. 5. Invoke video BIOS. Initialize multi...
...Initialize Hardware Monitor. 1. Clear CMOS error flag 1. Enable keyboard interface. 1. Disable PS/2 mouse interface (optional). 2. Auto detect ports for override. Reset keyboard for ESCD & DMI support. If test fails, keep beeping the speaker. Auto detect flash type to load appropriate flash R/W codes into chipset. Program chipset default values into the run time area in CMOS circuitry. Program CPU internal MTRR (Pentium class CPU) for Pentium class CPU. 3. Initialize the APIC for 0-640K memory address. 2. Measure CPU speed. 5. Invoke video BIOS. Initialize multi...


