Asus RS540-E8-RS36-ECP Support and Manuals
Get Help and Manuals for this Asus item
View All Support Options Below
Free Asus RS540-E8-RS36-ECP manuals!
Problems with Asus RS540-E8-RS36-ECP?
Ask a Question
Free Asus RS540-E8-RS36-ECP manuals!
Problems with Asus RS540-E8-RS36-ECP?
Ask a Question
Popular Asus RS540-E8-RS36-ECP Manual Pages
User Guide - Page 15

... of the product's serial number containing 12 characters such as xxS0xxxxxxxx shown as the figure below. 1.2 Serial number label
Before requesting support from the ASUS Technical Support team, you must take note of the product, ASUS Technical Support team members can then offer a quicker and satisfying solution to your problems.
RS540-E8-RS36-ECP
xxS0xxxxxxxx
ASUS RS540-E8-RS36-ECP
1-3
User Guide - Page 16

... mm)
(continued on the next page)
1-4
Chapter 1: Product Introduction
1.3 System specifications
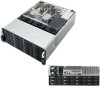
The ASUS RS540-E8-RS36-ECP is a 4U barebone server system featuring the ASUS Z10PR-D16 Server Board. supports software RAID 0, 1, 10 and 5)
HDD Bays System Fans
ASUS PIKE II 3008 8-port SAS HBA card
SAS Controller ASUS PIKE II 3108 8-port SAS HW card (Default with 2 x 800W 80 PLUS Platinum...
User Guide - Page 17

Model Name
RS540-E8-RS36-ECP
Networking
LAN
2 x Intel I210AT 1 x Management Port
Graphic
VGA
Aspeed AST2400 32MB
Front I/O Ports
2 x USB 2.0 ports
Rear I/O Connector and Switch/LED: 1 x External Serial Port (COM Port) 2 x RJ-45 GbE LAN ports I/O Connector and Switch/LED 1 x RJ-45 Mgmt LAN port 1 x Q-Code/Port 80 LED 2 x USB 3.0 ports 1 x VGA port
OS Support
1 x PS/2 KB/Mouse...
User Guide - Page 19

It has a piece of the server that allows you can pull out or easily slide back in. 1.4.2 Asset tag
The Asset tag is a simple but useful device that is conveniently located on the front panel of paper that you to write down important information about the server.
1 2
ASUS RS540-E8-RS36-ECP
1-7
User Guide - Page 33

... fixed and tucked securely under the retention tab (M). Push the right load lever down (I) ensuring that the edge of load plate
Load lever
Retention tab
ASUS RS540-E8-RS36-ECP
2-9
PnP cap
12. 11.
User Guide - Page 35

... into the DIMM sockets using the memory configurations in slots A2 or B2. ASUS RS540-E8-RS36-ECP
2-11 For optimum compatibility, it is recommended that you obtain memory modules from the same vendor.
• Start installing the DIMMs in this section.
• Always install DIMMs with sixteen (16) Double Data Rate 4 (DDR4) Dual Inline Memory Modules...
User Guide - Page 37

... with a notch so that the notch on the DIMM matches the DIMM slot key on the DIMM slot.
ASUS RS540-E8-RS36-ECP
2-13
Support the DIMM lightly with extra force. Align a DIMM on the socket such that it flips out with your... insert the DIMM into the socket. Remove the DIMM from the socket. 2.3.3 Installing a DIMM
Ensure to prevent DIMM notch damage.
2.3.4 Removing a DIMM
1.
User Guide - Page 39

...push it all the way to install the other 3.5-inch SATA / SAS HDDs. When installed, the SATA II/SAS connector... on the drive connects to secure the drive tray in the HDD tray with four screws (two on the backplane. 6.
Lock the secure tab to the SATA II/SAS interface on each side).
5. 4. Repeat steps 1 - 5 to the depth of the bay ( ). ASUS RS540-E8-RS36-ECP...
User Guide - Page 41

... secure the drive tray in place ( ).
Repeat steps 1 to 5 to the connector on the backplane. ASUS RS540-E8-RS36-ECP
2-17 SSD screw hole Drive tray screw hole
5. When installed, the connector on the drive connects to install other 2.5-inch SSDs.
INSTALL 3.5" HD
6. INSTALL 2.5" HD
4.
Ensure that the SSD is fitted firmly inside the drive tray and that the...
User Guide - Page 43

ASUS RS540-E8-RS36-ECP
2-19 Ensure that the golden fingers are totally inserted into the PCI-E slot. Insert the expansion card into the slot. Secure it with the screws removed before. 3.
User Guide - Page 45

... Mezzanine card to the AUXLED_CON header on the card. 2.5.3 Installing a Mezzanine card
You can install a supported Mezzanine card on the motherboard. Connect the signal transmission end (white) to the slot on the onboard slot. Remove the slot bay from the Mezzanine
card expansion slot.
2. ASUS RS540-E8-RS36-ECP
2-21 Prepare your Mezannine card and the signal cable.
User Guide - Page 47

... on the system and change the necessary BIOS settings, if any. Refer to the card. ASUS RS540-E8-RS36-ECP
2-23
Standard Interrupt assignments
IRQ
Priority Standard function
0
1
System Timer
1
2
Keyboard Controller
2
- Assign an IRQ to the following tables.
3.
See Chapter 5 for ISA or PCI devices. Install the software drivers for the expansion card. 2.5.4 Configuring an...
User Guide - Page 49

... connected, a total number of the Y-cable
ASUS RS540-E8-RS36-ECP
2-25 2.7 Backplane cabling
Front backplane
connect to the 8-pin power connector
connect to mini-SAS HD connectors 1 and 2 on the back backplane. MSAS_HD1 MSAS_HD2 MSAS_HD3
connect to the white connector of 36 SAS/SATA HDDs can be supported (SAS/SATA expander on the back backplane...
User Guide - Page 51

... airflow directional arrow on the side of the fan, then lift the fan to uninstall the other system fans. ASUS RS540-E8-RS36-ECP
2-27 To reinstall the system fans
Insert the fan into the system and covers the following components: 1. Redundant... CPU heatsink. 2.8 Removable/optional components
This section explains how to install optional components into the fan cage.
System fans 2.
User Guide - Page 55

... studs into the rack rail. ASUS RS540-E8-RS36-ECP
3-3 Press the spring lock on the rack post. 5. Lift the server chassis and insert into the selected square mounting
holes on the other rack rail. Extend the rack rail, if necessary. 6. (Optional) Use the rail screw and rail washer ( ) that the installed rack rails (left and right...
Asus RS540-E8-RS36-ECP Reviews
We have not received any reviews for Asus yet.