
Users Manual English
Page 3
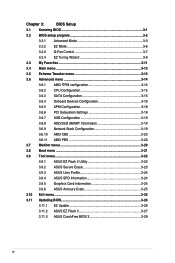
Contents Safety information...vi About this guide...vii ROG CROSSHAIR VIII FORMULA specifications summary ix Package contents...xv Installation tools and components xvi Chapter 1: Product Introduction 1.1 Motherboard ... 2-7 2.1.6 SATA device connection 2-8 2.1.7 Front I/O connector 2-9 2.1.8 Expansion card installation 2-10 2.1.9 M.2 installation 2-11 2.1.10 Wi-Fi antenna installation 2-12 2.2 BIOS update utility 2-13 2.3 Motherboard rear and audio connections 2-14 2.3.1 Rear I/O connection 2-14 2.3.2 Audio I/O connections 2-16 2.4 Starting up for the first time ...
Contents Safety information...vi About this guide...vii ROG CROSSHAIR VIII FORMULA specifications summary ix Package contents...xv Installation tools and components xvi Chapter 1: Product Introduction 1.1 Motherboard ... 2-7 2.1.6 SATA device connection 2-8 2.1.7 Front I/O connector 2-9 2.1.8 Expansion card installation 2-10 2.1.9 M.2 installation 2-11 2.1.10 Wi-Fi antenna installation 2-12 2.2 BIOS update utility 2-13 2.3 Motherboard rear and audio connections 2-14 2.3.1 Rear I/O connection 2-14 2.3.2 Audio I/O connections 2-16 2.4 Starting up for the first time ...
Users Manual English
Page 4
Chapter 3: BIOS Setup 3.1 Knowing BIOS 3-1 3.2 BIOS setup program 3-2 3.2.1 Advanced Mode 3-3 3.2.2 EZ Mode 3-6 3.2.3 Q-Fan Control 3-7 3.2.4 EZ Tuning Wizard 3-9 3.3 My Favorites 3-11 3.4 Main menu 3-13 3.5 ...3-21 3.9 Tool menu 3-22 3.9.1 ASUS EZ Flash 3 Utility 3-22 3.9.2 ASUS Secure Erase 3-23 3.9.3 ASUS User Profile 3-24 3.9.4 ASUS SPD Information 3-24 3.9.5 Graphics Card Information 3-24 3.9.6 ASUS Armoury Crate 3-25 3.10 Exit menu 3-25 3.11 Updating BIOS 3-26 3.11.1 EZ Update 3-26 3.11.2 ASUS EZ Flash 3 3-27 3.11.3 ASUS CrashFree BIOS 3 3-29 iv
Chapter 3: BIOS Setup 3.1 Knowing BIOS 3-1 3.2 BIOS setup program 3-2 3.2.1 Advanced Mode 3-3 3.2.2 EZ Mode 3-6 3.2.3 Q-Fan Control 3-7 3.2.4 EZ Tuning Wizard 3-9 3.3 My Favorites 3-11 3.4 Main menu 3-13 3.5 ...3-21 3.9 Tool menu 3-22 3.9.1 ASUS EZ Flash 3 Utility 3-22 3.9.2 ASUS Secure Erase 3-23 3.9.3 ASUS User Profile 3-24 3.9.4 ASUS SPD Information 3-24 3.9.5 Graphics Card Information 3-24 3.9.6 ASUS Armoury Crate 3-25 3.10 Exit menu 3-25 3.11 Updating BIOS 3-26 3.11.1 EZ Update 3-26 3.11.2 ASUS EZ Flash 3 3-27 3.11.3 ASUS CrashFree BIOS 3 3-29 iv
Users Manual English
Page 7
... describes the RAID configurations. Detailed descriptions of the standard package. Where to find more information Refer to change system settings through the BIOS Setup menus. ASUS website The ASUS website (www.asus.com) provides updated information on the motherboard. • Chapter 2: Basic Installation This chapter lists the hardware setup procedures that may have to...
... describes the RAID configurations. Detailed descriptions of the standard package. Where to find more information Refer to change system settings through the BIOS Setup menus. ASUS website The ASUS website (www.asus.com) provides updated information on the motherboard. • Chapter 2: Basic Installation This chapter lists the hardware setup procedures that may have to...
Users Manual English
Page 12
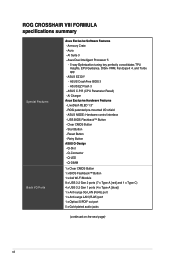
...+ VRM, Fan Expert 4, and Turbo app - ASUS EZ DIY - ASUS C.P.R (CPU Parameter Recall) - Retry Button ASUS Q-Design - Q-LED - ROG CROSSHAIR VIII FORMULA specifications summary Special Features Back I /O shield - Aura - ASUS CrashFree BIOS 3 - LiveDash OLED 1.3" - ROG patented pre-mounted I /O Ports Asus Exclusive Software Features - Reset Button - Q-Slot - AI Suite 3 - ASUS EZ Flash 3 - Ai Charger Asus Exclusive Hardware Features - ASUS NODE: Hardware control interface - Start Button...
...+ VRM, Fan Expert 4, and Turbo app - ASUS EZ DIY - ASUS C.P.R (CPU Parameter Recall) - Retry Button ASUS Q-Design - Q-LED - ROG CROSSHAIR VIII FORMULA specifications summary Special Features Back I /O shield - Aura - ASUS CrashFree BIOS 3 - LiveDash OLED 1.3" - ROG patented pre-mounted I /O Ports Asus Exclusive Software Features - Reset Button - Q-Slot - AI Suite 3 - ASUS EZ Flash 3 - Ai Charger Asus Exclusive Hardware Features - ASUS NODE: Hardware control interface - Start Button...
Users Manual English
Page 14
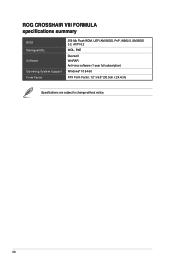
xiv ROG CROSSHAIR VIII FORMULA specifications summary BIOS Manageability Software Operating System Support Form Factor 256 Mb Flash ROM, UEFI AMI BIOS, PnP, WfM2.0, SM BIOS 3.2, ACPI 6.2 WOL, PXE Overwolf WinRAR Anti-virus software (1-year full subscription) Windows® 10 64-bit ATX Form Factor, 12" x 9.6" (30.5cm x 24.4cm) Specifications are subject to change without notice.
xiv ROG CROSSHAIR VIII FORMULA specifications summary BIOS Manageability Software Operating System Support Form Factor 256 Mb Flash ROM, UEFI AMI BIOS, PnP, WfM2.0, SM BIOS 3.2, ACPI 6.2 WOL, PXE Overwolf WinRAR Anti-virus software (1-year full subscription) Windows® 10 64-bit ATX Form Factor, 12" x 9.6" (30.5cm x 24.4cm) Specifications are subject to change without notice.
Users Manual English
Page 26
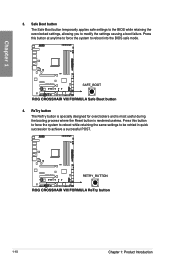
... Introduction Press this button to force the system to reboot while retaining the same settings to be retried in quick succession to reboot into the BIOS safe mode. 4. Chapter 1 3. ReTry button The ReTry button is specially designed for overclockers and is most useful during the booting process where the Reset button... is rendered useless. Safe Boot button The Safe Boot button temporarily applies safe settings to the BIOS while retaining the overclocked settings, allowing you to modify the settings causing a boot failure.
... Introduction Press this button to force the system to reboot while retaining the same settings to be retried in quick succession to reboot into the BIOS safe mode. 4. Chapter 1 3. ReTry button The ReTry button is specially designed for overclockers and is most useful during the booting process where the Reset button... is rendered useless. Safe Boot button The Safe Boot button temporarily applies safe settings to the BIOS while retaining the overclocked settings, allowing you to modify the settings causing a boot failure.
Users Manual English
Page 32
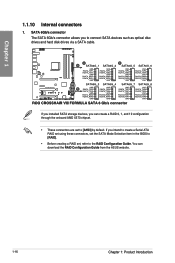
If you installed SATA storage devices, you can download the RAID Configuration Guide from the ASUS website. 1-16 Chapter 1: Product Introduction You can create a RAID 0, 1, and 10 configuration through the onboard AMD X570 chipset. • These connectors are set , refer to .../s connector The SATA 6Gb/s connector allows you intend to create a Serial ATA RAID set using these connectors, set the SATA Mode Selection item in the BIOS to [RAID]. • Before creating a RAID set to [AHCI] by default. Chapter 1 1.1.10 Internal connectors 1. If you to the RAID Configuration Guide...
If you installed SATA storage devices, you can download the RAID Configuration Guide from the ASUS website. 1-16 Chapter 1: Product Introduction You can create a RAID 0, 1, and 10 configuration through the onboard AMD X570 chipset. • These connectors are set , refer to .../s connector The SATA 6Gb/s connector allows you intend to create a Serial ATA RAID set using these connectors, set the SATA Mode Selection item in the BIOS to [RAID]. • Before creating a RAID set to [AHCI] by default. Chapter 1 1.1.10 Internal connectors 1. If you to the RAID Configuration Guide...
Users Manual English
Page 57
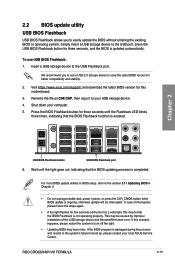
... up, please contact your local ASUS Service Center. To use a USB 2.0 storage device to use USB BIOS Flashback: 1. We recommend you to the USB Flashback port. ROG CROSSHAIR VIII FORMULA 2-13 Insert a USB storage device to easily update the BIOS without entering the existing BIOS or operating system. Chapter 2 USB BIOS Flashback button USB BIOS Flashback port 6. Wait until the...
... up, please contact your local ASUS Service Center. To use a USB 2.0 storage device to use USB BIOS Flashback: 1. We recommend you to the USB Flashback port. ROG CROSSHAIR VIII FORMULA 2-13 Insert a USB storage device to easily update the BIOS without entering the existing BIOS or operating system. Chapter 2 USB BIOS Flashback button USB BIOS Flashback port 6. Wait until the...
Users Manual English
Page 58
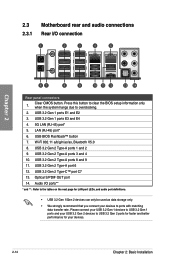
USB BIOS Flashback™ button 7. USB 3.2 Gen 2 Type-A port 6 12. USB 3.2 Gen 2 Type-C™ port C7 13. USB 3.2 Gen 2 Type-A ports 1 and 2 9. Please connect your USB 3.2 Gen 1 ... 2.3.1 Rear I /O ports** * and ** : Refer to the tables on the next page for your devices to overclocking. 2. Clear CMOS button. Press this button to clear the BIOS setup information only when the system hangs due to ports with matching data transfer rate. USB 3.2 Gen 1 ports E1 and E2 3. Wi-Fi 802.11...
USB BIOS Flashback™ button 7. USB 3.2 Gen 2 Type-A port 6 12. USB 3.2 Gen 2 Type-C™ port C7 13. USB 3.2 Gen 2 Type-A ports 1 and 2 9. Please connect your USB 3.2 Gen 1 ... 2.3.1 Rear I /O ports** * and ** : Refer to the tables on the next page for your devices to overclocking. 2. Clear CMOS button. Press this button to clear the BIOS setup information only when the system hangs due to ports with matching data transfer rate. USB 3.2 Gen 1 ports E1 and E2 3. Wi-Fi 802.11...

Users Manual English
Page 62
... chain) c. If you do not see anything within 30 seconds from orange to let the system enter the soft-off mode, depending on the BIOS setting. Press the power button for assistance. After applying power, the system power LED on the system front panel case lights up when you turned...green" standards or if it has a "power standby" feature, the monitor LED may have failed a power-on test. Connect the power cord to enter the BIOS Setup. Check the jumper settings and connections or call your monitor complies with ATX power supplies, the system LED lights up . Ensure that is ON...
... chain) c. If you do not see anything within 30 seconds from orange to let the system enter the soft-off mode, depending on the BIOS setting. Press the power button for assistance. After applying power, the system power LED on the system front panel case lights up when you turned...green" standards or if it has a "power standby" feature, the monitor LED may have failed a power-on test. Connect the power cord to enter the BIOS Setup. Check the jumper settings and connections or call your monitor complies with ATX power supplies, the system LED lights up . Ensure that is ON...
Users Manual English
Page 63
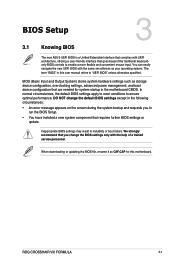
... in this motherboard. Chapter 3 ROG CROSSHAIR VIII FORMULA 3-1 BIOS (Basic Input and Output System) stores system hardware settings such as your operating system. Inappropriate BIOS settings may result to ensure optimal performance. We strongly recommend that you to enable a more flexible and convenient mouse input. Chapter 3: BIOS Setup BIOS Setup 3.1 Knowing BIOS 3 The new ASUS UEFI BIOS is a Unified Extensible Interface...
... in this motherboard. Chapter 3 ROG CROSSHAIR VIII FORMULA 3-1 BIOS (Basic Input and Output System) stores system hardware settings such as your operating system. Inappropriate BIOS settings may result to ensure optimal performance. We strongly recommend that you to enable a more flexible and convenient mouse input. Chapter 3: BIOS Setup BIOS Setup 3.1 Knowing BIOS 3 The new ASUS UEFI BIOS is a Unified Extensible Interface...
Users Manual English
Page 64
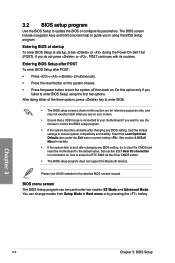
...in this option only if you do not press or , POST continues with its parameters. BIOS menu screen The BIOS Setup program can change modes from Setup Mode in using the first two options. Please visit ASUS website for reference purposes only, and may not exactly match what you see on the ...system chassis. • Press the power button to erase the RTC RAM via the Clear CMOS button. • The BIOS setup program does not support the Bluetooth devices...
...in this option only if you do not press or , POST continues with its parameters. BIOS menu screen The BIOS Setup program can change modes from Setup Mode in using the first two options. Please visit ASUS website for reference purposes only, and may not exactly match what you see on the ...system chassis. • Press the power button to erase the RTC RAM via the Clear CMOS button. • The BIOS setup program does not support the Bluetooth devices...
Users Manual English
Page 65
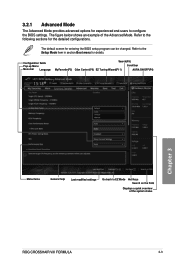
The default screen for entering the BIOS setup program can be changed. Refer to EZ Mode Hot Keys Search on the FAQ Displays a quick overview of the Advanced Mode. Configuration fields Pop-... Last modified settings Go back to the Setup Mode item in section Boot menu for details. Refer to configure the BIOS settings. The figure below shows an example of the system status ROG CROSSHAIR VIII FORMULA 3-3 3.2.1 Advanced Mode The Advanced Mode provides advanced options for experienced end-users to the following sections for the detailed...
The default screen for entering the BIOS setup program can be changed. Refer to EZ Mode Hot Keys Search on the FAQ Displays a quick overview of the Advanced Mode. Configuration fields Pop-... Last modified settings Go back to the Setup Mode item in section Boot menu for details. Refer to configure the BIOS settings. The figure below shows an example of the system status ROG CROSSHAIR VIII FORMULA 3-3 3.2.1 Advanced Mode The Advanced Mode provides advanced options for experienced end-users to the following sections for the detailed...
Users Manual English
Page 66
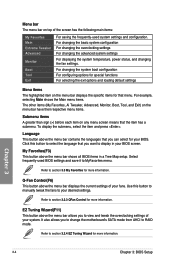
...on top of the screen has the following main items: My Favorites Main Extreme Tweaker Advanced Monitor Boot Tool Exit For saving the frequently-used BIOS settings and save it to display in a Tree Map setup. For example, selecting Main shows the Main menu items. The other items (... for that you can select for more information. My Favorites(F3) This button above the menu bar displays the current settings of your BIOS screen. Select frequently-used system settings and configuration. For changing the system boot configuration For configuring options for special functions For selecting the ...
...on top of the screen has the following main items: My Favorites Main Extreme Tweaker Advanced Monitor Boot Tool Exit For saving the frequently-used BIOS settings and save it to display in a Tree Map setup. For example, selecting Main shows the Main menu items. The other items (... for that you can select for more information. My Favorites(F3) This button above the menu bar displays the current settings of your BIOS screen. Select frequently-used system settings and configuration. For changing the system boot configuration For configuring options for special functions For selecting the ...

Users Manual English
Page 67
...to search for the BIOS setup program. Last Modified button This button shows the items that do not fit on the screen. You can change the value of the field opposite the item. General help At the bottom of the menu screen is highlighted when selected. ROG CROSSHAIR VIII FORMULA 3-5 AURA (F4)... This button allows you last modified and saved in the menu and change the value of a field, select it to turn the RGB LED lighting or functional LED on the right side of the ASUS support website. Use key to capture the BIOS screen and...
...to search for the BIOS setup program. Last Modified button This button shows the items that do not fit on the screen. You can change the value of the field opposite the item. General help At the bottom of the menu screen is highlighted when selected. ROG CROSSHAIR VIII FORMULA 3-5 AURA (F4)... This button allows you last modified and saved in the menu and change the value of a field, select it to turn the RGB LED lighting or functional LED on the right side of the ASUS support website. Use key to capture the BIOS screen and...
Users Manual English
Page 68
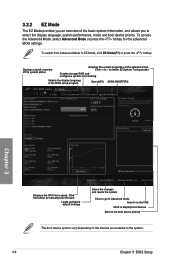
To access the Advanced Mode, select Advanced Mode or press the hotkey for the advanced BIOS settings. Click < or > to switch EZ System Tuning modes Creates storage RAID and configures system overclocking Selects the display language of the selected mode. Displays a... quick overview of the system status Displays the system properties of the BIOS setup program Search(F9) AURA ON/OFF(F4) Chapter 3 Displays the CPU Fan's speed. To switch from Advanced Mode to EZ Mode, click EZ ...
To access the Advanced Mode, select Advanced Mode or press the hotkey for the advanced BIOS settings. Click < or > to switch EZ System Tuning modes Creates storage RAID and configures system overclocking Selects the display language of the selected mode. Displays a... quick overview of the system status Displays the system properties of the BIOS setup program Search(F9) AURA ON/OFF(F4) Chapter 3 Displays the CPU Fan's speed. To switch from Advanced Mode to EZ Mode, click EZ ...
Users Manual English
Page 70
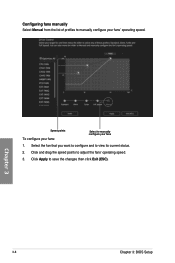
Click and drag the speed points to save the changes then click Exit (ESC). 3-8 Chapter 3: BIOS Setup Click Apply to adjust the fans' operating speed. 3. Chapter 3 Speed points To configure your fans: Select to view its current status. 2. Select the fan that you want to configure and to manually configure your fans' operating speed. Configuring fans manually Select Manual from the list of profiles to manually configure your fans 1.
Click and drag the speed points to save the changes then click Exit (ESC). 3-8 Chapter 3: BIOS Setup Click Apply to adjust the fans' operating speed. 3. Chapter 3 Speed points To configure your fans: Select to view its current status. 2. Select the fan that you want to configure and to manually configure your fans' operating speed. Configuring fans manually Select Manual from the list of profiles to manually configure your fans 1.
Users Manual English
Page 71
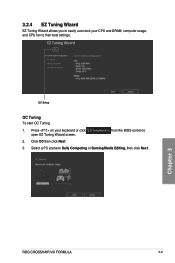
Press on your CPU and DRAM, computer usage, and CPU fan to 2. Chapter 3 ROG CROSSHAIR VIII FORMULA 3-9 3.2.4 EZ Tuning Wizard EZ Tuning Wizard allows you to easily overclock your keyboard or click open EZ Tuning Wizard screen. Click OC then click Next. 3. OC Setup OC Tuning To start OC Tuning: 1. Select a PC scenario Daily Computing or Gaming/Media Editing, then click Next. from the BIOS screen to their best settings.
Press on your CPU and DRAM, computer usage, and CPU fan to 2. Chapter 3 ROG CROSSHAIR VIII FORMULA 3-9 3.2.4 EZ Tuning Wizard EZ Tuning Wizard allows you to easily overclock your keyboard or click open EZ Tuning Wizard screen. Click OC then click Next. 3. OC Setup OC Tuning To start OC Tuning: 1. Select a PC scenario Daily Computing or Gaming/Media Editing, then click Next. from the BIOS screen to their best settings.
Users Manual English
Page 72
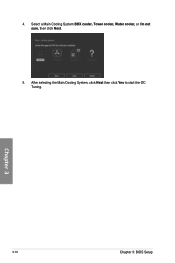
Select a Main Cooling System BOX cooler, Tower cooler, Water cooler, or I'm not sure, then click Next. 5. Chapter 3 3-10 Chapter 3: BIOS Setup 4. After selecting the Main Cooling System, click Next then click Yes to start the OC Tuning.
Select a Main Cooling System BOX cooler, Tower cooler, Water cooler, or I'm not sure, then click Next. 5. Chapter 3 3-10 Chapter 3: BIOS Setup 4. After selecting the Main Cooling System, click Next then click Yes to start the OC Tuning.
Users Manual English
Page 73
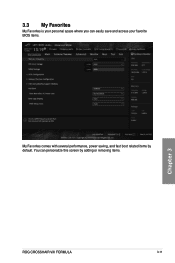
3.3 My Favorites My Favorites is your personal space where you can personalize this screen by default. You can easily save and access your favorite BIOS items. Chapter 3 My Favorites comes with several performance, power saving, and fast boot related items by adding or removing items. ROG CROSSHAIR VIII FORMULA 3-11
3.3 My Favorites My Favorites is your personal space where you can personalize this screen by default. You can easily save and access your favorite BIOS items. Chapter 3 My Favorites comes with several performance, power saving, and fast boot related items by adding or removing items. ROG CROSSHAIR VIII FORMULA 3-11


